ceb720d26249a590053f9efdb3b7ec87.ppt
- Количество слайдов: 122

WYSIWYG Beginners Tutorial Presented by: Written By: The Irwin Brothers: Michael, David and Steve AND Tom Thompson With assistance from: Pamela Mara Copyright © 2002 Cast Software Ltd. All screen shots and text excerpts used with permission of: CAST Group Inc. Rendering and Animations by: Tom Thompson – Prelite Studios-San Francisco Michael Irwin – Irwin Lighting Design, Inc. (I-LD) Steve Irwin – Show Design Network Rodd Mclaughlin – Prelite Studios-New York City David Irwin – WYG Retreats

Using the Tutorial Navigation Buttons • Click anywhere on the page to advance to the next slide in Power. Point. • Click any link to follow it. • Press the space bar to advance to the next window. • Click the “Table of Contents” link at the bottom of each page to jump back quickly. • The videos will repeat when they reach the end. Use the Reverse/Forward buttons for linear operation. • Use these buttons to move to the previous chapter or next chapter. Help

Using this Tutorial in Internet Explorer Although this Tutorial was created for Power. Point, it runs in Internet Explorer quite well. There are numerous ways to advance the tutorial pages. You can use the link window to the left or the slide buttons on the bottom. You can also advance by left clicking on a slide and then strike the keyboard space bar to move forward.

Table of Contents 1) 2) 3) 4) 5) 6) 7) 8) 9) 10) 11) Introduction to the User Interface Creating The Set Defining Hanging Positions Hanging and Focusing Fixtures Modifying Fixture Properties Creating, Modifying and Printing Reports Creating, Modifying and Printing Plots Building Lighting Looks Cueing The Show Rendering Help

Chapter 1 - Introduction to the User Interface • • • • Opening WYSIWYG Start a New or Open an Existing Plot The WYSIWYG Work Area Animation 1 The WYSIWYG Work Area Animation 2 The WYSIWYG Work Area Animation 3 Layout Manipulation Library Selection Toolbar Shortcut Bar Animation Choose your Toolbars Animation Status and Command Edit Bars Saving Chapter 1 - Introduction to the User Interface

Opening WYSIWYG • • • After installation, there will be several icons on your desktop. You can use them as you want. We generally drag the main program icon to the “Task Bar” and discard the others. But that is up to you. You can start the program by clicking an icon or going to the “Start” Menu. We will reference the “Start” method when opening the different programs associated with WYSIWYG. Following the path: Start to Programs to WYSIWYG Chapter 1 - Introduction to the User Interface

Start a New or Open an Existing Plot • • • There are several methods of opening a file (or to do anything for that matter). You could use “Hot Keys”, the “File” menu, the “> open existing plot” prompt or select from a list of recent plots. The same rules apply to opening a new plot. You may choose from several templates or click the “ >create a new plot” prompt. Chapter 1 - Introduction to the User Interface

The WYSIWYG Work Area Modes Registration Level Shortcut Bars Toolbars Layouts Statusbar Chapter 1 - Introduction to the User Interface

The WYSIWYG Work Area 1 Chapter 1 - Introduction to the User Interface

The WYSIWYG Work Area 2 Chapter 1 - Introduction to the User Interface

The WYSIWYG Work Area 3 Chapter 1 - Introduction to the User Interface

Layout Manipulation Chapter 1 - Introduction to the User Interface

Library Selection Toolbar Library Items Accessories Lights Truss Colours Symbols Chapter 1 - Introduction to the User Interface Lamps Gobos Lenses

Shortcut Bar Click a heading to access a selection of shortcuts Select and then right click to choose a library item for a shortcut Chapter 1 - Introduction to the User Interface

Shortcut Bar Chapter 1 - Introduction to the User Interface

Choose your Toolbars Right click on any toolbar to choose which toolbars will be visible Chapter 1 - Introduction to the User Interface

Choose your Toolbars Chapter 1 - Introduction to the User Interface

Status and Command Edit Bars O: F: C: The number of objects selected. The number of fixtures selected. The number of Circuits selected. Layouts This is the Command Edit Bar. It is an area where characters will appear if you type anything but hotkeys in a Plot View. The Command Edit Bar is used for direct entry of data into WYSIWYG. The placement of objects can often be done quicker and with more precision using the Command Edit Bar. Absolute or Relative Mode This is where you are prompted for your next action. An Ortho mode is active. A Snap mode is active. Coordinate Display Items in RED are able to be clicked and will toggle through their options. Chapter 1 - Introduction to the User Interface

Saving To save your file: • • • Follow: File to Save or Save As. Name your file if you chose “Save As”. Click Ok. And since we are talking about saving habits, now would be a good time to discuss backing-up. Back-up your important design/show files to whatever recording medium you have that will store that information safely, in a location outside of your computer. Test your back-up plan every now and then to make sure that you are actually saving and able to restore. Chapter 1 - Introduction to the User Interface

Chapter 2 - Creating The Set • • • • Insert a Venue Animation 3 D Space and Scales Animation The Missing Coordinate Layers Editing Layers – Quick Change Animation Layers – Change via Properties Animation Layers - Object Counts Snap Insert Riser Animation Insert 2 D or 3 D Shapes Insert 2 D Shapes Animation Insert 3 D Shapes Animation Chapter 2 - Creating The Set • • • • • Insert a Person Animation Inserting Other Library Items Animation Insert Line Animation Insert Surface Animation Extrude Tool Animation Selecting Objects Animation Moving Objects Animation Scenes Animation A Spin Around Your 3 D World Animation

Insert a Venue • • The first thing that should go into your design is the venue. Follow: Draw to Venue The venue defines your 3 D world. Without a venue, a beam of light can continue to infinity, not un-like real life outdoors. The Venue command creates a room of the specified type on the plot. Chapter 2 - Creating The Set • • • There are three types of venues available. Black Box-creates a simple room or television studio with a width depth and height. Arena-creates a sports arena or stadium. Proscenium-creates a proscenium type theatre with a stage, fly tower and auditorium. All venues can have size and other attributes edited.

Insert a Venue Chapter 2 - Creating The Set

3 D Space and Scales • • • WYSIWYG uses the standard method of describing a point in three dimensions. In relation to a plan view: The X axis is horizontal (+) being to the right and (-) being to the left. The Y axis is vertical (+) being thought of as towards the top of the page and (-) thought of as down toward the bottom of the page. The Z axis (+) is thought of as up or out and (-) is down or in. In the plan view, this is the “Missing Coordinate”. You are always drawing “to scale”. You only need to consider “scale” (1/4” = 1’, etc) when you print your plot. The size of the paper you are printing to dictates “scale”. Chapter 2 - Creating The Set

3 D Space and Scales Chapter 2 - Creating The Set

The Missing Coordinate • • • The “Missing Coordinate” is the coordinate whose data cannot be entered just by clicking on the screen. The “Missing Coordinate” (X, Y, or Z) is dependent on the type of plot view and the workplane selected. Your “Tab” key will open the dialogue box shown at right. Since the screen on your computer is two dimensional only two dimensions can be shown at one time. It is possible to simulate three dimensional objects using a Isometric or Perspective view however the problem still exists that objects can only be placed with two of the three coordinates. When working in three dimensional views and clicking to place objects one dimension will remain the missing CAD coordinate. “Focus Coordinate”: You can use separate “Missing Coordinates” for focusing fixtures if you choose the option when hitting Tab. The advantage of this is you can be adding pipes, etc at a height, but still focus the fixtures at an elevation of 0' (the ground). Chapter 2 - Creating The Set

Layers • • • Layers are drawing aids intended to help you organize your plot. They allow you to select and manipulate multiple like objects quickly. One way to think of layers is as transparent acetate sheets that you can draw on. In the same way that you can view several transparent sheets at once by placing them on top of each other you can hide and unhide layers by choosing which sheets are in the stack. The top sheet is the layer that new objects will be placed on and is called the current layer. Anything drawn will be in the current layer. Organizing layers by colour can be useful also. An example would be all incandescent lamps would be drawn in warmer colours; oranges, reds, etc. Arc lamps would be in the blue range and fluorescents would be in the greener end. Chapter 2 - Creating The Set A layer must be both “Visible and Editable” to be altered. We like to create the venue and then leave it visible and leave it “un-editable”.

Editing Layers • • • Click the button or drop down box to: Change the name. Change the plot colour and/or render colour. The plot colour can be different than the render colour. Make your layer visible, editable and set opacity. Set the line weight. The line weight of an object affects the width of the individual lines that make up a given object. Change your layer selection. If no objects are selected, the layer will change and you may continue drawing in the new layer. If objects are selected, the layer of the selected objects will change. Chapter 2 - Creating The Set

Layers – Quick Change Chapter 2 - Creating The Set

Layers – Change via Properties Chapter 2 - Creating The Set

Layers - Object Counts • “Object Counts” is another great reason to use organized layering. In this case, there are 16 – 1 ton chain motors (listed as a library item). Chapter 2 - Creating The Set

Snap • • The Snap tool limits cursor movement to selected snap types. Snap is a drawing aid intended to help you position objects on your plot. When a snap is selected the cursor automatically moves to the nearest point that matches the Snap type selected. When the snap mode is selected while you are placing an object, the selected snap becomes a one time only snap. When you complete the command, the previous snap modes are restored. If no commands are in progress (i. e. , you aren't doing anything) and you set the snap modes, these modes will be persistent. The F 9 key toggles snap on and off. You can change the size of the snap mode box around the cursor in the Draw Defaults tab under the User Properties. Grid-Snaps to the intervals specified by the grid. Points-Snaps to points. Midpoints-Snaps to the midpoint on lines. Endpoints-Snaps to the endpoints of lines. Center-Snaps to the Center of arcs and circles Assembly-Snaps Sections of truss together automatically. Pipe-Only allows fixtures to be placed as certain distances on pipes Focus-Snaps to focus position Chapter 2 - Creating The Set

Insert Riser • • • Follow: Draw to Riser or Use the Button Don’t forget to use TAB first to set your missing coordinate. We generally type in the size rather than draw it interactively. < Insert Riser Button Chapter 2 - Creating The Set

Insert Riser Chapter 2 - Creating The Set

Insert 2 D or 3 D Shapes < Insert Circle < Insert Arc • • < Insert Cylinder < Insert Sphere Chapter 2 - Creating The Set Follow: Draw to Circle, Arc, Cylinder or Sphere or Use the Button Don’t forget to use TAB first to set your missing coordinate.

Insert 2 D Shapes Chapter 2 - Creating The Set

Insert 3 D Shapes Chapter 2 - Creating The Set

Insert a Person • • Follow: Library to Browse Library or Use the Button. Don’t forget to use TAB first to set your missing co-ordinate. Clicking the Library button or following the path invokes the Library Browser < Insert Library Item Button Chapter 2 - Creating The Set

Insert a Person Chapter 2 - Creating The Set

Inserting Other Library Items • • Follow: : Library to Browse Library or Use the Button. Don’t forget to use TAB first to set your missing Coordinate. There are multiple ways to “Insert” a library item: Use the “Command Line”-You may insert coordinates using either two or three values such as 20, 5, 8. You don’t click on the “Command Line”, just type when prompted. When using two values the third value will be assumed from the missing coordinate. Or after choosing which “Library Item” you wish to insert, click the insert button and then click where you want to place your item. Place the item and then move the item, if needed. Chapter 2 - Creating The Set < Insert Library Item Button

Inserting Other Library Items Chapter 2 - Creating The Set

Insert Line < Insert Line • • • Chapter 2 - Creating The Set Follow: Draw to Line and choose your line style. Or click the Insert Line Button Use TAB first to set your missing coordinate. Click on the view to start your line. Move your pointer in the direction you wish the line to be drawn. Left click again to create a point from which you can go another direction. Right Click to Finish Line.

Insert Line Chapter 2 - Creating The Set

Insert Surface • • • Follow: Draw to Surface or Use the Button Don’t forget to use TAB first to set your missing coordinate. We generally draw these interactively. < Insert Surface Chapter 2 - Creating The Set

Insert Surface Chapter 2 - Creating The Set

Extrude Tool • • • The view from which you perform this dictates the direction in which the extrusion will take place. Select the line(s) or surface(s) you wish to extrude by clicking. Hold down the Ctrl key to select multiple lines or surfaces. Click the “Extrude” button. Enter the distance to extrude. “+” is one direction and “-” is the other. Click OK. Extrude Chapter 2 - Creating The Set

Extrude Tool Chapter 2 - Creating The Set

Selecting Objects All Current Layer Restores Previous Selection Last Object Created Specify Objects Specify Layer To select an object is to make it active and available to edit or query. There are multiple ways to select and move things in WYSIWYG: • • • Select All (Ctrl+A)-Selects anything that can be edited. Select Current Layer (Ctrl+Shift+A)-Selects everything on the current layer. Right Click on an object and select from the list. By left clicking and then holding while you drag over, or box around, one or several objects. Dragging from Left to Right selects only objects that are completely boxed in. Dragging from Right to Left selects anything editable that the selection line or box touches. Use the buttons shown above. After an object is Selected, you can hold down the Ctrl key and select more objects or click on a previously selected object and de-select it. Chapter 2 - Creating The Set

Selecting Objects Chapter 2 - Creating The Set

Moving Objects After an object(s) is selected, you may “Move” it by: • Place your cursor over an object, left click, hold and drag to a new position. If multiple objects are selected, they will all move. • Right click and choose “Move” from the list. • Hold down the Ctrl key and then type the “M” key. • Use the “Move” button. Chapter 2 - Creating The Set

Moving Objects Chapter 2 - Creating The Set

Scenes • • • Scenes are collections of layers used to organize the plot. A Scene may contain one or more layers. Selecting a Scene makes all “Layers In” visible while hiding all “Layers Out”. By organizing the layers and scenes in your plot you can quickly perform set changes. Chapter 2 - Creating The Set

Scenes Chapter 2 - Creating The Set

A Spin Around Your 3 D World • • Choose either an isometric view or shaded view. Left click a screen to make it active. • The keyboard arrow keys will now move the view. • The arrow Keys plus Ctrl will spin the view around. • The page up and down keys control the zoom lens. Add the Ctrl key and it moves the camera position instead of the zoom. • Holding down the Shift key will do all the moves in smaller increments. Chapter 2 - Creating The Set

A Spin Around Your 3 D World Chapter 2 - Creating The Set

Chapter 3 - Defining Hanging Positions • • • Insert Pipe Animation Insert Pipe – Interactive Animation Insert Truss Animation Chapter 3 - Defining Hanging Positions

Insert Pipe • • • < Insert Pipe • Follow: Draw to Pipe or click the Insert Pipe Button. When the “New Pipe” dialogue box opens, enter the length and trim height or click the “Interactive” button and move your pointer in the direction you wish the pipe drawn. When drawing “interactively”, right click to choose to ‘Start from Center” or to “Start from End”. Use “Tab” first to set your missing coordinate. Change your layer if needed. Remember, the direction you draw influences the direction in which lights will point when hung. Left click again to end pipe. Chapter 3 - Defining Hanging Positions

Insert Pipe Chapter 3 - Defining Hanging Positions

Insert Pipe - Interactive Chapter 3 - Defining Hanging Positions

Insert Truss • Don’t forget to have your “Assembly Snap” on. • • • Use TAB first to set your missing Coordinate. Change your Layer if needed. Click the “Assembly Snap” button. Click the Insert Truss Button. The truss library dialogue box will open. Choose your truss. Click “Insert”. As you place the truss, it should connect together and group. Bing, , , Truss, Truss. < Insert Truss • • Chapter 3 - Defining Hanging Positions Remember, the direction you draw influences the direction in which lights will point when hung. Right click to quit placing truss.

Insert Truss Chapter 3 - Defining Hanging Positions

Chapter 4 - Hanging and Focusing Fixtures • • • Inserting Fixtures Animation Properties Fixture Properties-Fixture Properties-POV & Shutters Fixture Properties – POV Animation Fixture Properties – Shutters Animation Fixture Properties – Intensity Quick Tools General Chapter 4 - Hanging and Focusing Fixtures

Inserting Fixtures • • • Follow Library to Browse Library then click the Fixture button. Or click the Insert Fixture Button and then the Library Browser opens. The Fixture Selection dialogue box will open. Choose your instrument. Be sure to check its Version, Data and Photometrics tabs for pertinent information. This is where you would choose your lamps and lenses. Note that on the “Data” tab may be a link to the manufacturers website for more information. Click Insert • After you click “Insert”, the cursor changes to a circle with a diagonal line across it. This will turn into a “ghost light” symbol when you cross over a pipe or truss. This indicates that you can now “hang” your instrument. • Keep in mind, that when hanging onto truss, that there are many places to hang (top front chord, bottom back chord, cross member) and you really need to zoom in to place the instrument correctly. • When you have the instrument where you want it, a left click will hang it. • Before hanging another instrument, a right click will bring up an options window with choices. < Insert Fixture Chapter 4 - Hanging and Focusing Fixtures

Inserting Fixtures Chapter 4 - Hanging and Focusing Fixtures

Inserting Fixtures • • Those choices include: Finish Placing Fixtures – Choose this when you are done. Focus Last Fixture – When using conventionals, choosing this option will turn-on the lamp, “loosen the yoke and clamp” and allow you to point the light wherever you move your cursor. A left click will “tighten everything down” and your light will be focused. Edit Last Fixture – Opens the Fixture Properties dialogue box. Add Accessory opens the Accessory Selection dialogue box. Chapter 4 - Hanging and Focusing Fixtures

Inserting Fixtures • • You can change the instruments layer. Changing the symbol colour of this particular instrument can be done here also. If you need to change the Line Thickness you are able. And we recommend changing the Layer Rendering colour to something more realistic. Chapter 4 - Hanging and Focusing Fixtures

Properties • Properties are the characteristics or attributes that shape and define an object. All objects have General properties which affect the colour and Layer on which they are drawn. These General properties are found on the objects General Properties Page. • Objects also have properties which are particular to that type of object. For example Fixtures have Unit numbers but do not have a radius. When a object is selected and its properties are displayed a tab appears in the properties dialog box for that type of object. When you select multiple objects of different types Tabs will appear for each type of object. 1. Select the object(s) 2. Click the right mouse button and choose Properties from the popup menu. 3. Select the Tab for the object at the top of the properties dialog box. 4. Click on the property you wish to change and enter a new value. 5. Click on O. K to close the dialog box. Other methods: · Double click on an object. · Select objects and hit Alt + Enter. · Select objects and press the Properties button on the toolbar. · Select objects and select Properties from the Edit Menu. Chapter 4 - Hanging and Focusing Fixtures

Fixture Properties-Fixture • • Position: When you create pipe or truss, you are given the opportunity to name it. This is one of the first places that info shows back up. Spot: This is used for hooking to consoles and using Autofocus and really more for automated fixtures. If your console calls a light 1, then you should call a light the same. An example on a Hog. II would be: Cyber 21 AT 100 Unit: Use a standard theater or rock and roll number system. Offset: Where the instrument sits on the hang structure. Purpose: What this instrument is used for. Focus Position: For a conventional, what it is pointed at. Lamp: Change it here if you want. Angle a PAR 64. Lens: Change lenses. 26º, 36º, etc. Chapter 4 - Hanging and Focusing Fixtures

Fixture Properties-POV & Shutters Fixture – POV The best way to explain the following is to imagine yourself standing behind a light that is hanging from a lighting c-clamp on a pipe looking through the lens. If you click the POV image, you can use the keyboards arrow keys to adjust the view. When you move the view, notice that the pan and tilt values also move. • • Fixture – Shutters • The combination of shutter blade cuts and Barrel Rotation really work well. • Just left click and drag. Pan: Left and Right Tilt: Up and Down Chapter 4 - Hanging and Focusing Fixtures

Fixture Properties – POV Chapter 4 - Hanging and Focusing Fixtures

Fixture Properties – Shutters Chapter 4 - Hanging and Focusing Fixtures

Fixture Properties Chapter 4 - Hanging and Focusing Fixtures

Fixture Properties - Intensity • • Control: More often used for conventionals. Channel-What handle is it on. Dimmer-Where it is plugged in. Circuit: Name-The name of the multicable. Number-The number of the circuit in your multicable. Patch: Universe-the DMX output that your instrument will be assigned to. Address: The individual address of the instrument. Chapter 4 - Hanging and Focusing Fixtures

Quick Tools General Quick Tools are the fastest way to enter information about your design into the database from the CAD mode. Alternatively, you may enter data directly into a “Spreadsheet” or through “Fixture Properties”. Generally when doing a design, we will place the instruments and then come back through and use Quick Tools to fill in the blanks. Quick Tools Button All of the Quick Tools work much the same: • Select the Quick tool(s) that you wish to use. • Clear All deselects any tools you may have chosen. • Click OK or Cancel to close the dialogue box. • Start clicking the instrument symbols to which you wish to apply the tool(s) to. • Right click to choose a different value, change tools or finish. • Hitting the “D” key will decrease the value and the “I” key will increase the count. Chapter 4 - Hanging and Focusing Fixtures

Chapter 5 - Modifying Fixture Properties • • Data Mode Animation Data Views Animation Chapter 5 - Modifying Fixture Properties

Data Mode The Data Mode is one of the most powerful features of WYSIWYG. All of your show information is tabulated for you in spreadsheet format. The “Mother” of all spreadsheets is the “All Data (Sortable)”. All other spreadsheets are just variations. The plot and the database are interactive. If you change something on the plot, it also changes in the database. Conversely, anything changed on a Spreadsheet is changed on the plot. No more changing the plot and then changing the data on your paperwork program. Choose any data cell on the spreadsheet and directly affect that attribute on the plot. Chapter 5 - Modifying Fixture Properties

Data Mode Chapter 5 - Modifying Fixture Properties

Spreadsheets • • • To create a new spreadsheet based on an existing spreadsheet: Right click on any existing spreadsheet and select clone to create a duplicate. Under “Columns”, checked headings will be visible and the higher up in the list a heading is, the closer to the left hand margin it is. The “Sort” options control how information is shown down the page. You can “Filter” a column for specific information. There are several checkable options to affect how cells and headings are displayed and manipulated. Chapter 5 - Modifying Fixture Properties

Spreadsheets Chapter 5 - Modifying Fixture Properties

Chapter 6 - Creating, Modifying and Printing Reports • • Presentation Mode Reports – Scenes Reports– Scenes Animation Reports -Columns Reports –Columns Animation Exporting Printing Paperwork Chapter 6 - Creating, Modifying and Printing Reports

Presentation Mode • . • • • You can access all of your plot’s information in a pre-formatted report form in the Presentation mode. In the Shortcuts Bar click on the Reports tab and then click the report you wish to use. Right click on the Report itself and you will get a menu, choose “View Options”. This will allow you to customize the report. Using Scenes under the General tab you can alter the information displayed per your scene selections. Headings and column width can be changed Chapter 6 - Creating, Modifying and Printing Reports

Reports – Scenes By using the View Properties dialogue box, you can change the Scene from which Reports draw information. • • • This all goes back to organizing your layers so that you can create useful “Scenes” from them. Right click and select “View Options”. Choose the General tab. Click the dropdown Scene box. Choose a Scene. Chapter 6 - Creating, Modifying and Printing Reports

Reports– Scenes Chapter 6 - Creating, Modifying and Printing Reports

Reports -Columns • • By slowly moving your cursor over the column dividers at the top of each column, the cursor changes to a double headed arrow. When the cursor changes, left click and hold. Moving either right or left affects the width of the column. Release the left button when the column is the width you want. Chapter 6 - Creating, Modifying and Printing Reports

Reports -Columns Chapter 6 - Creating, Modifying and Printing Reports

Exporting • • Reports can be exported to Microsoft Excel, HTML, Tabbed Text or Formula One. This facilitates the use of the information in custom reports or other lighting database programs such as LIGHTWRIGHT. Chapter 6 - Creating, Modifying and Printing Reports

Printing Paperwork • • • All reports and spreadsheets can be printed. Open the view you wish to print. Depending on your printer set-up, you may wish to preview the output and change your printer settings. Follow: File to Print Choose your printer. You can choose a range of pages on multi page reports. Click OK to start printing. Chapter 6 - Creating, Modifying and Printing Reports

Chapter 7 - Creating, Modifying and Printing Plots • • • Printing Plots Plot Tools The Big Plot Re-Size a Plot Animation What are Contents & Properties Animation Print to File Using Adobe Acrobat Printing Views Chapter 7 - Creating, Modifying and Printing Plots

Printing Plots are a collection of views, reports and bitmaps. There are two pre-formatted Plots, the “Big Plot” and the “Micro Plot”. • The Big Plot is sized for a 36” x 48” paper size. • The Micro Plot is sized for 8. 5” x 11” paper. If either is printed directly to a different size of paper, the resulting output will not “be to scale”. You can, of course, create your own plots from “scratch”. • Choose the Presentation mode and then click the Plot shortcut bar. • Select the plot that you wish to print. • You will want to check that your paper orientation and size is correct. Chapter 7 - Creating, Modifying and Printing Plots

Plot Tools Plots have their own toolbars. These buttons and the tools associated with them, become available upon opening a Plot. Spreadsheet Item Worksheet Item Polygon Bitmap Bring to Front Round Rectangle Line Content Properties Open Contents Square Ellipse Text Send to Back Plot Item Report Item Chapter 7 - Creating, Modifying and Printing Plots Item Properties

The Big Plot is great for highly detailed, large venue events • • Click the Presentation mode button, then select the “Plots” layout tab. From the Plots shortcut bar, clone the Big Plot icon. Click the icon you wish to print to open the plot. Choose the printer you wish to use and then select the paper size. When you return to the “Big Plot” view, if you see your paper size super-imposed on the 36” x 48” Big Plot work area, that is all that will print. If your paper size fits perfectly, you will not see your paper outline at all (it is part of the border) and the whole view will print. Layout the elements on your “Big Plot” in such a way that is visually appealing to you. Keep in mind that a bitmap of a render, for example, may require photographic quality ink and paper to print correctly. Chapter 7 - Creating, Modifying and Printing Plots

Re-Size a Plot • • • Have a Plot open and active Right click on the background grid that is behind and between all of the elements. In the Properties dialogue box that opens choose a different paper size. Click OK. Click once on an element to activate it and use the drag handles to resize it. You can also click and hold, then drag the element to move it. Chapter 7 - Creating, Modifying and Printing Plots

Re-Size a Plot Chapter 7 - Creating, Modifying and Printing Plots

What are Contents & Properties • • • Double click or right click on a Plot item such as the Plan View. The “Contents” of that Plan view opens. This is essentially a window over the view that changes size according to the scale you have chosen. Click, hold and drag to move the window. Right click and a small menu opens. Fit-everything inside the venue will fit inside the window (No Scale). Fixedopens a dialogue box with a list of scale choices or you can create a custom scale. Variable-places standard Windows re-sizing handles around the window. Click, hold and drag to re-size (No Scale). The last choice available is “View Options”. Choosing “View Options” opens another window with five tabs and more choices. • General – Name the element you are working on and choose the “Scene” it uses. • Plot Rotation – If you want to present with this element at an angle, that is your prerogative. • Plot Printing - Choose your Scale and Point Size. • Plot Type – Pick your View, Work plane (if Isometric is chosen) and whether your Scrollbars are on or not. • Show Details – You decide what fixture information will show. Chapter 7 - Creating, Modifying and Printing Plots

What are Contents & Properties Chapter 7 - Creating, Modifying and Printing Plots

Print to File Use this option to output a. prn file. Instead of printing to a piece of paper, this prints to a file. This is useful if you do not have a printer capable of printing the size of document you wish. If there is a print house nearby that has large format printers, but won’t let you install WYSIWYG, here is one solution. Obtain the driver for their specific printer. Install the driver on your computer and choose it as the printer. • • • Follow: File to Print or click the Print button. Click the check mark box to choose “ Print to file”. Click OK. Chapter 7 - Creating, Modifying and Printing Plots

Using Adobe Acrobat DO NOT CHECK THIS BOX Adobe Acrobat is a printer control program that outputs. pdf files. These files are a printing industry standard and very easy to use. Where you may have a problem with your local print house understanding. prn files, they will have no problems with an Acrobat file. Using Adobe Acrobat with WYSIWYG is no different than any other printing, just choose an Acrobat printer. You do not need to choose the “Print to file” option. Just be sure that when printing an Acrobat file to paper, DO NOT check the “Fit to page” box. If checked the print will not be scaled properly. Chapter 7 - Creating, Modifying and Printing Plots

Printing Views • • • You may need to choose your printer under “Print Setup” first. Follow: File to Print The dialogue box shown at right will open. Check “Print to file” if you want a file to send to your print house. Print What: Extents-will print everything from one extent to the other. View-prints the currently selected view. Window-you are prompted to enter an area to print. Scaling: Fit-what you have chosen will be printed to whatever size of paper is in your printer. Known as “Not to Scale”. The dropdown box allows you to choose from a list of common print scales. Choosing “Custom” from the list allows you to print to a specific scale. Chapter 7 - Creating, Modifying and Printing Plots

Chapter 8 - Building Lighting Looks • • • Design Mode – Toolbar Design Mode – Intensity Animation Design Mode – Focus Animation Design Mode – Iris Animation Design Mode – Zoom Animation Design Mode – Colour Animation Design Mode – Gobo Rotate Animation Design Mode – Prism Animation Chapter 8 - Building Lighting Looks

Design Mode - Toolbar Toggle Focus Tool At Last Intensity and Focus Toggle Gobo Tool Toggle Zoom Tool Render Wizard Toggle Intensity Tool Toggle Prism Tool Toggle Iris Tool Toggle Colour Tool The Design Mode tools all tend to work pretty much the same: Either use the buttons shown above or click the Design Tool selection menu. Chapter 8 - Building Lighting Looks

Design Mode - Intensity Chapter 8 - Building Lighting Looks

Design Mode - Focus Chapter 8 - Building Lighting Looks

Design Mode - Iris Chapter 8 - Building Lighting Looks

Design Mode - Zoom Chapter 8 - Building Lighting Looks

Design Mode - Colour Chapter 8 - Building Lighting Looks

Design Mode – Gobo Chapter 8 - Building Lighting Looks

Design Mode – Gobo Rotate Chapter 8 - Building Lighting Looks

Design Mode - Prism Chapter 8 - Building Lighting Looks

Chapter 9 - Cueing The Show • • Device Manager Animation Hook to Console Animation Using Auto. Focus AF and Wholehog II Animation Binding a Console Animation Console Running Wysiwyg Animation Chapter 9 - Cueing The Show

Device Manager The device manager lists the lighting consoles and devices in the current WYSIWYG document. From here, you can also insert and delete consoles as well as get any console's properties. Choose a console and click Insert. Chapter 8 - Building Lighting Looks

Hook to Console “Hooked to console” is the term given to the process of connecting a lighting console to WYSIWYG, both electrically and through software. We are using a Whole Hog II in many of our examples. 1. 2. 3. Connect a DMX (5 pin XLR) cable(s) between the console and your WYSIWYG interface (Wyg-it, Vision and others). Connect a MIDI cable between the interface and any compatible console. Connect your WYSIWYG computer to the interface. This could be via Ethernet or USB. Follow: Live Mode to Device Manager which opens the Device Manager. Click the new button to choose your console. 4. 5. 6. 7. 8. Chapter 9 - Cueing The Show With the console chosen in the Device Manager window, click the Properties button. The Properties dialogue box will open. Depending on your interface, you may need to address your console. In the list of ports, make sure the ones you are using are “Bound” to the console. (If the Bind button is available, you have “un-bound” ports and DMX universes. ) Click OK to close the dialogue box. Click the Connect button.

Hook to Console Chapter 9 - Cueing The Show

Using Auto. Focus facilitates very fast, precise programming. It enables a programmer to select lights and parameters by using standard Windows commands in a WYSIWYG environment and using Ethernet or MIDI to transfer programming information between the WYSIWYG workstation and compatible consoles. • • • In WYSIWYG, you will need to go to Live mode. From the “Live” menu select the Device Manager. In the device manager make sure your device or console has Auto. Focus bound to it. Also make sure the console is “connected” in the Device Manager. You will, of course, have to patch your lights and assign them a “Spot” number. Adding the Spot number allows Auto. Focus to identify the instrument(s) to the console when it is chosen in WYG. Now in WYSIWYG open a full screen or quad layout and select the lights that you would like to manipulate. The lights will load into your console’s programmer. Once the light is chosen and loaded to the console, you may now right click your mouse on screen and choose an Auto. Focus option. Chapter 9 - Cueing The Show

AF and Wholehog II Note When you want to use Auto Focus with the Wholehog II console, it is necessary to change the device ID. On your Hog you would open setup/input panel/device ID. Change the Device ID so that it reads the number 0. Don’t forget to turn on the MIDI input. Chapter 9 - Cueing The Show
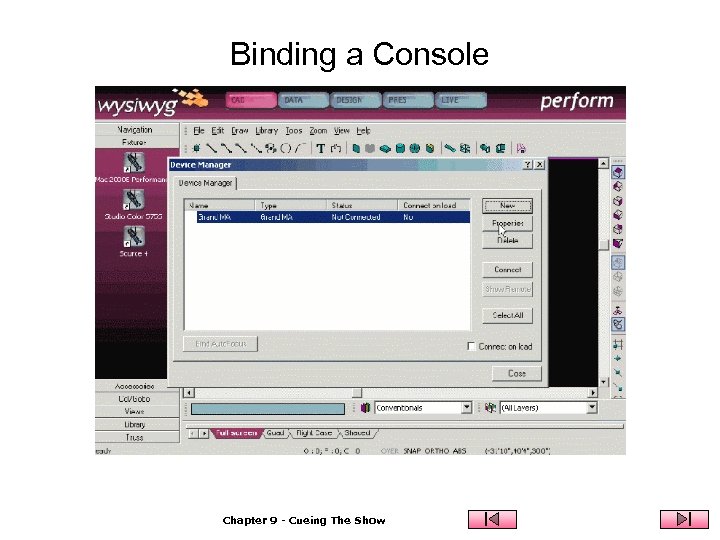
Binding a Console Chapter 9 - Cueing The Show
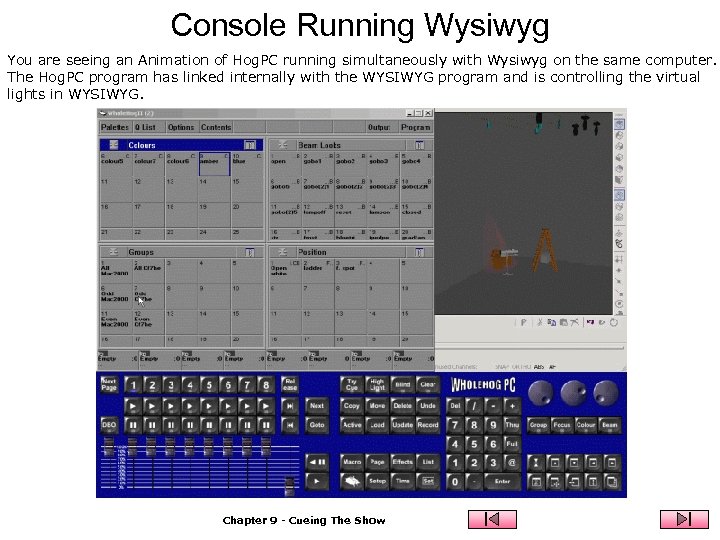
Console Running Wysiwyg You are seeing an Animation of Hog. PC running simultaneously with Wysiwyg on the same computer. The Hog. PC program has linked internally with the WYSIWYG program and is controlling the virtual lights in WYSIWYG. Chapter 9 - Cueing The Show
Chapter 10 - Rendering • • Rendering Animation Rendering Examples Chapter 10 - Rendering
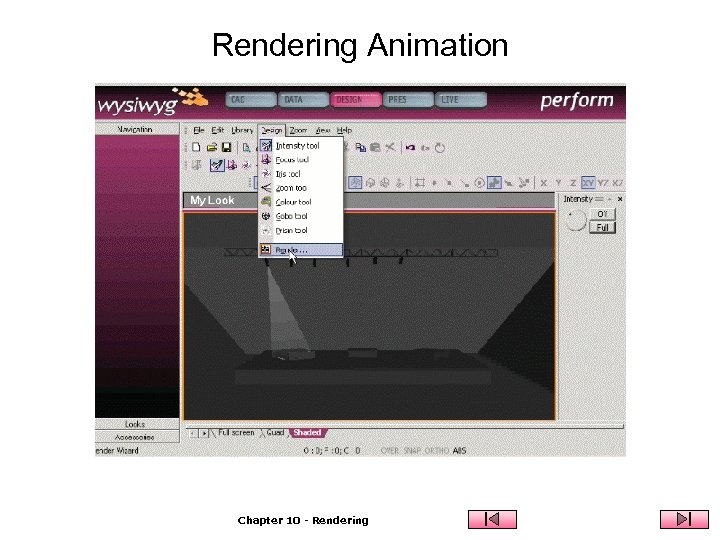
Rendering Animation Chapter 10 - Rendering
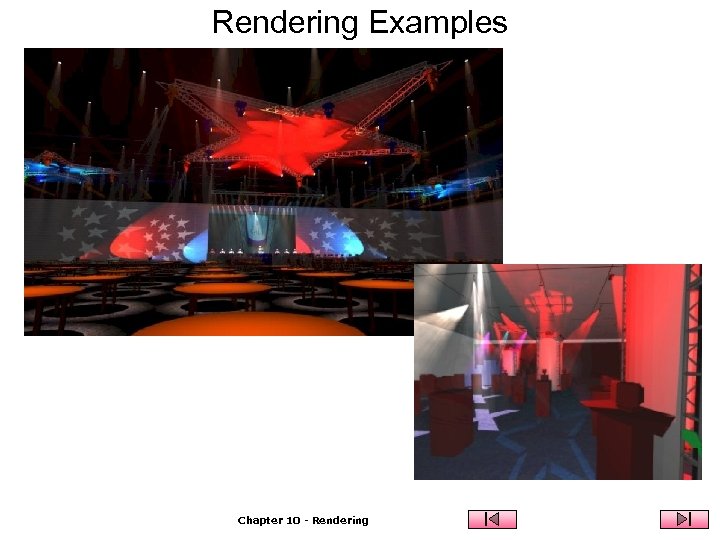
Rendering Examples Chapter 10 - Rendering
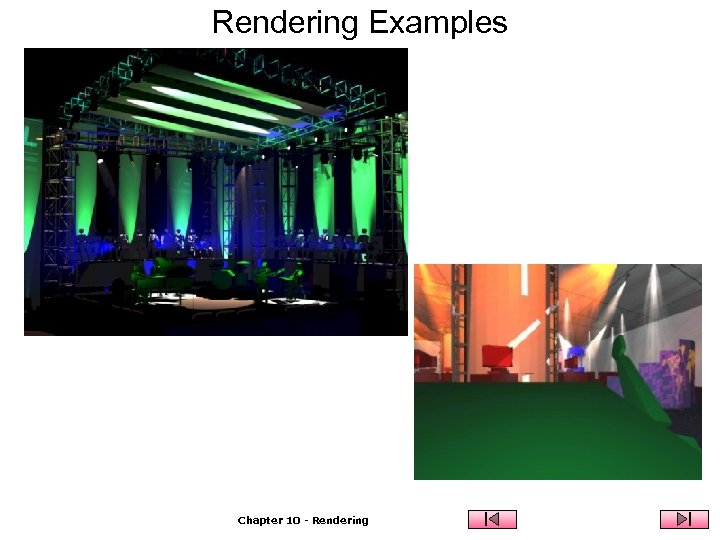
Rendering Examples Chapter 10 - Rendering
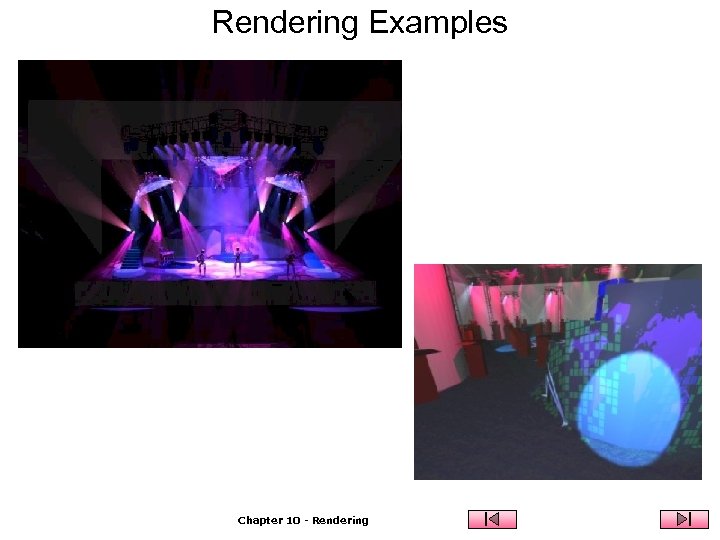
Rendering Examples Chapter 10 - Rendering
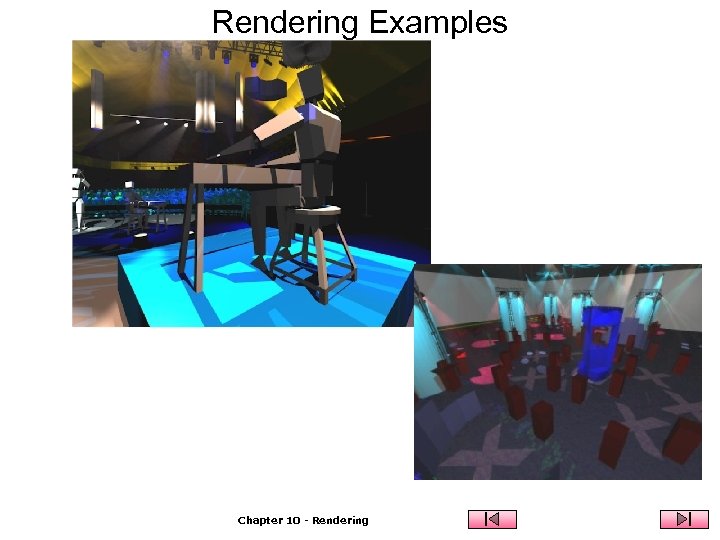
Rendering Examples Chapter 10 - Rendering
Where to Find Other Help ETC Technical Support ETC Contact Information Note: You must be connected to the Internet to use the links above.
ceb720d26249a590053f9efdb3b7ec87.ppt