

d7c67da835433e24c9fd713f7cf5e8e6.ppt
- Количество слайдов: 65
 Windows Vista Inside Out Ch 13: Managing Shared Folders and Printers Last modified 10 -7 -07
 Editions Ø Sharing is the same in all editions Ø Print Management console is not available in Home Basic and Home Premium Ø But all its functionality is available in other tools
 This Chapter Covers Workgroups Only Ø In this chapter, we describe resource sharing as it applies in a workgroup environment Ø We do not cover sharing in a domainbased environment
 Public folder sharing Ø Files in the Public folder and its subfolders l Ø Available to anyone who can log on to your computer Use "Public folder sharing" in "Network and Sharing Center" to control network access
 Password Protected Sharing Ø Also in "Network and Sharing Center"
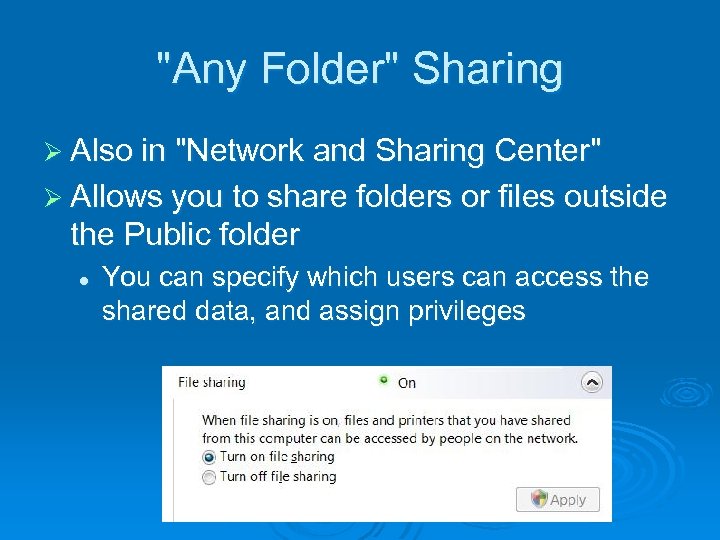 "Any Folder" Sharing Ø Also in "Network and Sharing Center" Ø Allows you to share folders or files outside the Public folder l You can specify which users can access the shared data, and assign privileges
 Printer and Media Sharing Ø Also in "Network and Sharing Center"
 Simple File Sharing is Gone Ø Windows XP's "Simple File Sharing" is gone Ø The Network and Sharing center is the new technique to control sharing
 Windows 9 x Folder Passwords Ø Windows 95/98/Me used share-level access control l Passwords (one for read-only access and one for full access) were assigned to each shared resource Ø Vista does not use that method
 Configuring Your Network for Sharing Ø Give all computers the same workgroup name l Optional if all the computers have Vista Ø Set the network’s location type to Private Ø Turn on Network Discovery Ø Select sharing options l In the "Sharing And Discovery" section of "Network And Sharing Center" Ø Set up user accounts
 The Sharing Wizard Ø The Sharing Wizard is enabled by default l l In Folder Options, on the View tab Open Folder Options with Start, FOL
 Using the Sharing Wizard Ø In Explorer, select the folders or files you want to share Ø Click the Share button
 Using the Sharing Wizard Ø Reader has Read & Execute permission Ø Contributor has Modify permission for a folder Ø Co-owner has Full Control
 Setting Advanced Sharing Properties Ø Right-click a folder, Properties Ø Sharing tab Ø "Advanced Sharing"
 Advanced Sharing Limit number of users Ø Specify sharing permissions Ø l Subfolders will also be shared
 Share Permissions and NTFS Permissions Work Together Ø Share permissions control network access to a resource l Share permissions have no effect if you log on locally Ø NTFS permissions control access to a file or folder l They apply both to network and local access
 Example: Sharing and NTFS Permissions Ø When connecting over the network l l Ø Joe has Read access The Share permissions limit his access When Joe logs on locally l l Joe has Full Control access The Share permissions don't matter Share Permissions Joe Read NTFS Permissions Joe Full Control
 Managing Shared Folders Ø These two links at the bottom of Network and Sharing center make it easy to see all shared folders
 The Shared Folders Snap-In Ø Start, right-click Computer, Manage
 Administrative Shares Created by Windows automatically Ø C$, D$, E$, … Ø l Ø ADMIN$ l Ø Used during remote administration IPC$ l Ø Used by backup programs Used when viewing a remote computer's resources PRINT$ l Used for remote administration of printers
 Accessing Shared Folders Ø Start, Network Ø Double-click a computer to see shares Ø Right-click a share to map a drive
 Sharing a Printer Ø Right-click a printer Ø Run as administrator Ø Sharing
 Setting Permissions on Shared Printers Ø When you set up a printer, initially all users in the Everyone group have Print permission for documents they create l l Provides access to the printer Ability to manage their own documents in the print queue Ø And by default, members of the Administrators group also have Manage Printers and Manage Documents permission
 Printer Permissions and Privileges Ø Print l l l Print documents Control properties of owned documents Pause, restart, and remove owned documents
 Printer Permissions and Privileges Ø Manage Printers l l l Share printer Change printer properties Remove printer Change printer permissions Pause and restart the printer
 Printer Permissions and Privileges Ø Manage Documents l Pause, restart, move, and remove all queued documents
 Hours of Availability Ø The Advanced tab of the printer’s properties dialog box l Always Available and Available From
 Priority and Drivers Ø Priority l Ø If you create multiple printers for a single print device, documents sent to the printer with the higher Priority setting print ahead of those sent to the other printer Driver l Shows all installed printer drivers
 Spooling Ø Spool settings l l A Spooled document is spooled to a hard disk before sending it to the printer Spooled documents are then sent to the print device in the background
 Spooling Ø Hold Mismatched Documents l Typically occurs when a required paper size is unavailable Ø Print Spooled Documents First l Saves time by printing documents that are ready first, even if they are lower-priority Ø Keep Printed Documents l Spooler doesn’t delete documents from the queue after they print
 Command-Line Utilities for Managing Shared Resources Ø Net Share l The Net Share command lets you view, create, modify, or delete shared resources on your computer. Ø Net Use l The Net Use command connects your computer to shared resources on other computers
 Windows Vista Inside Out Chapter 14 - Tweaking and Troubleshooting a Small Network
 Editions Ø The networking features in this chapter work identically in all Vista editions
 Ø A new Vista feature that automatically attempts to diagnose") Network Diagnostics Framework (NDF) Ø A new Vista feature that automatically attempts to diagnose and correct network problems l l Pops up boxes like this one Link Ch 14 a
Network Diagnostics Framework (NDF) Ø A new Vista feature that automatically attempts to diagnose and correct network problems l l Pops up boxes like this one Link Ch 14 a
 Viewing Status in Network And Sharing Center Ø Click the X or ! To launch Network Diagnostics
 Diagnosing Problems Using Network Map Ø Hover a device to see its address information
 Devices in the Network Map Ø Devices that don't support Link Layer Topology Discovery (LLTD) appear at the bottom, including: l l Win XP machines (unless you install the KB 922120 update – see link Ch 14 b) Devices that support Universal Plug and Play (UPn. P) but not LLTD Devices without network discovery turned on Devices on a public network
 Troubleshooting TCP/IP Problems Ø PING an IP Address or DNS name to test connectivity l But Win XP SP 2 and Vista have firewalls that block pings by default—you'll need to turn the firewalls off or allow the PINGs through first
 PATHPING Ø Finds intermediate routers Ø Calculates statistics
 TRACERT Ø Sends three packets to each router on the path Ø Similar to PATHPING
 Diagnosing IP Address Problems Ø To see your IP configuration l l l Ø In Network And Sharing Center, click Manage Network Connections Double-click the icon for your connection Click Details Or use the IPCONFIG /ALL command at a Command Prompt
 Important IP Addresses to Know Ø 169. 254. x. y 169. 254. l l l Automatic Private IP Address (APIPA) The computer tried to use Dynamic Host Configuration Protocol (DHCP) but could not contact a DHCP Server Make sure you are connected to the DHCP server (usually a router) and restart the machine • The IPCONFIG /RENEW command at a Command prompt works too
 Important IP Addresses to Know Ø 10. x. y. z 10. or 192. 168. x. y or 192. 168. 172. 16. x. y to 172. 31. x. y 172. 16. 172. 31. l l Reserved private IP address Normal for a computer behind a Network Address Translation (NAT) server, such as a router • But the router needs a public address on its Wide Area Network (WAN) side l You cannot connect directly to the Internet with a private address
 Important IP Addresses to Know Ø 0. 0 l l l Cable disconnected, or IP address conflict No networking is possible with this address
 Subnet Mask Ø The subnet mask must be the same for all computers on your local network segment l Usually the subnet mask is one of these three • • • l 255. 0. 0. 0 255. 0 Intermediate values like 255. 240. 0 are sometimes used in large networks
 Default Gateway Ø Traditionally uses an address ending with 1 like 192. 168. 0. 1 Ø All devices on a network should have the same default gateway l Unless you have a complex network with more than one router
 Repairing Your TCP/IP Configuration Ø Automated Repair l Right-click the connection icon in Network Connections and click Diagnose Ø Renew your IP address l In a Command Prompt window, use • IPCONFIG /RENEW l or • IPCONFIG /RENEW 6 l For IPv 6
 Resolving DNS Issues Ø Test DNS with the NSLOOKUP command Ø Your DNS address should be l l Your router, or your ISP's DNS server Open DNS - Free DNS Service for everyone • 208. 67. 222 • 208. 67. 220
 Hosts File Ø Malware sometimes changes the Hosts file to block websites l C: WindowsSystem 32driversetchosts
 DNS Cache Ø Windows maintains a temporary list of DNS names and IP addresses Ø You can clear it with this command at a Command Prompt l IPCONFIG /FLUSHDNS
 Bridging Two Networks A network bridge connects two networks together Ø Rarely used Ø
 Network Troubleshooting Tools
 Network Troubleshooting Tools
 In-Class Exercises Not in notes, but you will do ones just like these in the Project
 Good Network Subnet: 192. 168. 1. 0 To the Internet IP Address Subnet Mask Default Gateway 192. 168. 1. 1 Hub 255. 0 147. 144. 51. 1 192. 168. 1. 102 192. 168. 1. 103 255. 0 255. 0 192. 168. 1. 1
 Duplicate IP Address Subnet: 192. 168. 1. 0 To the Internet IP Address Subnet Mask Default Gateway 192. 168. 1. 1 Hub 255. 0 147. 144. 51. 1 192. 168. 1. 101 192. 168. 1. 103 255. 0 255. 0 192. 168. 1. 1
 IP Address Outside Subnet: 192. 168. 1. 0 To the Internet IP Address Subnet Mask Default Gateway 192. 168. 1. 1 Hub 255. 0 147. 144. 51. 1 192. 168. 1. 101 192. 168. 2. 102 192. 168. 1. 103 255. 0 255. 0 192. 168. 1. 1
 Wrong Subnet Mask To the Internet Subnet: 192. 168. 1. 0 IP Address Subnet Mask Default Gateway 192. 168. 1. 1 Hub 255. 0 147. 144. 51. 1 192. 168. 1. 102 192. 168. 1. 103 255. 0 255. 0 192. 168. 1. 1
 Wrong Default Gateway To the Internet Subnet: 192. 168. 1. 0 IP Address Subnet Mask Default Gateway 192. 168. 1. 1 Hub 255. 0 147. 144. 51. 1 192. 168. 1. 102 192. 168. 1. 103 255. 0 255. 0 192. 168. 1. 101 192. 168. 1. 1
 Find the Problem #1 Subnet: ______ To the Internet IP Address Subnet Mask Default Gateway 192. 168. 2. 1 Hub 255. 0 147. 144. 51. 1 192. 168. 2. 102 192. 169. 2. 103 255. 0 255. 0 192. 168. 2. 1
 Find the Problem #2 Subnet: ______ To the Internet IP Address Subnet Mask Default Gateway 192. 168. 1. 1 Hub 255. 0 147. 144. 51. 1 192. 168. 1. 102 192. 168. 1. 103 255. 0 192. 168. 1. 1
 Find the Problem #3 Subnet: ______ To the Internet IP Address Subnet Mask Default Gateway 192. 168. 2. 1 Hub 255. 0 147. 144. 51. 1 192. 168. 2. 102 255. 0 255. 0 192. 168. 2. 1
 Find the Problem #4 Subnet: ______ To the Internet IP Address Subnet Mask Default Gateway 192. 168. 0. 1 Hub 255. 0 147. 144. 51. 1 192. 168. 0. 102 192. 168. 0. 103 255. 0 255. 0 192. 168. 2. 1 192. 168. 0. 1
 Find the Problem #5 Subnet: ______ To the Internet IP Address Subnet Mask Default Gateway 192. 168. 1. 4 Hub 255. 0 147. 144. 51. 1 192. 168. 1. 102 192. 168. 1. 103 255. 0 255. 0 192. 168. 1. 1
 Answers #1: IP address out of subnet on rightmost machine Ø #2: Bad subnet mask on leftmost machine Ø #3: Duplicate IP address on rightmost machine Ø #4: Bad default gateway on leftmost machine Ø #5: All the default gateways are wrong (or the top machine’s IP address is wrong) Ø