98abbaea07678ca5aba9f922cc4b92a2.ppt
- Количество слайдов: 165


UNIT-I Wiring Tools

Learning Objectives • Identify the basic hand tools used in the electrical trades. • Select the essential tools for each specific job. • Maintain and use these tools safely. • List factors to consider when purchasing hand tools.

The Electrician’s Tool Pouch • The Electrician’s tool pouch is essential in that it helps kept electrical tools organized. The tool pouch allows the right tools at hand which makes the job more efficient. • The electrician must have proper tools for the job. • Tools must be maintain and kept in good working condition. • Certain tools are essential, and without them the electrician should not attempt to do any type of wiring. • Listed are the basic hand tools that are essential to electrical wiring.

Electrical Specific Hand Cutting Tools Needle-nose pliers • Forming loops on small conductors • Cutting and stripping small conductors Lineman’s pliers (side cutters) • Cutting large conductors • Forming loops on large conductors • Pulling and holding large conductors Diagonal pliers (dykes) • Cutting small conductors • Cutting conductors in limited spaces Wire strippers • Stripping insulation from conductors • Cutting small conductors • Crimping wire lugs

Electrical Specific Hand Tools Tap tool • Equipping drill holes with bolt threads • Retapping damaged threads • Determining bolt size Center punch • Making center tap in wood or metal for drilling Flat-blade screwdriver • Installing and removing slot-head screws Phillips screwdriver • Installing and removing phillips-head screws

Electrical Specific Hand Tools Slip-joint pliers • Holding couplings and conductors • Tightening couplings and conductors Magnetic torpedo level • Leveling conduit and equipment Keyhole saw • Cutting holes in plasterboard for circuit boxes Conduit reamer • Reaming burrs from cut conduits and EMT

Electrical Specific Hand Tools Hacksaw • Cutting large conductors and cables • Cutting conduit, metal, or bolts Adjustable wrenches • Used for turning bolts, nuts, and small pipe fittings Steel measuring tape • Measuring conduit and cable Nut driver • Installing and removing nuts and bolts • Tightening and loosening nuts and long bolts

Electrician's Essential Tools Electrician’s hammer • Diving and pulling nails • Opening wooden crates and breaking plasterboard Circuit tester • Checking circuits for power • Checking fuses and breakers Electrician’s knife • Opening paper cartons • Stripping cables and large conductors Hex key set (Allen wrenches) • Installing and removing Allen screws

Tools Used for Specialty Work Steel fish tape and reel • Pulling conductors through conduit • Pulling cables through insulated walls Rotating speed screwdrivers • Used for trim work, installing switch and receptacles Conduit bender • Bending conduit for conductor installation Sheet metal Cutters • Used for cutting and trimming sheet metal

Rules for care of hand tools • There are many more hand power tools that electricians will use in residential and commercial wiring. • All tools should be used only for the purpose intended. • It is the electrician’s responsibility to keep his or her tools sharp, clean, and lubricated. • • A well maintained tool has a longer life and is safer than an improperly maintained tool. Repair tools when possible, but discard worn or damaged tools.

Factors For Purchasing Tools Factors to consider when purchasing tools are size, design, and quality. • Always purchase the correct sized tools for the work to be done. • Tools should be designed specifically for electrical work. Ex: Insulated handles, hammers with straight claws. • The purchase of quality tools last longer which saves replacement cost.

Remember • Select the right tool for the job. • Keep tools clean, lubricated, and in good working condition. • Purchase good quality tools they are safer and will last longer. • Repair tools when possible, but discard worn or damaged tools.

UNIT-II Electrical wiring Accessories

How does electricity get to your house? Generation facilities. Most electricity is made by turbine blades rotating at speeds high enough to produce electricity in a generator. The blades can be turned by water, steam or wind.

Switchyard High-voltage switchyard- The electricity flows through metal conduction to a switchyard, where a transformer steps up voltage for transmission.

Transmission Lines Transmission lines -Transmission lines can efficiently carry high-voltage electricity over long distance to substations.

Substations -At substations, electricity is stepped down so it can travel over smaller distribution lines to homes and businesses.

Distribution Lines • Distribution lines -Distribution lines carry electricity to neighborhoods.

Transformer -an electric-pole transformer reduces the voltage to a level that can be used in homes

Service Drop and Meter The line that connect from the overhead street power lines to your house is called the Service Drop. The utility company owns and is responsible for the Service drop and any wires before they enter the Weatherhead.

Weatherhead • The weatherhead prevents any water, snow or moisture to enter the system and travel down the wires to the panel.

Service Panel • After the wires enter the weatherhead they travel down the large conduit to the Service panel. • From the panel, the power is distributed to the different circuits throughout the house.

Circuits • A circuit breaker is an automatically operated electrical switch designed to protect an electrical circuit from damage caused by overload or short circuit. • Its basic function is to detect a fault condition and, by interrupting continuity, to immediately discontinue electrical flow. • Unlike a fuse, which operates once and then has to be replaced, a circuit breaker can be reset (either manually or automatically) to resume normal operation.

Main components in residential application • Lights and Switches • Receptacles/outlets • Hardwired appliances

Lights and switches • Lights are typically run with 14 gauge wire. • In a single pole application when one switch is operating the light, 14 -2 wire is used. • In a 3 -way situation when a two switches are used to operate one light, then 14 -3 wire must be used.

Single pole switch wiring

3 -way switch wiring

Outlets • An electrical outlet, also called a receptacle, is the flush mounted plate we plug our electrical appliances into. 15 amp outlet 20 amp outlet

15 amp and 20 amp Outlets • 15 amp outlets are run with 14 gauge wire. • 20 amp outlets are run with 12 gauge wire. • 20 amp outlets are recognizable by the Tshaped slot on the neutral side of the outlet. 15 amp 20 amp

Wiring an Outlet There is usually more than one outlet on a circuit, so the above diagram explains how to wire an outlet in the middle of circuit and also how the outlet on the end is wired.

GFCI • GFCI stands for Ground Fault Circuit Interrupter. • GFCI outlets are required by code in bathrooms and kitchens because both areas have the chance of getting wet.

220 -240 amp outlets • Some appliances in your home will require a 220 volt outlet. – Kitchen Stove – Cloths Dryer

Hard wired • Some appliances or fixtures are hard wired to the power supply. This means they don’t plug in, but they have the wires from the wall tied directly to them. • Some examples might include – Dish waser – Well pump – Furnace/boiler – Hot water heater – Smoke detectors

Some wiring tips Always flip a breaker off before you do any work on a circuit! Smoke detectors are required by code in any residence. Lighting circuits should be wired separately from other circuits so if a breaker is tripped, you still have lights. By code switches have to be installed 48 inches from the floor. By code outlets have to installed 18 from the floor.

Tips continued Install outlets with the ground hole facing up so you will never drop something across the hot and neutral lines. When drilling studs for running wire in walls, always drill in the center of the stud to minimize the risk of hitting a wire with a nail. Remember that only 50 milliamps of electricity across your chest, stop your heart. Use insulated tools. Never cut across a hot and neutral with any tool. (lineman's pliers, sawzall) It will trip the breaker and ruin the tool.

Tips continued • If a wire has to be run too close to the edge of a stud, then use a metal protective plate in case someone drives a nail in that area. • When wiring switches and outlets, use needle nose pliers to bend C-Shaped hooks on the bare end of the wire. • Wrap the end of the wire clockwise onto the screw so that when you tighten the screw the hook tightens around the screw instead of loosening up.

Tips continued • Remember that to become an electrician you must complete a 4 year apprenticeship program, thousands of hours of on-the-job experience and hundreds of hours in the classroom. • So don’t assume that because you have seen this presentation you can wire a house!

Dedicated circuits For larger and more sensitive appliances, it is a good idea to run a dedicated circuit which means, only that appliance is on that circuit, nothing else. This minimizes the chance of the breaker being tripped. Some examples of appliances are: Refrigerator Air Conditioners Furnace/boiler Electric stove High-end Electronics (as seen in hospitals) Well pump Hot water heater Anything with a large electrical draw

UNIT-III Electrical Wiring Joints

• • Safety Standards Wiring Considerations Wire Terminations Coaxial Cable Wiring Installations Wiring Diagrams

Safety • Lethal Current • Safety Precautions MElec-Ch 2 - 41

Lethal Current • Fundamental policy of the USPS is SAFETY • Human Body – Resistance – 4 KΩ (moist skin) to 24 KΩ (dry skin) – Safe current (through chest) – less than 20 milliamps – E = 120 VAC R = 4 KΩ I = ? – I = 30 milliamps - NOT SAFE – Don’t want current through chest cavity (may be lethal) MElec-Ch 2 - 42

Safety Precautions • Turn circuit off – Disconnect service cord – Disconnect negative battery cable • If must work on live AC circuit – Need 2 nd safety person • Remove metal jewelry • Know your boat and its wiring • Use outlet tester on AC outlets • Use 3 -wire extension cord from GFI outlet MElec-Ch 2 - 43
 – AC and DC Electrical Systems")
Standards • American Boat and Yacht Council (ABYC) – AC and DC Electrical Systems is E-11 – Minimum standards • Construction • Repair • Marine Dept. of Underwriters Laboratory – Test and certify commercial products – Safety, not function MElec-Ch 2 - 44

Wiring Considerations • Conductors • Wire Types • Wire Size • Wire Insulation • Wire Color Code MElec-Ch 2 - 45

Conductors • Connects power sources to power loads • Characteristics – Safe – Dependable – Efficient (minimal voltage drop) • Boat environment – Worse than either house or car – High humidity – Vibration – Corrosive conditions MElec-Ch 2 - 46

Wire Types • Marine Grade – Type 3 is recommended • Stranded copper – Tinned is preferred MElec-Ch 2 - 47
 – Electronic Equipment")
Wire Size • 3% voltage drop – Critical circuits (Nav lights) – Electronic Equipment • 10% voltage drop – Cabin lights – Motorized Equipment • Minimum size AWG # 16 MElec-Ch 2 - 48

Wire Has Resistance 12 VDC 0. 1 Ώ 10 A 0. 1 Ώ V What Voltage? An. 10 VDC • Inadvertent Resistors – Wire too small (min of #16 - properly size using table) – Bad connections (or corroded connections) • Clean and tighten battery connectors • Tighten lug screws and inspect wire to lug connection – Why do wires get warm / hot? • Low resistance circuits pass high current (P = I 2 x R) • Wires can account for much of the overall resistance MElec-Ch 2 - 49

Wire Size Comparison #16 top to #10 bottom #2 top to #10 bottom MElec-Ch 2 - 50

Copper Wire Characteristics MElec-Ch 2 - 51

12 - VDC Wire Size Selection MElec-Ch 2 - 52

12 VDC Wire Size Selection MElec-Ch 2 - 53

120 VAC Wire Size Selection MElec-Ch 2 - 54

What Size Wires? B MElec-Ch 2 - 55

Step 1 B What current to Load? I = 10 Amps P = E * I I = P / E I = 1200/120 From Table 2 -1 – For 10 A need #16 wire From Table 2 -3 – Maximum of 44 feet (for 10 A in #16 wire) MElec-Ch 2 - 56

Step 1 Answers AMPACITY 10 Amperes #16 AWG TW by Table 2 -1 B for 3% voltage drop 44 feet maximum by Table 2 -3 MElec-Ch 2 - 57

Step 2 B What current to Inverter? Iload = 100 Amps @ 12 V Iload = Iout = Iin *0. 91 Iin = Iout / 0. 91 = 100 / 0. 91 = 110 Amps From Table 2 -1 – For 110 A need #1 wire From Table 2 -3 – Maximum of 14 feet (for 110 A in #1 wire) MElec-Ch 2 - 58

Step 2 Answers AMPACITY 110 Amperes #1 AWG TW by Table 1 B for 3% voltage drop 14 feet maximum by Table 2 -2 A MElec-Ch 2 - 59

Wire Insulation • AC cables must be type UL 1426 BC – 600 volt insulation – Gasoline and Oil resistant – Won’t absorb moisture • DC wires & cables must be Marine Grade – 600 volt insulation – Gasoline and Oil resistant – Won’t absorb moisture • Color coded wires MElec-Ch 2 - 60
 AC (Neut) AC (Gnd) Black X White X")
Wire Color Code Color AC (Hot) AC (Neut) AC (Gnd) Black X White X Green (may have a yellow stripe) Red X 2 Yellow DC + DC - X 1 X X X 1 Footnotes: 1 – Yellow preferred for DC negative to avoid confusion with AC Hot wire 2 – 2 nd hot wire in 220 VAC is Red MElec-Ch 2 - 61

MElec-Ch 2 - 62

Wire Terminations • Crimping – Special Tool – Approved Marine Connectors – Use of Ratcheting Tool • Solder • Heat-shrink Tubing MElec-Ch 2 - 63

Wire Terminals MElec-Ch 2 - 64

Ratcheting Crimper YES NO MElec-Ch 2 - 65

Ratcheting Tool Use • First select appropriate connector • Strip insulation length of stem plus 1/16” • Insert stripped end all way into terminal – End should extend 1/16” • Place terminal in same color slot – First crimp end of terminal barrel nearest ring – Then crimp wire end of terminal barrel • Check the connection with a solid tug MElec-Ch 2 - 66

Soldering • Terminal connection can’t be only soldered – Must also be crimped • Soldering is normally not required – Crimped connectors are acceptable to ABYC – If solder, apply only to ring end of terminal • Solder changes stranded wire into solid – Stranded wire is flexible • Use 40% lead / 60% tin, rosin core solder • Battery lugs may be only soldered MElec-Ch 2 - 67

Heat-Shrink Tubing Application Steps MElec-Ch 2 - 68

Coaxial Cable • • Antenna cable Radio coax is 50 ohm with PL-259 Radio cable is cut to length Want attenuation under 3 db • TV cable is 75 ohm with “F” connectors • GPS cable is not cut to length – Coil excess in 1 -foot loops MElec-Ch 2 - 69

Coaxial Cable Information MElec-Ch 2 - 70

Soldering PL-259 Connector MElec-Ch 2 - 71

Wiring Installation • • Basic Considerations Distribution Panel Fuses / Circuit Breakers Branch Circuits – Wire – Outlets – Switches • Grounding Systems • Bonding Systems MElec-Ch 2 - 72

Basic Considerations • Must have source and return wires – Return wires to a common point – May use feeder wire from power panel for: • engine, helm console, etc. • Wires above flood level of bilge – Waterproof if in bilge • Insulated support every 18” • Twist DC wires within 1 meter of compass MElec-Ch 2 - 73

Distribution Panel • Central location of Circuit Breakers / Fuses – All branch circuits from this location • AC and DC may be combined in one panel • All equipment / circuits should go to panel – Not direct to battery (except bilge pump) • Noise interference suppression covered in Section 7 MElec-Ch 2 - 74

DC / AC Power Panel Front View MElec-Ch 2 - 75

Inside Power Panel Buss Bars DC Side MElec-Ch 2 - 76

Fuses and Circuit Breakers • Used to protect wiring from over current – In positive or hot wire • Newer boats use circuit breakers – Initially more expensive • Replace blown fuse with correct rating • Circuit Breakers should be Marine Grade – Trip free – Manual reset MElec-Ch 2 - 77

Branch Circuits - Wires • Minimum size is 16 AWG – See Wire Selection Tables – For AC normally #14 for 15 A and #12 for 20 A • Must terminate in closed electrical box • Of sufficient length • DC negative returned to DC Panel – May use several negative feeder terminals • AC neutrals returned to AC Panel • Bonding system never used as return wire MElec-Ch 2 - 78

Branch Circuits - Outlets • 120 VAC outlets must be 3 -wire polarized – Black (hot) to brass or copper colored terminal • Outlet wires must have crimp terminals • GFI outlets – Required on weather deck, head, galley and machinery spaces – Good practice for all AC outlets to be GFI – Trip at 5 milliamps • Different outlets for AC and DC power MElec-Ch 2 - 79
 DC Plug 120 VAC 15 A")
12 VDC Outlets and Plugs DC Outlet (Receptacle) DC Plug 120 VAC 15 A Outlet GFI 15 A Outlet 20 A Outlet AC Plug 15 A AC Plug 20 A MElec-Ch 2 - 80

Branch Circuits - Switches • Modern panels use Circuit Breakers – Which also double as switches • Switches / Circuit Breakers – Must be Marine Grade – Rated for the voltage and current controlled – Interrupt the positive (DC) or hot (AC) leg • Battery Switch – Designed for high current service – Not located in engine or fuel-tank compartments MElec-Ch 2 - 81

Grounding System • Ground is potential of water around boat – Or potential of earth’s surface • DC – Ground Battery negative terminal(s) – Also engine block – Wire color is Yellow (or Black) • AC – Transformer center tap on shore – Also connected to ground rod at transformer – Wire color is Green and uninterrupted wire • Isolation transformers and galvanic isolators are exception and covered in Chapter 4 on AC • Engine, DC negative & AC ground connected MElec-Ch 2 - 82

Bonding System • For lightning protection – More in Chapter 6 • All metal objects should be bonded – Keeps all metal at zero potential – Engine blocks – Battery negative terminals • Non-current carrying wire • Through-hull fittings – ABYC now recommends they be bonded – Electrically isolated from metal hull MElec-Ch 2 - 83

Bonding Diagram MElec-Ch 2 - 84

Wiring Diagrams • Elements of a Good Wiring Diagram – Documents boat’s electrical layout – Should be kept current – Used for troubleshooting • Component Identification – Physical objects to their symbol – Wires are color coded MElec-Ch 2 - 85
 Incandescent Light Wires crossing (but NOT connected)")
Wiring Diagram Symbols Wire (insulated, metal conductor) Incandescent Light Wires crossing (but NOT connected) Alternate symbol for Light Wires connected (at dots) Circuit Breaker Battery (long line on top is positive) Switch, single pole, single throw (SPST) Switch, single pole, double throw (SPDT) Switch, double pole, single throw (DPST) Fuse Ground Male Connector Female Connector MElec-Ch 2 - 86

Simple DC Wiring Diagram MElec-Ch 2 - 87

Summary • Circuits should be off when working on them • Use only marine grade properly sized wires – Tables will help determine proper wire size – Minimum wire size is #16 AWG • Use wire terminations and ratcheting crimper • DC circuits are 2 dedicated wires – Waterproof wire connection in bilge • AC circuits are 3 dedicated wires – GFCI in galley, head, machine spaces & weather deck • Separate Grounding & Bonding systems required • Keep wiring diagram current MElec-Ch 2 - 88

UNIT-IV ELECTRICAL LAMP CIRCUITS
 R Georg Simon Ohm (1787 -1854)")
Ohm’s Law I=V/R I V = Voltage (Volts) R Georg Simon Ohm (1787 -1854) = Current (Amperes) (amps) = Resistance (ohms)

Voltage: a force that pushes the current through the circuit (in this picture it would be equivalent to gravity)
")
Resistance: friction that impedes flow of current through the circuit (rocks in the river)

Current: the actual “substance” that is flowing through the wires of the circuit (electrons!)

Would This Work?

The Central Concept: Closed Circuit

circuit diagram Scientists usually draw electric circuits using symbols; cell lamp switch wires

Simple Circuits • Series circuit – All in a row – 1 path for electricity – 1 light goes out and the circuit is broken • Parallel circuit – Many paths for electricity – 1 light goes out and the others stay on

1 2

PARALLEL CIRCUIT • Place two bulbs in parallel. What do you notice about the brightness of the bulbs? • Add a third light bulb in the circuit. What do you notice about the brightness of the bulbs? • Remove the middle bulb from the circuit. What happened?
 using an ammeter connected in")
measuring current Electric current is measured in amps (A) using an ammeter connected in series in the circuit. A

measuring current This is how we draw an ammeter in a circuit. A A SERIES CIRCUIT PARALLEL CIRCUIT

measuring voltage The ‘electrical push’ which the cell gives to the current is called the voltage. It is measured in volts (V) on a voltmeter V

measuring voltage This is how we draw a voltmeter in a circuit. V SERIES CIRCUIT V PARALLEL CIRCUIT

The circuit is no longer complete, therefore current can not flow The voltage decreases because the current is decreased and the resistance increases.

The current remains the same. The total resistance drops in a parallel circuit as more bulbs are added The current increases.

Series and Parallel Circuits • Series Circuits – only one end of each component is connected – e. g. Christmas tree lights • Parallel Circuits – both ends of a component are connected – e. g. household lighting

measuring voltage Different cells produce different voltages. The bigger the voltage supplied by the cell, the bigger the current. Unlike an ammeter, a voltmeter is connected across the components Scientist usually use the term Potential Difference (pd) when they talk about voltage.

series circuit • voltage is shared between the components 3 V 1. 5 V

parallel circuit • voltage is the same in all parts of the circuit. 3 V 3 V 3 V
 •")
Voltage, Current, and Power • One Volt is a Joule per Coulomb (J/C) • One Amp of current is one Coulomb per second (6. 24 x 10^18 electrons/second). • If I have one volt (J/C) and one amp (C/s), then multiplying gives Joules per second (J/s) – this is power: J/s = Watts • So the formula for electrical power is just: P = VI: power = voltage current • More work is done per unit time the higher the voltage and/or the higher the current

UNIT-V GROUNDING SYSTEMS

The objective of a grounding system are: 1. To provide safety to personnel during normal and fault conditions by limiting step and touch potential. 2. To assure correct operation of electrical/electronic devices. 3. To prevent damage to electrical/electronic apparatus. 4. To dissipate lightning strokes. 5. To stabilize voltage during transient conditions and to minimize the probability of flashover during transients. 6. To divert stray RF energy from sensitive audio, video, control, and computer equipment.

A safe grounding design has two objectives: 1. To provide means to carry electric currents into the earth under normal and fault conditions without exceeding any operating and equipment limits or adversely affecting continuity of service. 2. To assure that a person in the vicinity of grounded facilities is not exposed to the danger of critical electric shock.

The PRIMARY goal of the grounding system throughout any facilities is SAFETY. Why ground at all? PERSONNEL SAFETY FIRST EQUIPMENT PROTECTION SECOND

What are three main types of grounding? The three main types are: • EQUIPMENT GROUNDING (SAFETY) • SYSTEM GROUNDING • LIGHTNING/SURGE GROUNDING

Earth / Ground Basics Types of Grounding Systems • Many different types available • Choice depends on local conditions and required function • Simplest form is a single stake • Mostly used for: – Lightning protection – Stand alone structures – Back-up for utility ground Ground rod

Earth / Ground Basics Types of Grounding Systems • ground rod group • typically for lightning protection on larger structures or protection around potential hotspots such as substations. Ground rod group

Earth / Ground Basics Types of Grounding Systems • For areas where there is rock (or other poor conducting material) fairly close to the surface ground plates are preferred as they are more effective Ground plate

Earth / Ground Basics Types of Grounding Systems • A ground mesh consists of network of bars connected together, this system is often used at larger sites such as electrical substations. Ground mesh

Soil Characteristics • Soil type. Soil resistivity varies widely depending on soil type, from as low as 1 Ohmmeter for moist loamy topsoil to almost 10, 000 Ohmmeters for surface limestone. • Moisture content is one of the controlling factors in earth resistance because electrical conduction in soil is essentially electrolytic.

 Clamp Test link Rod(Earthing electrode) Rod coupler")
Cable(Earthing conductor) Clamp Test link Rod(Earthing electrode) Rod coupler
 Light current 0. 5 -1")
Recommended values of earth resistance system Recommended earth resistance(ohm) Light current 0. 5 -1 Low voltage 5 Medium voltage 2. 5 High voltage 0. 5

Substation earthing system • Step & Touch voltage • Grounding grids

Step and touch voltages


Step potential • “Step potential” is the voltage between the feet of a person standing near an energized grounded object. • It is equal to the difference in voltage, given by the voltage distribution curve, between two points at different distances from the “electrode. ” • A person could be at risk of injury during a fault simply by standing near the grounding point.

Touch potential • “Touch potential” is the voltage between the energized object and the feet of a person in contact with the object. • It is equal to the difference in voltage between the energized object and a point some distance away. • The touch potential could be nearly the full voltage across the grounded object if that object is grounded at a point remote from the place where the person is in contact with it.
 Resistivity Measurement The purpose of resistivity measurements is to quantify")
Ground Testing Methods (1) Resistivity Measurement The purpose of resistivity measurements is to quantify the effectiveness of the earth where a grounding system will be installed. Differing earth materials will affect the effectiveness of the grounding system. The capability of different earth materials to conduct current can be quantified by the value E (resistivity in W. m). Resistivity measurements should be made prior to installing a grounding system, the values measured will have an effect on the design of the grounding system.
 Resistivity Measurement ( Wenner method) Resistivity measurements are performed by")
Ground Testing Methods (1) Resistivity Measurement ( Wenner method) Resistivity measurements are performed by using a four wire method Used to determine which KIND of earthing should be used, so BEFORE placing earth stakes
 Resistivity Measurement From the indicated resistance value RE, the soil")
Ground Testing Methods (1) Resistivity Measurement From the indicated resistance value RE, the soil resistivity is calculated according to the equation : E = 2 . a. RE E RE a . . . mean value of soil resistivity (W. m). . . measured resistance (W). . . probe distance (m)
 of a single rod, of")
Resistance of driven rods: • The Ground Resistance (R) of a single rod, of diameter (d) and driven length (i) driven vertically into the soil of resistivity (ρ), can be calculate as follows: where: ρ Soil Resistivity in m l Buried Length of the electrode in m d Diameter of the electrode in m The rod is assumed as carrying current uniformly along its rod. • Examples (a) 20 mm rod of 3 m length and Soil resistivity 50 Ω-m. . . R=16. 1 Ω (b) 25 mm rod of 2 m length and Soil resistivity 30 Ω-m. . . R=13. 0 Ω

• The resistance of a single rod is not sufficiently low. • A number of rods are connected in parallel. • They should be driven far apart as possible to minimize the overlap among their areas of influence. • It is necessary to determine the net reduction in the total resistance by connecting rods in parallel. • The rod is replaced by a hemispherical electrode having the same resistance.

Rod Electrodes in Parallel • If the desired ground resistance cannot be achieved with one ground electrode, the overall resistance can be reduced by connecting a number of electrodes in parallel. • These are called “arrays of rod electrodes”. • The combined resistance is a function of the number and configuration of electrodes, the separation between them, their dimensions and soil resistivity. • Rods in parallel should be spaced at least twice their length to utilize the full benefit of the additional rods.

• If the separation of the electrodes is much larger than their lengths and only a few electrodes are in parallel, then the resultant ground resistance can be calculated using the ordinary equation for resistances in parallel. • In practice, the effective ground resistance will usually be higher than this. • Typically, a 4 spike array may provide an improvement of about 2. 5 to 3 times. • An 8 spike array will typically give an improvement of may be 5 to 6 times.

Earth clamping 1 AT-090 H Earth clamping 2 AT-087 J AT-089 J AT-093 J

METHODS OF DECREASING GROUND RESISTANCE • Decreasing the ground resistance of a grounding system in high resistivity soil is often a formidable task. • Recently, some new methods have been proposed to decrease ground resistance.

1 -Chemical Rods • Chemical rods are electrodes with holes along their length, filled with mineral salts. • The specially formulated mineral salts are evenly distributed along the entire length of the electrode. • The rod absorbs moisture from both air and soil. • Continuous conditioning of a large area insures an ultra-low-resistance ground which is more effective than a conventional electrode.

• If the conductive salts are running low, the rod can be recharged with a refill kit. • These rods are available in vertical and horizontal configurations. • They may be used in rocky soils, freezing climates, dry deserts, or tropical rain forests. • They provide stable protection for many years.


Disadvantages are: • Chemicals concentrated around electrodes will cause corrosion • Chemicals leach through the soil and dissipate • Scheduled replacement may be required • May be prohibited because they may contaminate the water table

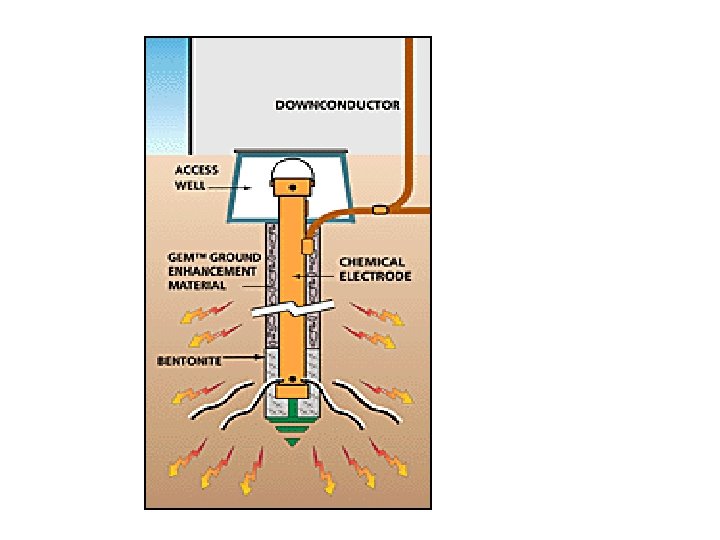
Soil Treatment Alternatives • Ground enhancement material Cement-like compound – Non-corrosive – Extremely conductive – Installed around the electrode – Easy installation – Permanent

• Installing an EARTHLINK 101 earthling strip is simple: Dig a trench and lay in the wire.

Pour EARTHLINK 101 conductive cement, using the handy applicator bag, and shovel in a thin protective layer of soil.

Backfill the remaining soil using a front-end loader and restore the surface to grade.

UNIT-VI INTERNAL WIRING

STAGES OF HOUSE WIRING • There are three stages for house wiring: –Underground stage –Rough stage –Electrical stage

• From the power company, we get: • two hot wires • one neutral wire. • The two major voltages available in our homes are: • 115 VAC • 230 VAC • Most of the receptacles in our homes are 115 VAC. • Washer, Dryer, Oven, etc. use the 230 VAC receptacle.

VOLTAGE RECEPTACLES 115 VAC 230 VAC Ground wire Neutral Hot Ground Hot wires
")
COLOR CODING OF WIRES AND SCREWS 115 VAC • Wires: – Hot (red/black wire) – Neutral (white wire) – Ground (bare copper wire) • Screws: – Brass (for hot wire) – Silver (for neutral wire) – Green with green dot (ground wire) 230 VAC • Wires: – Hot (red wire) – Hot (black wire) – Ground (bare copper wire) • Screws: – Brass (for hot wire) – Green with green dot (ground wire)

HOUSEHOLD WIRING FOR ROOMS: • For rooms: Within the first 6 ft of an entrance into a room, there should be an 120 volt receptacle outlet and then for every other 12 ft there should be an outlet. • For the kitchen: The outlets should be a minimum of 2 ft apart. • Receptacle connection: On the side of ground the 2 neutral wires are stripped ½ inch and pushed in the hole. Make sure to pull on it to check that it does not come out. Now strip the black wires ¼ inch, push them into the hole opposite of ground. 14 W gauge for bedrooms, hallways, living rooms, and all ceilings.

Duplex Receptacles: Some duplexes have 5 wires going into the receptacle, while others have 3 wires going into the receptacle. If a circuit is a feeder to the other circuits, then it has 5 wires: 2 neutral (white), 2 hot (black/red), 1 ground (bare copper wire). The 5 wires you see are actually power coming in and coming out. If it is the end of a circuit, then it has 3 wires: 1 neutral (white), 1 hot (black/red), 1 ground (bare copper wire) Every receptacle holds 15 Amperes of Current. Kitchen appliances have 20 Amperes of Current and Dryers have 30 Amperes of Current. Every wire has an adjacent screw

GFCI -GFCI: Stands for Ground Fault Circuit Interrupt. This receptacles is different from conventional receptacles. In the event of a ground fault, a GFCI will trip and quickly stop the flow of electricity to prevent serious injury. -For kitchens and bathrooms with sinks, GFI protection receptacles are required for anything between 6 ft from water. Make sure everything is grounded for safety purposes. -When does a ground fault occur? It occurs when electricity passes through a persons body to reach the ground instead of following its normal path. -GFCI receptacles protect against circuit overloads, short circuits, or shocks. -For GFCI’s, a 12 W gauge is required which is thicker than the 14 W gauge.

GFCI CONTINUED… • The GFCI receptacle itself has the Test and Reset buttons. The reciprocal feeling into the GFCI main no reciprocal has no Reset/Test buttons, but will indicate GFCI stickers on them. not GFCI
 or a 3 way (multiple locations) can")
DIMMER • A single pole (one location) or a 3 way (multiple locations) can be put only on the incandescent. • You will see 4 colored wires on the dimmer. Blue, yellow, black and green. Connecting wires for dimmer: • Green dimmer Ground leads to Green or copper wire in wall box. • Black dimmer lead to Line (hot) wall box wire removed from old switch. • Blue Dimmer lead to remaining wall box wire (Load) • Cap Yellow dimmer lead with appropriate size wire nut.

LAMPS • REGULAR MEDIUM BASE: used in regular fixtures • MOGUL BASE: is thicker and is used for street lights • CANDELABRA BASE: is smaller and is used in paddle/ceiling fan fixtures *On a ceiling fan which has lights, always use a A 15 lamp because the filament is thicker and it will last longer even though the fan causes vibration* *G-style lamps are used in bathrooms* *Fluorescent lamps are used under cabinets and countertops, and are available only up to a wattage of 32 Watts instead of 40 Watts*

Gang Box The Gang Box must be UL listed in approval for • electrical work. Deep Gang Boxes are maximum of 22. 5 cubic inches. • Inside the house : All gang boxes must be UL approved. • Outside the house the gangs used must be UL approved and suitable for dampness/wet conditions. • According to Title 24 everything in the home i. e. Bathroom, Kitchen, underneath the cabinets, laundry room, outside light should have incandescent lights.

Low Voltage Wires Red……Computer-CAT 5 White…. RG 6 -TV, SAT, DSL, Cameras Black…. . RG 6 -”” Blue……Phone-CAT 5 You can use red alone but to differentiate between computer wires and phone wires you use different colors.

High Voltage Wires • 14/ 2 - 15 A : is a 14 G wire black, white, and ground used for lighting wiring bedroom plug switches. anything rated up to 15 A. • 12/ 2 - 20 A : is a 12 G wire, black, white, ground, yellow wire for identification. • 12/ 3 - 20 A : is a 12 G wire black (hot) white (neutral), red (hot), and ground. In this there are 2 hot wires in one wire. If you have two circuits in the same area then you could use black for one circuit & jump the other circuits through red wires especially in General appliances.

High Voltage wires Continued • 10 Gauge/30 A: is Orange in color used for Dryers or Ovens if under 30 A. it is also used for Air conditioning if no more than 30 A is required • 8 Gauge/40/50 A: is a Black wire and is used in ovens that are over 30 A. • 6 Gauge/50/60 A: is used only in Air Conditioners and Ovens that have very high amperage

ROUGH STAGE §Low voltage enclosure: TV, Telephone, computers, cameras, speaker DVR, i. e. communication, run one main limit is 2 RG 6 (TV coax) cat 5 - phone line or computer line. When it says TV run 1 RG 6 i. e. Black wire. ……………. . Phone P…………………Plug TV………………. TV On/Q……………. All 4 wires drop (2 cat 5 and 2 RG 6) High Voltage……Stapled every 4 ft 6 in Low Voltage……. Not stapled tightly 1 RG 6……………TV Only 2 RG 6……………TV & DVR & HD

Rough Stage Continued… • RG 6 -Quad shield: a type of wire that helps to give a better signal, but not a better picture. (You could run High Definition signals like Comcast Internet Company with RG 6) • The wires going into every gang box should be stapled within 6 inches of the box, on the wood. • The wires going into Double or Triple boxes, should be 12 inches away from the box on the wood.
98abbaea07678ca5aba9f922cc4b92a2.ppt