946eb1aff8f71efa24259a6cfe32d8f8.ppt
- Количество слайдов: 35
 Surface Topography Characterisation Part III Industrial Center for Surface Microscopy, Microanalysis and Image Processing Center Contract with the Danish Agency for Trade and Industry, 1997 -2001 August 1999 Copyright, 1999 © Danish Technological Institute. Centre for Surface Analysis
 Table of Contents Instrumentation Scanning stylus instrument Interference microscope Atomic force microscope Traceability - Standardisation - Variability Factorial design Discriminant analysis Calibration standards Instrumental uncertainty Software verification Calibration of lateral axes Calibration of vertical axes Accuracy evaluation Assessment of measurement uncertainty Calibration certificate Bibliography Centre for Surface Analysis
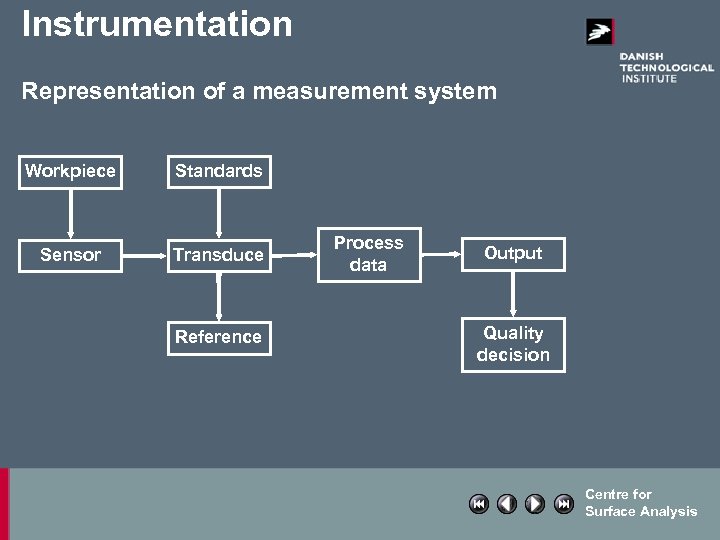 Instrumentation Representation of a measurement system Workpiece Standards Sensor Transduce r Reference Process data Output Quality decision Centre for Surface Analysis
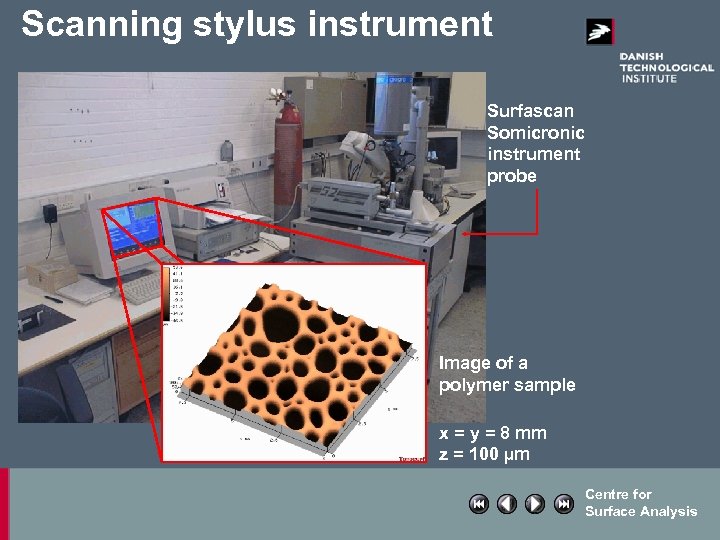 Scanning stylus instrument Surfascan Somicronic instrument probe Image of a polymer sample x = y = 8 mm z = 100 µm Centre for Surface Analysis
 Scanning stylus instrument • Surfascan equipment is a stylus instrument with a motorised, computer controlled x-y scanning stage. Allows simultaneous form and surface texture measurements in 2 D or 3 D. • Stylus instruments: a diamond tip (sensor), translating at constant speed along a direction which is parallel to the mean surface plane, follows the local relief of the surface. • Sensor signal is changed into an analogue signal which is in direct proportion to the surface height: Z = f(x). Centre for Surface Analysis
 Scanning stylus instrument Instrument characteristics: • Tip cone radius • • • : 2 or 10 µm Lateral resolution : Variable, from 4. 0 µm to 352. 0 µm Vertical resolution : 4 nm Working z range : Up to 4000 µm Scan area : Variable, 0. 1*0. 1 mm 2 to 16*100 mm 2 Measurement time : From 4 minutes to 42 hours Maximum workpiece weight: 3 Kg Uncertainty on average parameters: 0. 01 µm Uncertainty on height parameters: 0. 05 µm Reference surface straightness: 0. 2µm/20 mm and 0. 4µm/50 mm Drive unit mounted on antivibration pads Transducer response curve linearised by a laser interferometer Automatic calibration process using a reference sphere Centre for Surface Analysis
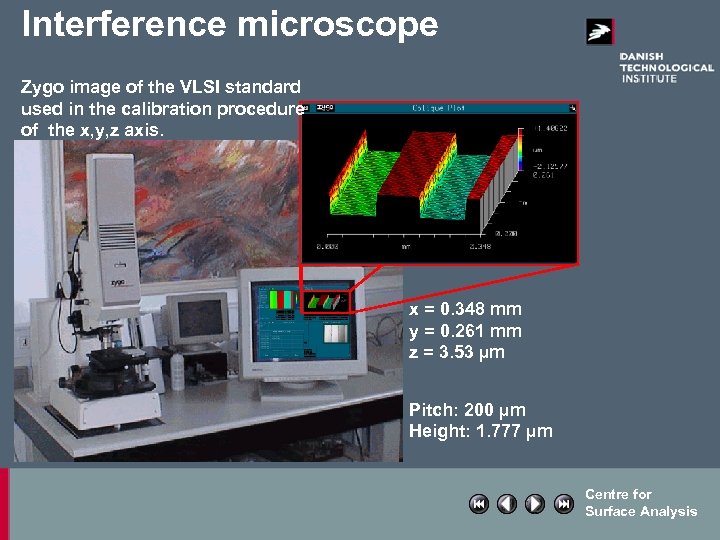 Interference microscope Zygo image of the VLSI standard used in the calibration procedure of the x, y, z axis. x = 0. 348 mm y = 0. 261 mm z = 3. 53 µm Pitch: 200 µm Height: 1. 777 µm Centre for Surface Analysis
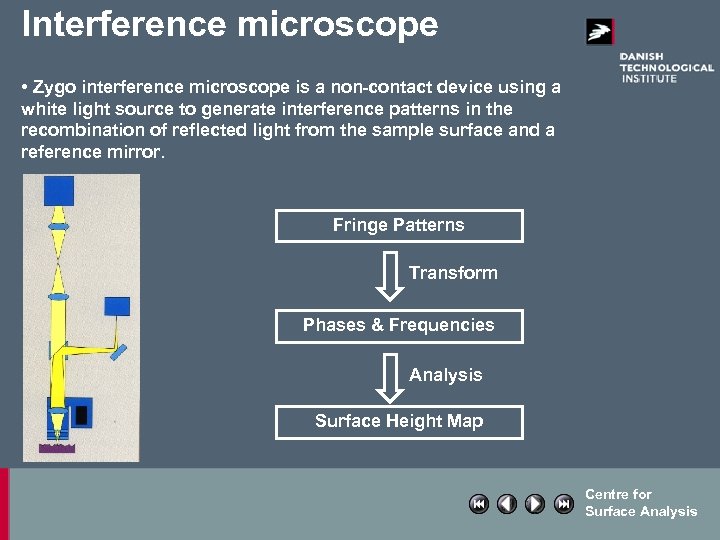 Interference microscope • Zygo interference microscope is a non-contact device using a white light source to generate interference patterns in the recombination of reflected light from the sample surface and a reference mirror. Fringe Patterns Transform Phases & Frequencies Analysis Surface Height Map Centre for Surface Analysis
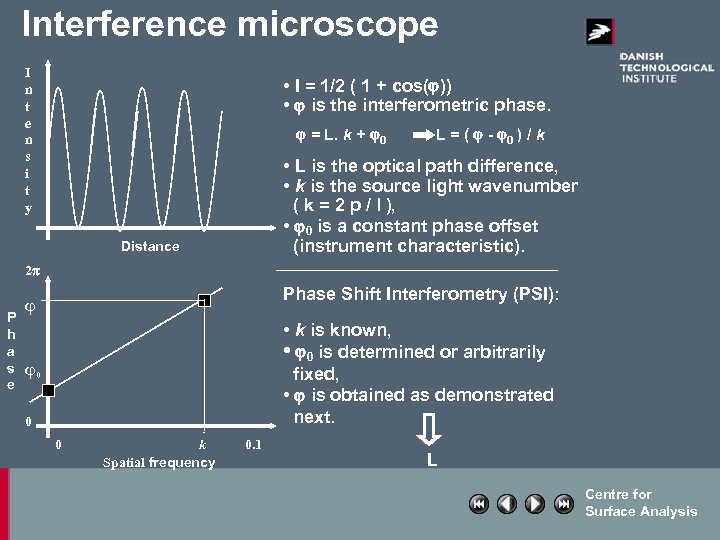 Interference microscope I n t e n s i t y • I = 1/2 ( 1 + cos( )) • is the interferometric phase. = L. k + 0 L = ( - 0 ) / k • L is the optical path difference, • k is the source light wavenumber ( k = 2 p / l ), • 0 is a constant phase offset (instrument characteristic). Distance 2 p P h a s e Phase Shift Interferometry (PSI): • k is known, • 0 is determined or arbitrarily fixed, • is obtained as demonstrated next. 0 0 0 k Spatial frequency 0. 1 L Centre for Surface Analysis
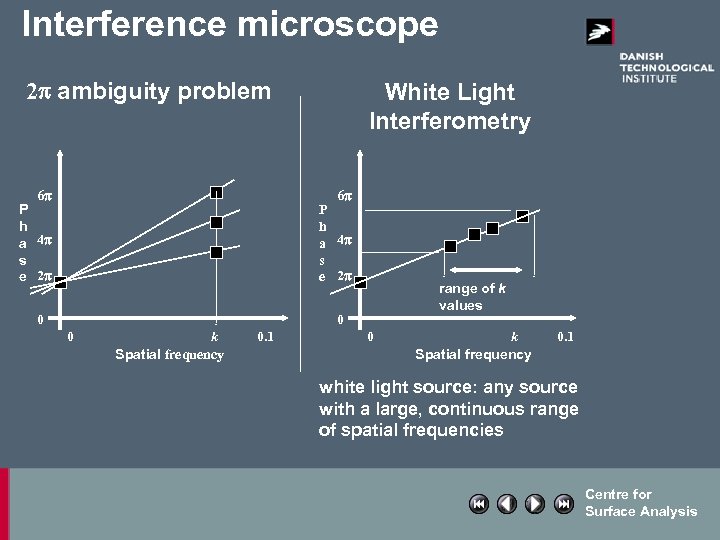 Interference microscope 2 p ambiguity problem 6 p P h a 4 p s e 2 p White Light Interferometry 6 p P h a 4 p s e 2 p 0 range of k values 0 0 k Spatial frequency 0. 1 white light source: any source with a large, continuous range of spatial frequencies Centre for Surface Analysis
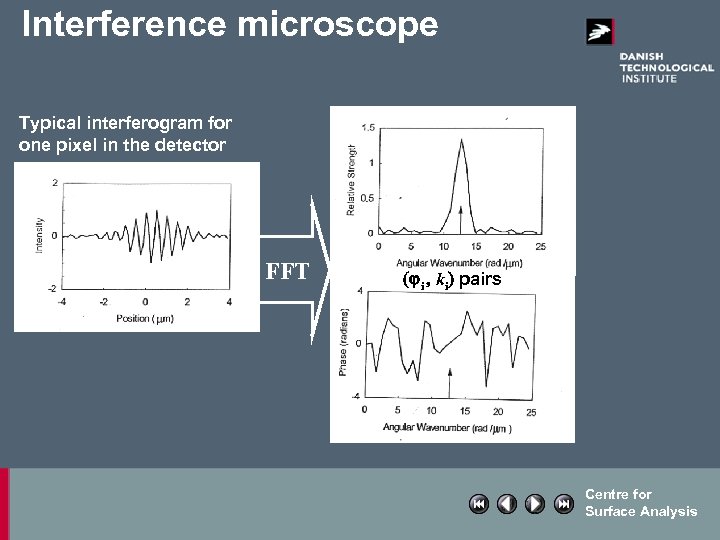 Interference microscope Typical interferogram for one pixel in the detector array. FFT ( i , ki) pairs Centre for Surface Analysis
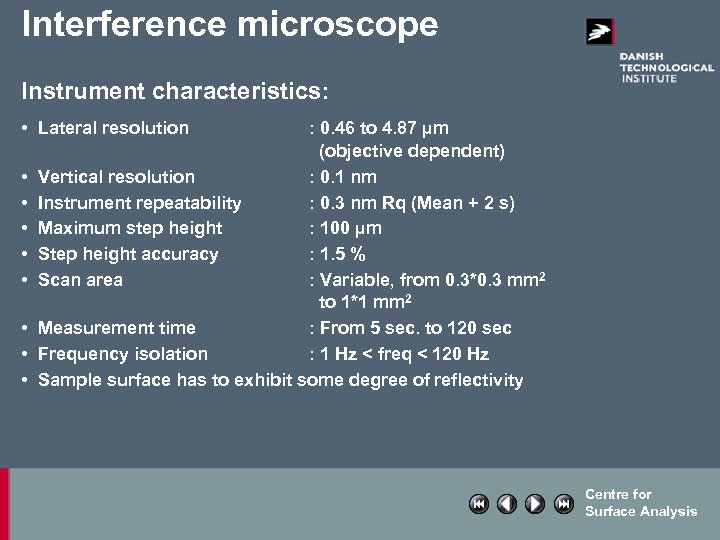 Interference microscope Instrument characteristics: • Lateral resolution • • : 0. 46 to 4. 87 µm (objective dependent) Vertical resolution : 0. 1 nm Instrument repeatability : 0. 3 nm Rq (Mean + 2 s) Maximum step height : 100 µm Step height accuracy : 1. 5 % Scan area : Variable, from 0. 3*0. 3 mm 2 to 1*1 mm 2 Measurement time : From 5 sec. to 120 sec Frequency isolation : 1 Hz < freq < 120 Hz Sample surface has to exhibit some degree of reflectivity Centre for Surface Analysis
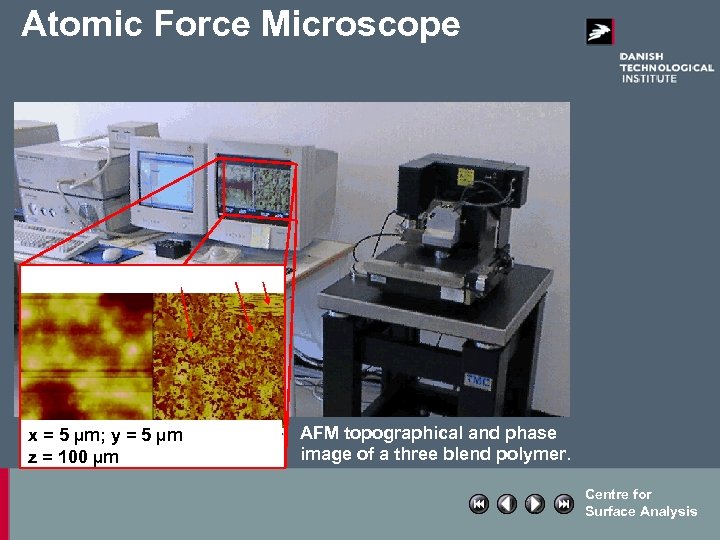 Atomic Force Microscope 1 x = 5 µm; y = 5 µm z = 100 µm 2 3 AFM topographical and phase image of a three blend polymer. Centre for Surface Analysis
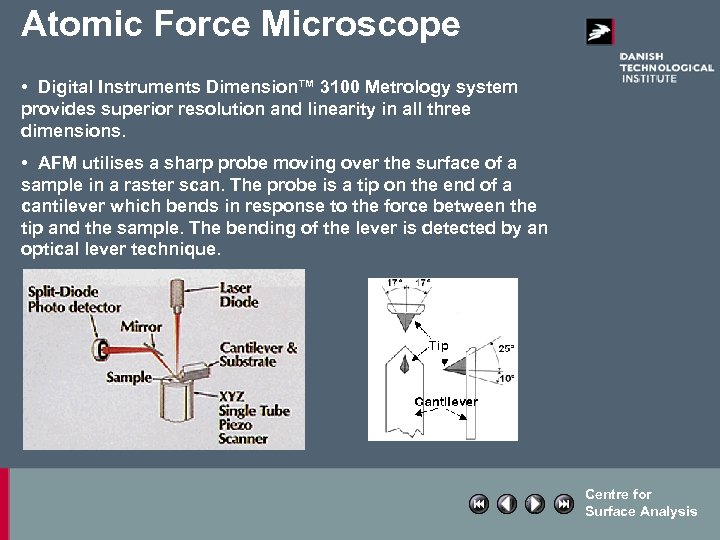 Atomic Force Microscope • Digital Instruments Dimension™ 3100 Metrology system provides superior resolution and linearity in all three dimensions. • AFM utilises a sharp probe moving over the surface of a sample in a raster scan. The probe is a tip on the end of a cantilever which bends in response to the force between the tip and the sample. The bending of the lever is detected by an optical lever technique. Centre for Surface Analysis
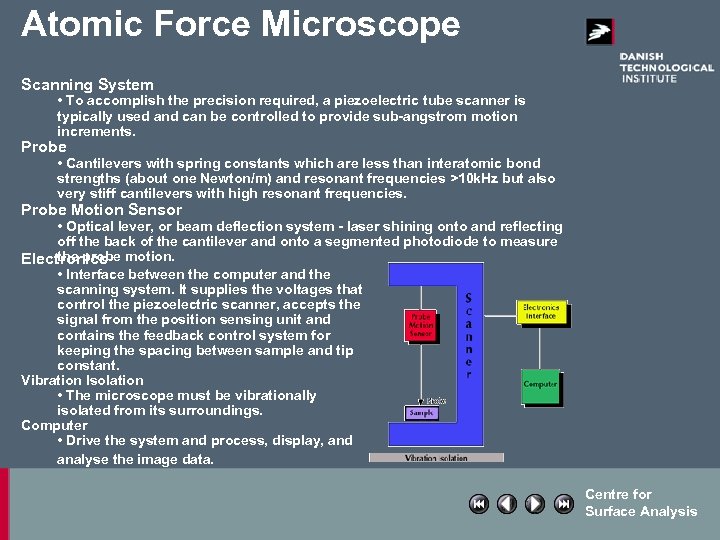 Atomic Force Microscope Scanning System • To accomplish the precision required, a piezoelectric tube scanner is typically used and can be controlled to provide sub-angstrom motion increments. Probe • Cantilevers with spring constants which are less than interatomic bond strengths (about one Newton/m) and resonant frequencies >10 k. Hz but also very stiff cantilevers with high resonant frequencies. Probe Motion Sensor • Optical lever, or beam deflection system - laser shining onto and reflecting off the back of the cantilever and onto a segmented photodiode to measure the probe Electronics motion. • Interface between the computer and the scanning system. It supplies the voltages that control the piezoelectric scanner, accepts the signal from the position sensing unit and contains the feedback control system for keeping the spacing between sample and tip constant. Vibration Isolation • The microscope must be vibrationally isolated from its surroundings. Computer • Drive the system and process, display, and analyse the image data. Centre for Surface Analysis
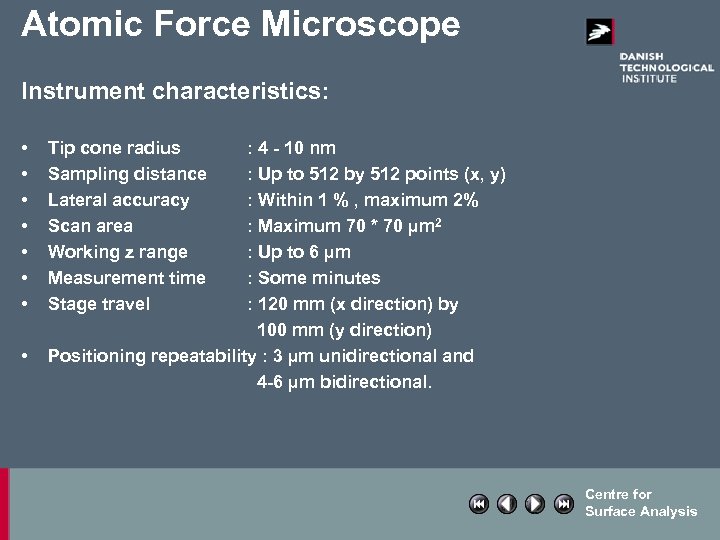 Atomic Force Microscope Instrument characteristics: • • Tip cone radius Sampling distance Lateral accuracy Scan area Working z range Measurement time Stage travel : 4 - 10 nm : Up to 512 by 512 points (x, y) : Within 1 % , maximum 2% : Maximum 70 * 70 µm 2 : Up to 6 µm : Some minutes : 120 mm (x direction) by 100 mm (y direction) Positioning repeatability : 3 µm unidirectional and 4 -6 µm bidirectional. Centre for Surface Analysis
 Traceability - Standardisation Variability • Metrology is concerned with identifying and controlling errors and with putting confidence limits to measured values. 2 basic aspects to be considered in surface metrology: - errors in the parameters due to the measuring instrument. - intrinsic variability of parameters due to the surface itself. • Nature of the errors: Systematic or Random - Systematic errors (bias): caused by imperfect devices or measurement procedures and also by the use of false standards. (included are biased people and the environment) - Random errors (scatter of readings): caused by nonconstant sources of error either in time or in space. Cannot be eliminated, but can be minimised by averaging techniques. Centre for Surface Analysis
 Traceability - Standardisation Variability Statistical tests for surface metrology • Measurement of relevance - factorial design • Discriminant analysis Centre for Surface Analysis
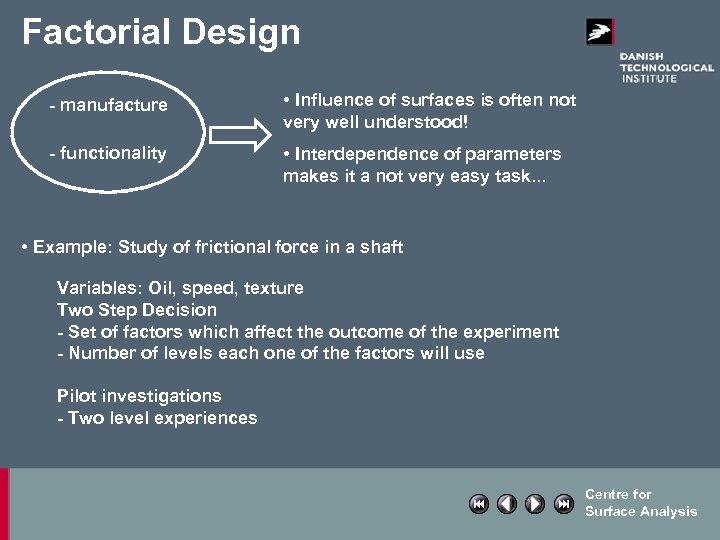 Factorial Design - manufacture • Influence of surfaces is often not very well understood! - functionality • Interdependence of parameters makes it a not very easy task. . . • Example: Study of frictional force in a shaft Variables: Oil, speed, texture Two Step Decision - Set of factors which affect the outcome of the experiment - Number of levels each one of the factors will use Pilot investigations - Two level experiences Centre for Surface Analysis
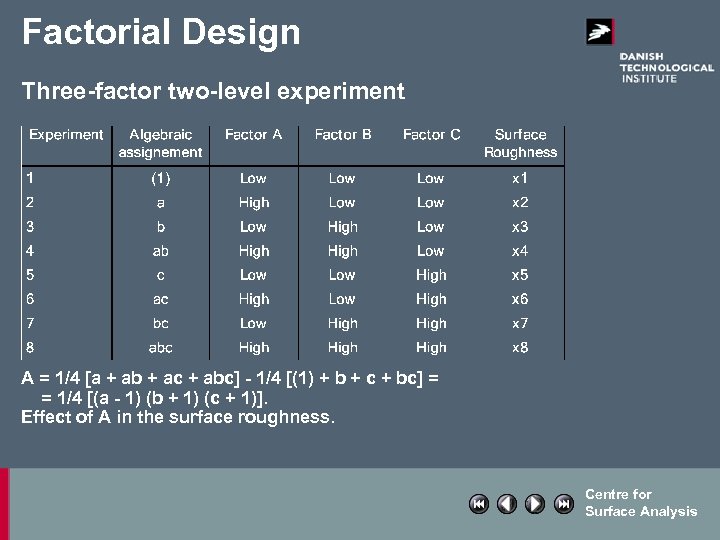 Factorial Design Three-factor two-level experiment A = 1/4 [a + ab + ac + abc] - 1/4 [(1) + b + c + bc] = = 1/4 [(a - 1) (b + 1) (c + 1)]. Effect of A in the surface roughness. Centre for Surface Analysis
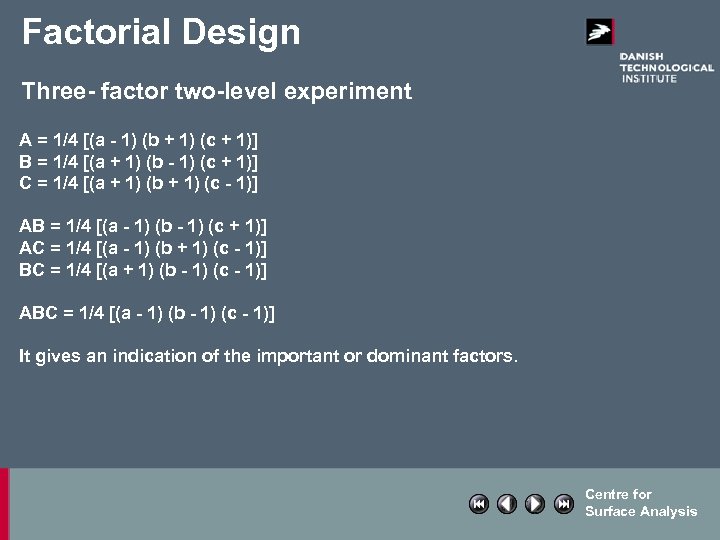 Factorial Design Three- factor two-level experiment A = 1/4 [(a - 1) (b + 1) (c + 1)] B = 1/4 [(a + 1) (b - 1) (c + 1)] C = 1/4 [(a + 1) (b + 1) (c - 1)] AB = 1/4 [(a - 1) (b - 1) (c + 1)] AC = 1/4 [(a - 1) (b + 1) (c - 1)] BC = 1/4 [(a + 1) (b - 1) (c - 1)] ABC = 1/4 [(a - 1) (b - 1) (c - 1)] It gives an indication of the important or dominant factors. Centre for Surface Analysis
 Factorial Design Measurement of relevance - factorial design • To be sure that the dominant factor is really the one found by the factorial design experiment it is useful to do more than one set of experiments. • The significance of the results obtained will be then tested using the t-test: process is called replication. • The difference between each set of experiments is carried out to see if the difference is significant. If it is, either the experiments have been badly performed or there is another factor which is present but has not been identified. Centre for Surface Analysis
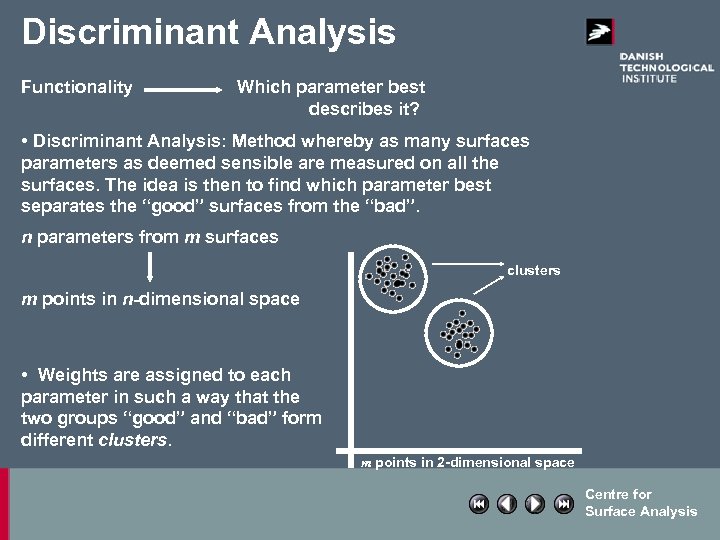 Discriminant Analysis Functionality Which parameter best describes it? • Discriminant Analysis: Method whereby as many surfaces parameters as deemed sensible are measured on all the surfaces. The idea is then to find which parameter best separates the “good” surfaces from the “bad”. n parameters from m surfaces clusters m points in n-dimensional space • Weights are assigned to each parameter in such a way that the two groups “good” and “bad” form different clusters. m points in 2 -dimensional space Centre for Surface Analysis
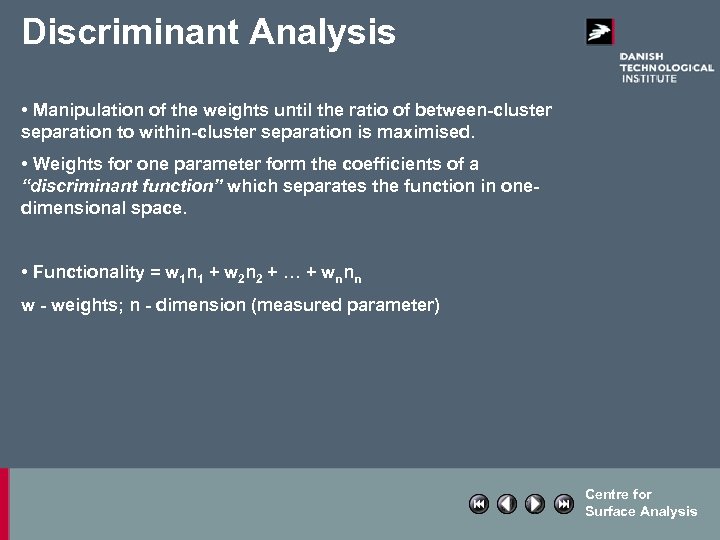 Discriminant Analysis • Manipulation of the weights until the ratio of between-cluster separation to within-cluster separation is maximised. • Weights for one parameter form the coefficients of a “discriminant function” which separates the function in onedimensional space. • Functionality = w 1 n 1 + w 2 n 2 + … + wnnn w - weights; n - dimension (measured parameter) Centre for Surface Analysis
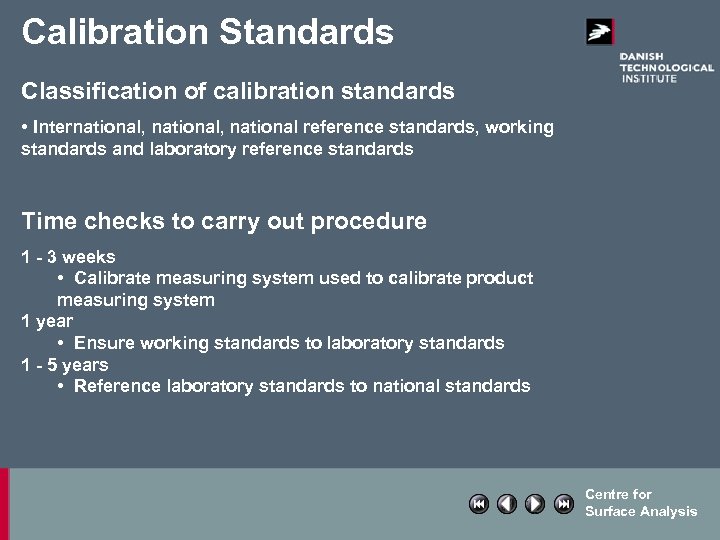 Calibration Standards Classification of calibration standards • International, national reference standards, working standards and laboratory reference standards Time checks to carry out procedure 1 - 3 weeks • Calibrate measuring system used to calibrate product measuring system 1 year • Ensure working standards to laboratory standards 1 - 5 years • Reference laboratory standards to national standards Centre for Surface Analysis
 Instrumental Uncertainty General Calibration Any surface metrology parameter assessment involves: • Recognition of the nature of the signal • Acceptance of measurements based on various approximations to the true surface • Acceptance of a sampling procedure • An appreciation of the nature of the parameters employed and the methods and instruments for carrying them into effect • The establishment of calibrating procedures and tests for accuracy Centre for Surface Analysis
 Instrumental Uncertainty General Calibration Holistic approach to calibration: i) software validation ii) calibration of translational tables iii) calibration of probe output (step height / sphere / hemisphere) Parametric calibration: Instrument assessment procedures that rely on the measurements of the surface parameter of a calibration specimen (periodic specimens and random specimens) and its comparison with some established value. Holistic approach should be preferred to the parametric calibration. Centre for Surface Analysis
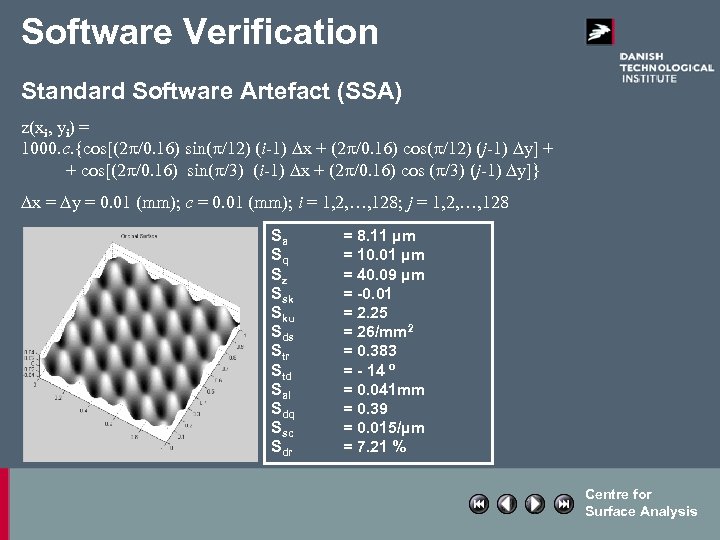 Software Verification Standard Software Artefact (SSA) z(xi, yi) = 1000. c. {cos[(2 p/0. 16) sin(p/12) (i-1) Dx + (2 p/0. 16) cos(p/12) (j-1) Dy] + + cos[(2 p/0. 16) sin(p/3) (i-1) Dx + (2 p/0. 16) cos (p/3) (j-1) Dy]} Dx = Dy = 0. 01 (mm); c = 0. 01 (mm); i = 1, 2, …, 128; j = 1, 2, …, 128 Sa Sq Sz Ssk Sku Sds Str Std Sal Sdq Ssc Sdr = 8. 11 µm = 10. 01 µm = 40. 09 µm = -0. 01 = 2. 25 = 26/mm 2 = 0. 383 = - 14 º = 0. 041 mm = 0. 39 = 0. 015/µm = 7. 21 % Centre for Surface Analysis
 Calibration of lateral axes Important translational table parameters • • Straightness Positioning accuracy Repeatability of positioning Yaw Pitch Roll Table velocity (absolute speed and stability) Backlash Centre for Surface Analysis
 Calibration of vertical axes Factors in the calibration of sensor output Linearity, Hysteresis, Frequency response, Sensitivity assumed to stay constant during normal working life of instrument. To allow valid measurements and intercomparison between instruments it is necessary to define or calibrate: • • • Probe tip dimension Mechanical probe loading Reference datum Logging conditions (number of data points, cut-off, etc) Profile digitisation (system resolution - number of bits) Vertical magnification Centre for Surface Analysis
 Calibration of vertical axes Stylus tip measurement • Apex angle • Stylus radius (substitute parameter: stylus width) Assessment of stylus tip conditions • V-shaped grooved specimens (measured using two different stylus) Calibration of vertical magnification • By calibrated step height • By calibrated sphere or hemisphere Centre for Surface Analysis
 Basic components of accuracy evaluation Factors affecting: • the calibration standard traceability - interchangeability, geometric compatibility, thermal properties, stability, elastic properties, position of use • the workpiece geometric truth, surface texture, elastic properties, cleanliness, thermal effects, definition of what is to be measured • the instrument amplification check, inter-range switching, filters, effects of friction, backlash, contact of workpiece, slideways, readability • the person training, skill, sense of precision, cost appreciation, hygiene • the environment thermal (20°C), sunlight, draughts, manual handling, cleanliness, adequate lighting Centre for Surface Analysis
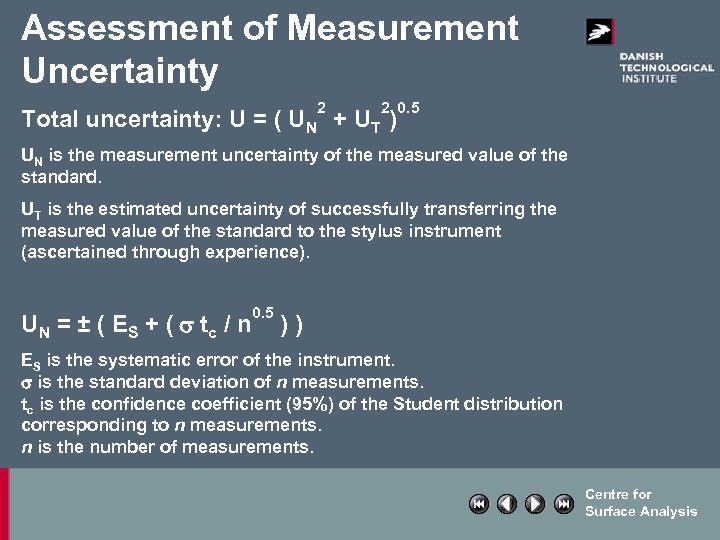 Assessment of Measurement Uncertainty 2 2 0. 5 Total uncertainty: U = ( UN + UT ) UN is the measurement uncertainty of the measured value of the standard. UT is the estimated uncertainty of successfully transferring the measured value of the standard to the stylus instrument (ascertained through experience). U N = ± ( E S + ( s tc / n 0. 5 )) ES is the systematic error of the instrument. s is the standard deviation of n measurements. tc is the confidence coefficient (95%) of the Student distribution corresponding to n measurements. n is the number of measurements. Centre for Surface Analysis
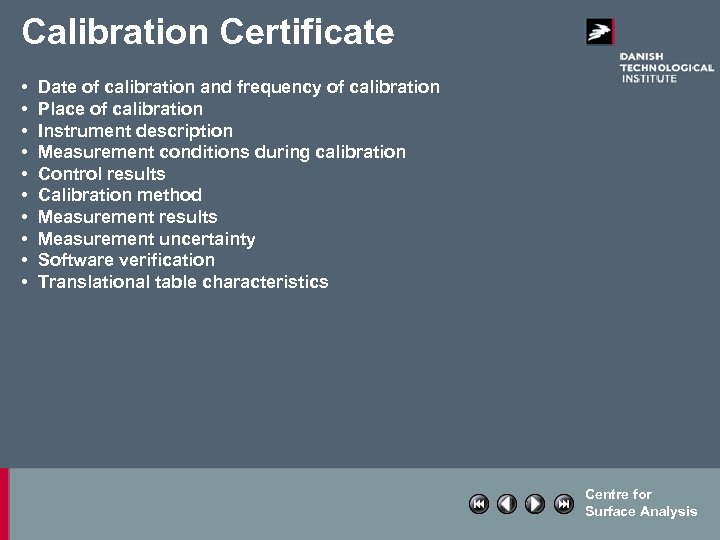 Calibration Certificate • • • Date of calibration and frequency of calibration Place of calibration Instrument description Measurement conditions during calibration Control results Calibration method Measurement results Measurement uncertainty Software verification Translational table characteristics Centre for Surface Analysis
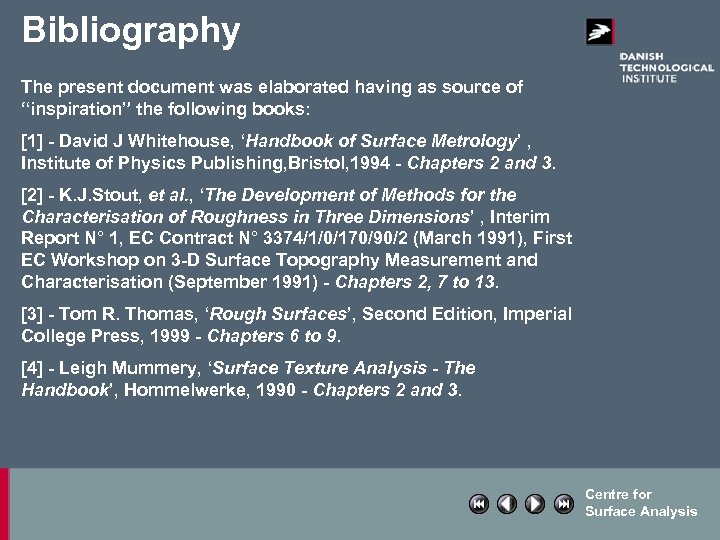 Bibliography The present document was elaborated having as source of “inspiration” the following books: [1] - David J Whitehouse, ‘Handbook of Surface Metrology’ , Institute of Physics Publishing, Bristol, 1994 - Chapters 2 and 3. [2] - K. J. Stout, et al. , ‘The Development of Methods for the Characterisation of Roughness in Three Dimensions’ , Interim Report N° 1, EC Contract N° 3374/1/0/170/90/2 (March 1991), First EC Workshop on 3 -D Surface Topography Measurement and Characterisation (September 1991) - Chapters 2, 7 to 13. [3] - Tom R. Thomas, ‘Rough Surfaces’, Second Edition, Imperial College Press, 1999 - Chapters 6 to 9. [4] - Leigh Mummery, ‘Surface Texture Analysis - The Handbook’, Hommelwerke, 1990 - Chapters 2 and 3. Centre for Surface Analysis


