Lecture 2_Sections.pptx
- Количество слайдов: 36
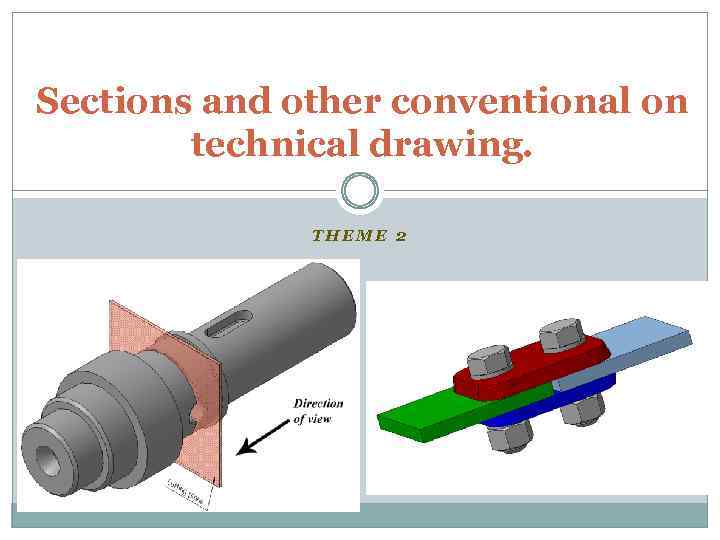 Sections and other conventional on technical drawing. THEME 2
 Sectioning is the process of imaginary cutting of an object to expose the interior or to reveal elements and their shape and sizes Sections are the result of that object cutting, and it is a view in which all or a substantial portion of the view is sectioned. Sectioning is the method when we can obtain the necessary information about sizes and shapes of the object elements using minimum projection views.
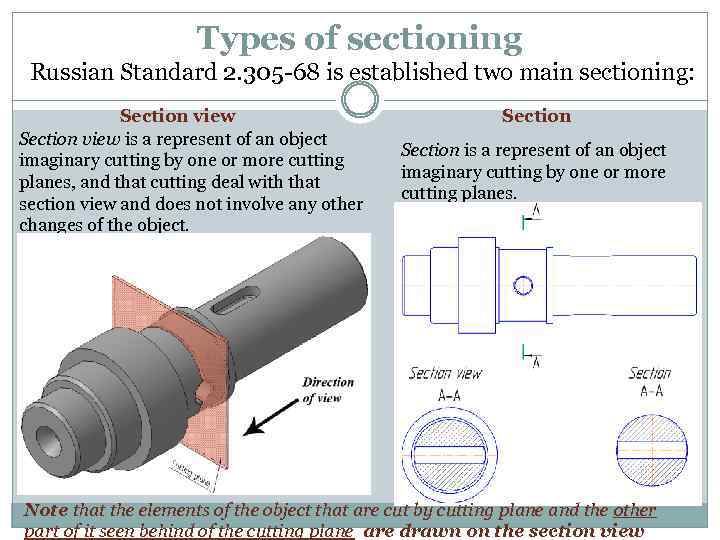 Types of sectioning Russian Standard 2. 305 -68 is established two main sectioning: Section view is a represent of an object imaginary cutting by one or more cutting planes, and that cutting deal with that section view and does not involve any other changes of the object. Section is a represent of an object imaginary cutting by one or more cutting planes. Note that the elements of the object that are cut by cutting plane and the other part of it seen behind of the cutting plane are drawn on the section view
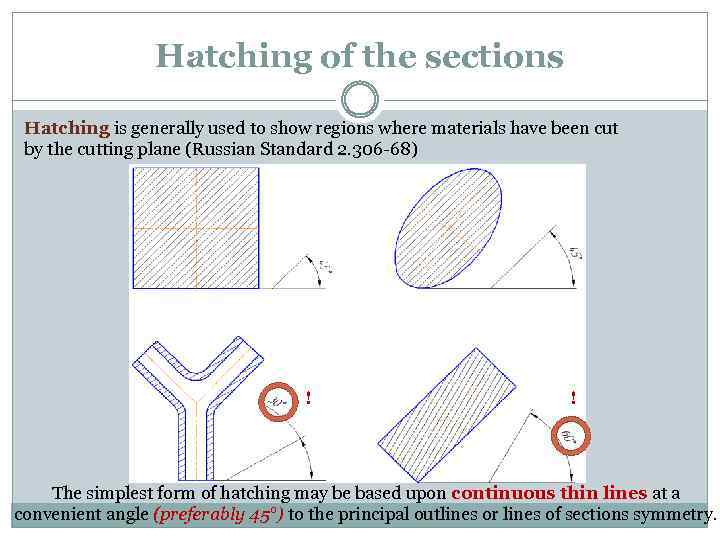 Hatching of the sections Hatching is generally used to show regions where materials have been cut by the cutting plane (Russian Standard 2. 306 -68) ! ! The simplest form of hatching may be based upon continuous thin lines at a convenient angle (preferably 45°) to the principal outlines or lines of sections symmetry.
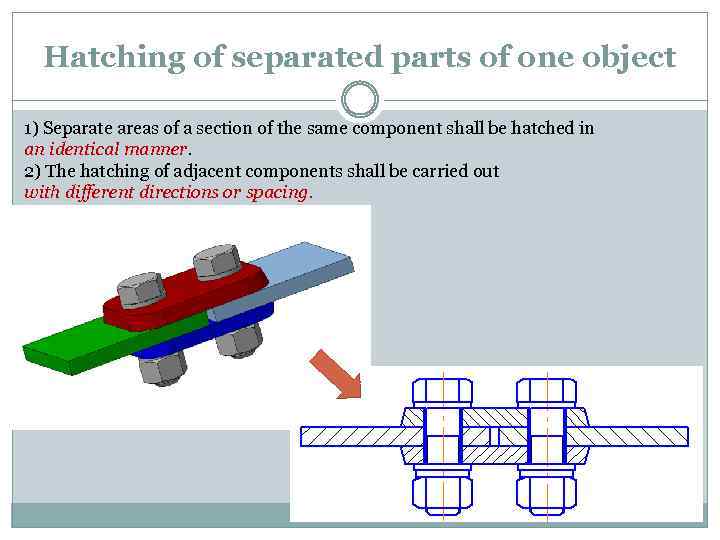 Hatching of separated parts of one object 1) Separate areas of a section of the same component shall be hatched in an identical manner. 2) The hatching of adjacent components shall be carried out with different directions or spacing.
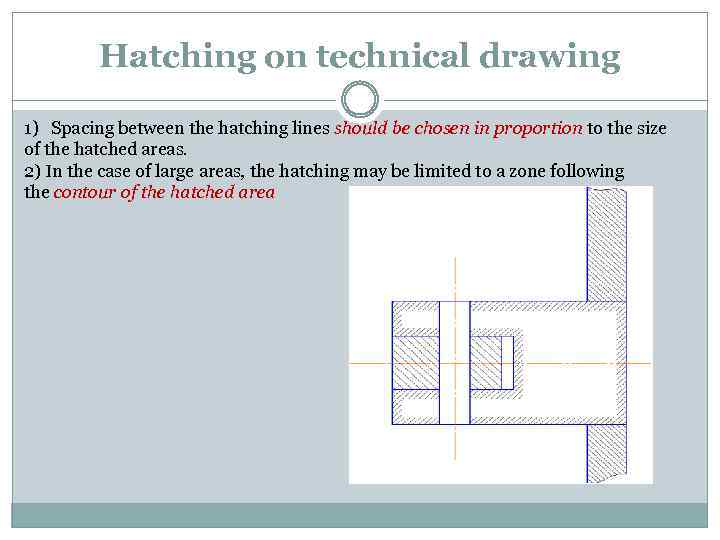 Hatching on technical drawing 1) Spacing between the hatching lines should be chosen in proportion to the size of the hatched areas. 2) In the case of large areas, the hatching may be limited to a zone following the contour of the hatched area
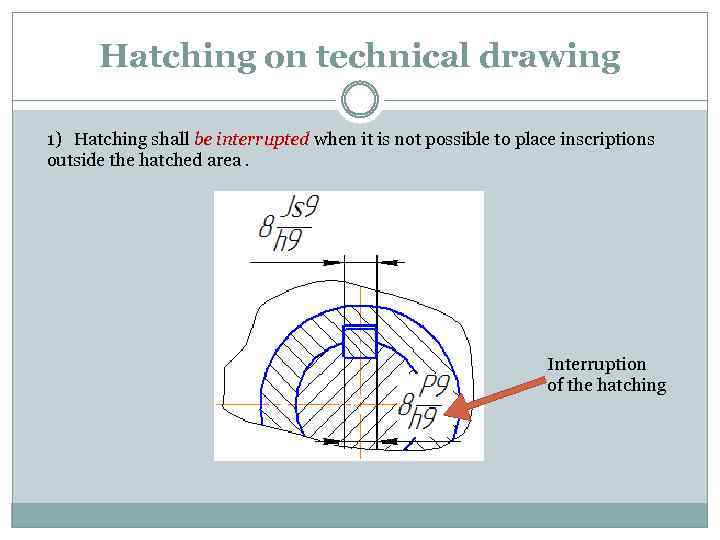 Hatching on technical drawing 1) Hatching shall be interrupted when it is not possible to place inscriptions outside the hatched area. Interruption of the hatching
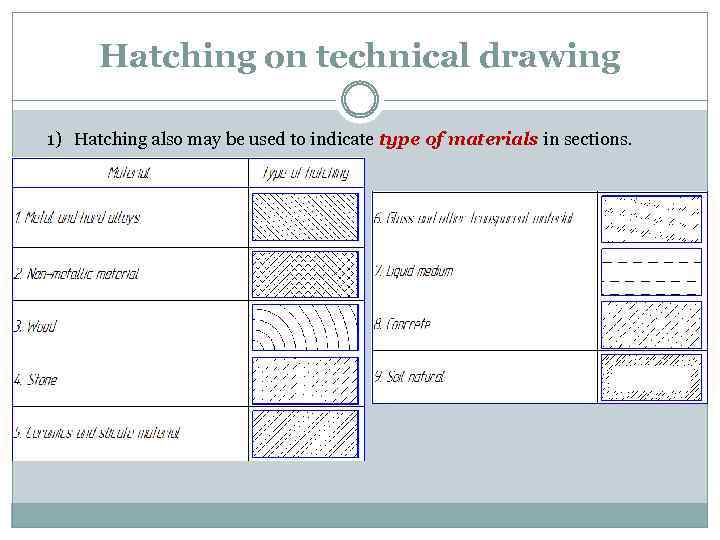 Hatching on technical drawing 1) Hatching also may be used to indicate type of materials in sections.
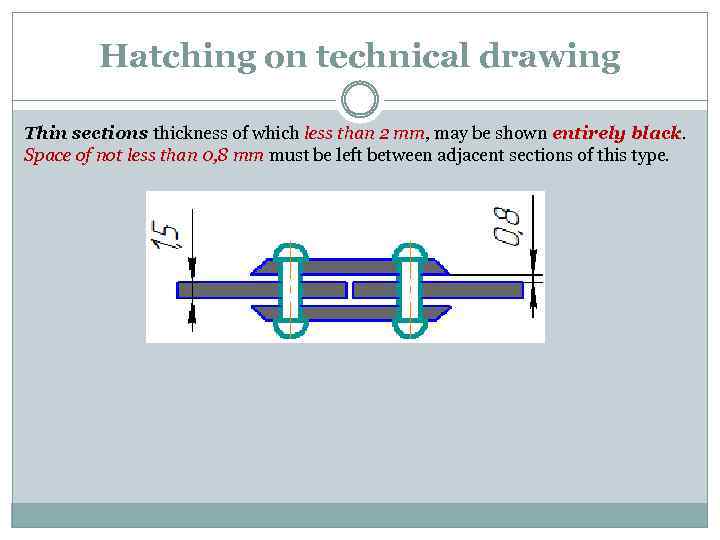 Hatching on technical drawing Thin sections thickness of which less than 2 mm, may be shown entirely black. Space of not less than 0, 8 mm must be left between adjacent sections of this type.
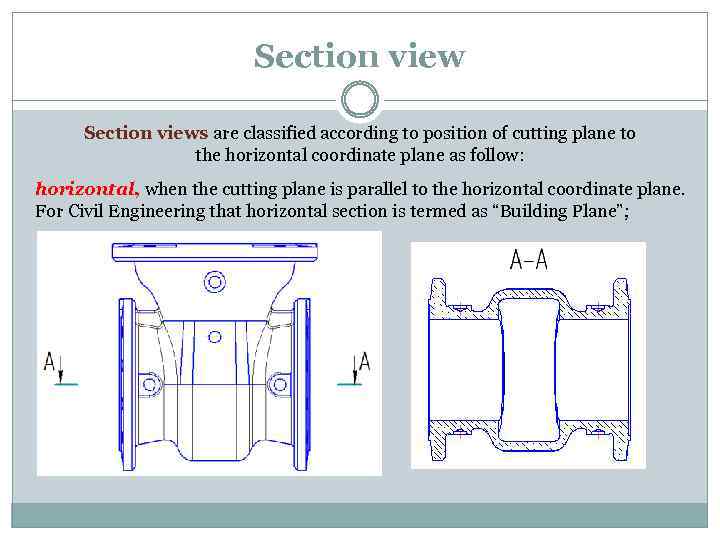 Section views are classified according to position of cutting plane to the horizontal coordinate plane as follow: horizontal, when the cutting plane is parallel to the horizontal coordinate plane. For Civil Engineering that horizontal section is termed as “Building Plane”;
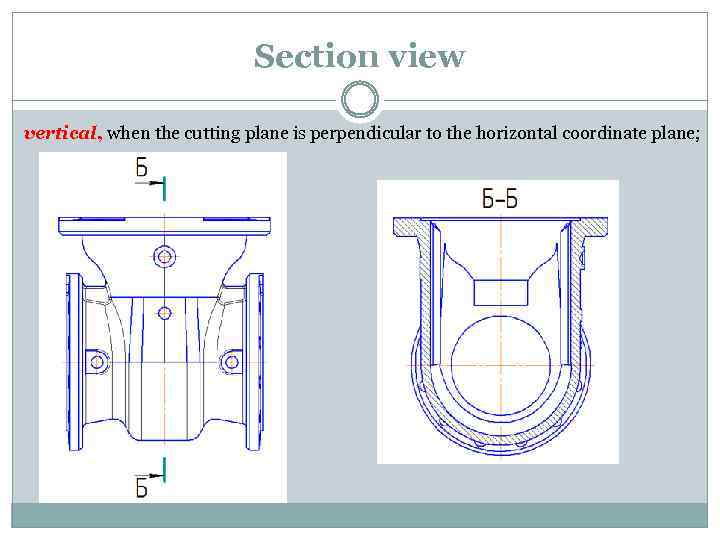 Section view vertical, when the cutting plane is perpendicular to the horizontal coordinate plane;
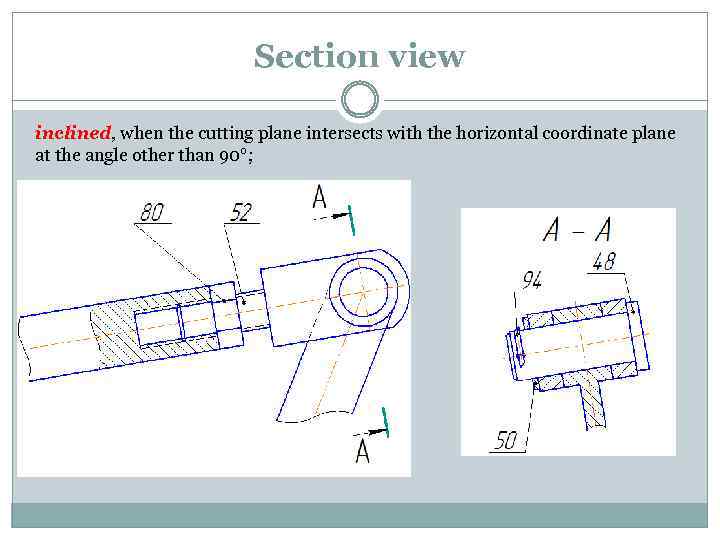 Section view inclined, when the cutting plane intersects with the horizontal coordinate plane at the angle other than 90°;
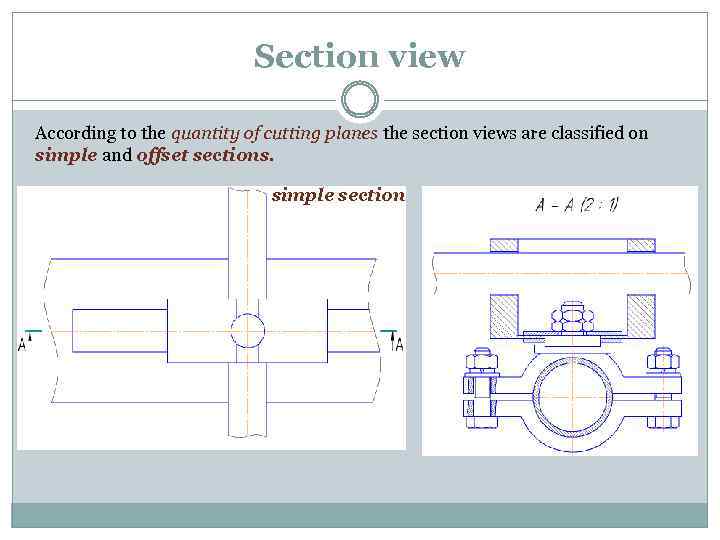 Section view According to the quantity of cutting planes the section views are classified on simple and offset sections. simple section
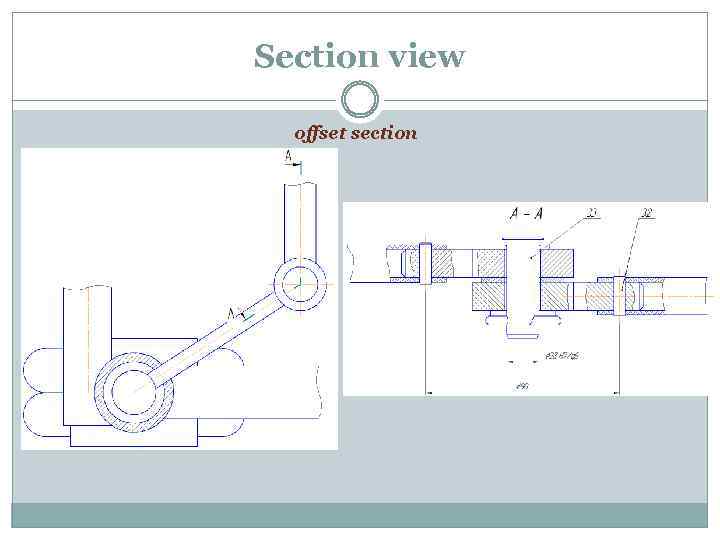 Section view offset section
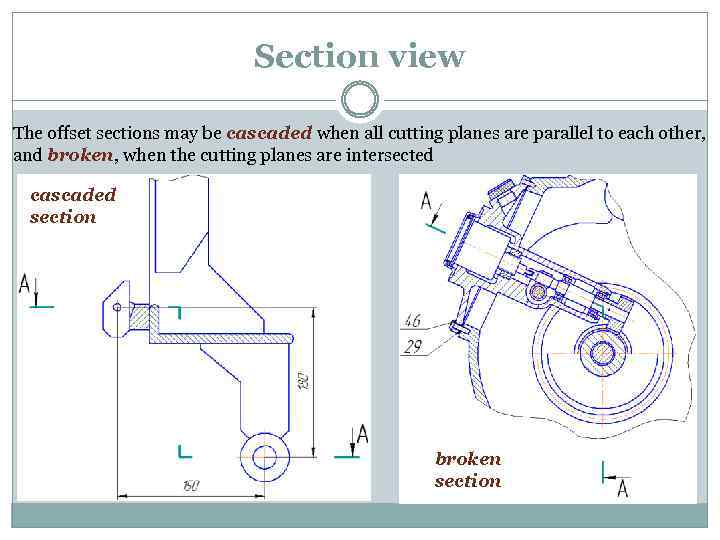 Section view The offset sections may be cascaded when all cutting planes are parallel to each other, and broken, when the cutting planes are intersected cascaded section broken section
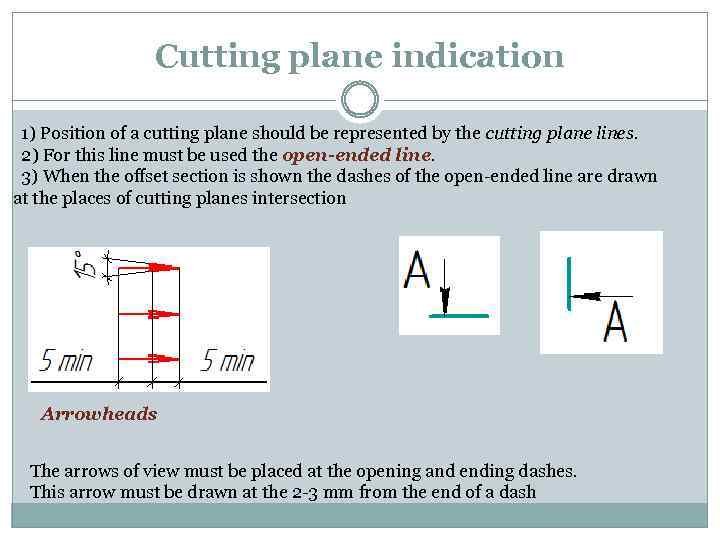 Cutting plane indication 1) Position of a cutting plane should be represented by the cutting plane lines. 2) For this line must be used the open-ended line. 3) When the offset section is shown the dashes of the open-ended line are drawn at the places of cutting planes intersection Arrowheads The arrows of view must be placed at the opening and ending dashes. This arrow must be drawn at the 2 -3 mm from the end of a dash
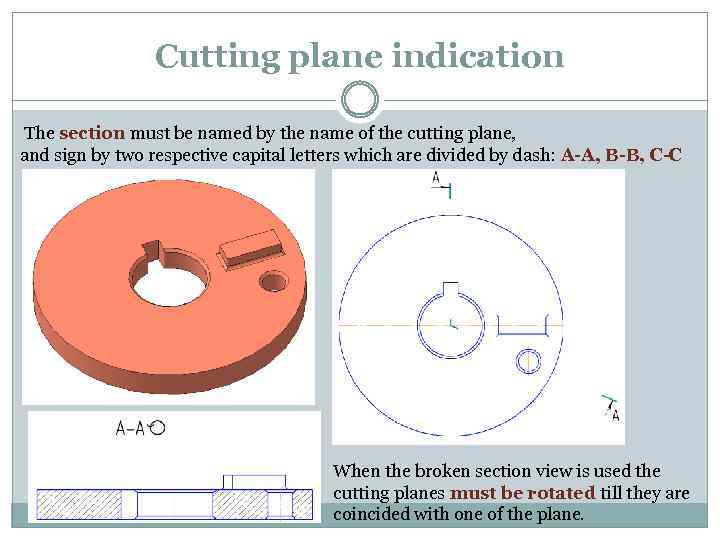 Cutting plane indication The section must be named by the name of the cutting plane, and sign by two respective capital letters which are divided by dash: A-A, B-B, C-C When the broken section view is used the cutting planes must be rotated till they are coincided with one of the plane.
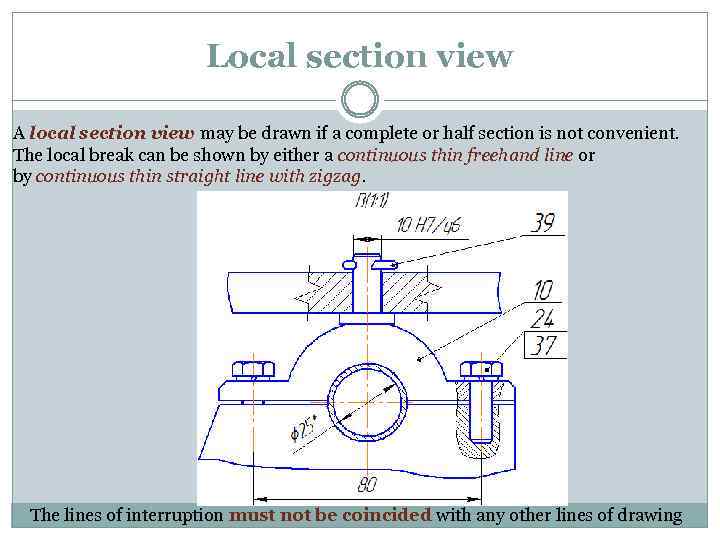 Local section view A local section view may be drawn if a complete or half section is not convenient. The local break can be shown by either a continuous thin freehand line or by continuous thin straight line with zigzag. The lines of interruption must not be coincided with any other lines of drawing
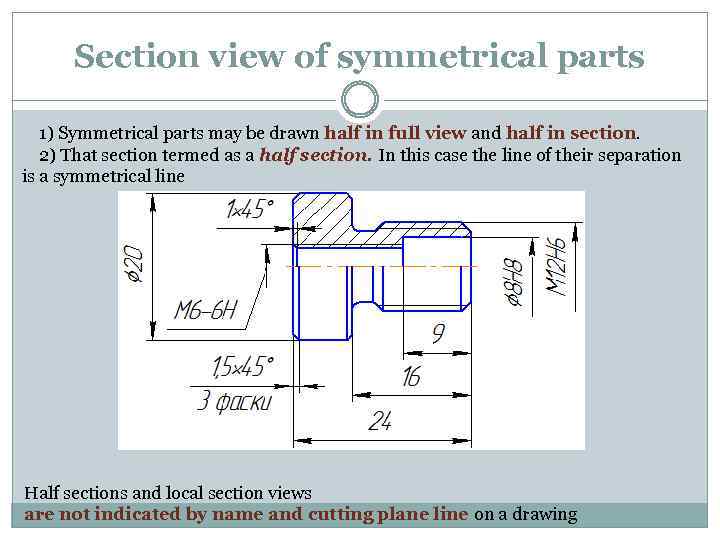 Section view of symmetrical parts 1) Symmetrical parts may be drawn half in full view and half in section. 2) That section termed as a half section. In this case the line of their separation is a symmetrical line Half sections and local section views are not indicated by name and cutting plane line on a drawing
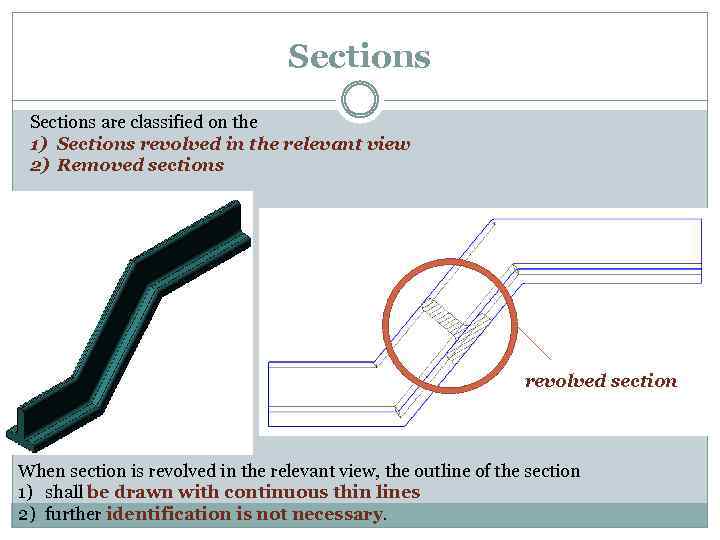 Sections are classified on the 1) Sections revolved in the relevant view 2) Removed sections revolved section When section is revolved in the relevant view, the outline of the section 1) shall be drawn with continuous thin lines 2) further identification is not necessary.
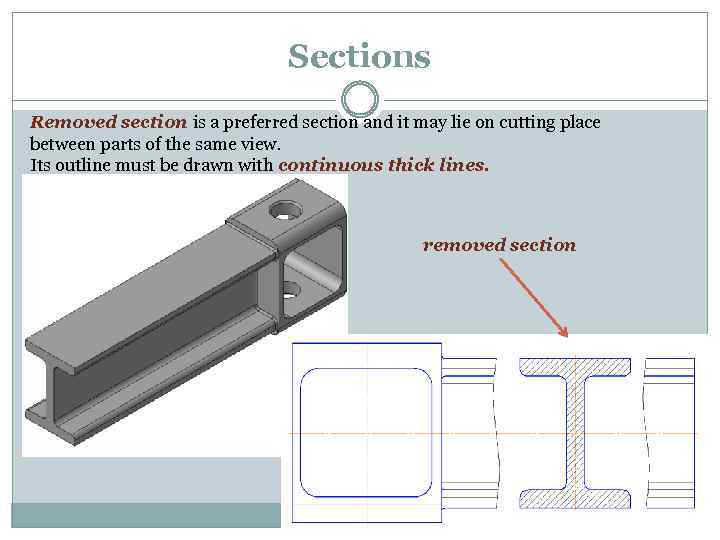 Sections Removed section is a preferred section and it may lie on cutting place between parts of the same view. Its outline must be drawn with continuous thick lines. removed section
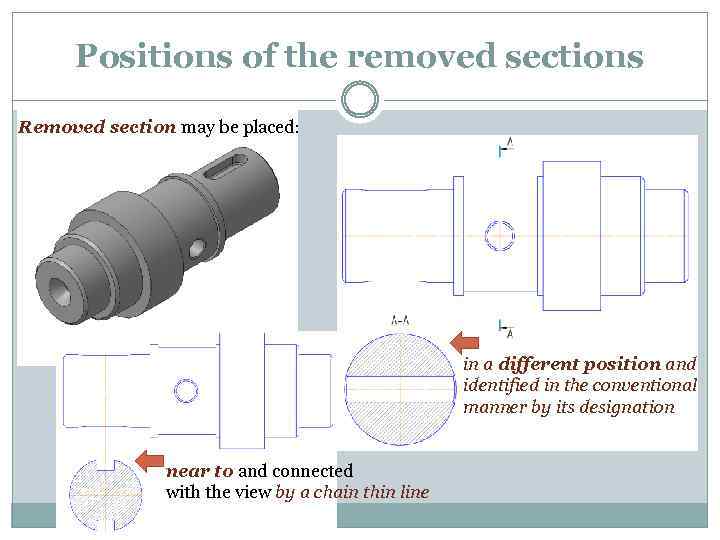 Positions of the removed sections Removed section may be placed: in a different position and identified in the conventional manner by its designation near to and connected with the view by a chain thin line
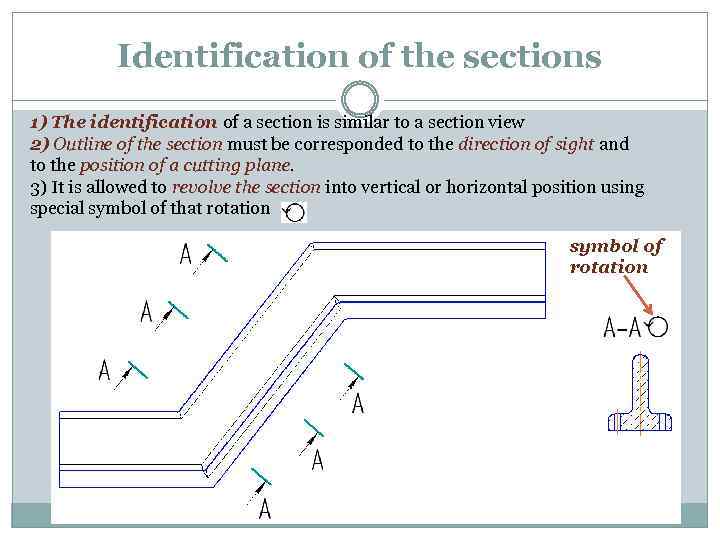 Identification of the sections 1) The identification of a section is similar to a section view 2) Outline of the section must be corresponded to the direction of sight and to the position of a cutting plane. 3) It is allowed to revolve the section into vertical or horizontal position using special symbol of that rotation symbol of rotation
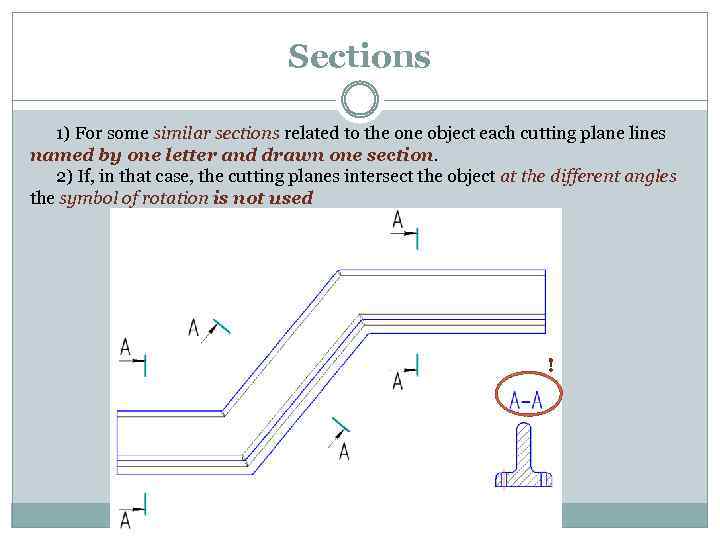 Sections 1) For some similar sections related to the one object each cutting plane lines named by one letter and drawn one section. 2) If, in that case, the cutting planes intersect the object at the different angles the symbol of rotation is not used !
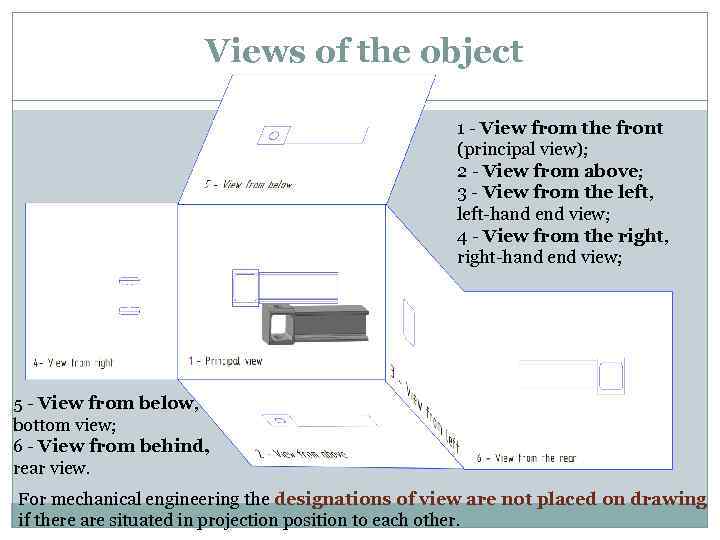 Views of the object 1 - View from the front (principal view); 2 - View from above; 3 - View from the left, left-hand end view; 4 - View from the right, right-hand end view; 5 - View from below, bottom view; 6 - View from behind, rear view. For mechanical engineering the designations of view are not placed on drawing if there are situated in projection position to each other.
 Designation of view Each view is not placed in projection connection with principle view, shall be identified by: 1) a capital letter; 2) the arrow needed to indicate the direction of viewing for the relevant view. Note that the most informative view of an object shall be used as the front or principal view.
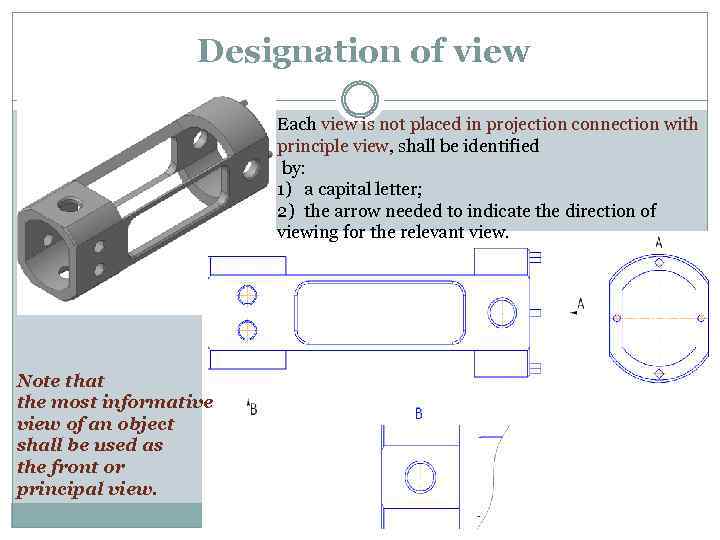 Designation of view Each view is not placed in projection connection with principle view, shall be identified by: 1) a capital letter; 2) the arrow needed to indicate the direction of viewing for the relevant view. Note that the most informative view of an object shall be used as the front or principal view.
 Principle of view representing When other views (including section views and sections) are needed, these shall be selected according to the following principles: 1) to limit the number of views, section views and sections to the minimum necessary and sufficient to fully delineate the object without ambiguity; 2) to avoid the need for hidden outlines and edges; 3) to avoid unnecessary repetition of detail. Note, that parts which can be used in any position should preferably be drawn in the main position of manufacturing or mounting. Partial views may be used where complete views would not improve the information to be given. The partial view shall be cutoff by a continuous thin freehand line or straight lines with zigzags.
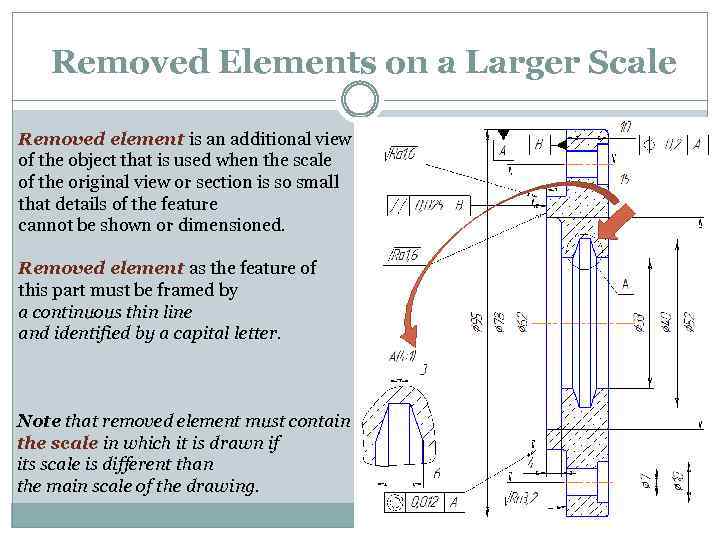 Removed Elements on a Larger Scale Removed element is an additional view of the object that is used when the scale of the original view or section is so small that details of the feature cannot be shown or dimensioned. Removed element as the feature of this part must be framed by a continuous thin line and identified by a capital letter. Note that removed element must contain the scale in which it is drawn if its scale is different than the main scale of the drawing.
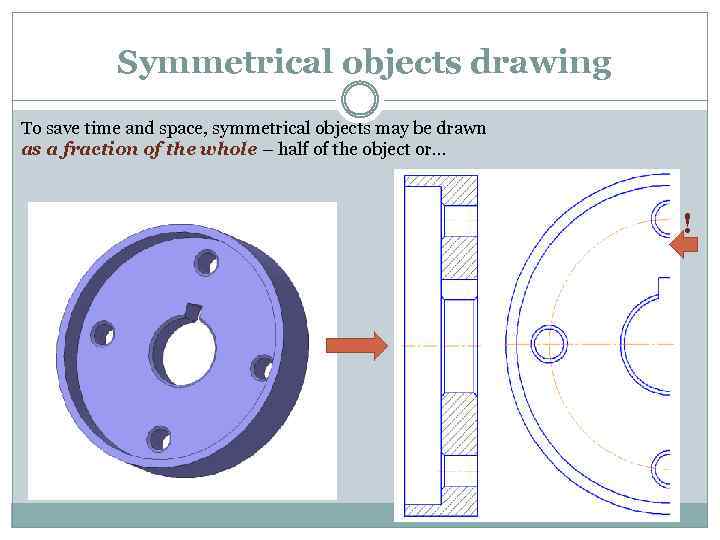 Symmetrical objects drawing To save time and space, symmetrical objects may be drawn as a fraction of the whole – half of the object or… !
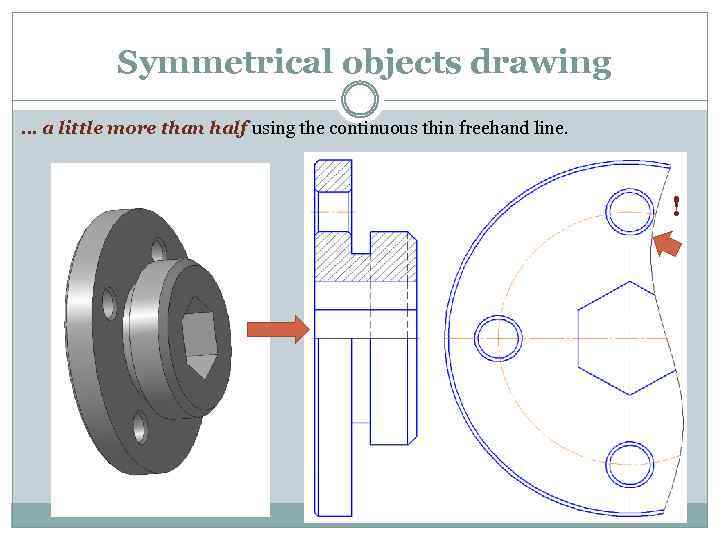 Symmetrical objects drawing … a little more than half using the continuous thin freehand line. !
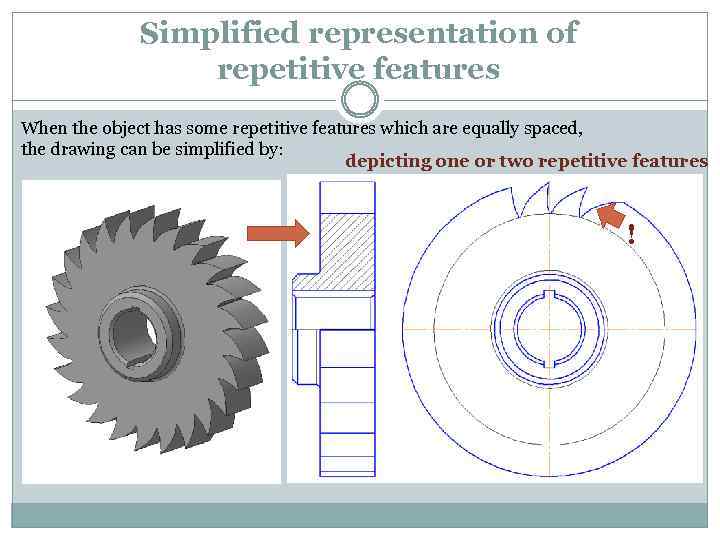 Simplified representation of repetitive features When the object has some repetitive features which are equally spaced, the drawing can be simplified by: depicting one or two repetitive features !
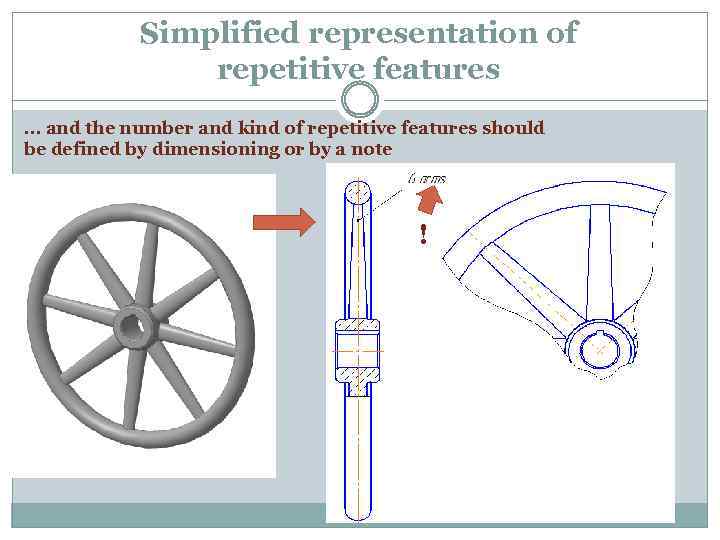 Simplified representation of repetitive features … and the number and kind of repetitive features should be defined by dimensioning or by a note !
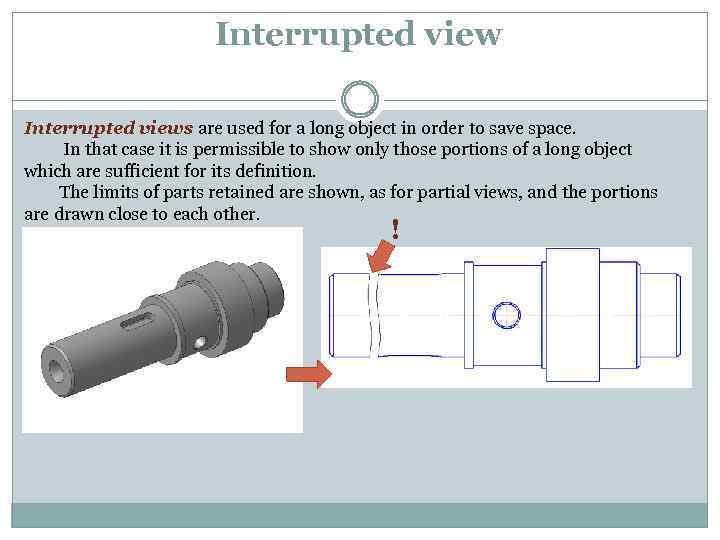 Interrupted views are used for a long object in order to save space. In that case it is permissible to show only those portions of a long object which are sufficient for its definition. The limits of parts retained are shown, as for partial views, and the portions are drawn close to each other. !
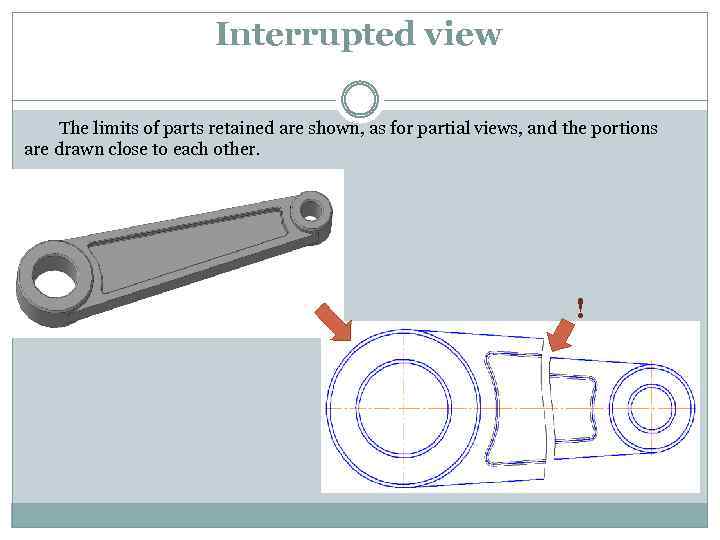 Interrupted view The limits of parts retained are shown, as for partial views, and the portions are drawn close to each other. !
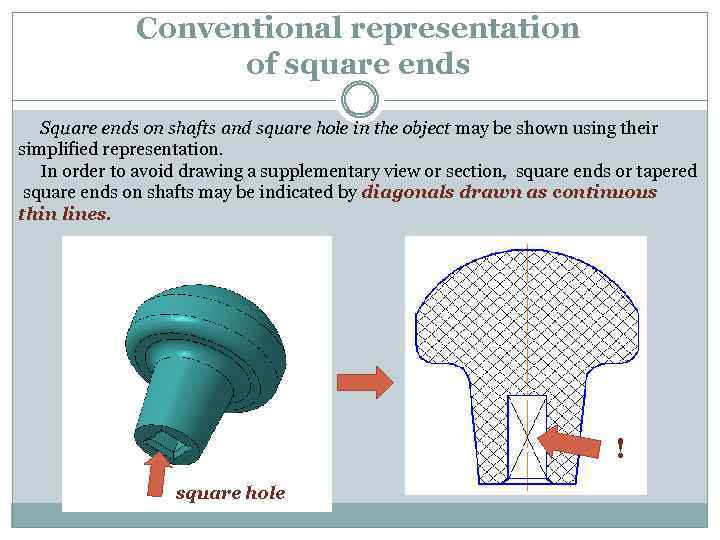 Conventional representation of square ends Square ends on shafts and square hole in the object may be shown using their simplified representation. In order to avoid drawing a supplementary view or section, square ends or tapered square ends on shafts may be indicated by diagonals drawn as continuous thin lines. ! square hole


