a16ac5ea925ac03027eae380a0fe12c6.ppt
- Количество слайдов: 17
Quality System and Calibrations “Realizing and Disseminating the SI meter” Ted Doiron Quality Manager • Quality System and SIM • Calibration Performance • New Capabilities Dimensional Metrology
NIST Quality System In October 1999, the directors of the national metrology institutes (NMIs) of thirty-eight Member States of the Metre Convention signed a Mutual Recognition Arrangement (MRA) for national measurement standards and for calibration and measurement certificates issued by national metrology institutes. 3/19/2018 Dimensional Metrology 2
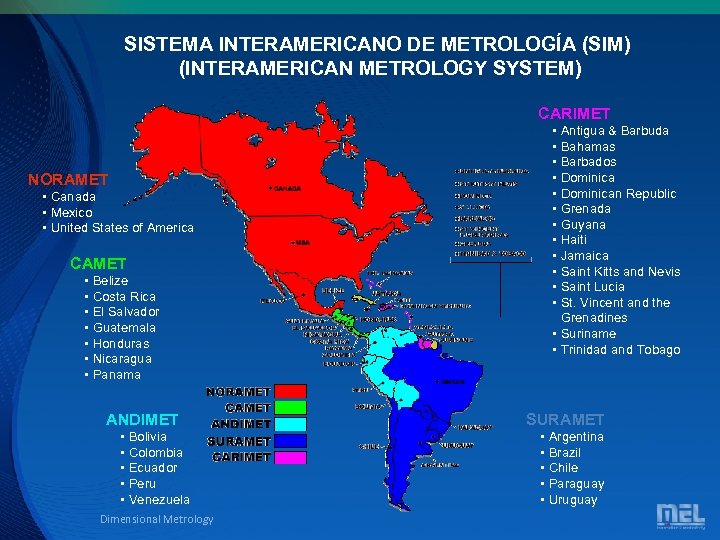
SISTEMA INTERAMERICANO DE METROLOGÍA (SIM) (INTERAMERICAN METROLOGY SYSTEM) CARIMET • • • Antigua & Barbuda Bahamas Barbados Dominican Republic Grenada Guyana Haiti Jamaica Saint Kitts and Nevis Saint Lucia St. Vincent and the Grenadines • Suriname • Trinidad and Tobago NORAMET • Canada • Mexico • United States of America CAMET • • Belize Costa Rica El Salvador Guatemala Honduras Nicaragua Panama ANDIMET • • • Bolivia Colombia Ecuador Peru Venezuela Dimensional Metrology SURAMET • • • Argentina Brazil Chile Paraguay Uruguay
PED Quality System Based on ISO 17025 Primary standard for laboratory accreditation world-wide. PED Quality Manual is quite small – 61 pages with no secondary SOPs. In preparation for 2009 audit, PED had an outside trainer present the standardized 5 day training course for assessors. Technical assessment by metrology students at Butler County Community College. Dimensional Metrology
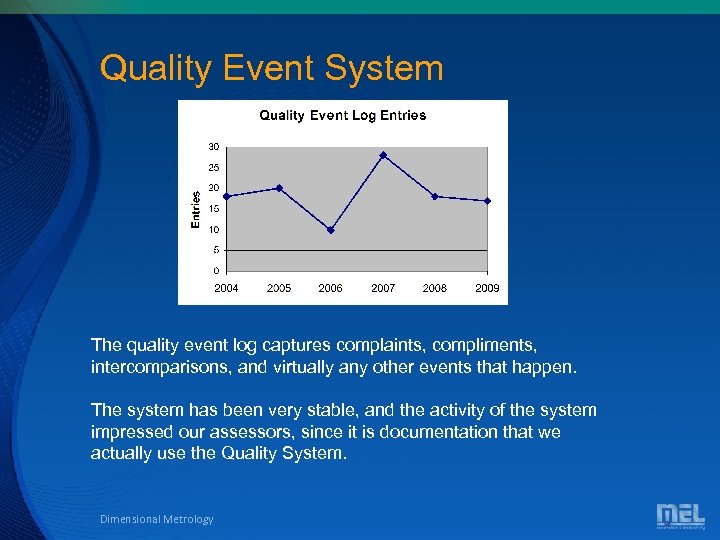
Quality Event System The quality event log captures complaints, compliments, intercomparisons, and virtually any other events that happen. The system has been very stable, and the activity of the system impressed our assessors, since it is documentation that we actually use the Quality System. Dimensional Metrology
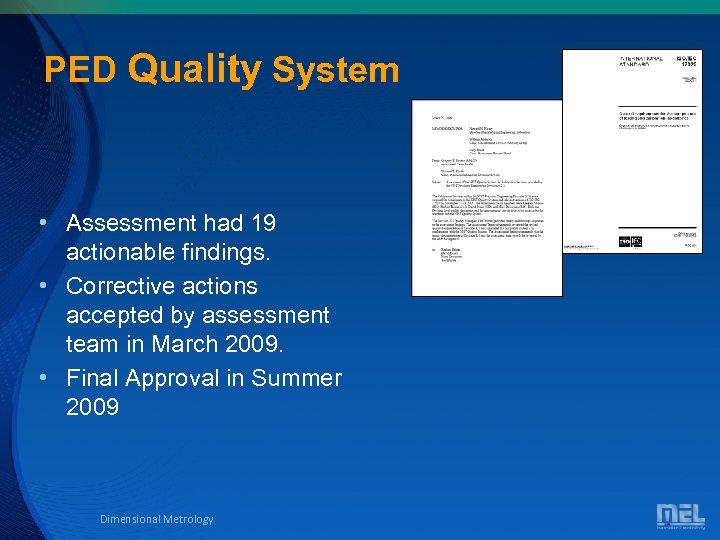
PED Quality System • Assessment had 19 actionable findings. • Corrective actions accepted by assessment team in March 2009. • Final Approval in Summer 2009 Dimensional Metrology
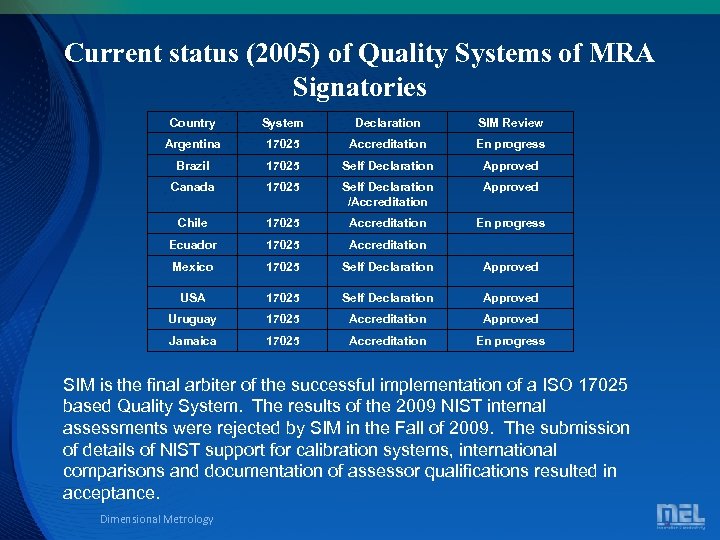
Current status (2005) of Quality Systems of MRA Signatories Country System Declaration SIM Review Argentina 17025 Accreditation En progress Brazil 17025 Self Declaration Approved Canada 17025 Self Declaration /Accreditation Approved Chile 17025 Accreditation En progress Ecuador 17025 Accreditation Mexico 17025 Self Declaration Approved USA 17025 Self Declaration Approved Uruguay 17025 Accreditation Approved Jamaica 17025 Accreditation En progress SIM is the final arbiter of the successful implementation of a ISO 17025 based Quality System. The results of the 2009 NIST internal assessments were rejected by SIM in the Fall of 2009. The submission of details of NIST support for calibration systems, international comparisons and documentation of assessor qualifications resulted in acceptance. Dimensional Metrology
Calibration Program The number of division calibration staff has been roughly constant, although there have been more turnover in the last few years. The primary change has been that an increasing calibration load is handled by engineers rather than technicians. The change from fairly simple comparators to more complex automated measuring machines has driven the trend. Dimensional Metrology
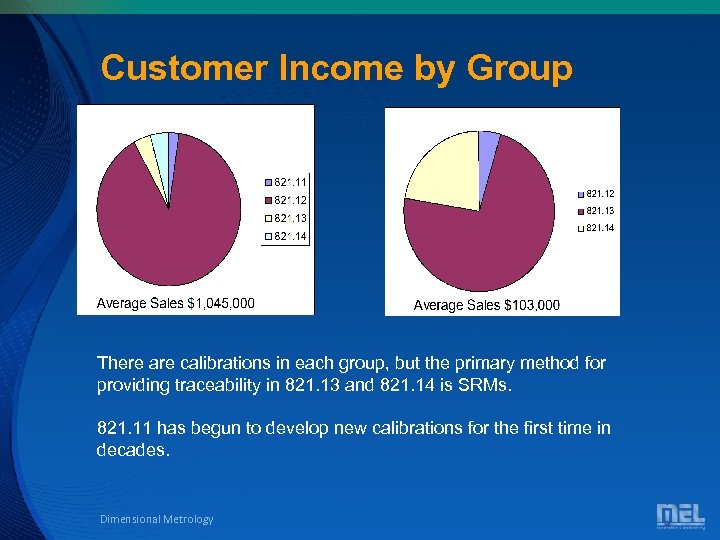
Customer Income by Group There are calibrations in each group, but the primary method for providing traceability in 821. 13 and 821. 14 is SRMs. 821. 11 has begun to develop new calibrations for the first time in decades. Dimensional Metrology
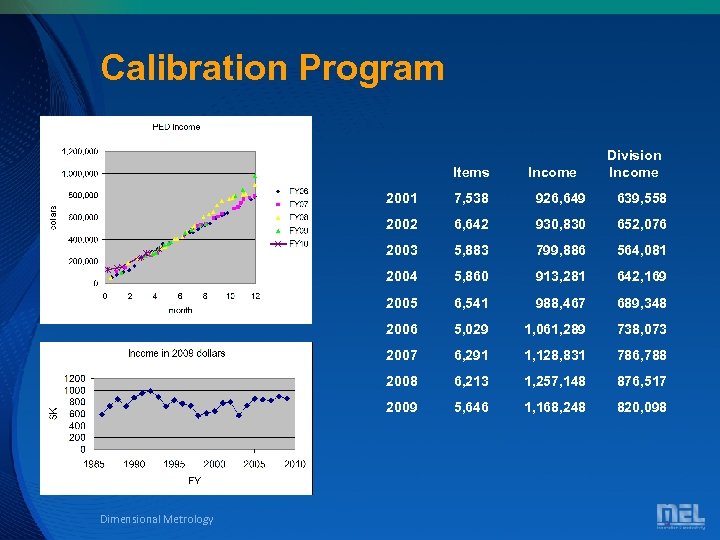
Calibration Program Items Income Division Income 2001 926, 649 639, 558 2002 6, 642 930, 830 652, 076 2003 5, 883 799, 886 564, 081 2004 5, 860 913, 281 642, 169 2005 6, 541 988, 467 689, 348 2006 5, 029 1, 061, 289 738, 073 2007 6, 291 1, 128, 831 786, 788 2008 6, 213 1, 257, 148 876, 517 2009 Dimensional Metrology 7, 538 5, 646 1, 168, 248 820, 098
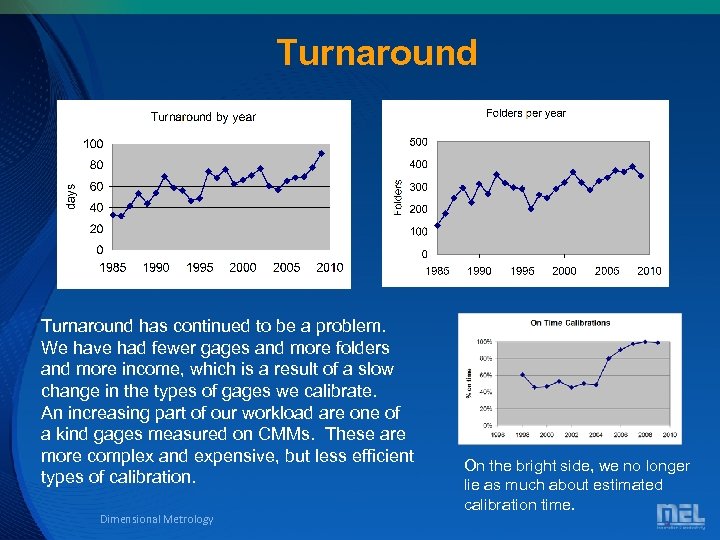
Turnaround has continued to be a problem. We have had fewer gages and more folders and more income, which is a result of a slow change in the types of gages we calibrate. An increasing part of our workload are one of a kind gages measured on CMMs. These are more complex and expensive, but less efficient types of calibration. Dimensional Metrology On the bright side, we no longer lie as much about estimated calibration time.
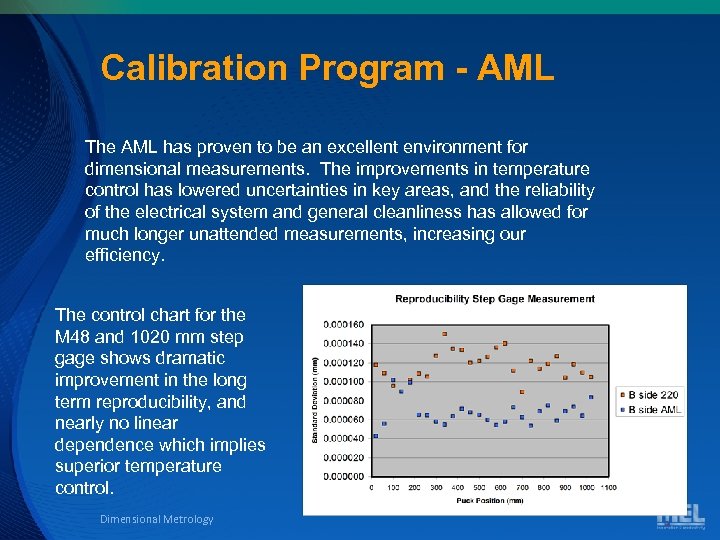
Calibration Program - AML The AML has proven to be an excellent environment for dimensional measurements. The improvements in temperature control has lowered uncertainties in key areas, and the reliability of the electrical system and general cleanliness has allowed for much longer unattended measurements, increasing our efficiency. The control chart for the M 48 and 1020 mm step gage shows dramatic improvement in the long term reproducibility, and nearly no linear dependence which implies superior temperature control. Dimensional Metrology
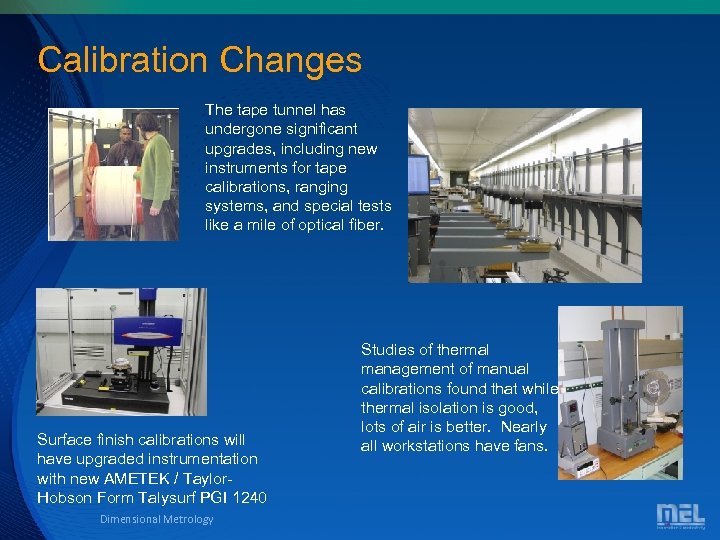
Calibration Changes The tape tunnel has undergone significant upgrades, including new instruments for tape calibrations, ranging systems, and special tests like a mile of optical fiber. Surface finish calibrations will have upgraded instrumentation with new AMETEK / Taylor. Hobson Form Talysurf PGI 1240 Dimensional Metrology Studies of thermal management of manual calibrations found that while thermal isolation is good, lots of air is better. Nearly all workstations have fans.
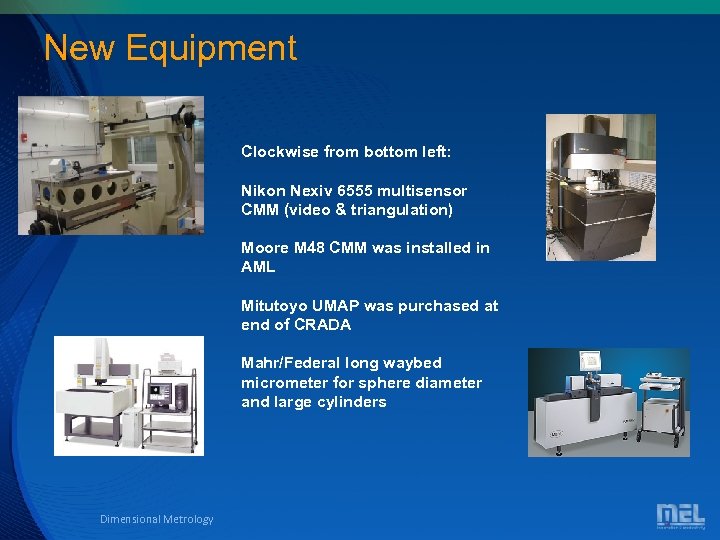
New Equipment Clockwise from bottom left: Nikon Nexiv 6555 multisensor CMM (video & triangulation) Moore M 48 CMM was installed in AML Mitutoyo UMAP was purchased at end of CRADA Mahr/Federal long waybed micrometer for sphere diameter and large cylinders Dimensional Metrology
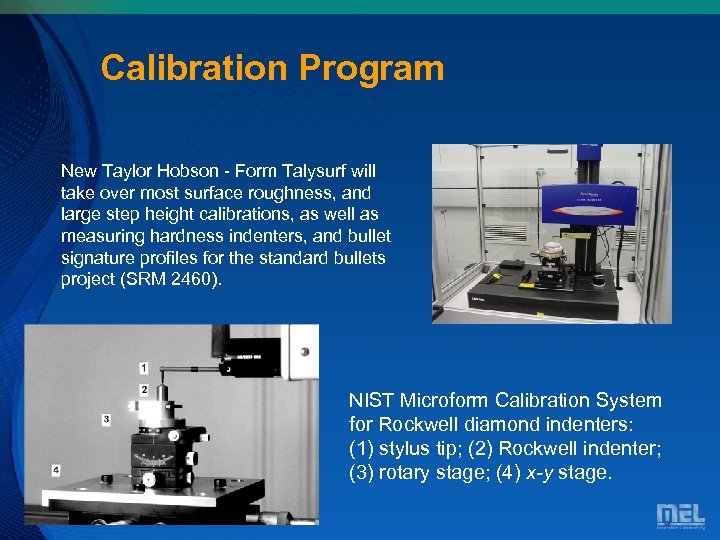
Calibration Program New Taylor Hobson - Form Talysurf will take over most surface roughness, and large step height calibrations, as well as measuring hardness indenters, and bullet signature profiles for the standard bullets project (SRM 2460). NIST Microform Calibration System for Rockwell diamond indenters: (1) stylus tip; (2) Rockwell indenter; (3) rotary stage; (4) x-y stage. Dimensional Metrology
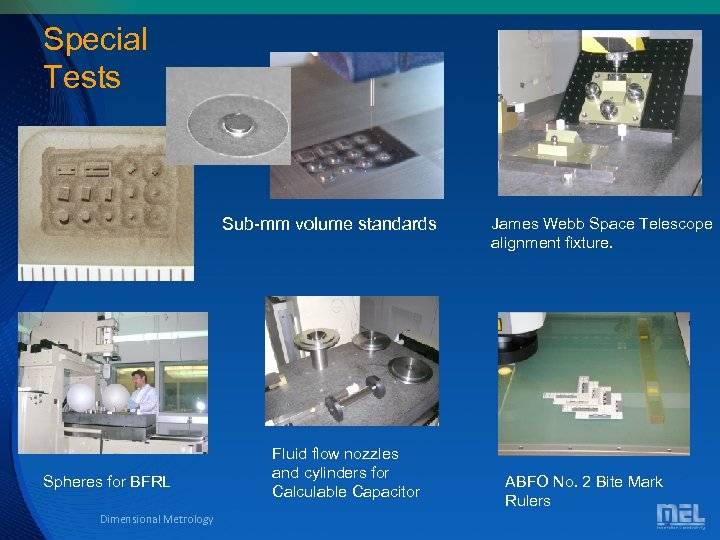
Special Tests Sub-mm volume standards Spheres for BFRL Dimensional Metrology Fluid flow nozzles and cylinders for Calculable Capacitor James Webb Space Telescope alignment fixture. ABFO No. 2 Bite Mark Rulers

Dimensional Metrology
a16ac5ea925ac03027eae380a0fe12c6.ppt