fcbbaf2bca0aec5cc930ce894275daa1.ppt
- Количество слайдов: 49
 Quality Improvement Chapter 7 - Additional SPC Techniques for Variables Power. Point presentation to accompany Besterfield, Quality Improvement, 9 e
 Outline q. Continuous and Batch Processes q. Multi-Vari Chart q. Short-Run SPC q. Gauge Control Quality Improvement, 9 e Dale H. Besterfield 2 © 2013, 2008 by Pearson Higher Education, Inc Upper Saddle River, New Jersey 07458 • All Rights Reserved
 Learning Objectives When you have completed this chapter you should be able to: q. Explain the difference between discrete, continuous, and batch processes. q. Construct and use a group chart. q. Construct a multi-vari chart. q. Calculate the central line and control limits of a specification chart Quality Improvement, 9 e Dale H. Besterfield 3 © 2013, 2008 by Pearson Higher Education, Inc Upper Saddle River, New Jersey 07458 • All Rights Reserved
 Learning Objectives-Continued When you have completed this chapter you should be able to: o Calculate the central line and central limits for a Zbar & W and Z & MW charts Explain how to use precontrol for set up and run activities. o o. Determine a PTPC chart q Understand the concept of GR&R Quality Improvement, 9 e Dale H. Besterfield 4 © 2013, 2008 by Pearson Higher Education, Inc Upper Saddle River, New Jersey 07458 • All Rights Reserved
 Continuous Processes q Usually operates 24 hrs a day, 7 days a week, stops for scheduled maintenance. q Often involves a conveyor or moving assembly line q Associated with product involving hazardous materials Quality Improvement, 9 e Dale H. Besterfield 5 © 2013, 2008 by Pearson Higher Education, Inc Upper Saddle River, New Jersey 07458 • All Rights Reserved
 Continuous Processes q Examples q Paper-making machines q Oil refineries q Soft drinks (continuous then discrete) q Control charts for each value (multiple stream output) Quality Improvement, 9 e Dale H. Besterfield 6 © 2013, 2008 by Pearson Higher Education, Inc Upper Saddle River, New Jersey 07458 • All Rights Reserved
 Continuous Processes q. It is extremely important to have knowledge about the process and objectives for the control chart. When it is difficult to obtain samples from a location, sensors may be helpful to collect data, compare to control limits, and automatically control the process. Quality Improvement, 9 e Dale H. Besterfield 7 © 2013, 2008 by Pearson Higher Education, Inc Upper Saddle River, New Jersey 07458 • All Rights Reserved
 Continuous & Batch Processing A good example of a continuous process is depicted by the paper-making process. They operate 24 hrs a day, 7 days a week, and stop only for scheduled maintenance or emergencies. Observed values are taken in the machine direction(md) or cross-machine direction (cd). Quality Improvement, 9 e Dale H. Besterfield 8 © 2013, 2008 by Pearson Higher Education, Inc Upper Saddle River, New Jersey 07458 • All Rights Reserved
 Continuous & Batch Processing If the flow of pulp is controlled by 48 valves, then 48 md control charts would be required to control each valve. In this case it is very important for the practitioner to be knowledgeable about the process and have definite objectives for the control chart. Quality Improvement, 9 e Dale H. Besterfield 9 © 2013, 2008 by Pearson Higher Education, Inc Upper Saddle River, New Jersey 07458 • All Rights Reserved
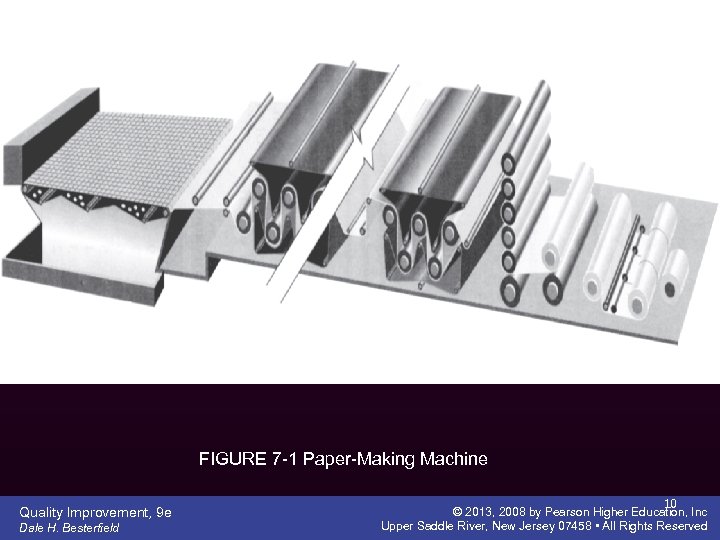 FIGURE 7 -1 Paper-Making Machine Quality Improvement, 9 e Dale H. Besterfield 10 © 2013, 2008 by Pearson Higher Education, Inc Upper Saddle River, New Jersey 07458 • All Rights Reserved
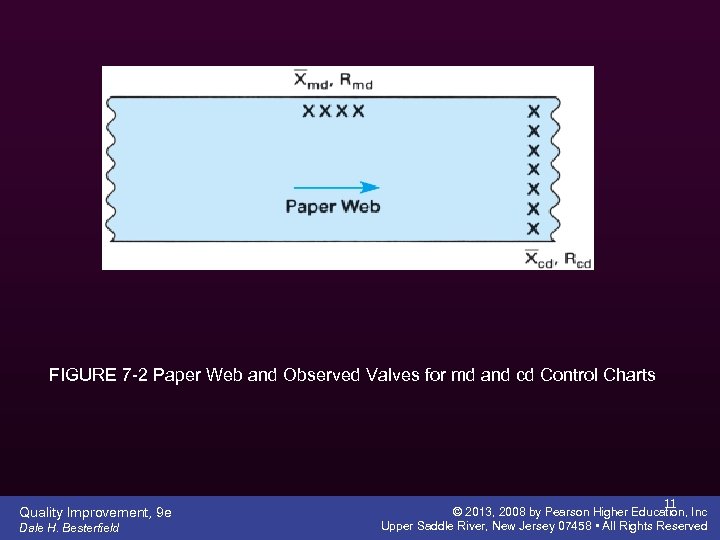 FIGURE 7 -2 Paper Web and Observed Valves for md and cd Control Charts Quality Improvement, 9 e Dale H. Besterfield 11 © 2013, 2008 by Pearson Higher Education, Inc Upper Saddle River, New Jersey 07458 • All Rights Reserved
 Group Chart q Eliminates the need for a chart for each stream; however, it does not eliminate the need for measurements at each stream q Uses the same methodology outlined in Chapter 6, 25 subgroups for each stream. q Use lowest and highest averages for Xbar chart and the highest range for the R chart. Each stream has a number. Quality Improvement, 9 e Dale H. Besterfield 12 © 2013, 2008 by Pearson Higher Education, Inc Upper Saddle River, New Jersey 07458 • All Rights Reserved
 Group Chart q Any out-of-control situation would call for corrective actions q We have the out-of-control situation when the same value streams gives the highest or lowest value r times in succession Quality Improvement, 9 e Dale H. Besterfield 13 © 2013, 2008 by Pearson Higher Education, Inc Upper Saddle River, New Jersey 07458 • All Rights Reserved
 Group Chart q See Table 7 -1 for the r values q The technique is applicable to machines, test equipment, operators, or suppliers as long as: q Each stream has the same target q Same variation q Variation is as close to normal as required by conventional Xbar and R charts. Quality Improvement, 9 e Dale H. Besterfield 14 © 2013, 2008 by Pearson Higher Education, Inc Upper Saddle River, New Jersey 07458 • All Rights Reserved
 Batch Processes q Paint, soft drinks, bread, soup, etc q SPC of batches has two forms: 1. Within batch variation q Only one observed value of a particular quality characteristic can be obtained q They need to be obtained at different locations within the batch 2. Between-batch variation q Does not always occur Quality Improvement, 9 e Dale H. Besterfield 15 © 2013, 2008 by Pearson Higher Education, Inc Upper Saddle River, New Jersey 07458 • All Rights Reserved
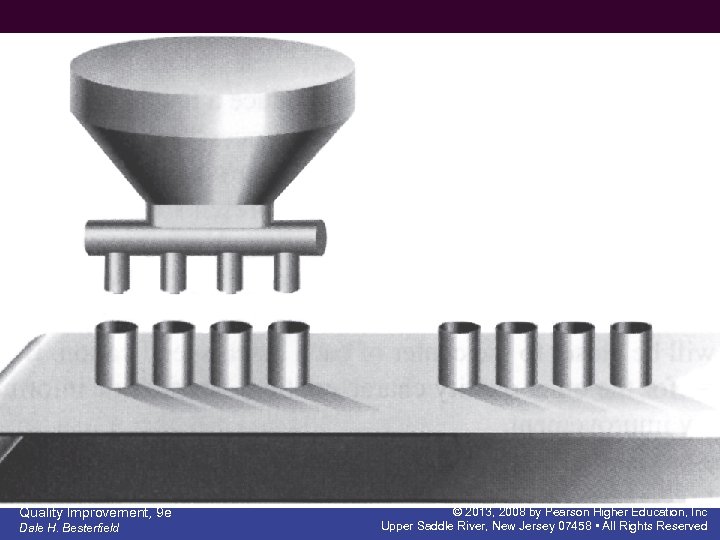 FIGURE 7 -3 Example of Multiple Streams: A Four-Spindle Filling Machine Quality Improvement, 9 e Dale H. Besterfield 16 © 2013, 2008 by Pearson Higher Education, Inc Upper Saddle River, New Jersey 07458 • All Rights Reserved
 Batch Chart q It is not a control chart, it might be more appropriately called a run chart q Can provide information for effective quality improvement Quality Improvement, 9 e Dale H. Besterfield 17 © 2013, 2008 by Pearson Higher Education, Inc Upper Saddle River, New Jersey 07458 • All Rights Reserved
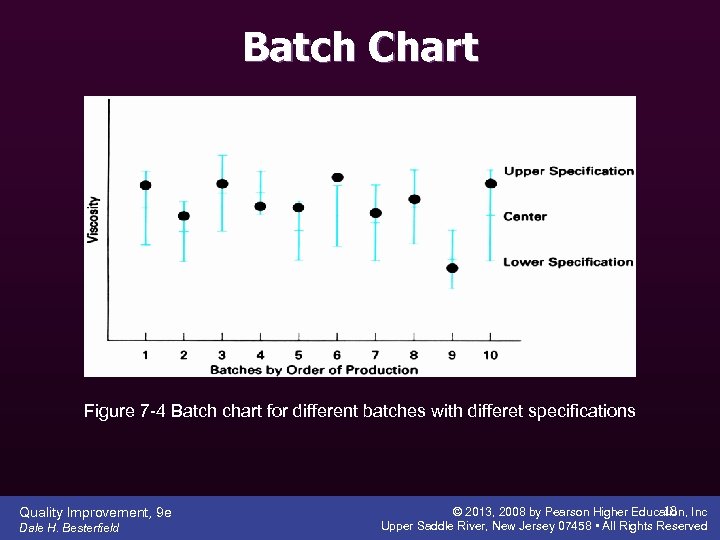 Batch Chart Figure 7 -4 Batch chart for different batches with differet specifications Quality Improvement, 9 e Dale H. Besterfield 18 © 2013, 2008 by Pearson Higher Education, Inc Upper Saddle River, New Jersey 07458 • All Rights Reserved
 Multi-Vari Chart q For detecting different types of variation that are found in products and services q The chart will lead to a problem solution much faster than other techniques q Shows the different types of variation within a single unit or service (within unit variation, unitto-unit variation, time-to-time variation) Quality Improvement, 9 e Dale H. Besterfield 19 © 2013, 2008 by Pearson Higher Education, Inc Upper Saddle River, New Jersey 07458 • All Rights Reserved
 Multi-Vari Chart q. Procedure: 1. Select 3 to 5 consecutive units Plot the highest and lowest observed value of each piece 2. 3. Draw a line between them 4. Repeat the process Quality Improvement, 9 e Dale H. Besterfield 20 © 2013, 2008 by Pearson Higher Education, Inc Upper Saddle River, New Jersey 07458 • All Rights Reserved
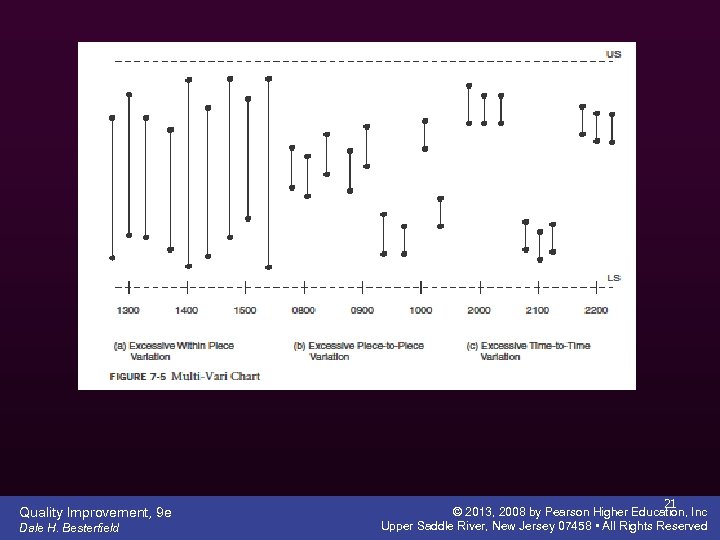 Quality Improvement, 9 e Dale H. Besterfield 21 © 2013, 2008 by Pearson Higher Education, Inc Upper Saddle River, New Jersey 07458 • All Rights Reserved
 Short-Run SPC Specification Chart q Used for small lot sizes – common in JIT q Gives some measure of control and a method of quality improvement q Central line and control limits are established using the specification σ = (USL-LSL) / 6 Cp Quality Improvement, 9 e Dale H. Besterfield 22 © 2013, 2008 by Pearson Higher Education, Inc Upper Saddle River, New Jersey 07458 • All Rights Reserved
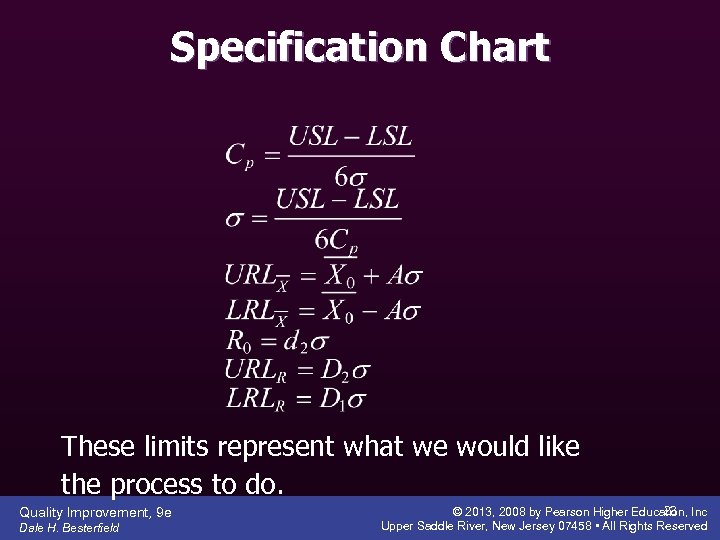 Specification Chart These limits represent what we would like the process to do. Quality Improvement, 9 e Dale H. Besterfield 23 © 2013, 2008 by Pearson Higher Education, Inc Upper Saddle River, New Jersey 07458 • All Rights Reserved
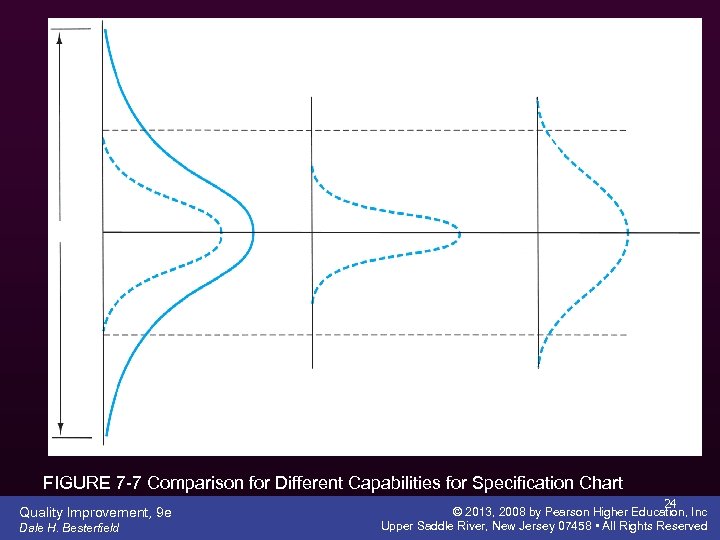 FIGURE 7 -7 Comparison for Different Capabilities for Specification Chart Quality Improvement, 9 e Dale H. Besterfield 24 © 2013, 2008 by Pearson Higher Education, Inc Upper Saddle River, New Jersey 07458 • All Rights Reserved
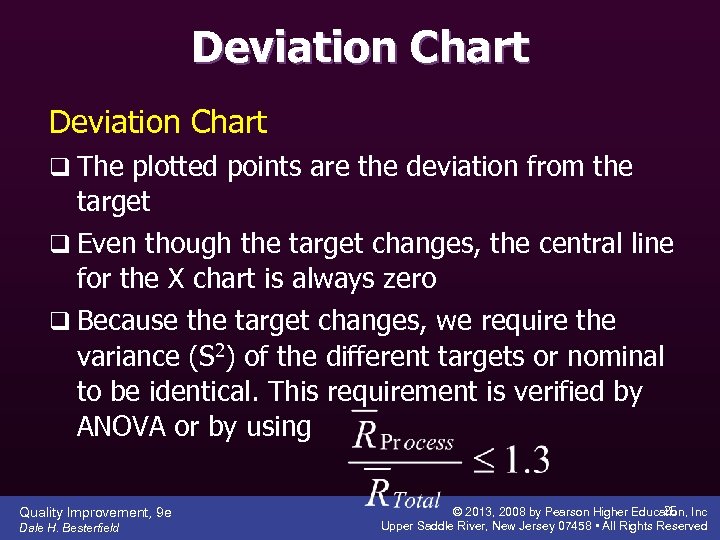 Deviation Chart q The plotted points are the deviation from the target q Even though the target changes, the central line for the X chart is always zero q Because the target changes, we require the variance (S 2) of the different targets or nominal to be identical. This requirement is verified by ANOVA or by using Quality Improvement, 9 e Dale H. Besterfield 25 © 2013, 2008 by Pearson Higher Education, Inc Upper Saddle River, New Jersey 07458 • All Rights Reserved
 Deviation Chart q. Advantages: 1. Provide the opportunity to convey enhanced information 2. Can plot different quality characteristics on the same chart Quality Improvement, 9 e Dale H. Besterfield 26 © 2013, 2008 by Pearson Higher Education, Inc Upper Saddle River, New Jersey 07458 • All Rights Reserved
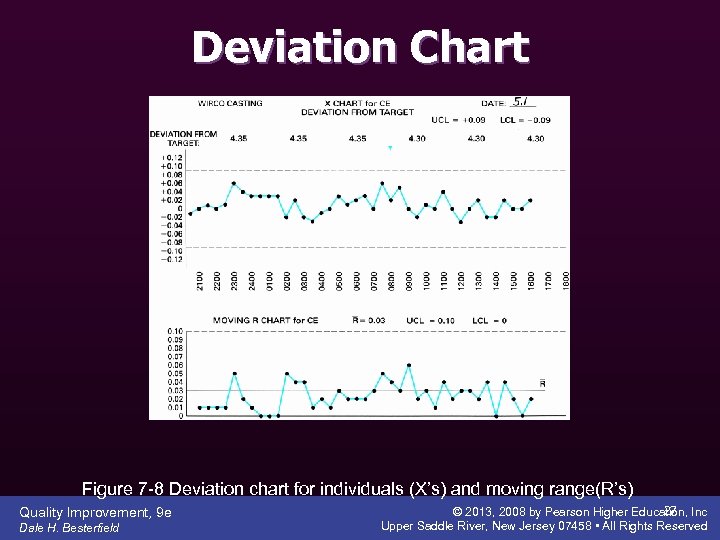 Deviation Chart Figure 7 -8 Deviation chart for individuals (X’s) and moving range(R’s) Quality Improvement, 9 e Dale H. Besterfield 27 © 2013, 2008 by Pearson Higher Education, Inc Upper Saddle River, New Jersey 07458 • All Rights Reserved
 Precontrol q Was developed originally with machining operations in mind. q Operator faced with the problem of first setting up the machine and then deciding if the machine is ready for full production. q Small lot sizes with each piece taking a long time to produce. Quality Improvement, 9 e Dale H. Besterfield 34 © 2013, 2008 by Pearson Higher Education, Inc Upper Saddle River, New Jersey 07458 • All Rights Reserved
 Precontrol o Well suited for machining operations where one can devise simple feedback algorithms to bring the process back on target. o Requires operators who are very knowledgeable about the process. Quality Improvement, 9 e Dale H. Besterfield 35 © 2013, 2008 by Pearson Higher Education, Inc Upper Saddle River, New Jersey 07458 • All Rights Reserved
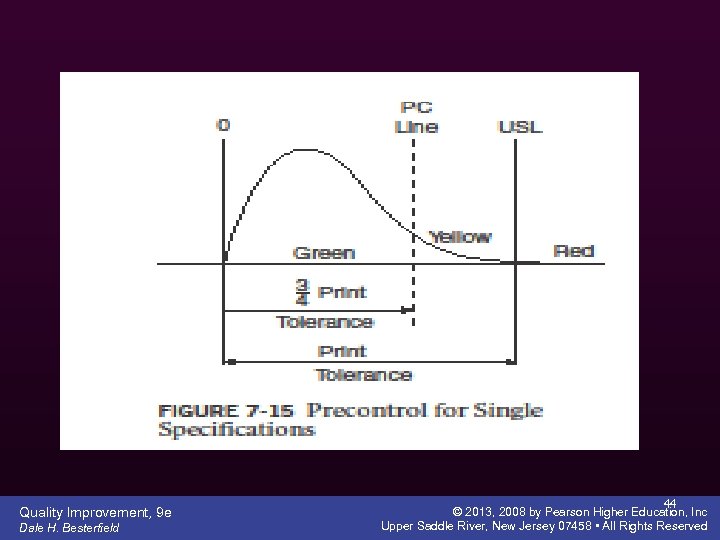
 Precontrol q Steps for the construction: q. Be sure that the process capability is less than the specifications. q. PC lines are established to divide the tolerance into five zones (Figure 7 -12) q The PC procedure has two stages: q. Start-up q. Run Quality Improvement, 9 e Dale H. Besterfield 36 © 2013, 2008 by Pearson Higher Education, Inc Upper Saddle River, New Jersey 07458 • All Rights Reserved
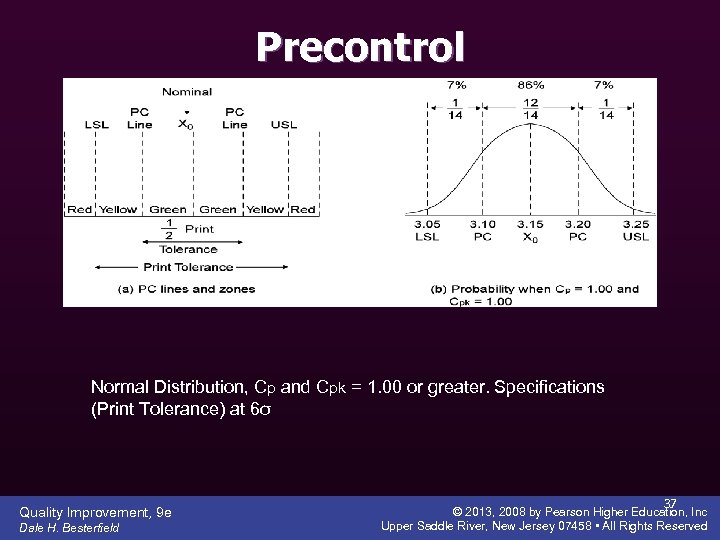 Precontrol Normal Distribution, Cp and Cpk = 1. 00 or greater. Specifications (Print Tolerance) at 6σ Quality Improvement, 9 e Dale H. Besterfield 37 © 2013, 2008 by Pearson Higher Education, Inc Upper Saddle River, New Jersey 07458 • All Rights Reserved
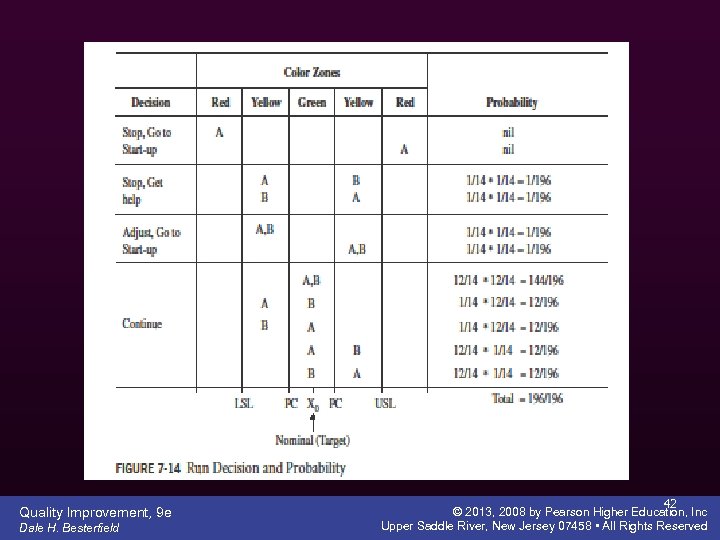
 Precontrol PRE-Control Rules: 1. Start up Process q 5 consecutive units in green zone –o. k. to run q 1 yellow, restart counting q 2 yellow in a row, adjust the process q 1 red, adjust the process q < 5 signifies: q Process capability << 1 q PRE-control is not appropriate Quality Improvement, 9 e Dale H. Besterfield 38 © 2013, 2008 by Pearson Higher Education, Inc Upper Saddle River, New Jersey 07458 • All Rights Reserved
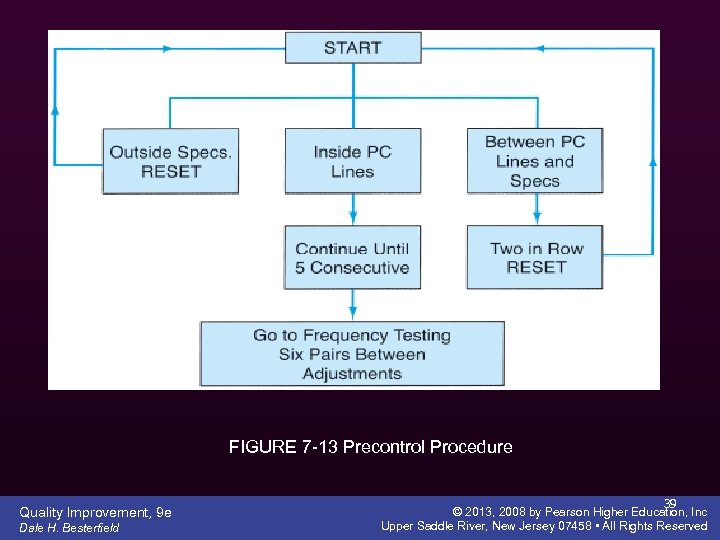 FIGURE 7 -13 Precontrol Procedure Quality Improvement, 9 e Dale H. Besterfield 39 © 2013, 2008 by Pearson Higher Education, Inc Upper Saddle River, New Jersey 07458 • All Rights Reserved
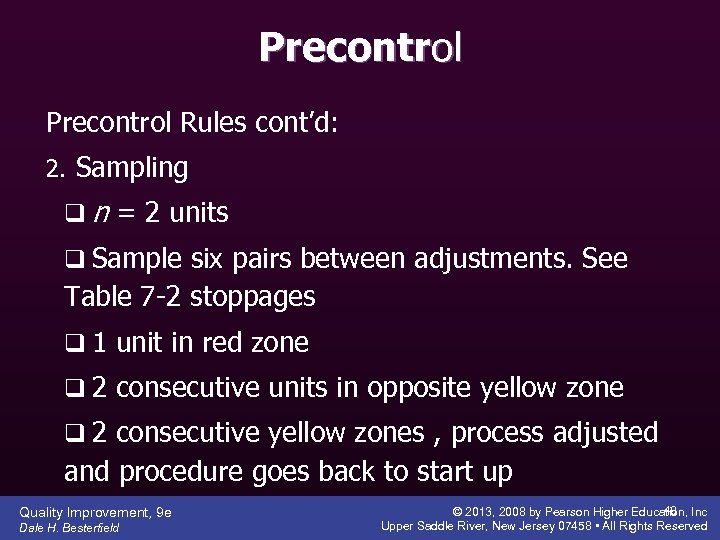 Precontrol Rules cont’d: 2. Sampling q n = 2 units q Sample six pairs between adjustments. See Table 7 -2 stoppages q 1 unit in red zone q 2 consecutive units in opposite yellow zone q 2 consecutive yellow zones , process adjusted and procedure goes back to start up Quality Improvement, 9 e Dale H. Besterfield 40 © 2013, 2008 by Pearson Higher Education, Inc Upper Saddle River, New Jersey 07458 • All Rights Reserved
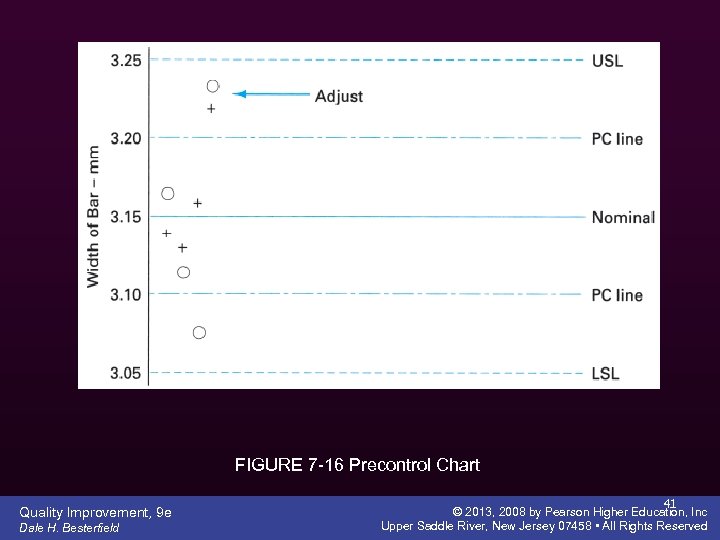 FIGURE 7 -16 Precontrol Chart Quality Improvement, 9 e Dale H. Besterfield 41 © 2013, 2008 by Pearson Higher Education, Inc Upper Saddle River, New Jersey 07458 • All Rights Reserved
 Quality Improvement, 9 e Dale H. Besterfield 42 © 2013, 2008 by Pearson Higher Education, Inc Upper Saddle River, New Jersey 07458 • All Rights Reserved
 Precontrol q Precontrol can be used for single specifications q Precontrol can be used for attributes q Precontrol is also used for visual characteristics by assigning visual standards for the Precontrol lines Quality Improvement, 9 e Dale H. Besterfield 43 © 2013, 2008 by Pearson Higher Education, Inc Upper Saddle River, New Jersey 07458 • All Rights Reserved
 Quality Improvement, 9 e Dale H. Besterfield 44 © 2013, 2008 by Pearson Higher Education, Inc Upper Saddle River, New Jersey 07458 • All Rights Reserved
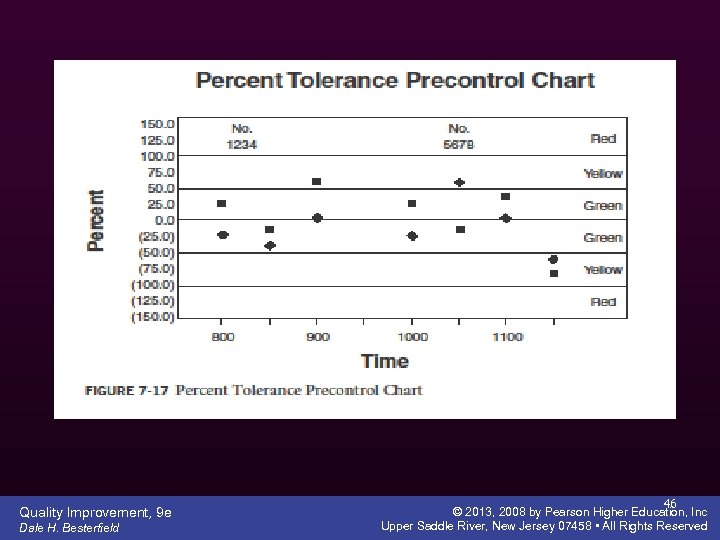
 % Tolerance Precontrol Chart q Z Charts: Ability to accommodate more than one quality characteristic q We can combine Z chart into one technique by the use of percent tolerance precontrol chart (PTPCC) q Target or nominal q X*= (X – nominal) / [(USL-LSL)/2] q A negative value indicates that the observed value is below the nominal Quality Improvement, 9 e Dale H. Besterfield 45 © 2013, 2008 by Pearson Higher Education, Inc Upper Saddle River, New Jersey 07458 • All Rights Reserved
 Quality Improvement, 9 e Dale H. Besterfield 46 © 2013, 2008 by Pearson Higher Education, Inc Upper Saddle River, New Jersey 07458 • All Rights Reserved
 Gage Repeatability and Reproducibility (GR&R) studies provide information on measurement system performance by analyzing measurement error from various sources. Typically the sources of variation are divided into three categories: part-to-part, operator or appraiser, and gage or equipment. In some instances another category, interaction between parts and operators, can provide additional information about the gaging process. Quality Improvement, 9 e Dale H. Besterfield 47 © 2013, 2008 by Pearson Higher Education, Inc Upper Saddle River, New Jersey 07458 • All Rights Reserved
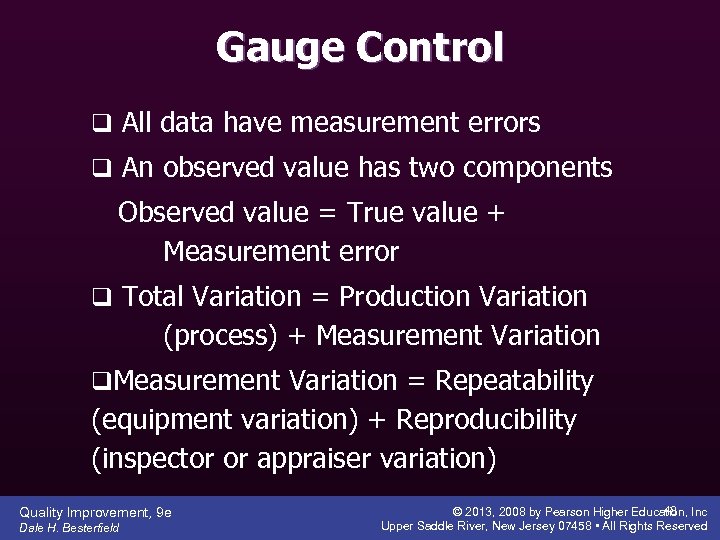 Gauge Control q All data have measurement errors q An observed value has two components Observed value = True value + Measurement error q Total Variation = Production Variation (process) + Measurement Variation q. Measurement Variation = Repeatability (equipment variation) + Reproducibility (inspector or appraiser variation) Quality Improvement, 9 e Dale H. Besterfield 48 © 2013, 2008 by Pearson Higher Education, Inc Upper Saddle River, New Jersey 07458 • All Rights Reserved
 Gauge R&R METHODS: In instances such as automated measuring processes, the GR&R studies are not affected by operator influence. These data then are analyzed using a calculation method. Quality Improvement, 9 e Dale H. Besterfield 49 © 2013, 2008 by Pearson Higher Education, Inc Upper Saddle River, New Jersey 07458 • All Rights Reserved
 Gauge R&R 1. Gage has to be calibrated using standards 2. Data is collected q 2 or 3 appraisers q 2 or 3 trials q 10 parts q Part characteristic is measured in a random order Quality Improvement, 9 e Dale H. Besterfield 50 © 2013, 2008 by Pearson Higher Education, Inc Upper Saddle River, New Jersey 07458 • All Rights Reserved
 Gauge Control o The preferred method is to use ANOVA, which is discussed in Chapter 13 o A P/T is determined which compares the measurement variation (P) to the total variation (T) Quality Improvement, 9 e Dale H. Besterfield 51 © 2013, 2008 by Pearson Higher Education, Inc Upper Saddle River, New Jersey 07458 • All Rights Reserved
 Gage Control Guidelines for acceptance of GR&R using the P/T ratio: Under 0. 10 (10%) error q Gage system is satisfactory 0. 10 to 0. 30 (10% to 30%) error q May be acceptable based upon importance of application, cost of gage, cost of repairs, etc. Over 0. 30 (30%) error q Gage system is not satisfactory. Identify the causes and take corrective action Quality Improvement, 9 e Dale H. Besterfield 52 © 2013, 2008 by Pearson Higher Education, Inc Upper Saddle River, New Jersey 07458 • All Rights Reserved
 Evaluation If repeatability is large compared to reproducibility: 1. The gage needs maintenance 2. The gage should be redesigned to be more rigid 3. The clamping or location for gaging needs to be improved 4. There is excessive within-part variation Quality Improvement, 9 e Dale H. Besterfield 53 © 2013, 2008 by Pearson Higher Education, Inc Upper Saddle River, New Jersey 07458 • All Rights Reserved
 Evaluation If reproducibility is large compared to repeatability: 1. The operator needs to be better trained in how to use and read the gage 2. Calibrations on the gage are not legible 3. A fixture may be needed to help the operator use the gage consistently Quality Improvement, 9 e Dale H. Besterfield 54 © 2013, 2008 by Pearson Higher Education, Inc Upper Saddle River, New Jersey 07458 • All Rights Reserved
 Homework Chapter 7 Problems 5, 6, 7, 13, 16, 17 Quality Improvement, 9 e Dale H. Besterfield 55 © 2013, 2008 by Pearson Higher Education, Inc Upper Saddle River, New Jersey 07458 • All Rights Reserved


