235cf08c5b6dac881bd0616a363fdfe7.ppt
- Количество слайдов: 41
 Power. Point to accompany Technology of Machine Tools 6 th Edition Krar • Gill • Smid Tapers and Taper Turning Unit 54 Copyright © The Mc. Graw-Hill Companies, Inc. Permission required for reproduction or display.
 2 Objectives • Identify and state the purpose of selfholding and self-releasing tapers • Cut short, steep tapers using the compound rest • Calculate and cut tapers on work between centers by offsetting the tailstock • Calculate and machine tapers with a taper attachment
 3 Taper • Uniform change in diameter of workpiece measured along its axis • Inch system expressed in taper foot, taper inch, or degrees • Metric system expressed as ratio of 1 mm per unit of length • Provides rapid and accurate method of aligning machine parts and easy method of holding tools
 4 Machine Tapers • Classified by American Standards Association – Self-holding tapers – Steep or self-releasing tapers
 5 Self-Holding Tapers • Remain in position because of the wedging action of the small taper angle • Most common forms – Morse, the Brown & Sharpe, . 750 -in. -per-ft taper • Smaller sizes provided with tang to help drive the cutting tool • Larger sizes employ tang drive with shank held in by key or key drive with shank held draw bolt
 6 Steep Tapers • 3. 500 in. taper foot (tpf) • Formerly called standard milling machine taper • Used mainly for alignment of milling machine arbors and accessories • Has key drive and uses draw-in bolt to hold it securely in milling machine spindle
 7 Standard Tapers • Morse taper – Approximaely. 625 -in tpf, eight sizes #0 to #7 – Used for drills, reamers, and lathe center shanks • Brown & Sharpe taper –. 502 -in. tpf, sizes from #4 to #12 – Used on Brown and Sharpe machines • Jarno taper –. 600 -in. tpf, sizes from #2 to #20 • Standard taper pins – Used for positioning and holding parts together – ¼ tpf, standard sizes range from #6/0 to #10
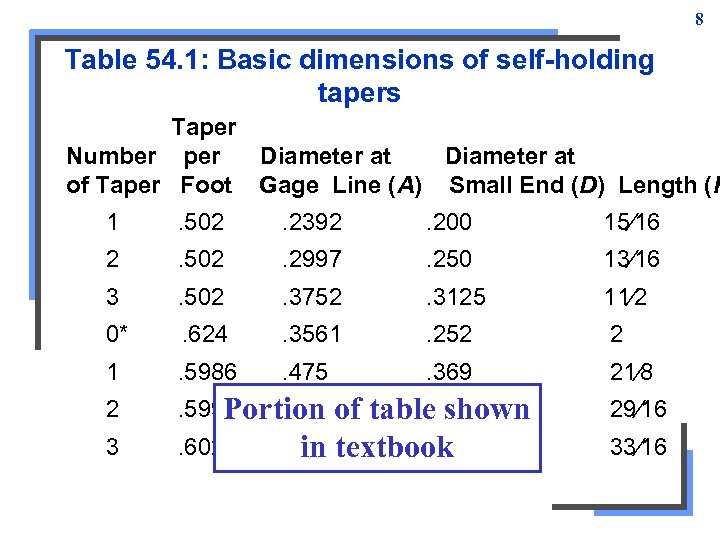 8 Table 54. 1: Basic dimensions of self-holding tapers Taper Number per Diameter at of Taper Foot Gage Line (A) Small End (D) Length (P 1 . 502 . 2392 . 200 15⁄16 2 . 502 . 2997 . 250 13⁄16 3 . 502 . 3752 . 3125 11⁄2 0* . 624 . 3561 . 252 2 1 . 5986 . 475 . 369 21⁄8 2 . 5994. 700 Portion of 29⁄16 3 . 6023 33⁄16 . 572 table shown. 938 textbook. 778 in
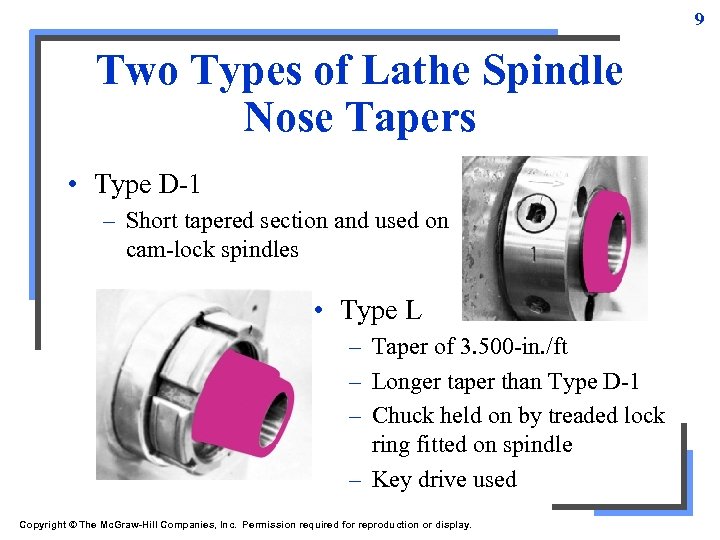 9 Two Types of Lathe Spindle Nose Tapers • Type D-1 – Short tapered section and used on cam-lock spindles • Type L – Taper of 3. 500 -in. /ft – Longer taper than Type D-1 – Chuck held on by treaded lock ring fitted on spindle – Key drive used Copyright © The Mc. Graw-Hill Companies, Inc. Permission required for reproduction or display.
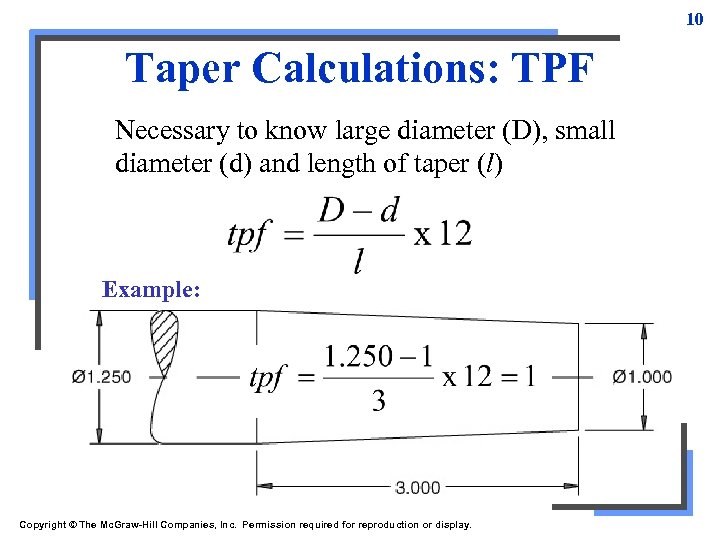 10 Taper Calculations: TPF Necessary to know large diameter (D), small diameter (d) and length of taper (l) Example: Copyright © The Mc. Graw-Hill Companies, Inc. Permission required for reproduction or display.
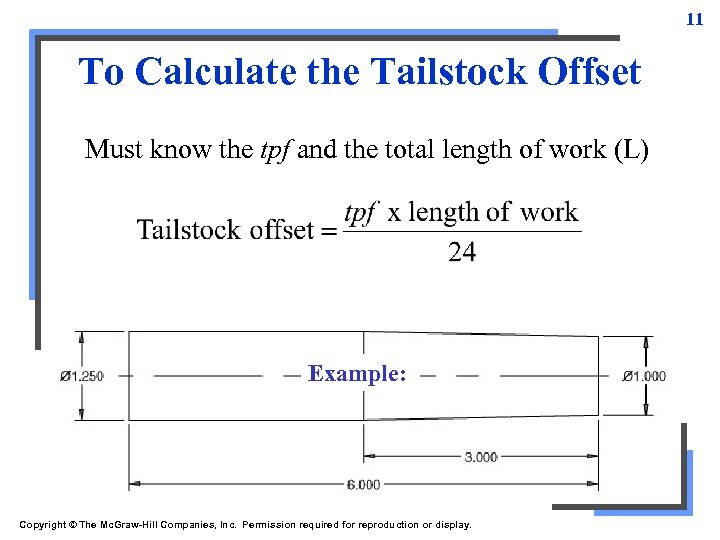 11 To Calculate the Tailstock Offset Must know the tpf and the total length of work (L) Example: Copyright © The Mc. Graw-Hill Companies, Inc. Permission required for reproduction or display.
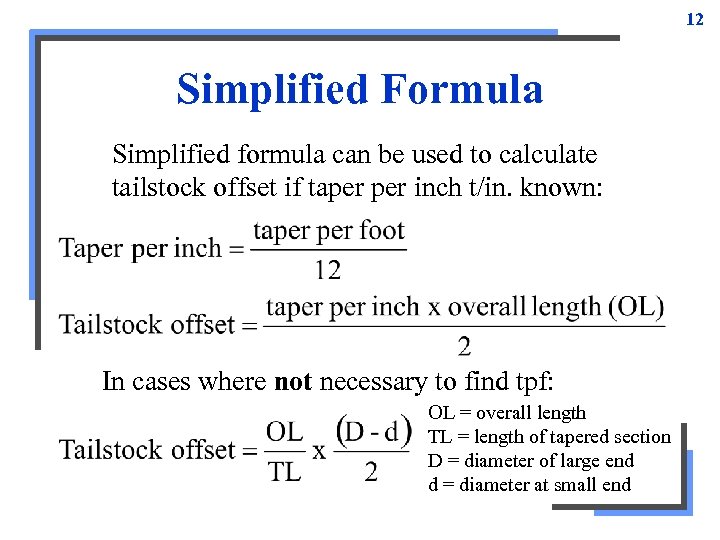 12 Simplified Formula Simplified formula can be used to calculate tailstock offset if taper inch t/in. known: In cases where not necessary to find tpf: OL = overall length TL = length of tapered section D = diameter of large end d = diameter at small end
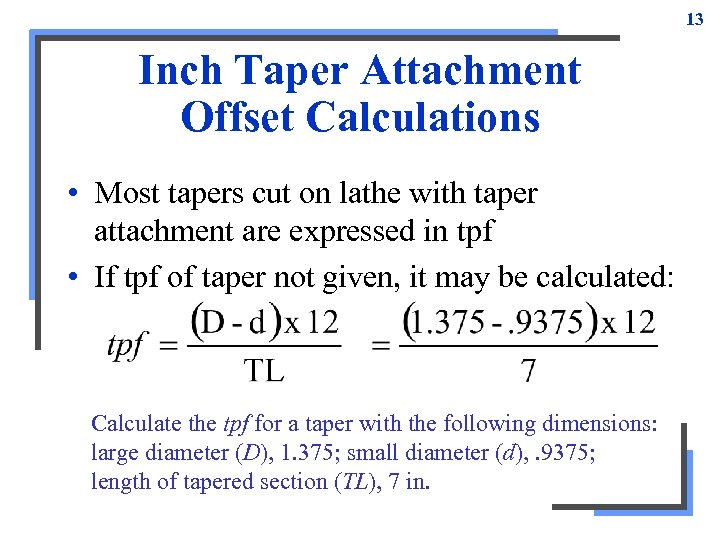 13 Inch Taper Attachment Offset Calculations • Most tapers cut on lathe with taper attachment are expressed in tpf • If tpf of taper not given, it may be calculated: Calculate the tpf for a taper with the following dimensions: large diameter (D), 1. 375; small diameter (d), . 9375; length of tapered section (TL), 7 in.
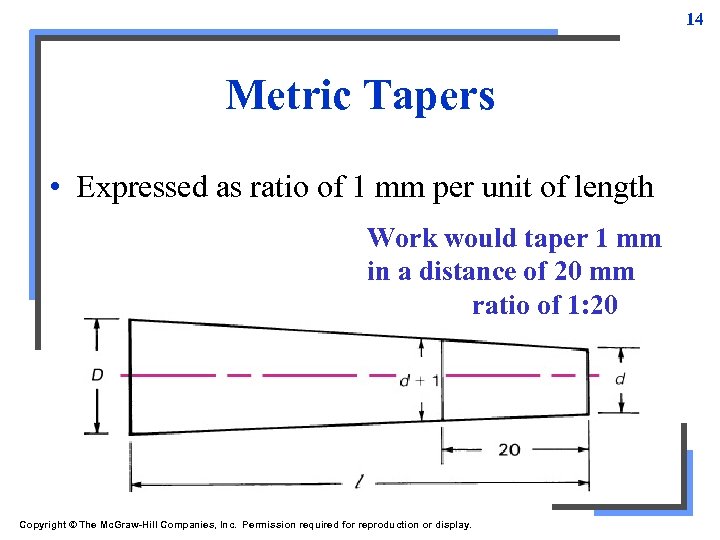 14 Metric Tapers • Expressed as ratio of 1 mm per unit of length Work would taper 1 mm in a distance of 20 mm ratio of 1: 20 Copyright © The Mc. Graw-Hill Companies, Inc. Permission required for reproduction or display.
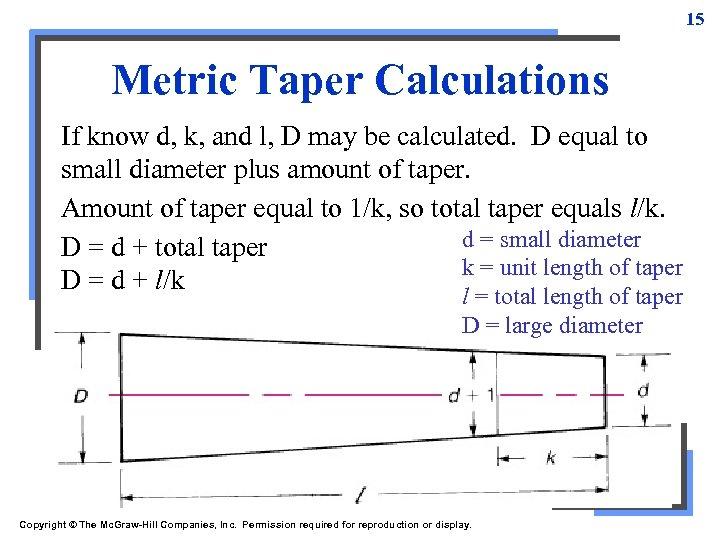 15 Metric Taper Calculations If know d, k, and l, D may be calculated. D equal to small diameter plus amount of taper. Amount of taper equal to 1/k, so total taper equals l/k. d = small diameter D = d + total taper k = unit length of taper D = d + l/k l = total length of taper D = large diameter Copyright © The Mc. Graw-Hill Companies, Inc. Permission required for reproduction or display.
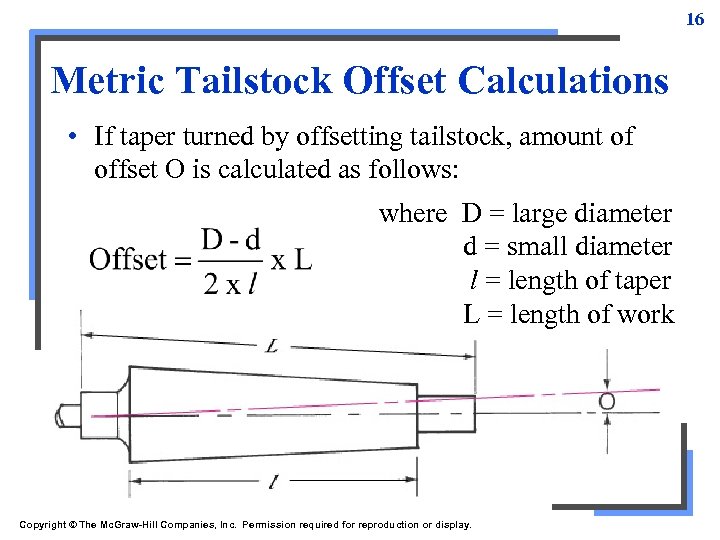 16 Metric Tailstock Offset Calculations • If taper turned by offsetting tailstock, amount of offset O is calculated as follows: where D = large diameter d = small diameter l = length of taper L = length of work Copyright © The Mc. Graw-Hill Companies, Inc. Permission required for reproduction or display.
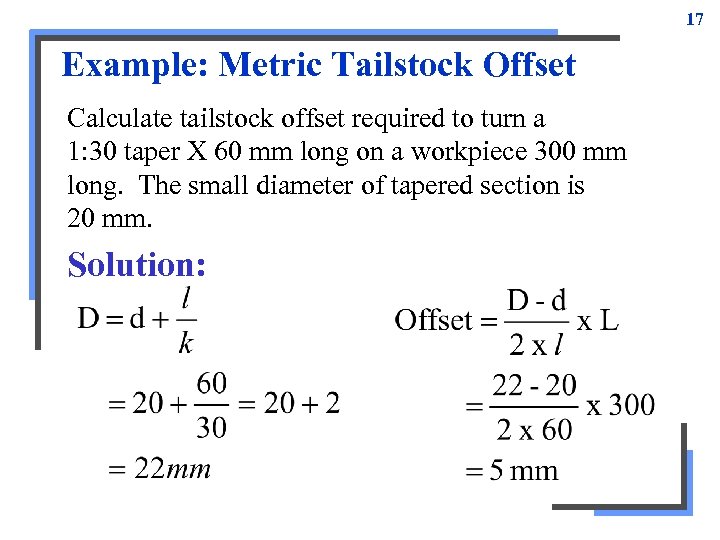 17 Example: Metric Tailstock Offset Calculate tailstock offset required to turn a 1: 30 taper X 60 mm long on a workpiece 300 mm long. The small diameter of tapered section is 20 mm. Solution:
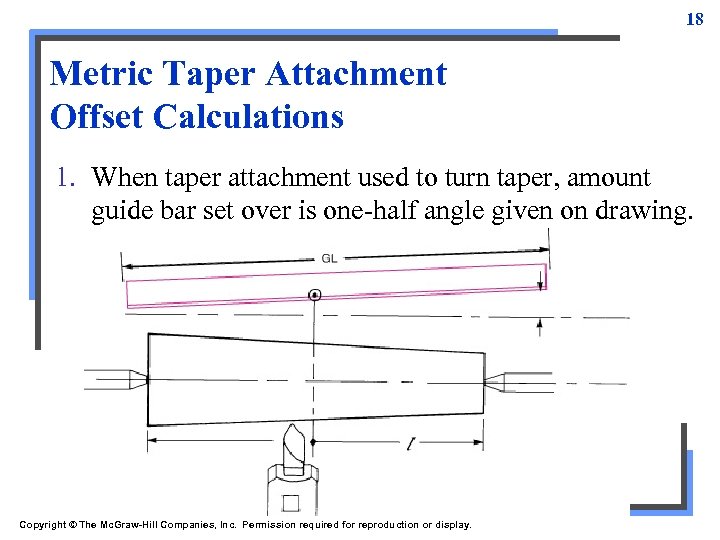 18 Metric Taper Attachment Offset Calculations 1. When taper attachment used to turn taper, amount guide bar set over is one-half angle given on drawing. Copyright © The Mc. Graw-Hill Companies, Inc. Permission required for reproduction or display.
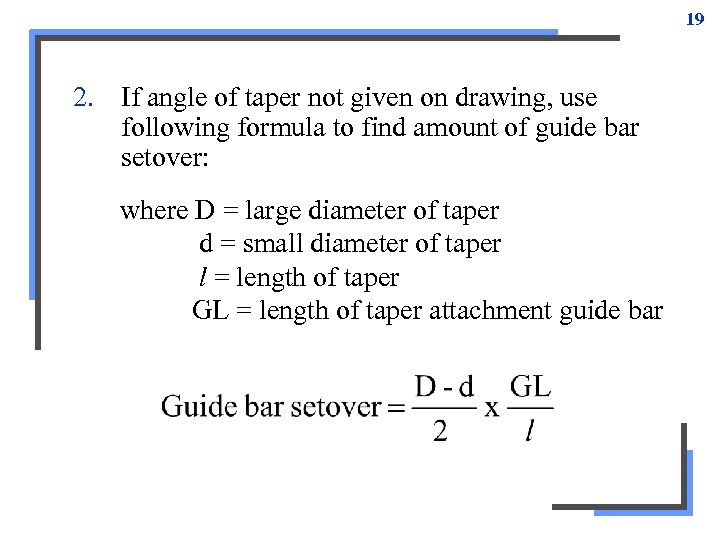 19 2. If angle of taper not given on drawing, use following formula to find amount of guide bar setover: where D = large diameter of taper d = small diameter of taper l = length of taper GL = length of taper attachment guide bar
 20 Taper Turning • Performed on work held between centers of in lathe chuck • Three methods of producing taper – Offsetting tailstock – Taper attachment set to proper tpf • Metric by calculating guide bar offset – Adjusting compound rest to angle of taper • Method used depends on work length, taper angle and number of pieces
 21 Tailstock Offset Method • Generally used to cut taper when no taper attachment available • Involves moving tailstock center out of line with headstock center – Amount tailstock may be offset limited • Will not permit steep tapers to be turned or standard tapers turned on end of long piece of work
 22 Three Methods of Offsetting the Tailstock • By using graduations on end of the tailstock (visual method) • By means of the graduated collar and feeler gage • By means of a dial indicator
 23 Procedure to Offset Tailstock by the Visual Method • Loosen the tailstock clamp nut • Offset upper part of tailstock by loosening one setscrew and tightening the other until required amount is indicated on graduated scale at end of tailstock Note: Make sure both setscrews snugged up to prevent any lateral movement of tailstock
 24 Procedure to Offset the Tailstock Accurately 1. Adjust tailstock spindle to distance it will be used in machining setup and lock tailstock spindle clamp 2. Mount a dial indicator in toolpost with plunger in horizontal position and on center 3. Using crossfeed handle, move indicator so registers ~. 020 in on work, and set indicator and crossfeed graduated collars to zero
 25 4. Loosen tailstock clamp nut 5. With tailstock adjusting setscrews, move tailstock until required offset shown on dial indicator 6. Tighten tailstock setscrew that was loosened, making sure indicator reading does not change 7. Tighten tailstock clamp nut Note: Tailstock may also be offset by using feeler gage between toolpost and tailstock spindle in conjunction with crossfeed graduated collar
 26 Advantages of Using a Taper Attachment for Taper Turning 1. Lathe centers remain in alignment, preventing distortion of centers on work 2. Setup is simple and permits changing from taper to parallel turning with no time lost to align centers 3. Length of workpiece does not matter, since duplicate tapers may be turned on any length of work
 27 4. Tapers may be produced on work held between centers, in chuck or in collet 5. Internal tapers can be produced by this method 6. Metric taper attachments are graduated in millimeters and degrees, while inch attachments are graduated in both degrees and inches of tpf • Eliminates need for lengthy calculations and setup 7. Wider range of tapers may be produced
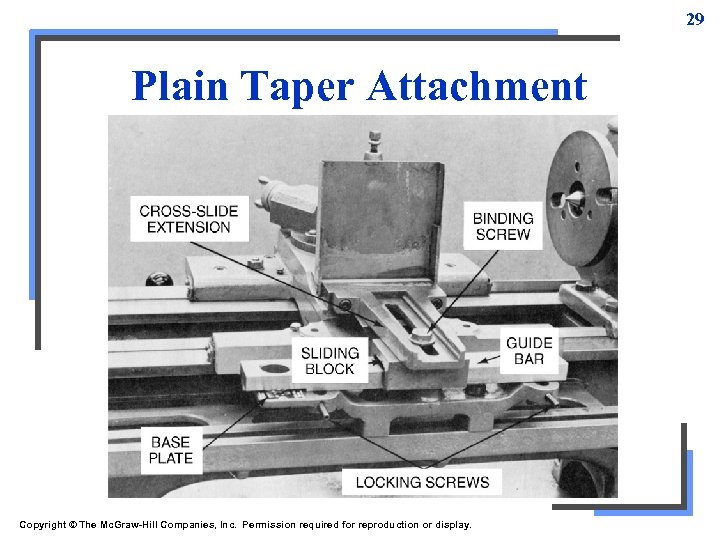
 28 Two Types of Taper Attachments • Plain taper – Remove binding screw that holds cross-slide to crossfeed screw nut • Binding screw used to connect sliding block to slide of taper attachment – Depth of cut made by using compound rest feed handle • Telescopic taper – Crossfeed screw not disengaged and depth of cut set by crossfeed handle
 29 Plain Taper Attachment Copyright © The Mc. Graw-Hill Companies, Inc. Permission required for reproduction or display.
 30 To Cut a Taper Using a Telescopic Taper Attachment 1. Clean and oil guide bar 2. Loosen lock screws and offset end of guide bar the required amount or, for inch attachments, set bar to required taper in degrees or tpf 3. Tighten lock screws 4. With compound rest set at 90º, set up cutting tool on center
 31 5. Set workpiece in lathe and mark length of taper 6. Tighten connecting screw on sliding block 7. Move carriage until center of attachment opposite length to be tapered 8. Lock anchor bracket to lathe bed 9. Take cut. 060 in. long, stop lathe, check end of taper for size 10. Set depth of roughing cut to. 050 to. 060 in. oversize, and machine taper
 32 11. Readjust taper attachment, if necessary, take light cut, and recheck taper fit 12. Finish-turn and fit taper to gage • Standard tapers – • Internal taper – • Taper plug gage mounted between centers and taper attachment adjusted to angle by using dial indicator mounted on center Same procedure, except guide bar set to side of centerline Mating external and internal tapers – Machine internal taper to plug gage then external
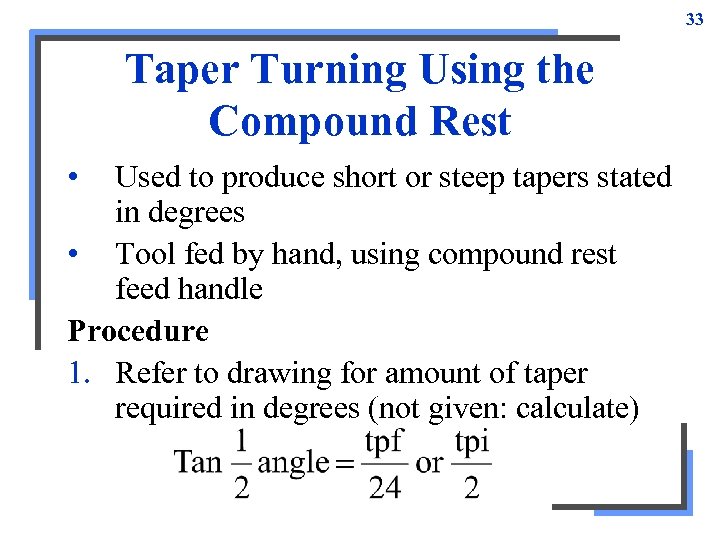 33 Taper Turning Using the Compound Rest • Used to produce short or steep tapers stated in degrees • Tool fed by hand, using compound rest feed handle Procedure 1. Refer to drawing for amount of taper required in degrees (not given: calculate)
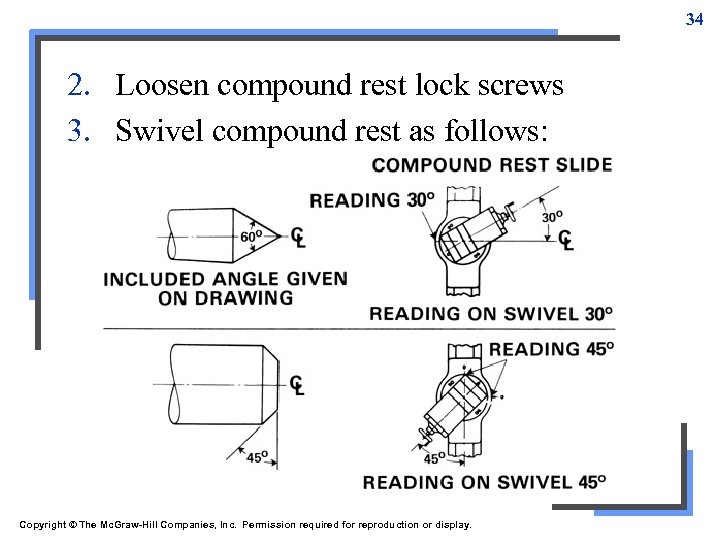 34 2. Loosen compound rest lock screws 3. Swivel compound rest as follows: Copyright © The Mc. Graw-Hill Companies, Inc. Permission required for reproduction or display.
 35 4. Tighten compound rest lock screws 5. Set cutting tool to center with toolholder at right angles to taper to be cut 6. Tighten toolpost securely 7. Back off top slide of compound rest so there will be enough travel to machine length of taper 8. Move carriage to position cutting tool near start of taper and then lock carriage
 36 9. Rough turn taper by feeding cutting tool using compound rest feed handle 10. Check taper for accuracy and readjust compound rest setting if necessary 11. Finish-turn and check taper for size and fit
 37 Checking a Taper • Scribing two lines exactly 1 in. apart on inch taper and measuring taper at these points with micrometer (difference is tpi) • Using a sine bar • Using taper ring gage for external tapers • Using a taper plug gage for internal tapers
 38 Taper Micrometer • Measures tapers quickly and accurately while work still in machine • Includes adjustable anvil and 1 -in. sine bar attached to frame – Adjusted by micrometer thimble • Reading indicates tpi, which converts to tpf • Available in various model for measuring internal tapers and dovetails
 39 Advantages of Taper Micrometers • Taper accuracy can be checked while workpiece still in machine • Provide quick and accurate means of checking tapers • Simple to operate • Need for costly gaging equipment eliminated • Can be used for measuring external tapers, internal tapers, and dovetails
 40 To Fit an External Taper 1. Make three equally spaced lines with chalk or mechanics blue along taper 2. Insert taper into ring gage and turn counterclockwise for one-half turn 3. Remove workpiece and examine chalk marks • • Correct if chalk spread along whole length of taper Adjust if chalk lines rubbed from only one end 4. Make slight adjustment to taper attachment and taking trial cuts, machine taper until fit is correct
 41 To Check a Metric Taper 1. Check drawing for taper required 2. Clean tapered section of work; apply layout dye 3. Lay out two lines on taper that are same distance apart as second number in taper ration 4. Measure diameters with metric micrometer at the two lines. Difference between should be 1 mm for each unit of length 5. If necessary, adjust taper attachment setting to correct taper


