

3ec1df40e510f55d39cc549ce49f8bc3.ppt
- Количество слайдов: 65
 Planning and Designing Projects
 Next Generation Science/Common Core Standards Addressed! l l CCSS. Math. Content. HSGCO. D. 12 Make formal geometric constructions with a variety of tools and methods (compass and straightedge, string, reflective devices, paper folding, dynamic geometric software, etc. ). Copying a segment; copying an angle; bisecting a segment; bisecting an angle; constructing perpendicular lines, including the perpendicular bisector of a line segment; and constructing a line parallel to a given line through a point not on the line. MP. 4 Model with mathematics. l (HS‐PS 1‐ 8) HSNQ. A. 2 Define appropriate quantities for the purpose of descriptive modeling. (HS‐PS 1‐ 4), (HS‐PS 1‐ 7) l CCSS. ELALiteracy. RST. 11‐ 12. 4 Determine the meaning of symbols, key terms, and other domain‐specific words and phrases as they are used in a specific scientific or technical context relevant to grades 11– 12 texts and topics. l
 Agriculture, Food and Natural Resource Standards Addressed! l PST. 04. 01. Create sketches and plans for AFNR structures. l PST. 04. 01. a. Interpret and explain the meaning of symbols used in sketches of agricultural structures.
 Bell Work! 1. Explain how to read project plans and blueprints. l 2. Explain how to draw project plans. l 3. Discuss the importance of a cutting list and a bill of materials. l
 Interest Approach l Ask students why a project needs to be planned on paper. Show copies of project plans and building blue-prints. Explain that planning “on paper” will help avoid costly mistakes and the purchase of unneeded materials. Lack of planning results in time wasted on trips to the lumber yard to buy one more board, a few more nails, or another pair of hinges.
 Interest Approach l “Paper planning” with scale drawings will help spot potential problems. Trial and error construction (unplanned construction) results in wasted time and materials. Stress to the students that when planning is done on paper, problems can be corrected with a pencil eraser instead of a hammer, wrecking bar, and saw.
 Terminology l l l l Architectural scale Bill of materials Border line Blueprint Center line Cleaning pad Compass Computer aided drafting (CAD) l l l l Construction procedure Cutting list Dimension line Divider Drafting paper Drafting pencils Drafting tape Drawing board
 Terminology l l l l Dusting brush Eraser shield Extension line Fasteners Finish Full-size drawing Hardware Hidden object line l l l l Isometric drawing Mechanical drawing Object line Pencil block eraser Pencil lead pointer Protractor Scale drawing Sketch
 Terminology T-square l Templates l Triangles l
 Reading or interpreting plans and blueprints l Ideas come alive when it is transferred to the paper. l Sketches and drawings are the written language that will tell you what must be built and the materials needed for the job.
 Reading or interpreting plans and blueprints Lines, symbols, and dimensions convey the project to the mind of the builder. l It is important to be able to read and draw sketches and scale drawings. l
 Sketches l Sketch: Original idea put on paper in a rough form which is not drawn to scale.
 Full-size drawing l Full-size drawing: Drawing the exact size of the project to be built.
 Scale drawing l Scale drawing: Drawn proportionally to the size of the actual project with a label that indicates its size in comparison to the project. – The scale might be ¼ inch to one foot.
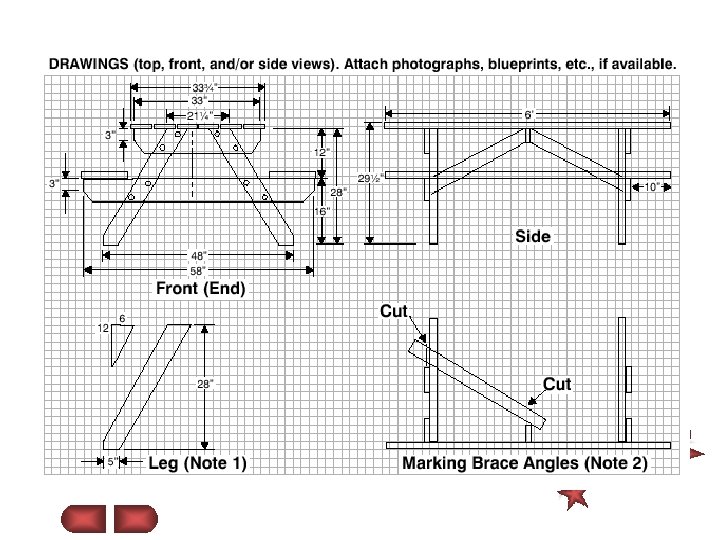
 Views l Types of Views: – One, two, or three views. – If three views are used, they are generally the top, front, and right side. – Isometric Drawings
 Views l When three views are used, they are generally the top, front, and right side. Picture Courtesy, Interstate Publishers, Inc.
 Isometric Drawing Isometric drawing: Three-dimensional drawing. l Difficult to draw, especially to scale. l When isometric drawings are made the corner lines are vertical and the front and side lines are drawn at an angle of 30 degrees to the horizontal. l
 Isometric Drawing Picture Courtesy, Interstate Publishers, Inc.
 Lines Several types of lines are used in drawings. l Using the wrong type of line is like using an incorrect word. l Types of Lines: – Border line, Object line, Hidden object line, Dimension line, Extension line, Center lines l
 Border Lines l Darker than any lines in the drawing and is used around the outside of the drawing like a frame for a picture.
 Object Lines l Darkest line of the drawing and stands out to show the exact shape of the object.
 Hidden Object Lines l Medium in darkness, and represents edge lines that can’t be seen.
 Dimension Lines Marks the dimensions of an object such as length, width, thickness, and diameter of holes. l Is a fine line with an arrowhead placed at each end and the number representing the dimension placed in the center of or on the dimension line. l
 Extension Lines l Fine line placed at the end of the dimension line referring the reader to the part of the object being dimensioned.
 Center Lines l Light, broken lines of alternating short and long dashes. Picture Courtesy, Interstate Publishers, Inc.
 Picture Courtesy, Interstate Publishers, Inc.
 Plans Typically prepared with an original and copies. l Copies may be collectively known as plans. l Types of Plans: – Blueprint – Computer aided drafting (CAD) l
 Blueprints Blueprint Copy of an original plan that is produced with a process that produces white lines and other images on a blue background. l Blue prints area being replaced with plans made by copying machines. l
 Blueprints l These machines show lines and details in black or blue on white paper. l Typical paper size is 18 × 24 inches but other sizes can be used, depending on the size of the drawing.
 CAD Computer aided drafting generates drawings on a computer which are then printed with a laser printer or a machine known as a plotter. l Some people refer to all large, detailed plans as blueprints regardless of how they have been prepared. l
 Reading Plans l. Reading project plans are like following a road map. l. You know you can’t visualize everything you will see along the way, but if you follow the lines and symbols properly, you will arrive at your destination. l. Learn to follow the plans step-by-step, and you will complete the project.
 Common Plan Symbols Picture Courtesy, Interstate Publishers, Inc.
 Common Plan Symbols Picture Courtesy, Interstate Publishers, Inc.
 Planning Tools and Procedures Mechanical drawing: Detailed drawing that is carefully and accurately drawn to scale using various drawing instruments. l Such drawings are the means of communication between those who prepare plans and the people who are builders. l
 Common Tools l l l l Drawing Board T-Square Drafting Board Ruler Architectural Scales Triangles Protractor Drafting Pencil l l l l Pencil Lead Pointer Compass Divider Templates Pencil Block Eraser Shield Dusting Brush Cleaning Pad
 Drawing Board A drawing board is a 20 × 24 inch piece of knot-free softwood. l The drawing board should have square corners and straight edges so that the T-square can be used to square from the board. l
 T-Square A T-square is used to position the paper square on the board and as a straight edge to draw horizontal lines. l When the head or short part of the square is held firmly against the board, the blade will extend squarely across the board. l
 Drafting Paper which drawings are done l Comes in white, cream, and light green l Sizes ranging from 8½ × 11 to 17 × 22. l
 Drafting Tape Used to fasten the paper to the drafting board. l Not as likely to damage the paper when removed as scotch tape or masking tape. l
 Measuring Devices Ruler marked in 16 ths of an inch may be used for most drawings. l Some drawings might be done in metric (millimeters, centimeters, meters) using an engineers scale rather than the standard English measurements (inches, feet, yards). l
 Measuring Devices l Architectural scale: Three-sided ruler with six different measuring scales often used by professionals.
 Triangles Held tightly against the T-square to form a straightedge to mark vertical lines. l Common Triangles: – 45– 90 degree triangle – 30– 60– 90 degree triangle l Picture Courtesy, Interstate Publishers, Inc.
 Protractor l Used to measure angles from 0 to 180 degrees.
 Drafting Pencils l Made in 18 different grades of hardness l Have the grade stamped near the end of the pencil.
 Drafting Pencils Pencil has no eraser it could be sharpened from either end, but it should be sharpened from the unmarked end so the hardness grade is not removed. l 2 H pencils are recommended for beginning draftsmen. l
 Pencil Lead Pointer Only a sharp pencil can produce accurate, clean-cut, dark lines. l A dull pencil produces fuzzy, indefinite, sloppy lines. l After sharpening, rotate the pencil on a piece of sandpaper, rough paper, or a fine file to finish the point. l
 Compass l Compass: Adjustable device with a point on one side and a pencil on the other side and is used to draw circles.
 Divider l Divider: Has a point on both legs and is used to transfer a measured distance to another location. – It may be faster and more accurate than using a ruler.
 Templates l Metal or plastic objects with a variety of circles or irregular curves that may be used to help draw circles and curves.
 Removing Construction Lines Pink or red pencil block eraser: Used to remove construction lines and other un-wanted lines. l Eraser shield: Piece of metal or plastic used to protect areas while unwanted lines are erased. l
 Removing Construction Lines l Dusting Brush: Small brush used to remove eraser fragments from the drawing.
 Removing Construction Lines Cleaning pad: Pad containing special cleaning powder l When the drawing is completely finished use to help remove any remaining loose graphite particles from the drawing. l
 Block Lettering A finished drawing should have the name of the project, your name, and scale used in legible, neat, well balanced, and attractive lettering. l Block lettering is probably the most popular type of lettering. l
 Drawing Dimensions Used to take the next step in the planning process. l Order must be prepared for the lumber yard or metal supplier and instructions must be prepared for the builder. l
 Cutting Lists l List of all pieces giving exact dimensions of each item needed to complete the project. l Used by the builder to cut purchased lumber/metal into the sizes needed to assemble the project.

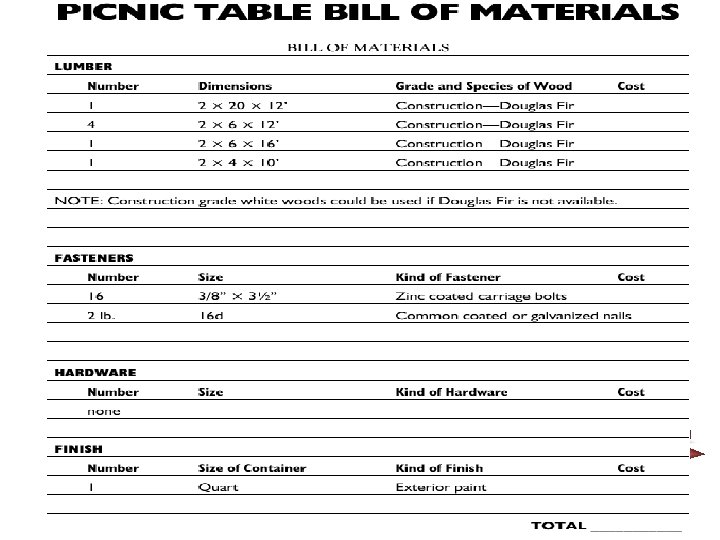
 Bill of Materials Listing of the kinds and amount of lumber, fasteners, hardware, and finish necessary for completing the project. l Is in sizes and quantities that the lumberyard worker can use to fill your order. l
 Bill of Materials The plans should include the lumber dimensions, grade, and species of wood. l Example: One 12 foot 2 × 4, construction grade, white pine. l 2 x 2 x ¼ Angle iron l
 Fasteners The fasteners section, sometimes referred to as rough hardware, needs to have the number, size, and kind of fastener (nails, screws, bolts, and glue). l Example: 12 flat head standard slot 1½ inch eight gauge steel wood screws. l Picture Courtesy, Interstate Publishers, Inc.
 Hardware l Hinges, catches, knobs, handles, and locks are all classified as hardware or finish hardware. l An example of hardware would be one pair of 2 inch brass tee hinges. Picture Courtesy, Interstate Publishers, Inc.
 Finish l Finish is used to protect and beautify a project. l It includes primers, paints, stains, wood preservatives, and clear sealers.
 Labor l Even if the project is to be built for yourself, estimating the hours helps to determine whether it makes sense to continue the plan to build the project.
 The End!