

f90cd6efd2334c09b018b63f4e58d412.ppt
- Количество слайдов: 74
 MICRO CONTROLLER 8051 UNIT IV Mr. S. VINOD LECTURER EEE DEPARTMENT
 Functional block diagram • Instruction format • addressing modes • Interrupt structure • Timer • I/O ports • Serial communication.
 Microprocessor vs Microcontroller Microprocessor • CPU is stand-alone, RAM, ROM, I/O, timer are separate • designer can decide on the amount of ROM, RAM and I/O ports. • expansive • versatility • general-purpose Microcontroller • CPU, RAM, ROM, I/O and timer are all on a single chip • fix amount of on-chip ROM, RAM, I/O ports • for applications in which cost, power and space are critical • single-purpose
 Embedded System • Embedded system means the processor is embedded into that application. • An embedded product uses a microprocessor or microcontroller to do one task only. • In an embedded system, there is only one application software that is typically burned into ROM. • Example-printer, keyboard, video game player
 INTRODUCTION • MCS-51 family, originally designed by Intel in the 1980’s • Used in a large percentage of embedded systems • Includes several on-chip peripherals, like timers and counters • 128 bytes of on-chip data memory and up to 4 K bytes of on-chip program memory
 FEATURES • 8 -bit CPU optimized for control applications • Extensive Boolean processing (single-bit logic) capabilities • 64 K Program Memory address space • 64 K Data Memory address space • Up to 4 K bytes of on-chip Program Memory • 128 bytes of on-chip Data RAM • 32 bi-directional and individually addressable I/O lines • Two 16 -bit timer/counters • 6 -source/5 -vector interrupt structure with two priority levels
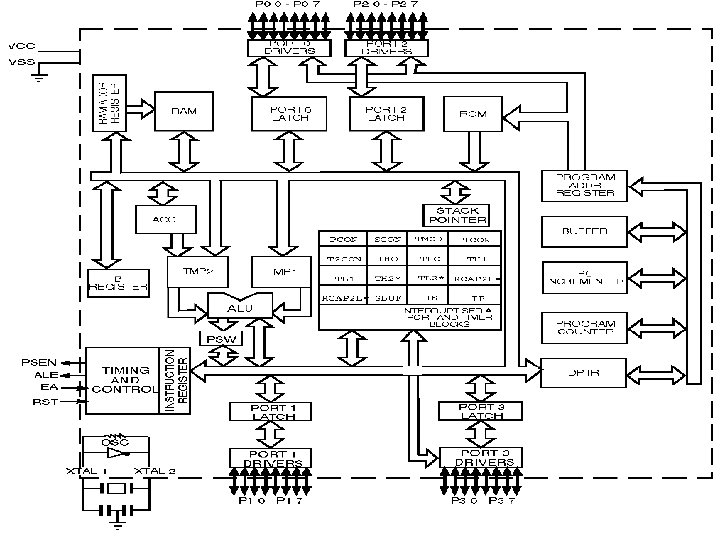
 Block Diagram External interrupts Interrupt Control On-chip ROM for program code Timer/Counter On-chip RAM Timer 1 Timer 0 CPU OSC Bus Control 4 I/O Ports P 0 P 1 P 2 P 3 Address/Data Serial Port Tx. D Rx. D Counter Inputs
 Pin Description of the 8051 P 1. 0 P 1. 1 P 1. 2 P 1. 3 P 1. 4 P 1. 5 P 1. 6 P 1. 7 RST (RXD)P 3. 0 (TXD)P 3. 1 (INT 0)P 3. 2 (INT 1)P 3. 3 (T 0)P 3. 4 (T 1)P 3. 5 (WR)P 3. 6 (RD)P 3. 7 XTAL 2 XTAL 1 GND 1 2 3 4 5 6 7 8 9 10 11 12 13 14 15 16 17 18 19 20 8051 40 39 38 37 36 35 34 33 32 31 30 29 28 27 26 25 24 23 22 21 Vcc P 0. 0(AD 0 P 0. 1(AD 1) ) P 0. 2(AD 2 P 0. 3(AD 3) ) P 0. 4(AD 4) P 0. 5(AD 5) P 0. 6(AD 6) P 0. 7(AD 7) EA/VPP ALE/PROG PSEN P 2. 7(A 15) P 2. 6(A 14) P 2. 5(A 13) P 2. 4(A 12) P 2. 3(A 11) P 2. 2(A 10) P 2. 1(A 9) P 2. 0(A 8)
 XTAL Connection to 8051 • Using a quartz crystal oscillator • We can observe the frequency on the XTAL 2 pin. C 2 XTAL 2 30 p. F C 1 XTAL 1 30 p. F GND
 Architecture • • • Memory Organization Program Status Word Interrupt Structure Port Structures Timer/Counters Reset
 Memory Organization • Logical separation of program and data memory – Separate address spaces for Program (ROM) and Data (RAM) Memory – Allow Data Memory to be accessed by 8 -bit addresses quickly and manipulated by 8 -bit CPU • Program Memory – Only be read, not written to – The address space is 16 -bit, so maximum of 64 K bytes – Up to 4 K bytes can be on-chip (internal) of 8051 core – PSEN (Program Store Enable) is used for access to external Program Memory
 Memory Organization • Data Memory – Includes 128 bytes of on-chip Data Memory which are more easily accessible directly by its instructions – There is also a number of Special Function Registers (SFRs) – Internal Data Memory contains four banks of eight registers and a special 32 -byte long segment which is bit addressable by 8051 bitinstructions – External memory of maximum 64 K bytes is accessible by “movx”
 Memory Organization • Internal Data Memory, 128 bytes
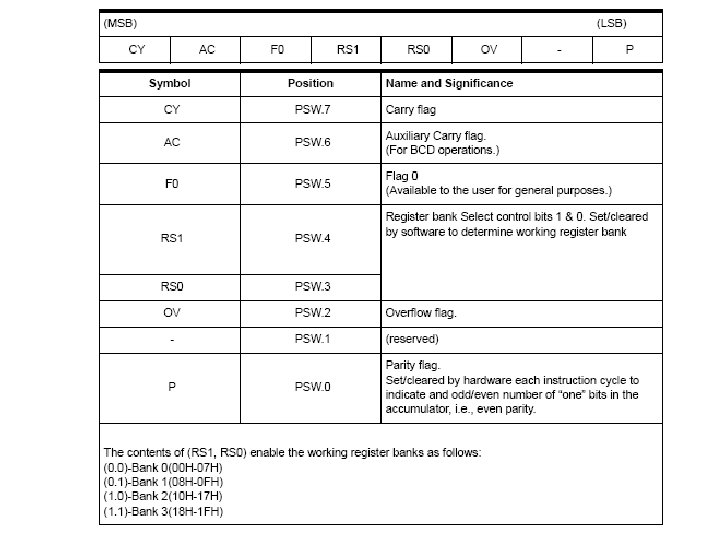
 contains several status bits that reflect") Program Status Word The Program Status Word (PSW) contains several status bits that reflect the current state of the CPU. • It contains the Carry bit, the Auxiliary Carry (for BCD operations), the two register bank select bits, the Overflow flag, a parity bit, and two user-definable status flags. 1. The Carry bit, other than serving the functions of a Carry bit in arithmetic operations, also serves as the “Accumulator” for a number of Boolean operations. 2. the Auxiliary Carry for BCD operations. 3. The bits RS 0 and RS 1 are used to select one of the four register banks shown below. A number of instructions refer to these RAM locations as R 0 through R 7. The selection of which of the four banks is being referred to is made on the basis of the bits RS 0 and RS 1 at execution time. • The parity bit reflects the number of 1’s in the Accumulator: P = 1 if the Accumulator contains an odd number of 1’s, and P = 0 if the Accumulator contains an even number of 1’s. • Two bits in the PSW are uncommitted and may be used as general purpose status flags.
Program Status Word The Program Status Word (PSW) contains several status bits that reflect the current state of the CPU. • It contains the Carry bit, the Auxiliary Carry (for BCD operations), the two register bank select bits, the Overflow flag, a parity bit, and two user-definable status flags. 1. The Carry bit, other than serving the functions of a Carry bit in arithmetic operations, also serves as the “Accumulator” for a number of Boolean operations. 2. the Auxiliary Carry for BCD operations. 3. The bits RS 0 and RS 1 are used to select one of the four register banks shown below. A number of instructions refer to these RAM locations as R 0 through R 7. The selection of which of the four banks is being referred to is made on the basis of the bits RS 0 and RS 1 at execution time. • The parity bit reflects the number of 1’s in the Accumulator: P = 1 if the Accumulator contains an odd number of 1’s, and P = 0 if the Accumulator contains an even number of 1’s. • Two bits in the PSW are uncommitted and may be used as general purpose status flags.
 Interrupt Structure • The 8051 provides 4 interrupt sources – Two external interrupts – Two timer interrupts • Additional description follows in Operations chapter
 Port Structures • • • The 8051 contains four I/O ports All four ports are bidirectional Each port has SFR (Special Function Registers P 0 through P 3) which works like a latch, an output driver and an input buffer Both output driver and input buffer of Port 0 and output driver of Port 2 are used for accessing external memory Accessing external memory works like this – Port 0 outputs the low byte of external memory address (which is time-multiplexed with the byte being written or read) – Port 2 outputs the high byte (only needed when the address is 16 bits wide) Port 3 pins are multifunctional. The alternate functions are activated with the 1 written in the corresponding bit in the port SFR
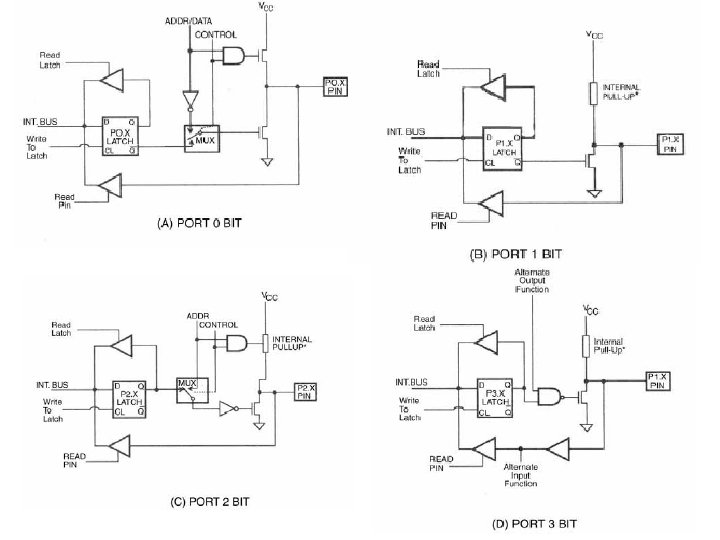
 Read-Modify-Write Feature • • When reading a port some instructions read the latch and others read the pin The instructions that read the latch rather than the pin are the ones that read a value (possibly change it), an then rewrite it to the latch are called “read-modify-write” instructions
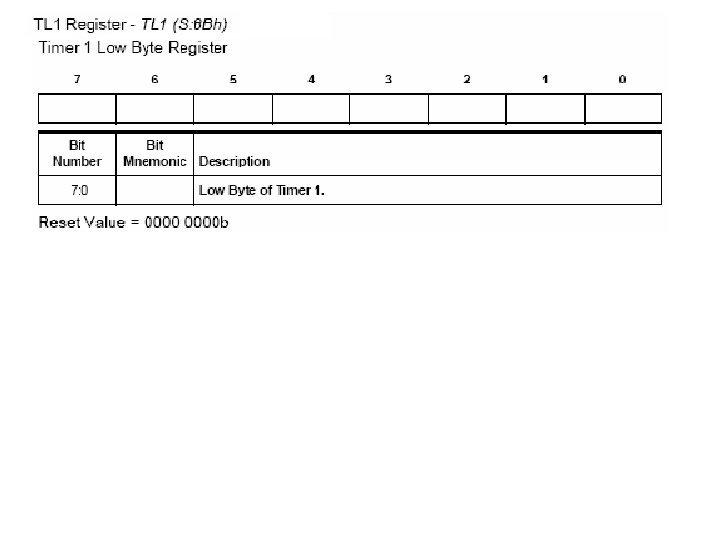
 Timer/Counters • The 8051 has two 16 -bit Timer/Counter registers – Timer 0 – Timer 1 • Both can work either as timers or event counters • Both have four different operating modes from which to select. – – Mode 0 (13 -bit Timer) Mode 1 (16 -bit Timer) Mode 2 (8 -bit Timer with Auto-Reload) Mode 3 (Two 8 -bit Timers)
 Instruction Set • Optimized for 8 -bit control applications • Fast addressing modes for accessing internal RAM in order to facilitate byte operations on small data structures • Good for systems that require a lot of Boolean processing because of its extensive support for one-bit variables as a separate data type
 • Direct Addressing – Operand is specified by an 8 -bit") Addressing Modes (1/3) • Direct Addressing – Operand is specified by an 8 -bit address field in the instruction – This address mode is possible only for addressing internal Data RAM and SFRs • Indirect Addressing – The instruction specifies a register which contains the address of the operand – The address register for 8 -bit addresses can be R 0 or R 1 of the selected bank, or the Stack Pointer – The address register for 16 -bit addresses can only be 16 -bit “data pointer” register, DPTR – Both internal and external RAM can be indirectly addressed
Addressing Modes (1/3) • Direct Addressing – Operand is specified by an 8 -bit address field in the instruction – This address mode is possible only for addressing internal Data RAM and SFRs • Indirect Addressing – The instruction specifies a register which contains the address of the operand – The address register for 8 -bit addresses can be R 0 or R 1 of the selected bank, or the Stack Pointer – The address register for 16 -bit addresses can only be 16 -bit “data pointer” register, DPTR – Both internal and external RAM can be indirectly addressed
 • Register Instructions – Special instructions are used for accessing four") Addressing Modes (2/3) • Register Instructions – Special instructions are used for accessing four register banks (containing R 0 to R 7) – This instructions have 3 -bit register specification within the opcode – This way of accessing registers is much more efficient because of no need for the address byte – When such instruction is executed one of registers in selected ban is accessed – Register bank is selected by two bank select bits in PSW
Addressing Modes (2/3) • Register Instructions – Special instructions are used for accessing four register banks (containing R 0 to R 7) – This instructions have 3 -bit register specification within the opcode – This way of accessing registers is much more efficient because of no need for the address byte – When such instruction is executed one of registers in selected ban is accessed – Register bank is selected by two bank select bits in PSW
 • Register-Specific Instructions – These are instructions which are specific to") Addressing Modes (3/3) • Register-Specific Instructions – These are instructions which are specific to a certain register and they don’t need an address byte (they always operate with the same register) • Immediate Constants – The value of a constant follows the opcode – MOV A, #10 – loads the Accumulator with the decimal number 10 • Indexed Addressing – Only Program Memory can be accessed and it can be a read – Used for reading look-up tables in Program Memory and “case jump” instruction
Addressing Modes (3/3) • Register-Specific Instructions – These are instructions which are specific to a certain register and they don’t need an address byte (they always operate with the same register) • Immediate Constants – The value of a constant follows the opcode – MOV A, #10 – loads the Accumulator with the decimal number 10 • Indexed Addressing – Only Program Memory can be accessed and it can be a read – Used for reading look-up tables in Program Memory and “case jump” instruction
 Instruction Types of 8051 • • • Arithmetic Instructions Logical Instructions Data Transfers Lookup Tables Boolean Instructions Jump Instructions
 8051 Registers
 The Instruction Set and Addressing Modes • Rn Register R 7 -R 0 of the currently selected Register Bank. • direct 8 -bit internal data location’s address. This could be an Internal Data RAM location (0127) or a SFR [i. e. , I/O port, control register, status register, etc. (128 255)]. • @Ri 8 -bit internal data RAM location (0 -255) addressed indirectly through register R 1 or R 0. • #data 8 -bit constant included in instruction. • #data 16 16 -bit constant included in instruction. • addr 16 16 -bit destination address. Used by LCALL and LJMP. A branch can be anywhere within the 64 K byte Program Memory address space. • addr 11 11 -bit destination address. Used by ACALL and AJMP. The branch will be within the same 2 K byte page of program memory as the first byte of the following instruction. • rel Signed (two’s complement) 8 -bit offset byte. Used by SJMP and all conditional jumps. Range is -128 to +127 bytes relative to first byte of the following instruction. • bit Direct Addressed bit in Internal Data RAM or Special Function Register.
 ARITHMETIC OPERATIONS ADD A, Rn ADD A, direct ADD A, @Ri ADD A, #data ADDC A, Rn ADDC A, direct ADDC A, @Ri ADDC A, #data SUBB A, Rn SUBB A, direct SUBB A, @Ri SUBB A, #data INC A INC Rn INC direct INC @Ri DEC A DEC Rn DEC direct DEC @Ri INC DPTR MUL AB DIV AB DA A Add register to Accumulator Add direct byte to Accumulator Add indirect RAM to Accumulator Add immediate data to Accumulator Add register to Accumulator with Carry Add direct byte to Accumulator with Carry Add indirect RAM to Accumulator with Carry Add immediate data to Acc with Carry Subtract Register from Acc with borrow Subtract direct byte from Acc with borrow Subtract indirect RAM from ACC with borrow Subtract immediate data from Acc with borrow Increment Accumulator Increment register Increment direct byte Increment direct RAM Decrement Accumulator Decrement Register Decrement direct byte Decrement indirect RAM Increment Data Pointer Multiply A & B Divide A by B Decimal Adjust Accumulator
 LOGICAL OPERATION ANL A, Rn ANL A, direct ANL A, @Ri ANL A, #data ANL direct, A ANL direct, #data ORL A, Rn ORL A, direct ORL A, @Ri ORL A, #data ORL direct, A ORL direct, #data XRL A, Rn XRL A, direct XRL A, @Ri XRL A, #data XRL direct, A XRL direct, #data AND Register to Accumulator AND direct byte to Accumulator AND indirect RAM to Accumulator AND immediate data to Accumulator AND Accumulator to direct byte AND immediate data to direct byte OR register to Accumulator OR direct byte to Accumulator OR indirect RAM to Accumulator OR immediate data to Accumulator OR Accumulator to direct byte OR immediate data to direct byte Exclusive-OR register to Accumulator Exclusive-OR direct byte to Accumulator Exclusive-OR indirect RAM to Accumulator Exclusive-OR immediate data to Accumulator Exclusive-OR Accumulator to direct byte Exclusive-OR immediate data to direct byte
 LOGICAL OPERATION CLR A Clear Accumulator CPL A Complement Accumulator RL A Rotate Accumulator Left RLC A Rotate Accumulator Left through the Carry RR A Rotate Accumulator Right RRC A Rotate Accumulator Right through the Carry SWAP A Swap nibbles within the Accumulator
 Data Transfers MOV A, Rn MOV A, direct MOV A, @Ri MOV A, #data MOV Rn, A MOV Rn, direct MOV Rn, #data MOV direct, A MOV direct, Rn MOV direct, direct MOV direct, @Ri MOV direct, #data MOV @Ri, A MOV @Ri, direct Move register to Accumulator Move direct byte to Accumulator Move indirect RAM to Accumulator Move immediate data to Accumulator Move Accumulator to register Move direct byte to register Move immediate data to register Move Accumulator to direct byte Move register to direct byte Move direct byte to direct Move indirect RAM to direct byte Move immediate data to direct byte Move Accumulator to indirect RAM Move direct byte to indirect RAM
 Data Transfers MOV @Ri, #data MOV DPTR, #data 16 MOVC A, @A+DPTR MOVC A, @A+PC MOVX A, @Ri MOVX A, @DPTR MOVX @Ri, A MOVX @DPTR, A PUSH direct POP direct XCH A, Rn XCH A, direct XCH A, @Ri XCHD A, @Ri Move immediate data to indirect RAM Load Data Pointer with a 16 -bit constant Move Code byte relative to DPTR to Acc Move Code byte relative to PC to Acc Move External RAM (8 -bit addr) to. Acc Move External RAM (16 -bit addr) to Acc Move Acc to External RAM (8 -bit addr) Move Acc to External RAM (16 -bitaddr) Push direct byte onto stack Pop direct byte from stack Exchange register with Accumulator Exchange direct byte with Accumulator Exchange indirect RAM with Accumulator Exchange low-order Digit indirect RAM with Acc
 BOOLEAN VARIABLE MANIPULATION CLR C CLR bit SETB C SETB bit CPL C CPL bit ANL C, /bit ORL C, /bit MOV C, bit MOV bit, C JC rel JNC rel JB bit, rel JNB bit, rel JBC bit, rel Clear Carry Clear direct bit Set Carry Set direct bit Complement Carry Complement direct bit AND direct bit to CARRY AND complement of direct bit to Carry OR complement of direct bit to Carry Move Carry to direct bit Jump if Carry is set Jump if Carry not set Jump if direct Bit is Not set Jump if direct Bit is set & clear bit
 PROGRAM BRANCHING ACALL LCALL RETI AJMP addr 11 LJMP addr 16 SJMP rel Short JMP @A+DPTR JZ rel JNZ rel CJNE A, direct, rel CJNE A, #data, rel CJNE Rn, #data, rel CJNE @Ri, #data, rel DJNZ Rn, rel DJNZ direct, rel NOP addr 11 Absolute Subroutine Call addr 16 Long Subroutine Call Return from Subroutine Return from interrupt Absolute Jump Long Jump (relative addr) Jump indirect relative to the DPTR Jump if Accumulator is Zero Jump if Accumulator is Not Zero Compare direct byte to Acc and Jump if Not Equal Compare immediate to register and Jump if Not Equal Compare immediate to indirect and Jump if Not Equal Decrement register and Jump if Not. Zero Decrement direct byte and Jump if. Not Zero No Operation
 Lookup Tables
 Timer/Counters • 8051 has two 16 -bit Timer/Counter registers – Timer/Counter 0 – Timer/Counter 1 • These registers can be used as timers or as event counters • When operating as a timer, the timer/counter runs for a programme length of time, then issues an interrupt request. • When operating as a counter, the timer/counter counts negative transitions on an external pin. After a preset number of counts, the counter issues an interrupt request. • Both registers have additional four operating modes
 Timer/Counter Modes • The selection for “Timer” or “Counter” is done by control bits C/T in the TMOD register • Both Timer/Counters have four operating modes, which Modes 0, 1 and 2 are the same for both Timer/Counters, Mode 3 is different • Modes are selected by bit pairs (M 1, M 0) in TMOD SFR • Another SFR used for work with Timer/Counters is TCON containing flag (TFx) and control (TRx) bits
 TMOD REGISTER
 T CON REGISTER
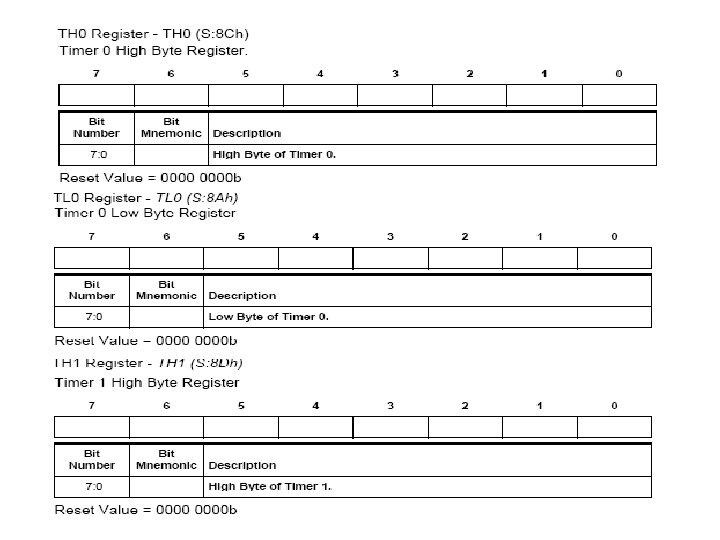
 Timer 0 • Timer 0 functions as either a timer or event counter in four modes of operation. Timer 0 is controlled by the four lower bits of the TMOD register (see Table 2 -5) and bits 0, 1, 4 and 5 of the TCON register (see Table 2 -3). TMOD register selects the method of timer gating (GATE 0), timer or counter operation (T/C 0#) and mode of operation (M 10 and M 00). The TCON register provides timer 0 control functions: overflow flag (TF 0), run control bit (TR 0), interrupt flag (IE 0) and interrupt type control bit (IT 0). • For normal timer operation (GATE 0= 0), setting TR 0 allows TL 0 to be incremented by the selected input. Setting GATE 0 and TR 0 allows external pin INT 0# to control timer operation. • Timer 0 overflow (count rolls over from all 1 s to all 0 s) sets TF 0 flag, generating an interrupt request. • It is important to stop timer/counter before changing mode.
 • • Mode 0 configures timer 0 as a") Mode 0 (13 -bit Timer) • • Mode 0 configures timer 0 as a 13 -bit timer which is set up as an 8 -bit timer (TH 0 register) and the lower five bits of the TL 0 register. The upper three bits of TL 0 register are indeterminate and should be ignored. Pre scalar overflow increments the TH 0 register. As the count rolls over from all 1’s to all 0’s, it sets the timer interrupt flag TF 0. The counted input is enabled to the Timer when TR 0 = 1 and either GATE = 0 or INT 0 = 1. (Setting GATE = 1 allows the Timer to be controlled by external input INT 0, to facilitate pulse width measurements). TR 0 is a control bit in the Special Function register TCON, GATE is in TMOD. Mode 0 operation is the same for Timer 0 as for Timer 1. Substitute TR 0, TF 0 and INT 0 for the corresponding Timer 1 signals. There are two different GATE bits, one for Timer 1 (TMOD. 7) and one for Timer 0 (TMOD. 3).
Mode 0 (13 -bit Timer) • • Mode 0 configures timer 0 as a 13 -bit timer which is set up as an 8 -bit timer (TH 0 register) and the lower five bits of the TL 0 register. The upper three bits of TL 0 register are indeterminate and should be ignored. Pre scalar overflow increments the TH 0 register. As the count rolls over from all 1’s to all 0’s, it sets the timer interrupt flag TF 0. The counted input is enabled to the Timer when TR 0 = 1 and either GATE = 0 or INT 0 = 1. (Setting GATE = 1 allows the Timer to be controlled by external input INT 0, to facilitate pulse width measurements). TR 0 is a control bit in the Special Function register TCON, GATE is in TMOD. Mode 0 operation is the same for Timer 0 as for Timer 1. Substitute TR 0, TF 0 and INT 0 for the corresponding Timer 1 signals. There are two different GATE bits, one for Timer 1 (TMOD. 7) and one for Timer 0 (TMOD. 3).
 • Mode 1 is the same as Mode 0,") Mode 1 (16 -bit Timer) • Mode 1 is the same as Mode 0, except that the Timer register is being run with all 16 • bits. Mode 1 configures timer 0 as a 16 -bit timer with the TH 0 and TL 0 registers connected in cascade. The selected input increments the TL 0 register.
Mode 1 (16 -bit Timer) • Mode 1 is the same as Mode 0, except that the Timer register is being run with all 16 • bits. Mode 1 configures timer 0 as a 16 -bit timer with the TH 0 and TL 0 registers connected in cascade. The selected input increments the TL 0 register.
 • • • Mode 2 configures timer") Mode 2 (8 -bit Timer with Auto-Reload) • • • Mode 2 configures timer 0 as an 8 -bit timer (TL 0 register) that automatically reloads from the TH 0 register. TL 0 overflow sets TF 0 flag in the TCON register and reloads TL 0 with the contents of TH 0, which is preset by software. When the interrupt request is serviced, hardware clears TF 0. The reload leaves TH 0 unchanged. The next reload value may be changed at any time by writing it to the TH 0 register. Mode 2 operation is the same for Timer/Counter 1.
Mode 2 (8 -bit Timer with Auto-Reload) • • • Mode 2 configures timer 0 as an 8 -bit timer (TL 0 register) that automatically reloads from the TH 0 register. TL 0 overflow sets TF 0 flag in the TCON register and reloads TL 0 with the contents of TH 0, which is preset by software. When the interrupt request is serviced, hardware clears TF 0. The reload leaves TH 0 unchanged. The next reload value may be changed at any time by writing it to the TH 0 register. Mode 2 operation is the same for Timer/Counter 1.
 • • • Mode 3 configures timer 0") Mode 3 (Two 8 -bit Timers) • • • Mode 3 configures timer 0 so that registers TL 0 and TH 0 operate as separate 8 -bit timers. This mode is provided for applications requiring an additional 8 -bit timer or counter. TL 0 uses the timer 0 control bits C/T 0# and GATE 0 in the TMOD register, and TR 0 and TF 0 in the TCON register in the normal manner. TH 0 is locked into a timer function (counting FPER /6) and takes over use of the timer 1 interrupt (TF 1) and run control (TR 1) bits. Thus, operation of timer 1 is restricted when timer 0 is in mode 3.
Mode 3 (Two 8 -bit Timers) • • • Mode 3 configures timer 0 so that registers TL 0 and TH 0 operate as separate 8 -bit timers. This mode is provided for applications requiring an additional 8 -bit timer or counter. TL 0 uses the timer 0 control bits C/T 0# and GATE 0 in the TMOD register, and TR 0 and TF 0 in the TCON register in the normal manner. TH 0 is locked into a timer function (counting FPER /6) and takes over use of the timer 1 interrupt (TF 1) and run control (TR 1) bits. Thus, operation of timer 1 is restricted when timer 0 is in mode 3.
 Interrupt • 8051 provides 4 interrupt sources – 2 external interrupts – 2 timer interrupts • They are controlled via two SFRs, IE and IP • Each interrupt source can be individually enabled or disabled by setting or clearing a bit in IE (Interrupt Enable). IE also exists a global disable bit, which can be cleared to disable all interrupts at once
 Interrupt • Each interrupt source can also be individually set to one of two priority levels by setting or clearing a bit in IP (Interrupt Priority) • A low-priority interrupt can be interrupted by high -priority interrupt, but not by another low-priority one • A high-priority interrupt can’t be interrupted by any other interrupt source • If interrupt requests of the same priority level are received simultaneously, an internal polling sequence determines which request is serviced, so within each priority lever there is a second priority structure
 Interrupt • This internal priority structure is determined by the polling sequence, shown in the following table
 External Interrupts • External interrupts ~INT 0 and ~INT 1 have two ways of activation – Level-activated – Transition-activated • This depends on bits IT 0 and IT 1 in TCON • The flags that actually generate these interrupts are bits IE 0 and IE 1 in TCON • On-chip hardware clears that flag that generated an external interrupt when the service routine is vectored to, but only if the interrupt was transition-activated • When the interrupt is level-activated, then the external requesting source is controlling the request flag, not the on-chip hardware
 Timer 0 and Timer 1 Interrupts • Timer interrupts are generated by TF 0 and TF 1 flags in their respective Timer/Counter registers • Similarly like in the case of transitionactivated external interrupts, the flag that generated an interrupt is cleared by the on -chip hardware when the service routine is vectored to
 Handling of Interrupts • When interrupt occurs (or correctly, when the flag for an enabled interrupt is found to be set 1), the interrupt system generates an LCALL to the appropriate location in Program Memory, unless some other conditions block the interrupt • Several conditions can block an interrupt – An interrupt of equal or higher priority level is already in progress – The current (polling) cycle is not the final cycle in the execution of the instruction in progress – The instruction in progress is RETI or any write to IE or IP registers • If an interrupt flag is active but not being responded to for one of the above conditions, must be still active when the blocking condition is removed, or the denied interrupt will not be serviced • Next step is saving the registers on stack. The hardware-generated LCALL causes only the contents of the Program Counter to be pushed onto the stack, and reloads the PC with the beginning address of the service routine • In some cases it also clears the flag that generated the interrupt, and in other cases it doesn’t. It clears an external interrupt flag (IE 0 or IE 1) only if it was transition-activated.
 Handling of Interrupts • Having only PC be automatically saved gives programmer more freedom to decide how much time to spend saving other registers. Programmer must also be more careful with proper selection, which register to save • The service routine for each interrupt begins at a fixed location. The interrupt locations are spaced at 8 -byte interval, beginning at 0003 H for External Interrupt 0, 000 BH for Timer 0, 0013 H for External Interrupt 1 and 001 BH for Timer 1, shown in the following tables • Execution of service routine continues from that location until the end, that is until it encounters RETI instruction does two things – It informs the processor that this interrupt Routine is finished – Secondly, reloads the PC from the top bytes from the stack
 Reset • The reset input is RST pin • To accomplish a reset the RST pin must be held high for at least two machine cycles • In the response on the RST signal, CPU generates an internal reset • The external reset signal is asynchronous to the internal clock • In the internal reset algorithm, 0 s are written to all the SFRs except the port latches and Stack Pointer • The port latches are initialized to FFH and Stack Pointer to 07 H • Driving ALE and PSEN pins to 0 while reset is active could cause the device to go into an indeterminate state • The internal RAM is not affected by reset. On power up the RAM content is indeterminate
 • If the bit is 0, the corresponding") IE: Interrupt Enable Register (bit addressable) • If the bit is 0, the corresponding interrupt is disabled. Otherwise, the interrupt is enabled.
IE: Interrupt Enable Register (bit addressable) • If the bit is 0, the corresponding interrupt is disabled. Otherwise, the interrupt is enabled.
 • If the bit is 0, the corresponding") IP: Interrupt Priority Register (bit addressable) • If the bit is 0, the corresponding interrupt has a lower priority and if the bit is 1, the interrupt has a higher priority
IP: Interrupt Priority Register (bit addressable) • If the bit is 0, the corresponding interrupt has a lower priority and if the bit is 1, the interrupt has a higher priority
 8051 CONNECTION TO RS 232 • Rx. D and Tx. D pins in the 8051 – 8051 has two pins used for transferring and receiving data serially – Tx. D and Rx. D are part of the port 3 group – pin 11 (P 3. 1) is assigned to Tx. D – pin 10 (P 3. 0) is designated as Rx. D – these pins are TTL compatible – require a line driver to make them RS 232 compatible – driver is the MAX 232 chip
 8051 CONNECTION TO RS 232 MAX 232 – converts from RS 232 voltage levels to TTL voltage levels – uses a +5 V power source – MAX 232 has two sets of line drivers for transferring and receiving data – line drivers used for Tx. D are called T 1 and T 2 – line drivers for Rx. D are designated as R 1 and R 2 – T 1 and R 1 are used together for Tx. D and Rx. D of the 8051 – second set is left unused. MAX 233 – MAX 233 performs the same job as the MAX 232 – eliminates the need for capacitors – much more expensive than the MAX 232
 Inside MAX 232 (b) its Connection to") 8051 CONNECTION TO RS 232 Figure (a) Inside MAX 232 (b) its Connection to the 8051 (Null Modem)
8051 CONNECTION TO RS 232 Figure (a) Inside MAX 232 (b) its Connection to the 8051 (Null Modem)
 Inside MAX 233 (b) Its Connection to") 8051 CONNECTION TO RS 233 Figure (a) Inside MAX 233 (b) Its Connection to the 8051 (Null Modem)
8051 CONNECTION TO RS 233 Figure (a) Inside MAX 233 (b) Its Connection to the 8051 (Null Modem)
 8051 SERIAL PORT PROGRAMMING IN ASSEMBLY • • Baud rate in the 8051 – serial communications of the 8051 with the COM port of the PC – must make sure that the baud rate of the 8051 system matches the baud rate of the PC's COM port Baud rate in the 8051 – baud rate in the 8051 is programmable – done with the help of Timer 1 – relationship between the crystal frequency and the baud rate in the 8051 – 8051 divides the crystal frequency by 12 to get the machine cycle frequency – XTAL = 11. 0592 MHz, the machine cycle frequency is 921. 6 k. Hz – 8051's UART divides the machine cycle frequency of 921. 6 k. Hz by 32 once more before it is used by Timer 1 to set the baud rate – 921. 6 k. Hz divided by 32 gives 28, 800 Hz – Timer 1 must be programmed in mode 2, that is 8 -bit, auto-reload
 8051 SERIAL PORT PROGRAMMING IN ASSEMBLY Timer 1 TH 1 Register Values for Various Baud Rates
 With XTAL = 11. 0592 MHz, find the TH 1 value needed to have the following baud rates. (a) 9600 (b) 2400 (c) 1200 • machine cycle frequency = 11. 0592 MHz / 12 = 921. 6 k. Hz • Timer 1 frequency provided by 8051 UART = 921. 6 k. Hz / 32 = 28, 800 Hz (a) 28, 800 / 3 = 9600 (b) 28, 800 / 12 = 2400 where -3 where -12 = FD (hex) = F 4 (hex) (c) 28, 800 / 24 = 1200 where -24 = E 8 (hex)
 8051 SERIAL PORT PROGRAMMING IN ASSEMBLY 11. 0592 MHz XTAL oscillator
 register • A byte") 8051 SERIAL PORT PROGRAMMING IN ASSEMBLY • SBUF (serial buffer) register • A byte of data to be transferred via the Tx. D line must be placed in the SBUF register. SBUF holds the byte of data when it is received by the Rx. D line • can be accessed like any other register MOV SBUF, #'D' ; load SBUF=44 H, ASCII for 'D‘ MOV SBUF, A ; copy accumulator into SBUF MOV A, SBUF ; copy SBUF into accumulator • when a byte is written, it is framed with the start and stop bits and transferred serially via the Tx. D pin • when the bits are received serially via Rx. D, it is deframe by eliminating the stop and start bits, making a byte out of the data received, and then placing it in the SBUF
8051 SERIAL PORT PROGRAMMING IN ASSEMBLY • SBUF (serial buffer) register • A byte of data to be transferred via the Tx. D line must be placed in the SBUF register. SBUF holds the byte of data when it is received by the Rx. D line • can be accessed like any other register MOV SBUF, #'D' ; load SBUF=44 H, ASCII for 'D‘ MOV SBUF, A ; copy accumulator into SBUF MOV A, SBUF ; copy SBUF into accumulator • when a byte is written, it is framed with the start and stop bits and transferred serially via the Tx. D pin • when the bits are received serially via Rx. D, it is deframe by eliminating the stop and start bits, making a byte out of the data received, and then placing it in the SBUF
 register – to program") 8051 SERIAL PORT PROGRAMMING IN ASSEMBLY • SCON (serial control) register – to program the start bit, stop bit, and data bits SCON Serial Port Control Register (Bit-Addressable)
8051 SERIAL PORT PROGRAMMING IN ASSEMBLY • SCON (serial control) register – to program the start bit, stop bit, and data bits SCON Serial Port Control Register (Bit-Addressable)
 SERIAL PORT PROGRAMMING IN ASSEMBLY • • SM 0 and SM 1 determine the mode only mode 1 is important For mode 1 SM 0= 0, SM 1=1 when mode 1 is chosen, the data framing is 8 bits, 1 stop bit, and 1 start bit • compatible with the COM port of PCs • mode 1 allows the baud rate to be variable and is set by Timer 1 of the 8051 • for each character a total of 10 bits are transferred, where the first bit is the start bit, followed by 8 bits of data, and finally 1 stop bit.
 • REN=1, allows 8051 to") SERIAL PORT PROGRAMMING IN ASSEMBLY • REN (receive enable) • REN=1, allows 8051 to receive data on the Rx. D • if 8051 is to both transfer and receive data, REN must be set to 1 • REN=0, the receiver is disabled • TI (transmit interrupt) – when 8051 finishes the transfer of the 8 -bit character, it raises the TI flag to indicate that it is ready to transfer another byte • RI (receive interrupt) – when the 8051 receives data serially via Rx. D, it places the byte in the SBUF register – then raises the RI flag bit to indicate that a byte has been received and should be picked up before it is lost
SERIAL PORT PROGRAMMING IN ASSEMBLY • REN (receive enable) • REN=1, allows 8051 to receive data on the Rx. D • if 8051 is to both transfer and receive data, REN must be set to 1 • REN=0, the receiver is disabled • TI (transmit interrupt) – when 8051 finishes the transfer of the 8 -bit character, it raises the TI flag to indicate that it is ready to transfer another byte • RI (receive interrupt) – when the 8051 receives data serially via Rx. D, it places the byte in the SBUF register – then raises the RI flag bit to indicate that a byte has been received and should be picked up before it is lost
 • Program to transfer data serially 1. 2. 3. 4. 5. 6. 7. TMOD register is loaded with the value 20 H TH 1 is loaded with value to set the baud rate SCON register is loaded with the value 50 H TR 1 is set to 1 to start Timer 1 TI is cleared by the "CLR TI" instruction transmit character byte is written into the SBUF register TI flag bit is monitored to see if the character has been transferred completely 8. to transfer the next character, go to Step 5. program to transfer letter "A" serially at 4800 baud
 Write a program to transfer the message "YES" serially at 9600 baud, 8 -bit data, 1 stop bit. Do this continuously.
 PROGRAMMING IN ASSEMBLY • Importance of the TI flag – – check the TI flag bit, we know whether can transfer another byte TI flag bit is raised by the 8051 TI flag cleared by the programmer writing a byte into SBUF before the TI flag bit is raised, may lead to loss of a portion of the byte being transferred • Program to receive data serially 1. TMOD register is loaded with the value 20 H 2. TH 1 is loaded with value set the baud rate 3. SCON register is loaded with the value 50 H 4. TR 1 is set to 1 to start Timer 1 5. RI is cleared with the "CLR RI" instruction 6. RI flag bit is monitored to see if an entire character has been received yet 7. RI=1 SBUF has the byte, its contents are moved into a safe place 8. to receive the next character, go to Step 5
 Program the 8051 to receive bytes of data serially, and put them in P 1. Set the baud rate at 4800, 8 -bit data, and 1 stop bit.
 • Importance of the RI flag bit 1. it receives the start bit, next bit is the first bit of the character 2. when the last bit is received, a byte is formed and placed in SBUF 3. when stop bit is received, makes RI = 1 4. when RI=1, received byte is in the SBUF register, copy SBUF contents to a safe place 5. after the SBUF contents are copied the RI flag bit must be cleared to 0