45aa33c484e57889f563f08605f8d37d.ppt
- Количество слайдов: 29
 MFGT 124 Solid Design in Manufacturing CAD Standards Professor Joe Greene CSU, CHICO Reference: The Mechanical Process, 3 rd Edition, David Ullman, Mc. Grall Hill New York (2003) MFGT 124 Copyright 2003 Joseph Greene All Rights Reserved 1
 Design Standards • Topics – – – Introduction History ANSI Standards ISO Standards Examples Copyright 2003 Joseph Greene All Rights Reserved 2
 Introduction • Standards are necessary in CAD design since designs are typically complex. – Designers create drawings for others to make. . – Engineering and Manufacturing needs common symbols, fonts, dimensions, call outs, section views to reduce cost of reading drawings and producing parts from them. – American • ANSI standard • ASME standard – European • ISO standard Copyright 2003 Joseph Greene All Rights Reserved 3
 Introduction • History – Design standards are thought to have been used in ancient Egypt for the pyramids. – Drafting Standards started in England in the 1940 s • Stanley Parker – English worker in a torpedo factory in Scotland, devised a method of specifying cylindrical tolerance zones surrounding an absolute location from what was previously specified as rectangular plus/minus tolerances. This became true position. – 1935: American Standards Association (ASA) published first standard for engineering drawings. • Only 20 pages in length with 5 pages devoted to dimensioning. – 1940: SAE Draftsman handbook • Chevrolet division at GM detailed standards for automotive draftsmen. – 1945: US Army publication of ordinance manual specified dimensioning and tolerance for the US Army. – 1949: Military Standard 8 was published to specify dimensioning and tolerancing standards for US Army. • Little coordination between ASA, SAE and Military Copyright 2003 Joseph Greene All Rights Reserved 4
 Introduction • History – 1957: American Standards Association • Approved first American standard devoted to dimensioning and tolerancing. • Britain and Canada cooperated. – 1966: First unified standard published by American National Standards Institute (ANSI) • Standard ANSI 14. 1 to 14. 5 – Updated in 1973 and 1982 – 1994 and 1995 updated and published by the ASME • 95% in agreement with ISO global standards. – ISO is the European standards (metric) Copyright 2003 Joseph Greene All Rights Reserved 5
 ANSI/ASME Y 14 Design Drafting Standards • Standard – Establishes a series of recommended drawing sizes and basic format for engineering drawing in the United States. • Provides common standards to aid in the interchange of drawings between companies, government, and other users. – Started in 1975 in Detroit, MI, and revised every 5 years or so. • 1994 and 1995 updated and published by the ASME – ANSI Y 14. 1 Drawing Sheet Size and Format – ANSI Y 14. 2 Line Conventions and Lettering – ANSI Y 14. 3 Multi and Sectional View Drawings – ANSI Y 14. 4 American Drafting Standards Manual – ANSI Y 14. 5 Dimensioning and Tolerancing – ANSI Y 14. 6 Screw Thread Representation – ANSI Y 14. 7 Gear Drawing Standard – ANSI Y 14. 8 Castings – ANSI Y 14. 9 Forgings – ANSI Y 14. 1 Metal Stampings – ANSI Y 14. 13 to Section 36 Springs, electrical, Title and Notes, … Copyright 2003 Joseph Greene All Rights Reserved 6
 ANSI/ASME Y 14. 1 Standards • Drawing Sheet Size and Format Standards (ASME and SAE) • Renamed ASME Y 14. 1 -1995 – Scope – Definitions • Drawing size – – – – Standard Drawing sheet sizes Basic Formats Title Blocks Revision Block Parts List or Bill of Materials (BOM) Supplementary Blocks Drawing Numbers Copyright 2003 Joseph Greene All Rights Reserved 7
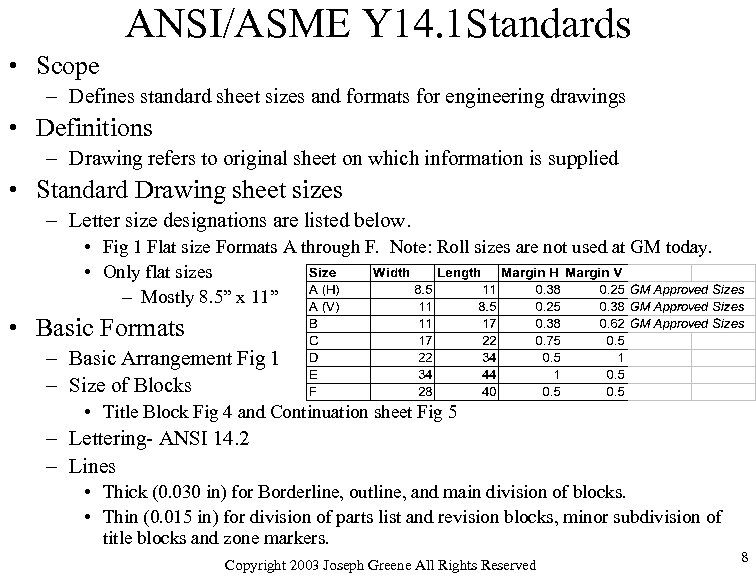 ANSI/ASME Y 14. 1 Standards • Scope – Defines standard sheet sizes and formats for engineering drawings • Definitions – Drawing refers to original sheet on which information is supplied • Standard Drawing sheet sizes – Letter size designations are listed below. • Fig 1 Flat size Formats A through F. Note: Roll sizes are not used at GM today. • Only flat sizes – Mostly 8. 5” x 11” • Basic Formats – Basic Arrangement Fig 1 – Size of Blocks • Title Block Fig 4 and Continuation sheet Fig 5 – Lettering- ANSI 14. 2 – Lines • Thick (0. 030 in) for Borderline, outline, and main division of blocks. • Thin (0. 015 in) for division of parts list and revision blocks, minor subdivision of title blocks and zone markers. Copyright 2003 Joseph Greene All Rights Reserved 8
 ANSI/ASME Y 14. 1 Standards • Title Blocks- Fig 4 & 5 (MFGT 124 drawings must follow this!) – Location- lower right corner – Contents • • • Block A: Name and address of the company or design activity Block B: Drawing Title Block C: Drawing number Block D: Drafts-person, checker with dates Block E: Approval with Date Block F: Approval from other sources with Date (optional) Block G: Predominate Scale of Drawing Block H: Drawing number or filename number Block J: Drawing size letter designation Block K: Actual or estimated weight of item Block L: Sheet number for multiple sheet drawings. Copyright 2003 Joseph Greene All Rights Reserved 9
 ANSI/ASME Y 14. 1 Standards • Revision Block – Location: Located in upper right hand corner of the drawing – Contents: Provides space for revision number or symbol, description or identification of change authorization, date, and approvals. • Parts List or Bill of Materials (BOM) – Location: Located on lower right corner near title block, Additional lists may be located at the left of and adjacent to original block. – For large assemblies, BOM is located in a specified layer of the model. • Example, – Layer 1 is title page with revisions, title block, revision list, and exploded view of assembly – Layer 2 is assembly 1 with detailed dimensions. – Layer 99 is Bill of Material. Layer number of BOM can be standardized on all documents to a layer that is never used for design. – BOM is the order list that the purchase order is written to. – BOM will list those items that are purchased and those items that are manufactured in house. Copyright 2003 Joseph Greene All Rights Reserved 10
 ANSI/ASME Y 14. 1 Standards • Supplementary Bocks – Information covering GD&T notes, material treatment, finish, general notes. • Drawing Numbers – Location: Lower right corner of the title block and in at least one other location. • Fig 1, 2, and 3 • Fig 9: block descriptions – Revision symbol block – Numbering multiple sheets • Second and subsequent sheets of drawings consisting of more than one sheet are identified by same basic drawing number ant the applicable sheet number. • Example, Sheet 1 of 4, sheet 2 of 4, sheet 4 of 4, etc… Copyright 2003 Joseph Greene All Rights Reserved 11
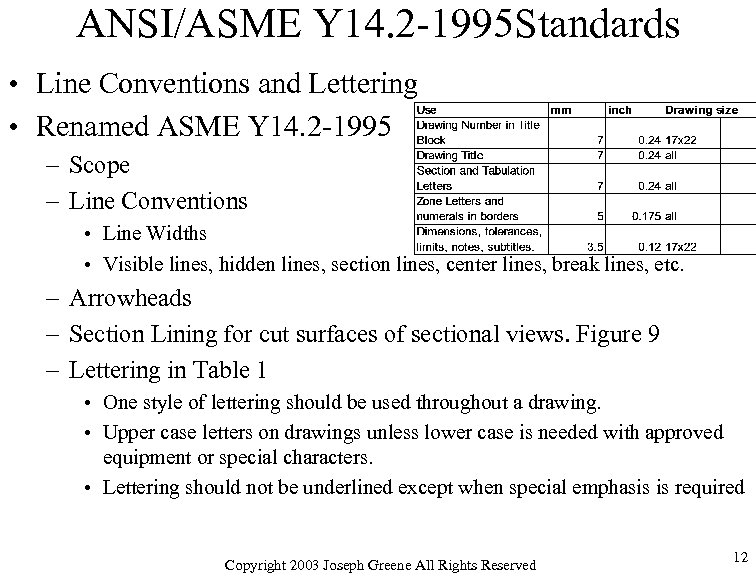 ANSI/ASME Y 14. 2 -1995 Standards • Line Conventions and Lettering • Renamed ASME Y 14. 2 -1995 – Scope – Line Conventions • Line Widths • Visible lines, hidden lines, section lines, center lines, break lines, etc. – Arrowheads – Section Lining for cut surfaces of sectional views. Figure 9 – Lettering in Table 1 • One style of lettering should be used throughout a drawing. • Upper case letters on drawings unless lower case is needed with approved equipment or special characters. • Lettering should not be underlined except when special emphasis is required Copyright 2003 Joseph Greene All Rights Reserved 12
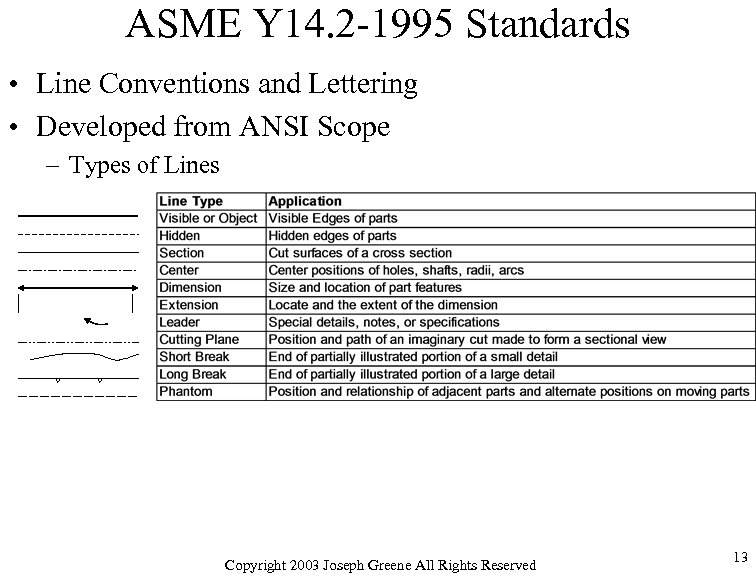 ASME Y 14. 2 -1995 Standards • Line Conventions and Lettering • Developed from ANSI Scope – Types of Lines V V Copyright 2003 Joseph Greene All Rights Reserved 13
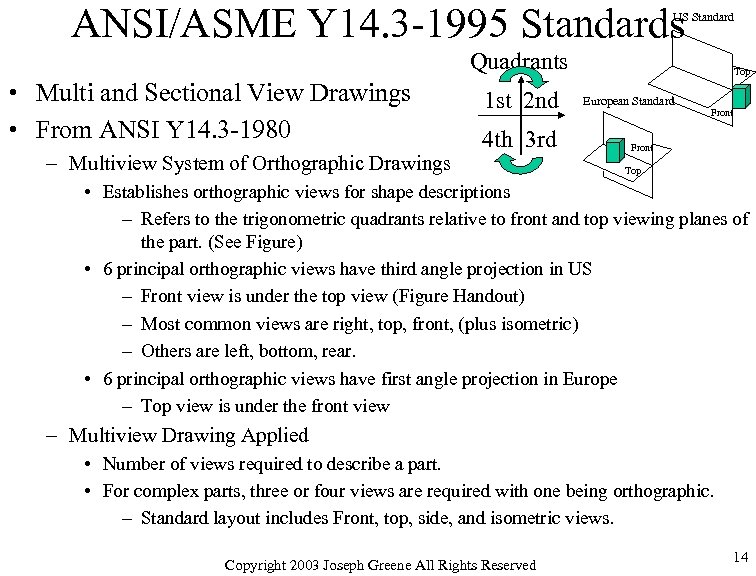 ANSI/ASME Y 14. 3 -1995 Standards US Standard Quadrants • Multi and Sectional View Drawings • From ANSI Y 14. 3 -1980 – Multiview System of Orthographic Drawings 1 st 2 nd 4 th 3 rd Top European Standard Front Top • Establishes orthographic views for shape descriptions – Refers to the trigonometric quadrants relative to front and top viewing planes of the part. (See Figure) • 6 principal orthographic views have third angle projection in US – Front view is under the top view (Figure Handout) – Most common views are right, top, front, (plus isometric) – Others are left, bottom, rear. • 6 principal orthographic views have first angle projection in Europe – Top view is under the front view – Multiview Drawing Applied • Number of views required to describe a part. • For complex parts, three or four views are required with one being orthographic. – Standard layout includes Front, top, side, and isometric views. Copyright 2003 Joseph Greene All Rights Reserved 14
 ANSI/ASME Y 14. 3 -1995 Standards • Multi and Sectional View Drawings – Auxiliary Views • Used to show the true size & shape of features not parallel to principal views. • Projected from a principal view. – Sectional Views • Shows interior details that are clearer than exterior views due to hidden lines. • Location of sectional view is indicated by a cutting plane line and arrows. • Used to show the solid materials with thin lines at 45°. Figure 16 -6 – More than one line may occupy the same position in a view. Fig 16 -7 • • Line Order of Preference Object lines take preference over hidden lines and centerlines. Hidden lines take preference over centerlines. Cutting planes take preference over centerlines when showing path of sectional view. • Notice in the right-side-view that when ever a hidden line has precedence over a centerline, the centerline is still drawn in the view by leaving a space and then extending it beyond the edge. Copyright 2003 Joseph Greene All Rights Reserved 15
 ANSI/ASME Y 14. 5 -1994 Standards • Dimensioning Standards – Dimensions describe the details of a part so it can be constructed to the proper size. – Dimensions options in Solid. Works • Determine the display and position of text and extension lines • Reference dimensions require parentheses – Parentheses can be added to a dimension at anytime through Property option. – Guidelines for dimension spacing • Space between the first dimension line and the part outline should not be less than 10 mm. • Space between subsequent parallel dimension lines should not be less than 6 mm. • Spacing may be different depending upon drawing size and scale. • Set the offset distance from last dimension to 6 mm. • Set offset distance from model to 10 mm. • Specify that unless otherwise stated, dimensions are in millimeters of inches – Arrowheads is recommended to be solid filled arrow Copyright 2003 Joseph Greene All Rights Reserved 16
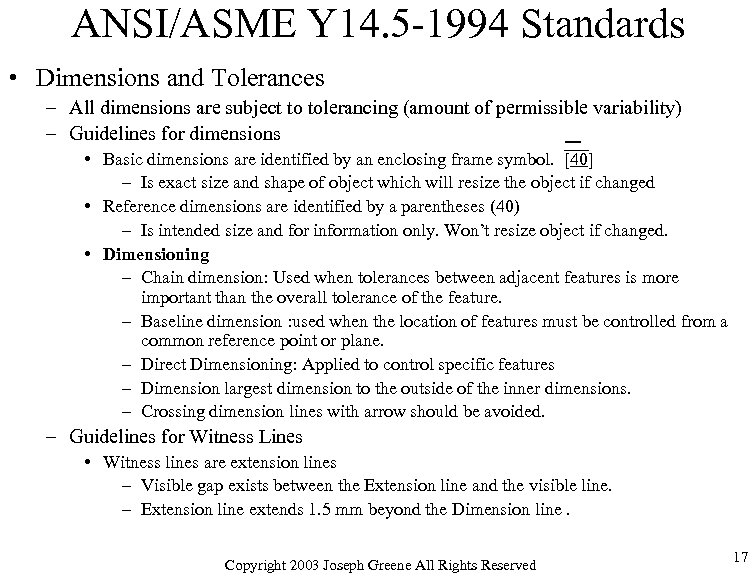 ANSI/ASME Y 14. 5 -1994 Standards • Dimensions and Tolerances – All dimensions are subject to tolerancing (amount of permissible variability) – Guidelines for dimensions • Basic dimensions are identified by an enclosing frame symbol. [40] – Is exact size and shape of object which will resize the object if changed • Reference dimensions are identified by a parentheses (40) – Is intended size and for information only. Won’t resize object if changed. • Dimensioning – Chain dimension: Used when tolerances between adjacent features is more important than the overall tolerance of the feature. – Baseline dimension : used when the location of features must be controlled from a common reference point or plane. – Direct Dimensioning: Applied to control specific features – Dimension largest dimension to the outside of the inner dimensions. – Crossing dimension lines with arrow should be avoided. – Guidelines for Witness Lines • Witness lines are extension lines – Visible gap exists between the Extension line and the visible line. – Extension line extends 1. 5 mm beyond the Dimension line. Copyright 2003 Joseph Greene All Rights Reserved 17
 ANSI/ASME Y 14. 5 -1994 Standards • Tolerancing – – Parts typically are made in part of an assembly that has to fit together. Parts are not made to exact dimensions but are made to plus/minus. Exact dimensions would be expensive to make. Higher precision = higher costs • Gage blocks are made to very precise dimensions but are used to check parts. • Parts are made to varying degrees of accuracy depending on part requirements. – Some parts are required to be built with low precision (+/- 0. 05 in) – Some parts are required to be built with medium precision (+/- 0. 005 in) – Some parts are required to be built with high precision (+/- 0. 0005 in) – Major terms – Nominal size is designation for general ID, e. g. 9/32 drill or 2 by 4 – Basic size is size from which limits of size are derived by application of allowances and tolerances. Basic size of 9/32 drill is 0. 28125 in. – Limits are the extreme allowable sizes for a feature. +/- dim Fig 16 -11 – Tolerance is permissible variation in dimension. (Big – Small) Fig 16 -12 Copyright 2003 Joseph Greene All Rights Reserved 18
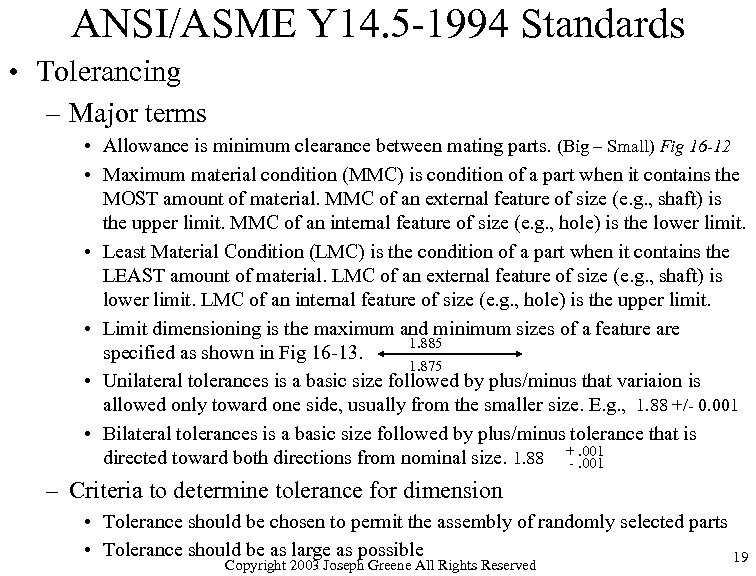 ANSI/ASME Y 14. 5 -1994 Standards • Tolerancing – Major terms • Allowance is minimum clearance between mating parts. (Big – Small) Fig 16 -12 • Maximum material condition (MMC) is condition of a part when it contains the MOST amount of material. MMC of an external feature of size (e. g. , shaft) is the upper limit. MMC of an internal feature of size (e. g. , hole) is the lower limit. • Least Material Condition (LMC) is the condition of a part when it contains the LEAST amount of material. LMC of an external feature of size (e. g. , shaft) is lower limit. LMC of an internal feature of size (e. g. , hole) is the upper limit. • Limit dimensioning is the maximum and minimum sizes of a feature are 1. 885 specified as shown in Fig 16 -13. 1. 875 • Unilateral tolerances is a basic size followed by plus/minus that variaion is allowed only toward one side, usually from the smaller size. E. g. , 1. 88 +/- 0. 001 • Bilateral tolerances is a basic size followed by plus/minus tolerance that is +. 001 directed toward both directions from nominal size. 1. 88 -. 001 – Criteria to determine tolerance for dimension • Tolerance should be chosen to permit the assembly of randomly selected parts • Tolerance should be as large as possible 19 Copyright 2003 Joseph Greene All Rights Reserved
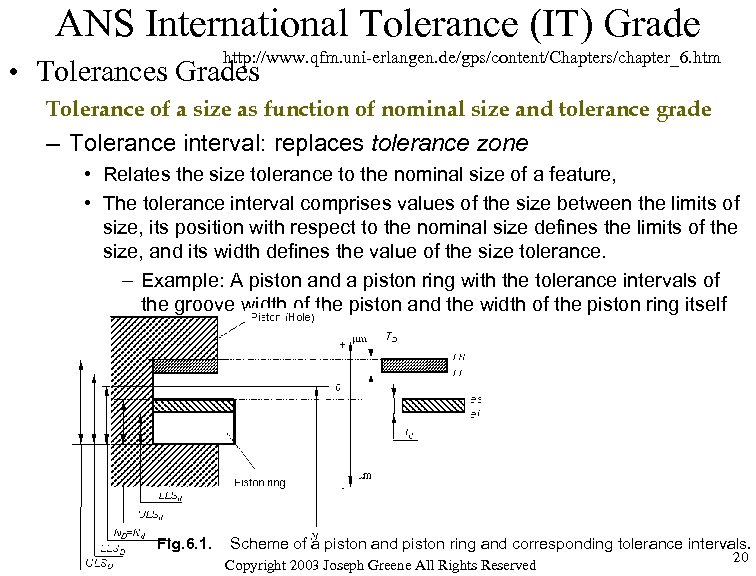 ANS International Tolerance (IT) Grade http: //www. qfm. uni-erlangen. de/gps/content/Chapters/chapter_6. htm • Tolerances Grades Tolerance of a size as function of nominal size and tolerance grade – Tolerance interval: replaces tolerance zone • Relates the size tolerance to the nominal size of a feature, • The tolerance interval comprises values of the size between the limits of size, its position with respect to the nominal size defines the limits of the size, and its width defines the value of the size tolerance. – Example: A piston and a piston ring with the tolerance intervals of the groove width of the piston and the width of the piston ring itself Fig. 6. 1. Scheme of a piston and piston ring and corresponding tolerance intervals. Copyright 2003 Joseph Greene All Rights Reserved 20
 ANS International Tolerance (IT) Grade http: //www. qfm. uni-erlangen. de/gps/content/Chapters/chapter_6. htm • Tolerances Grades Tolerance of a size as function of nominal size and tolerance grade – Tolerance interval – The horizontal axis of the scheme is the zero line, representing the nominal size to which the deviations and tolerances refer. – Above the zero line there are shown positive deviations, below the zero line – the negative ones. – The scheme is drawn to scale and deviations are presented in micrometers. – As drawings are composed in millimeters, the scales of these two images differ by at least three orders of magnitude also. – The nominal size can be shown on the tolerance scheme by a sole arrowhead; the other head would never fit into the scheme done to scale. – Here, these images are shown side-by side, in order to emphasize the physical meaning of the tolerance interval. – Dispersion of actual sizes at processing depends among other factors on the total size of the part processed. The bigger the size being processed, the bigger are deviations arising at processing and inspection. Copyright 2003 Joseph Greene All Rights Reserved 21
 ANS International Tolerance (IT) Grade http: //www. qfm. uni-erlangen. de/gps/content/Chapters/chapter_6. htm • Tolerances Grades – In order to secure the same level of accuracy for different nominal sizes the concept of tolerance grade is used as a measure of accuracy. The tolerance value for a given size equals to IT = a x I (6. 1) • where: i – tolerance unit a –tolerance grade factor. – The tolerance unit depends only on the nominal size and the tolerance grade factor – only on the tolerance grade selected. – The series of standard tolerances obtained in this way (IT– International Tolerance) are universal and regular depending on the nominal size – Selecting tolerance grades enables the designer to get different levels of accuracy. • This sort of system of standardization of tolerances gives to the level of accuracy characterized by the tolerance grade a certain economic and technological meaning. – The tolerance unit is used not as a continuously variable quantity but as a set of discrete numbers. Copyright 2003 Joseph Greene All Rights Reserved 22
 ANS International Tolerance (IT) Grade http: //www. qfm. uni-erlangen. de/gps/content/Chapters/chapter_6. htm • Tolerances Grades – For this purpose, all the values of a dimension used are divided up into ranges and for the whole of each range only one value of the tolerance unit applies, which is calculated by the average size of the given range. – The number of such ranges, covering dimensions up to 3150 mm, is only 21. As a result, a slight difference arises between the calculation value of the tolerance unit and the value that is used as a base for the standard tolerance (up to 8%), but, in return, the number of different standard tolerances sharply diminishes. • This makes it possible to limit considerably the list of necessary cutting tools and measuring instruments with a substantial consequent economic impact. – The ISO system of tolerances and fits (ISO 286 -1) comprises 20 different groups (levels of accuracy), which are characterized by the standard tolerance grades, general designation - IT. • The tolerance grade is specified by numbers 01, 0, 1, 2, . . . 18 in order of decreasing accuracy, i. e. increasing tolerance. • Thus, the designation of an ISO standard tolerance would be, respectively to the tolerance grade, IT 01, IT 3, and IT 12 etc. – Table 6. 1. An excerpt of values of standard tolerance grades. – Copyright 2003 Joseph Greene All Rights Reserved 23
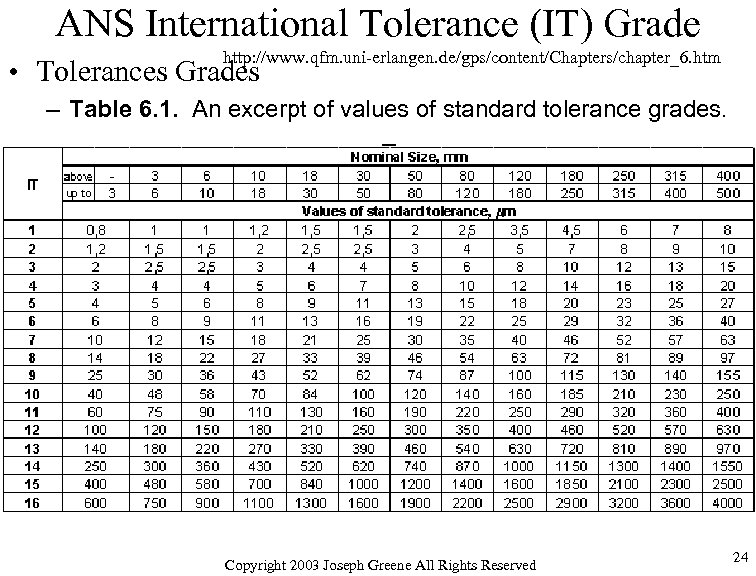 ANS International Tolerance (IT) Grade http: //www. qfm. uni-erlangen. de/gps/content/Chapters/chapter_6. htm • Tolerances Grades – Table 6. 1. An excerpt of values of standard tolerance grades. – Copyright 2003 Joseph Greene All Rights Reserved 24
 American National Standard Holes and Fits • Fits – Fit signifies type of clearance that exists between mating parts. • Clearance Fits provide some gap between mating parts. • Interference Fits have no clearance between mating parts. • Transition fits are listed to result in either a clearance or interference – American National Standard and metric sizes for holes and shafts • Set of classes of fits based on the basic hole system. • Basic hole system used from reamers and drills to produce standard size holes. • Types of fit covered – RC - running and sliding fits – LC - clearance locational fits. – LT – transition locational fits. – LN – interference locational fits. – FN force and shrink fits. • Tables and standards are organized on hole basis, thus basic shaft size and type of fit are needed to determine the dimension and tolerance for mating parts. • Example, RC 4 is close running fit and RC 9 is a loose running fit • Standard tables are in Machinery’s Handbook Copyright 2003 Joseph Greene All Rights Reserved 25
 ANSI/ASME Y 14. 5 -1994 Standards • GD&T Standards – According to ANSI Y 14. 5 -1994 standards, the following rules should be observed: • Each dimension must have a tolerance, either applied directly or indicated by a general note. – Identified as reference, basic, or maximum dimensions are exceptions. • Dimensions for size, form, and location of features should be complete to the extent that there is full understanding of the characteristics of each feature. – Scaling (measuring from drawing) of the print is not allowed. – Assumption of a distance or size is not allowed. • Dimensions should be shown between points, lines, or surfaces having necessary and specific relationship to each other. • Dimensions must be selected and arranged to avoid accumulation of tolerances and more than one interpretation. Copyright 2003 Joseph Greene All Rights Reserved 26
 ANSI/ASME Y 14. 5 -1994 Standards • GD&T Standards – According to ANSI Y 14. 5 -1994 standards, the following rules should be observed: • Multiview display should define a part without specifying manufacturing methods (CAM). – Thus, only the diameter of the hole is given and not whether it is reamed, punched, drilled, etc. • Finish allowance and shrinkage allowance can be added. • Dimensions should be selected for display to provide required information. • Wires, cables, sheets, or rods, and other display items must be specified by linear dimension, indicating the diameter or thickness. • Surfaces or centerlines shown on displays at right angles to each other are implied to be 90° apart. Copyright 2003 Joseph Greene All Rights Reserved 27
 ANSI/ASME Y 14. 5 -1994 Standards • GD&T Standards – Geometric Dimensioning and Tolerancing (GD&T) establishes the standard by which designers can communicate the intended function of the part to the machinist making the part and the inspector checking the part. – This standard lets the designer inform the machinist, toolmaker or fabricator what are the important features of the design when they are making the part. – The standard also lets the inspector know what are the important features to inspect form. • GD&T uses symbols to communicate the information to those involved in making the part to eliminate any misunderstanding. • Word explanations can be confusing especially with the global market and the translations of words into different languages. – A simple layout of the symbols used in GD&T can be found as follows Copyright 2003 Joseph Greene All Rights Reserved 28
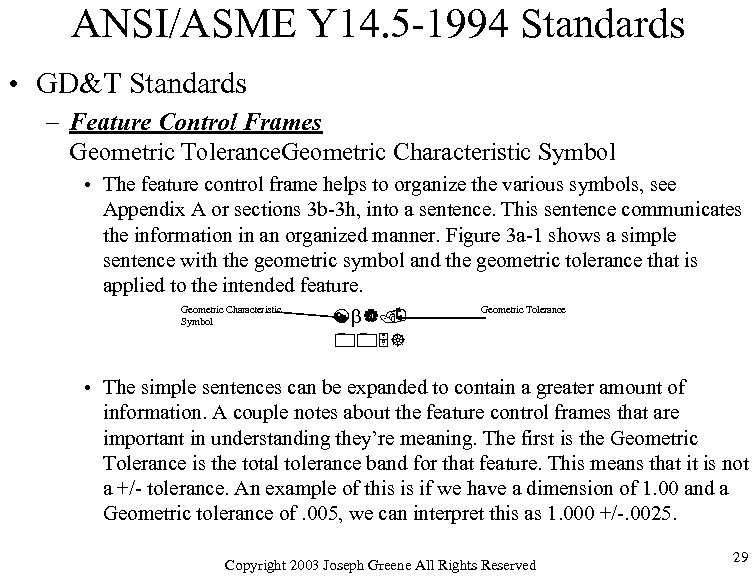 ANSI/ASME Y 14. 5 -1994 Standards • GD&T Standards – Feature Control Frames Geometric Tolerance. Geometric Characteristic Symbol • The feature control frame helps to organize the various symbols, see Appendix A or sections 3 b-3 h, into a sentence. This sentence communicates the information in an organized manner. Figure 3 a-1 shows a simple sentence with the geometric symbol and the geometric tolerance that is applied to the intended feature. Geometric Characteristic Symbol [ |. 005] Geometric Tolerance • The simple sentences can be expanded to contain a greater amount of information. A couple notes about the feature control frames that are important in understanding they’re meaning. The first is the Geometric Tolerance is the total tolerance band for that feature. This means that it is not a +/- tolerance. An example of this is if we have a dimension of 1. 00 and a Geometric tolerance of. 005, we can interpret this as 1. 000 +/-. 0025. Copyright 2003 Joseph Greene All Rights Reserved 29


