Metallurgy of the welded joint IIS Progress Gruppo







01_-_metallurgy_of_the_welded_joint.ppt
- Размер: 10.9 Mегабайта
- Количество слайдов: 41
Описание презентации Metallurgy of the welded joint IIS Progress Gruppo по слайдам
 Metallurgy of the welded joint IIS Progress Gruppo Istituto Italiano della Saldatura 1 /18 STRUCTURE OF THE WELDED JOINT
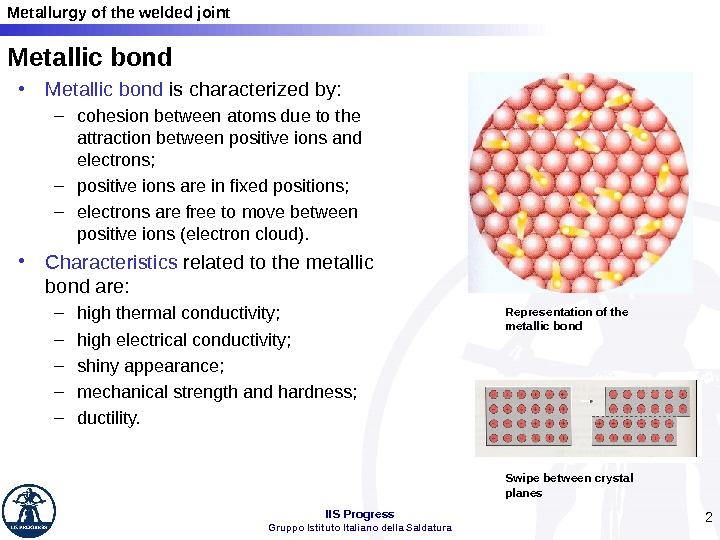
 Metallurgy of the welded joint IIS Progress Gruppo Istituto Italiano della Saldatura 2 Metallic bond • Metallic bond is characterized by: – cohesion between atoms due to the attraction between positive ions and electrons; – positive ions are in fixed positions; – electrons are free to move between positive ions (electron cloud). • Characteristics related to the metallic bond are: – high thermal conductivity; – high electrical conductivity; – shiny appearance; – mechanical strength and hardness; – ductility. Representation of the metallic bond Swipe between crystal planes
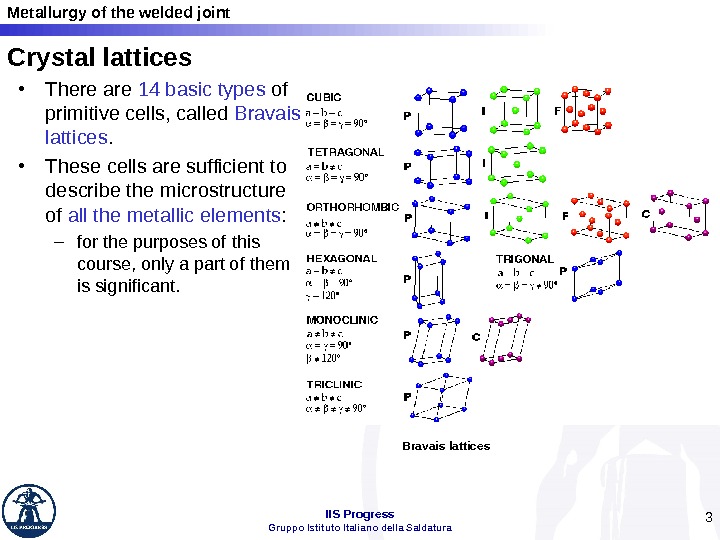
 Metallurgy of the welded joint IIS Progress Gruppo Istituto Italiano della Saldatura 3 • There are 14 basic types of primitive cells, called Bravais lattices. • These cells are sufficient to describe the microstructure of all the metallic elements : – for the purposes of this course, only a part of them is significant. Crystal lattices Bravais lattices
 Metallurgy of the welded joint IIS Progress Gruppo Istituto Italiano della Saldatura 4 Monomorphic and polymorphic metallic materials • The metallic elements can be divided into: – monomorphic elements : always have the same type of lattice, regardless the conditions of pressure and temperature; – polymorphic elements : assume different crystal lattices as a function of pressure and temperature. • The phenomenon described above is called allotropy (or polymorphism): – the different microstructures employed by the same element are called allotropic features. • The allotropy is the basic condition in order to achieve some metallurgical states by an heat treatment (like quench in steels for example).
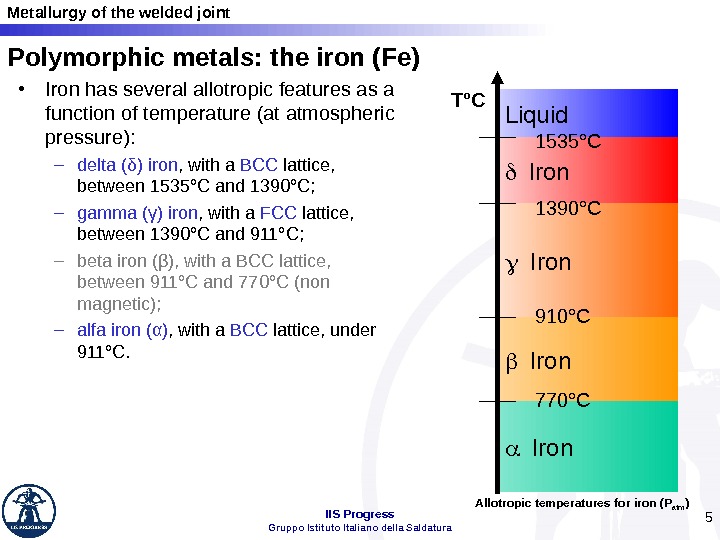
 Metallurgy of the welded joint IIS Progress Gruppo Istituto Italiano della Saldatura 5 • Iron has several allotropic features as a function of temperature (at atmospheric pressure): – delta ( δ) iron , with a BCC lattice, between 1535°C and 1390°C; – gamma ( γ) iron , with a FCC lattice, between 1390°C and 911°C; – beta iron ( β) , with a BCC lattice, between 911°C and 770°C (non magnetic); – alfa iron ( α) , with a BCC lattice, under 911°C. Liquid Iron 770°C 1535°C 910°C 1390°CT°C Allotropic temperatures for iron (P atm )Polymorphic metals: the iron (Fe)
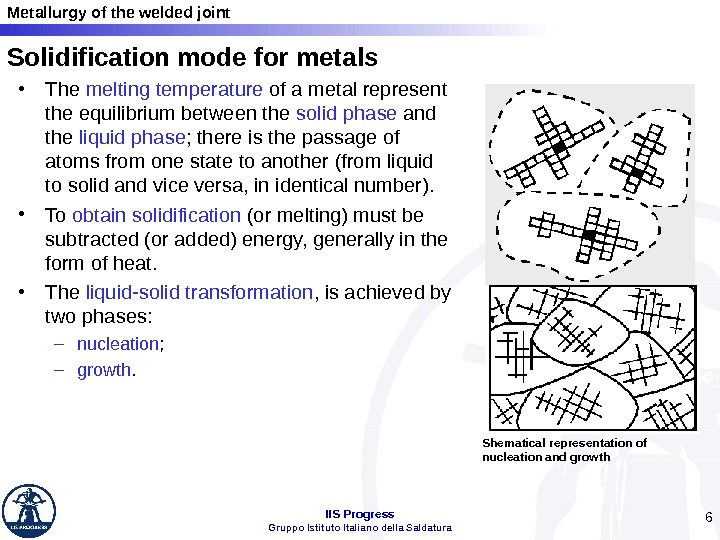
 Metallurgy of the welded joint IIS Progress Gruppo Istituto Italiano della Saldatura 6 Solidification mode for metals • The melting temperature of a metal represent the equilibrium between the solid phase and the liquid phase ; there is the passage of atoms from one state to another (from liquid to solid and vice versa, in identical number). • To obtain solidification (or melting) must be subtracted (or added) energy, generally in the form of heat. • The liquid-solid transformation , is achieved by two phases: – nucleation ; – growth. Shematical representation of nucleation and growth
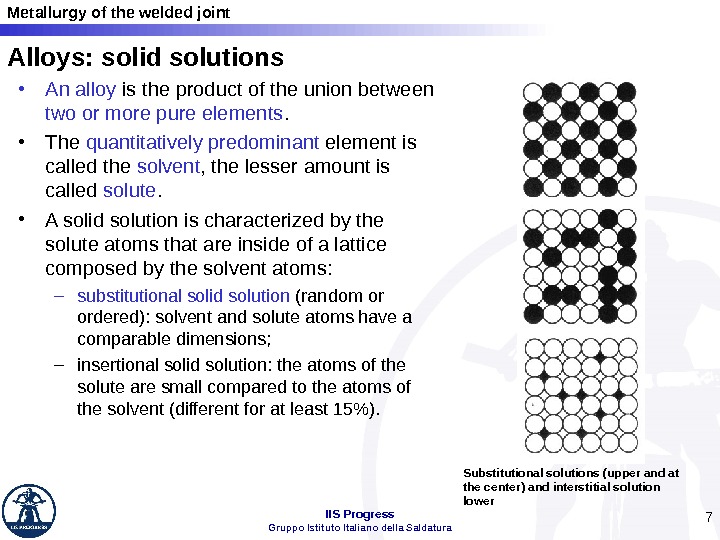
 Metallurgy of the welded joint IIS Progress Gruppo Istituto Italiano della Saldatura 7 Alloys: solid solutions • An alloy is the product of the union between two or more pure elements. • The quantitatively predominant element is called the solvent , the lesser amount is called solute. • A solid solution is characterized by the solute atoms that are inside of a lattice composed by the solvent atoms: – substitutional solid solution (random or ordered): solvent and solute atoms have a comparable dimensions; – insertional solid solution: the atoms of the solute are small compared to the atoms of the solvent (different for at least 15%). Substitutional solutions (upper and at the center) and interstitial solution lower
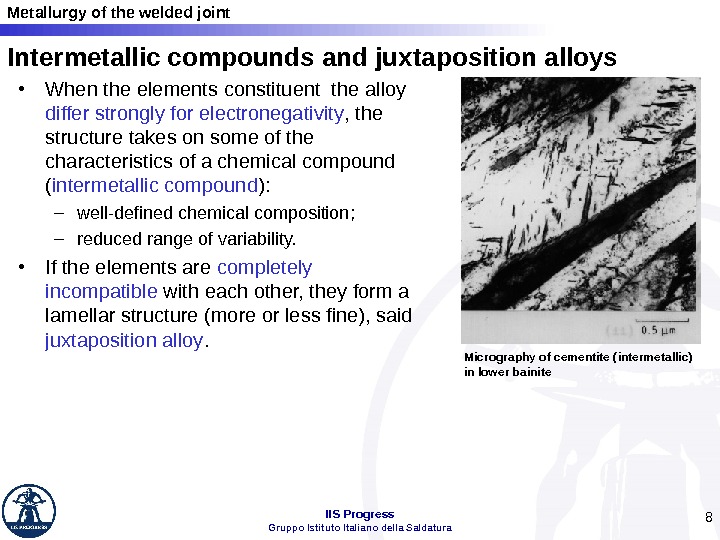
 Metallurgy of the welded joint IIS Progress Gruppo Istituto Italiano della Saldatura 8 Intermetallic compounds and juxtaposition alloys • When the elements constituent the alloy differ strongly for electronegativity , the structure takes on some of the characteristics of a chemical compound ( intermetallic compound ): – well-defined chemical composition; – reduced range of variability. • If the elements are completely incompatible with each other, they form a lamellar structure (more or less fine), said juxtaposition alloy. Micrography of cementite (intermetallic) in lower bainite
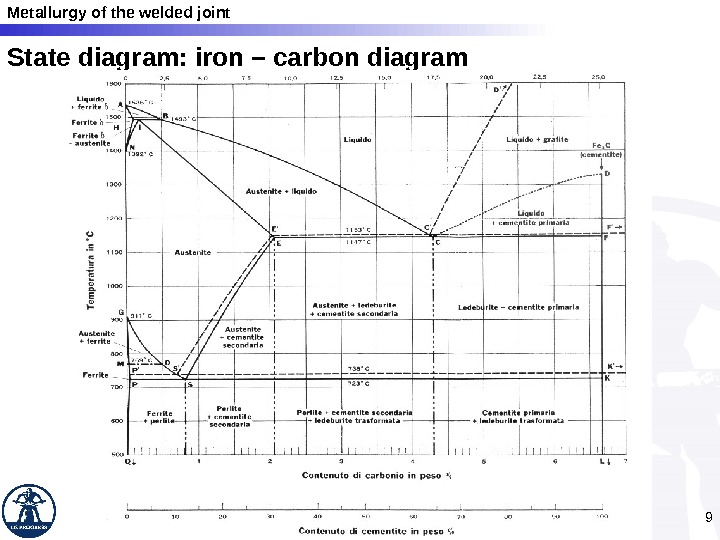
 Metallurgy of the welded joint IIS Progress Gruppo Istituto Italiano della Saldatura 9 State diagram: iron – carbon diagram
 Metallurgy of the welded joint IIS Progress Gruppo Istituto Italiano della Saldatura 10 Cooling speed • It’s the main parameter that influences the transformations at the solid state. • For carbon steels and low alloyed steels the passage , during cooling, through A 3 is of great importance : – γ α transformation; – separation of the carbon to form the cementite. • These transformations take place thanks to the phenomena of the atomic diffusion. • The cooling rate affect the relationship between nucleation and growth , the balance between the phases and determines the appearance of non equilibrium structures.
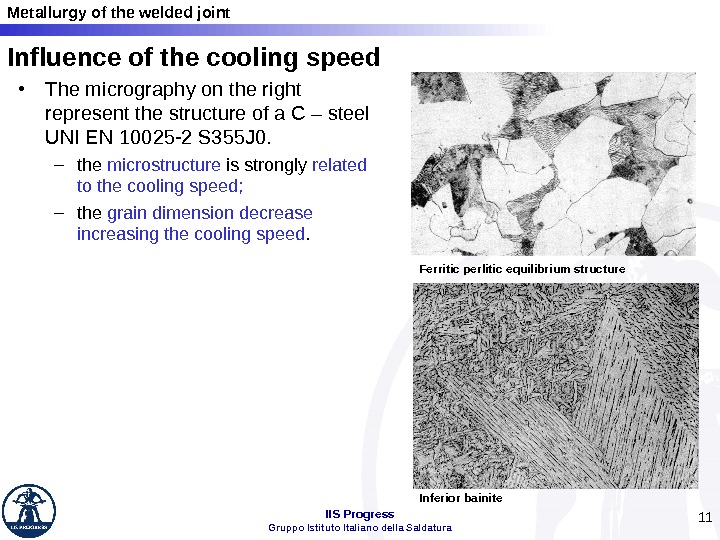
 Metallurgy of the welded joint IIS Progress Gruppo Istituto Italiano della Saldatura 11 Influence of the cooling speed • The micrography on the right represent the structure of a C – steel UNI EN 10025 -2 S 355 J 0. – the microstructure is strongly related to the cooling speed; – the grain dimension decrease increasing the cooling speed. Ferritic perlitic equilibrium structure Inferior bainite
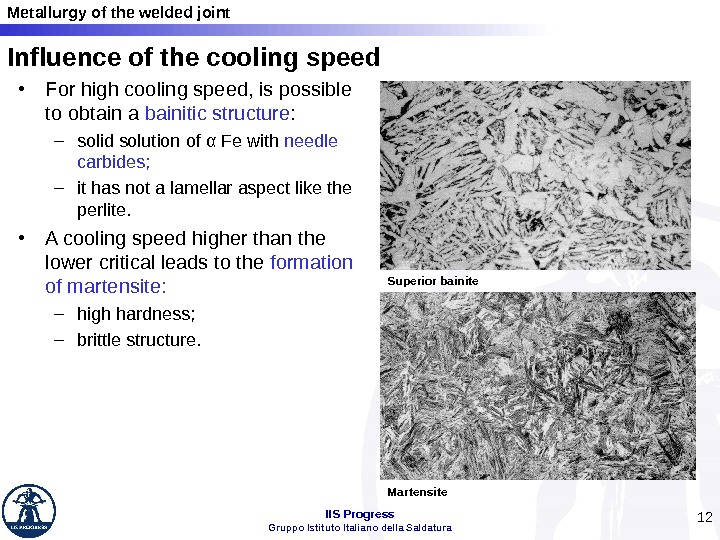
 Metallurgy of the welded joint IIS Progress Gruppo Istituto Italiano della Saldatura 12 • For high cooling speed, is possible to obtain a bainitic structure : – solid solution of α Fe with needle carbides; – it has not a lamellar aspect like the perlite. • A cooling speed higher than the lower critical leads to the formation of martensite: – high hardness; – brittle structure. Superior bainite Martensite. Influence of the cooling speed
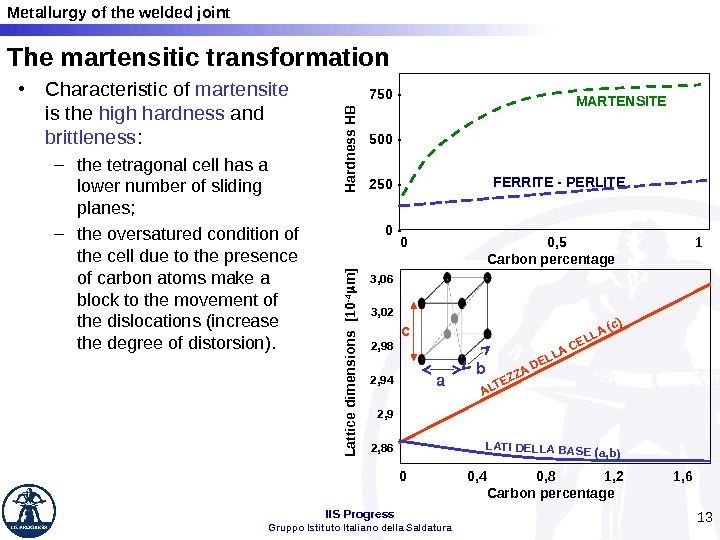
 Metallurgy of the welded joint IIS Progress Gruppo Istituto Italiano della Saldatura 13 • Characteristic of martensite is the high hardness and brittleness : – the tetragonal cell has a lower number of sliding planes; – the oversatured condition of the cell due to the presence of carbon atoms make a block to the movement of the dislocations (increase the degree of distorsion). a bc MARTENSITE FERRITE — PERLITE 0 0, 5 1 Carbon percentage 750 — 500 — 250 — 0 0, 4 0, 8 1, 2 1, 6 Carbon percentage 3, 06 3, 02 2, 98 2, 94 2, 9 2, 86 ALTEZZA DELLA CELLA (c) LATI DELLA BASE (a, b) Lattice dim ensions [10 -4 m ] H ardness H BThe martensitic transformation
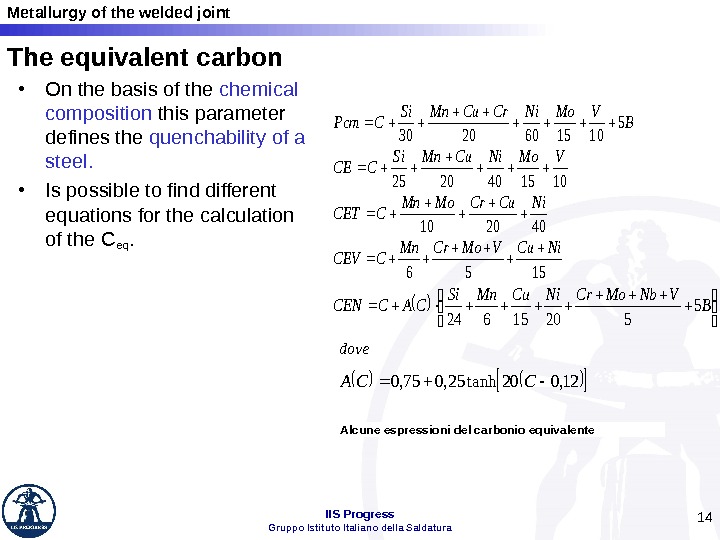
 Metallurgy of the welded joint IIS Progress Gruppo Istituto Italiano della Saldatura 14 The equivalent carbon • On the basis of the chemical composition this parameter defines the quenchability of a steel. • Is possible to find different equations for the calculation of the C eq. B VMo. Ni. Cr. Cu. Mn. Si CPcm 5 1015602030 1015402025 VMo. Ni. Cu. Mn. Si CCE 402010 Ni. Cu. Cr. Mo. Mn CCET 1556 Ni. Cu. VMo. Cr. Mn CCEV B VNb. Mo. Cr. Ni. Cu. Mn. Si CACCEN 5 52015624 12, 020 tanh 25, 075, 0 CCA dove Alcune espressioni del carbonio equivalente
 Metallurgy of the welded joint IIS Progress Gruppo Istituto Italiano della Saldatura. Welding thermal cycle • Factors influencing thermal cycle: – Heat input – Combined thickness – Preheat temperature • Consequences of the “heat treatment” imposed by the welding thermal sources: – Metallurgical structure of welded zone – Mechanical effects (stresses and distortions) 15 /18 TEM PER ATU R E TIME 60 saldv IV HI
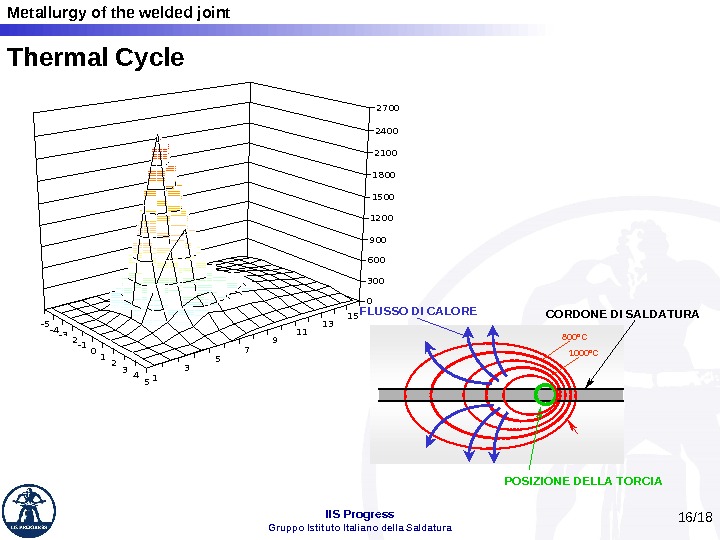
 Metallurgy of the welded joint IIS Progress Gruppo Istituto Italiano della Saldatura. Thermal Cycle 16 /1813579111315 543210 -1 -2 -3 -4 -5 0 300 600 900 1200 1500 1800 2100 2400 2700 CORDONE DI SALDATURA POSIZIONE DELLA TORCIAFLUSSO DI CALORE 1000°C 800°
 Metallurgy of the welded joint IIS Progress Gruppo Istituto Italiano della Saldatura 17 /18 Metallurgical effects: structure of the welded joint FUSED ZONE or WELD METAL (WM)BASE MATERIAL HEAT AFFECTED ZONE (HAZ)
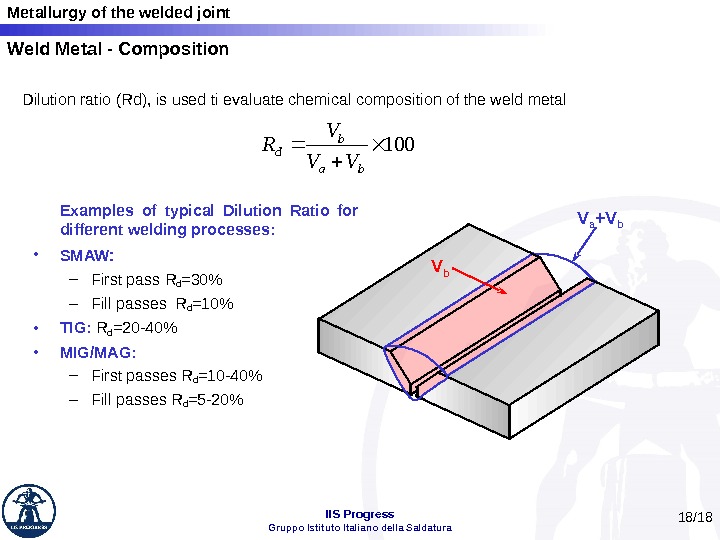
 Metallurgy of the welded joint IIS Progress Gruppo Istituto Italiano della Saldatura 18 /18 Weld Metal — Composition Dilution ratio (Rd), is used ti evaluate chemical composition of the weld metal 100 ba b d VV V R V a +V b V b. Examples of typical Dilution Ratio for different welding processes: • SMAW : – First pass R d =30% – Fill passes R d =10% • TIG: R d =20 -40% • MIG/MAG: – First passes R d =10 -40% – Fill passes R d =5 -20%
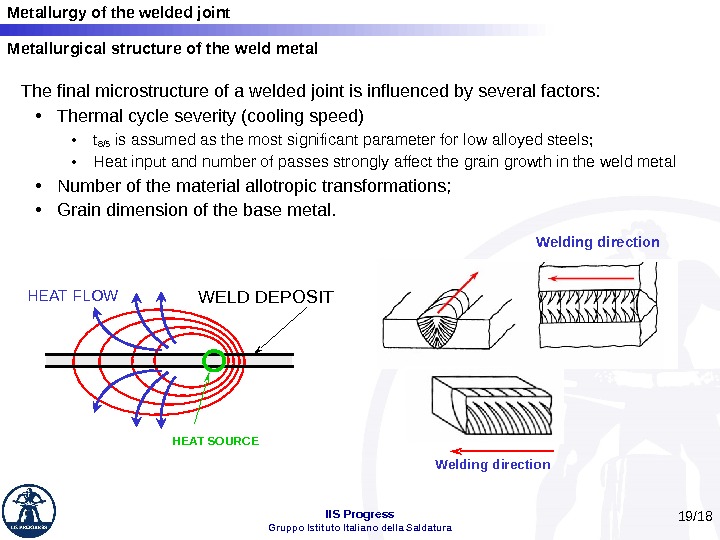
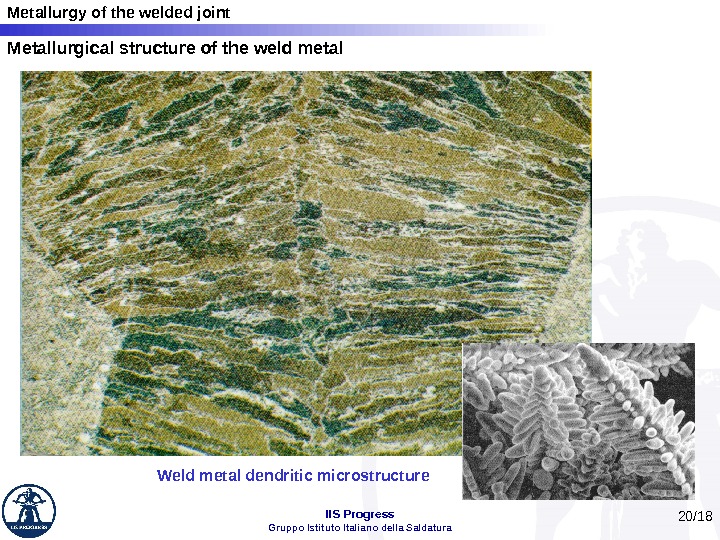
 Metallurgy of the welded joint IIS Progress Gruppo Istituto Italiano della Saldatura 19 /18 Metallurgical structure of the weld metal WELD DEPOSIT HEAT SOURCEHEAT FLOW Welding direction. The final microstructure of a welded joint is influenced by several factors: • Thermal cycle severity (cooling speed) • t 8/5 is assumed as the most significant parameter for low alloyed steels; • Heat input and number of passes strongly affect the grain growth in the weld metal • Number of the material allotropic transformations; • Grain dimension of the base metal.
 Metallurgy of the welded joint IIS Progress Gruppo Istituto Italiano della Saldatura 20 /18 Metallurgical structure of the weld metal Weld metal dendritic microstructure
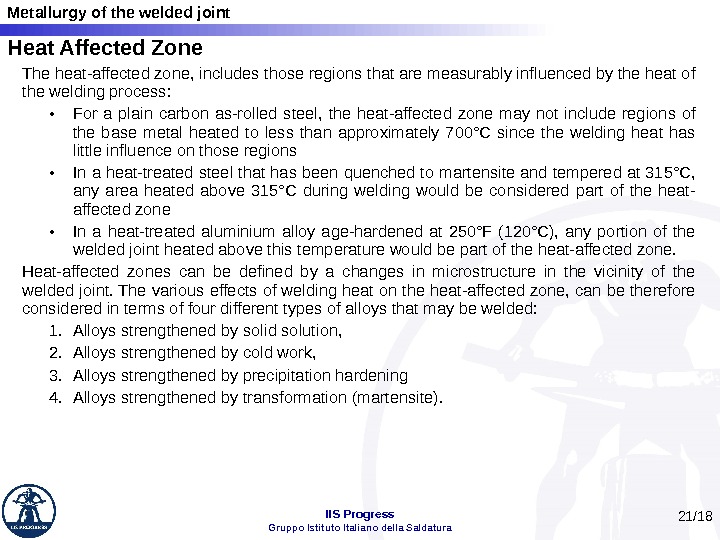
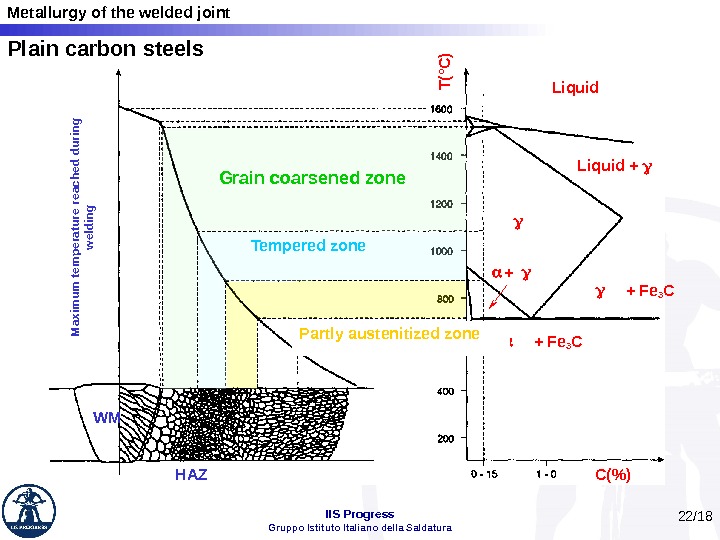
 Metallurgy of the welded joint IIS Progress Gruppo Istituto Italiano della Saldatura 21 /18 Heat Affected Zone The heat-affected zone, includes those regions that are measurably influenced by the heat of the welding process: • For a plain carbon as-rolled steel, the heat-affected zone may not include regions of the base metal heated to less than approximately 700°C since the welding heat has little influence on those regions • In a heat-treated steel that has been quenched to martensite and tempered at 315°C, any area heated above 315°C during welding would be considered part of the heat- affected zone • In a heat-treated aluminium alloy age-hardened at 250°F (120°C), any portion of the welded joint heated above this temperature would be part of the heat-affected zone. Heat-affected zones can be defined by a changes in microstructure in the vicinity of the welded joint. The various effects of welding heat on the heat-affected zone, can be therefore considered in terms of four different types of alloys that may be welded: 1. Alloys strengthened by solid solution, 2. Alloys strengthened by cold work, 3. Alloys strengthened by precipitation hardening 4. Alloys strengthened by transformation (martensite).
 Metallurgy of the welded joint IIS Progress Gruppo Istituto Italiano della Saldatura 22 /18 C(%)T(°C )Liquid + + Fe 3 C + M axim um tem perature reached during welding WM HAZ Grain coarsened zone Tempered zone Partly austenitized zone. Plain carbon steels
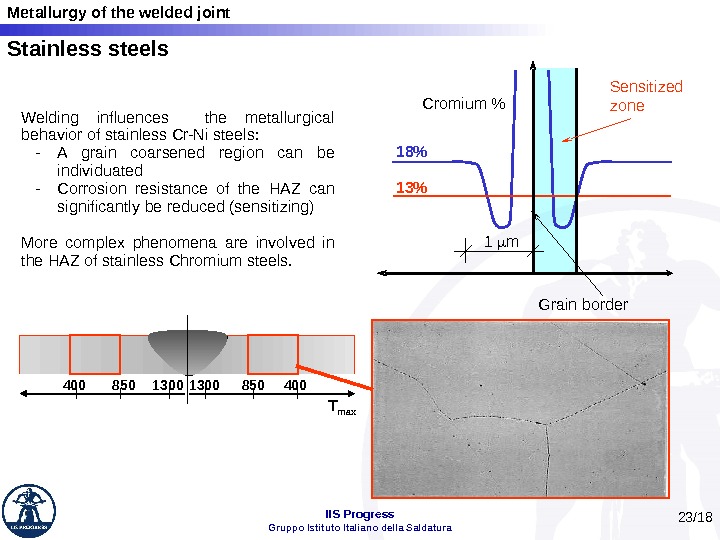
 Metallurgy of the welded joint IIS Progress Gruppo Istituto Italiano della Saldatura 23 /18 Stainless steels Welding influences the metallurgical behavior of stainless Cr-Ni steels: — A grain coarsened region can be individuated — Corrosion resistance of the HAZ can significantly be reduced (sensitizing) More complex phenomena are involved in the HAZ of stainless Chromium steels. Sensitized zone 18% 13% Grain border 1 m. Cromium % T max
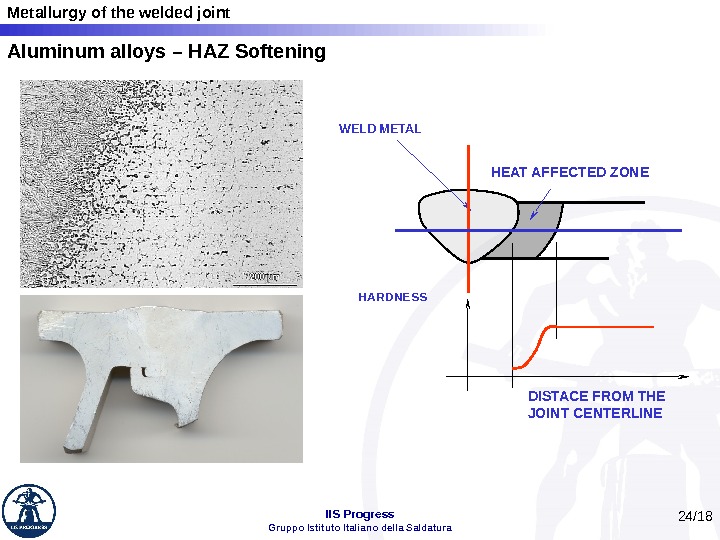
 Metallurgy of the welded joint IIS Progress Gruppo Istituto Italiano della Saldatura 24 /18 Aluminum alloys – HAZ Softening WELD METAL HARDNESS DISTACE FROM THE JOINT CENTERLINEHEAT AFFECTED ZON
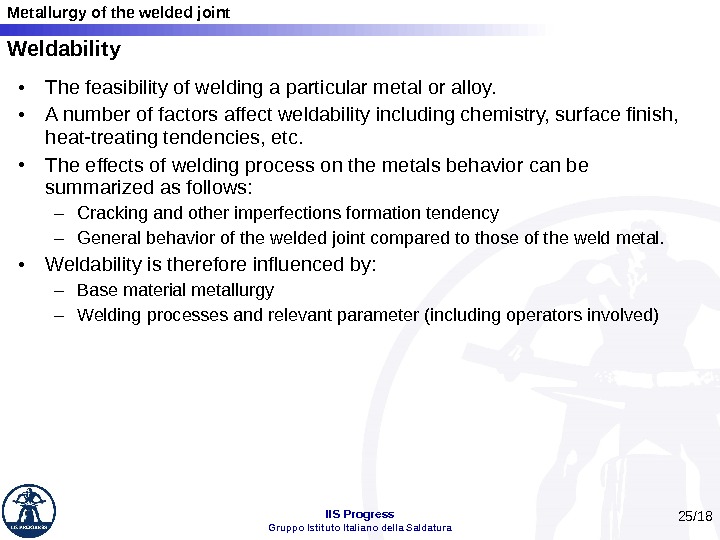
 Metallurgy of the welded joint IIS Progress Gruppo Istituto Italiano della Saldatura • The feasibility of welding a particular metal or alloy. • A number of factors affect weldability including chemistry, surface finish, heat-treating tendencies, etc. • The effects of welding process on the metals behavior can be summarized as follows: – Cracking and other imperfections formation tendency – General behavior of the welded joint compared to those of the weld metal. • Weldability is therefore influenced by: – Base material metallurgy – Welding processes and relevant parameter (including operators involved) 25 /18 Weldability
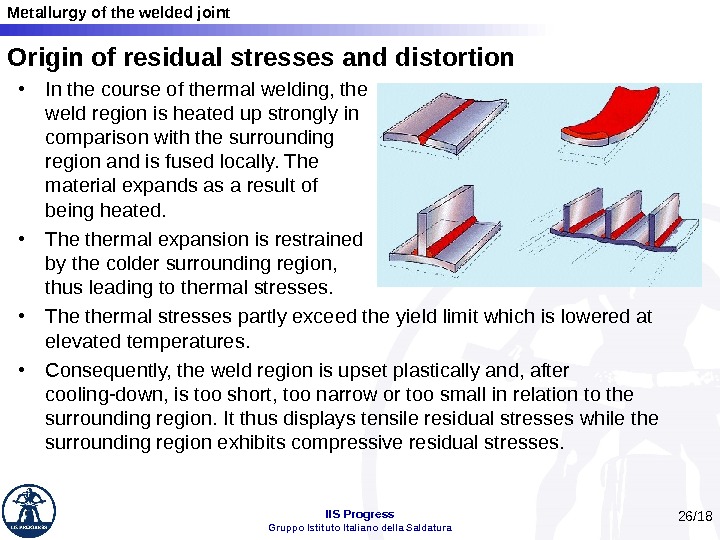
 Metallurgy of the welded joint IIS Progress Gruppo Istituto Italiano della Saldatura. Origin of residual stresses and distortion • In the course of thermal welding, the weld region is heated up strongly in comparison with the surrounding region and is fused locally. The material expands as a result of being heated. • The thermal expansion is restrained by the colder surrounding region, thus leading to thermal stresses. • The thermal stresses partly exceed the yield limit which is lowered at elevated temperatures. • Consequently, the weld region is upset plastically and, after cooling-down, is too short, too narrow or too small in relation to the surrounding region. It thus displays tensile residual stresses while the surrounding region exhibits compressive residual stresses. 26 /
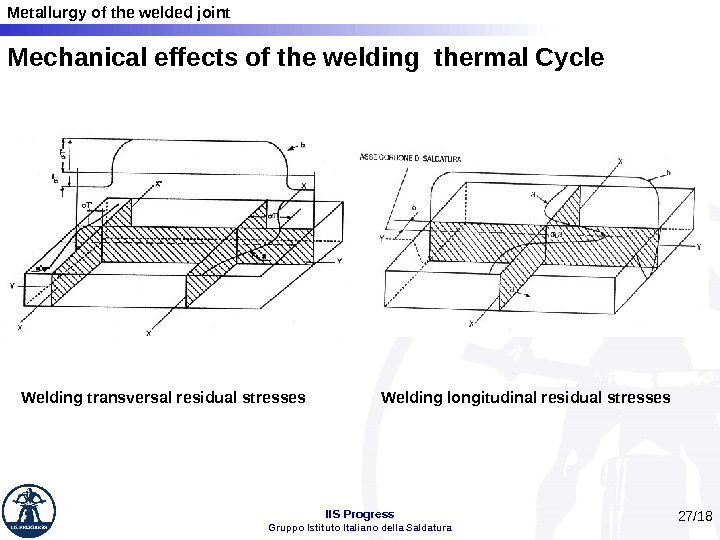
 Metallurgy of the welded joint IIS Progress Gruppo Istituto Italiano della Saldatura. Mechanical effects of the welding thermal Cycle Welding transversal residual stresses Welding longitudinal residual stresses 27 /
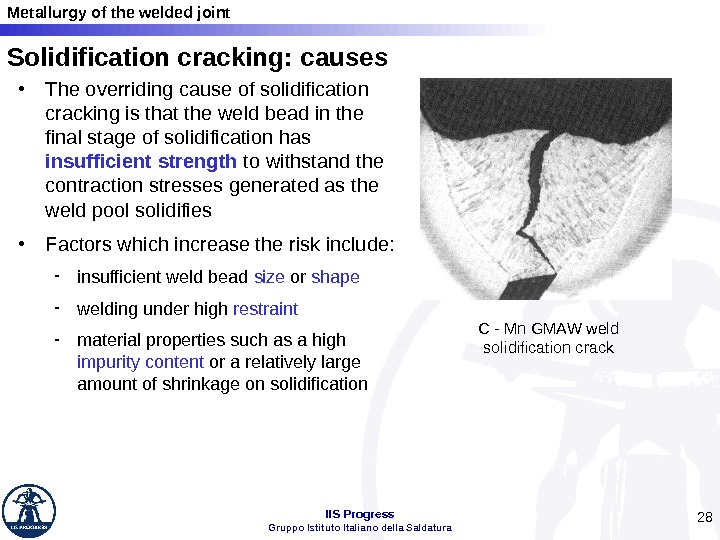
 Metallurgy of the welded joint IIS Progress Gruppo Istituto Italiano della Saldatura 28 Solidification cracking: causes • The overriding cause of solidification cracking is that the weld bead in the final stage of solidification has insufficient strength to withstand the contraction stresses generated as the weld pool solidifies • Factors which increase the risk include: insufficient weld bead size or shape welding under high restraint material properties such as a high impurity content or a relatively large amount of shrinkage on solidification C — Mn GMAW weld solidification crack
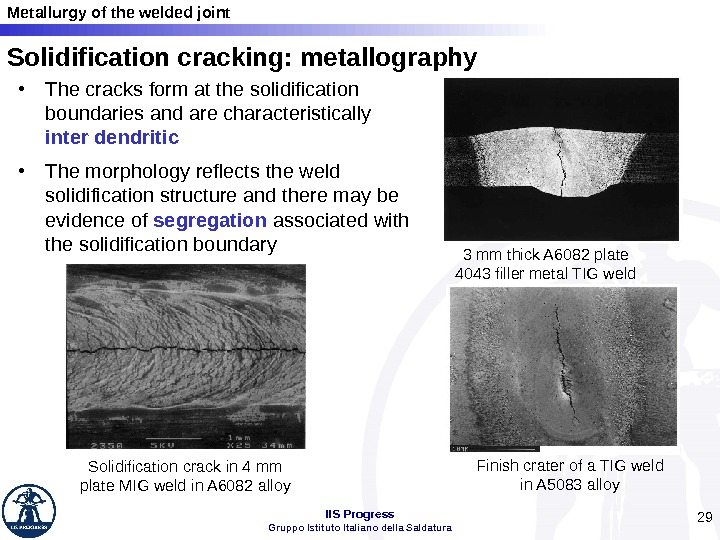
 Metallurgy of the welded joint IIS Progress Gruppo Istituto Italiano della Saldatura 29 Solidification cracking: metallography • The cracks form at the solidification boundaries and are characteristically inter dendritic • The morphology reflects the weld solidification structure and there may be evidence of segregation associated with the solidification boundary 3 mm thick A 6082 plate 4043 filler metal TIG weld Finish crater of a TIG weld in A 5083 alloy. Solidification crack in 4 mm plate MIG weld in A 6082 alloy
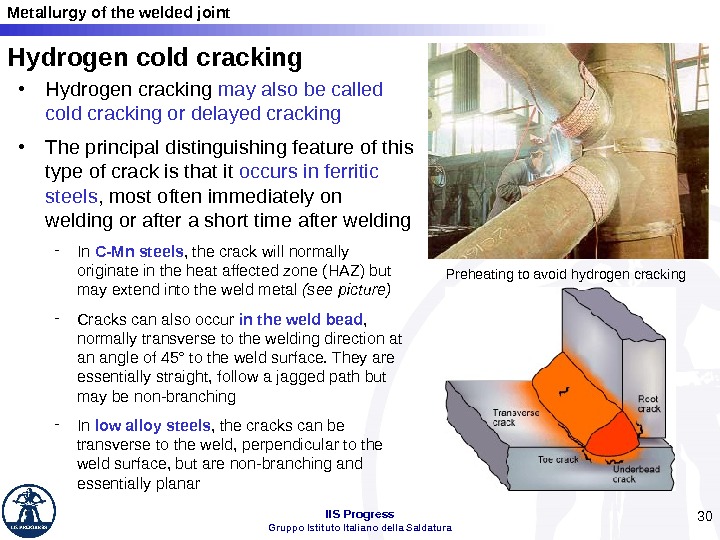
 Metallurgy of the welded joint IIS Progress Gruppo Istituto Italiano della Saldatura 30 Hydrogen cold cracking • Hydrogen cracking may also be called cold cracking or delayed cracking • The principal distinguishing feature of this type of crack is that it occurs in ferritic steels , most often immediately on welding or after a short time after welding In C-Mn steels , the crack will normally originate in the heat affected zone (HAZ) but may extend into the weld metal (see picture) Cracks can also occur in the weld bead , normally transverse to the welding direction at an angle of 45° to the weld surface. They are essentially straight, follow a jagged path but may be non-branching In low alloy steels , the cracks can be transverse to the weld, perpendicular to the weld surface, but are non-branching and essentially planar Preheating to avoid hydrogen cracking
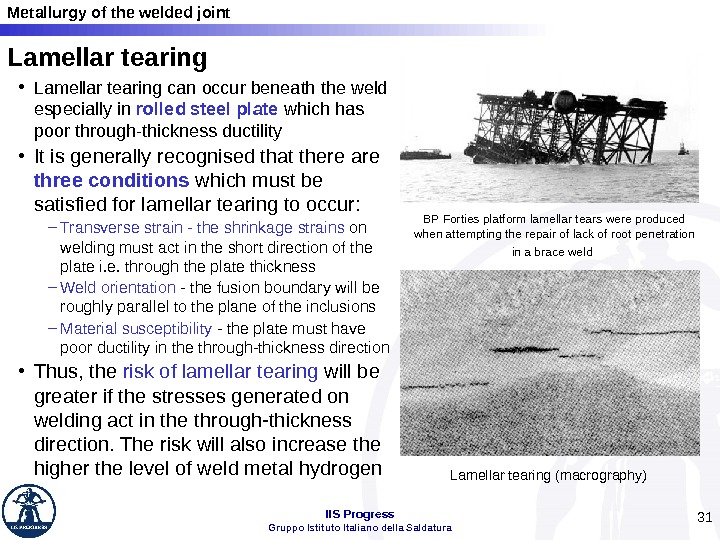
 Metallurgy of the welded joint IIS Progress Gruppo Istituto Italiano della Saldatura 31 Lamellar tearing • Lamellar tearing can occur beneath the weld especially in rolled steel plate which has poor through-thickness ductility • It is generally recognised that there are three conditions which must be satisfied for lamellar tearing to occur: – Transverse strain — the shrinkage strains on welding must act in the short direction of the plate i. e. through the plate thickness – Weld orientation — the fusion boundary will be roughly parallel to the plane of the inclusions – Material susceptibility — the plate must have poor ductility in the through-thickness direction • Thus, the risk of lamellar tearing will be greater if the stresses generated on welding act in the through-thickness direction. The risk will also increase the higher the level of weld metal hydrogen BP Forties platform lamellar tears were produced when attempting the repair of lack of root penetration in a brace weld Lamellar tearing (macrography)
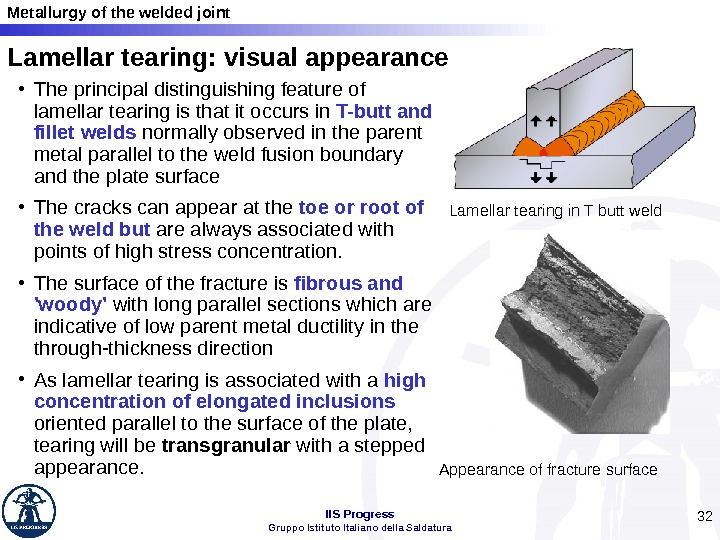
 Metallurgy of the welded joint IIS Progress Gruppo Istituto Italiano della Saldatura 32 Lamellar tearing: visual appearance • The principal distinguishing feature of lamellar tearing is that it occurs in T-butt and fillet welds normally observed in the parent metal parallel to the weld fusion boundary and the plate surface • The cracks can appear at the toe or root of the weld but are always associated with points of high stress concentration. • The surface of the fracture is fibrous and ‘woody’ with long parallel sections which are indicative of low parent metal ductility in the through-thickness direction • As lamellar tearing is associated with a high concentration of elongated inclusions oriented parallel to the surface of the plate, tearing will be transgranular with a stepped appearance. Lamellar tearing in T butt weld Appearance of fracture surface
 Metallurgy of the welded joint IIS Progress Gruppo Istituto Italiano della Saldatura 33 Incomplete root fusion or penetration • Incomplete root fusion is when the weld fails to fuse one side of the joint in the root • Incomplete root penetration occurs when both sides of the joint are unfused. Typical imperfections can arise in the following situations: an excessively thick root face in a butt weld (Fig. a) too small a root gap (Fig. b) misplaced welds (Fig. c) failure to remove sufficient metal in cutting back to sound metal in a double sided weld (Fig. d) incomplete root fusion when using too low an arc energy (heat) input (Fig. e) too small a bevel angle too large an electrode in MMA welding (Fig. F)
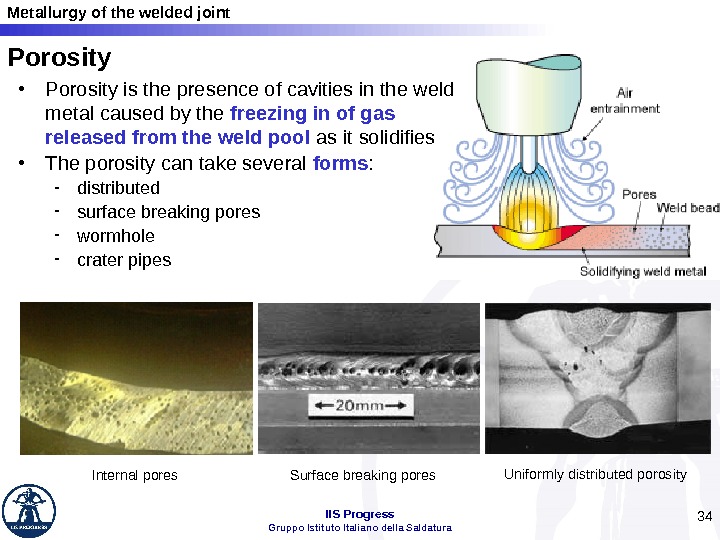
 Metallurgy of the welded joint IIS Progress Gruppo Istituto Italiano della Saldatura 34 Porosity • Porosity is the presence of cavities in the weld metal caused by the freezing in of gas released from the weld pool as it solidifies • The porosity can take several forms : distributed surface breaking pores wormhole crater pipes Uniformly distributed porosity Surface breaking pores. Internal pores
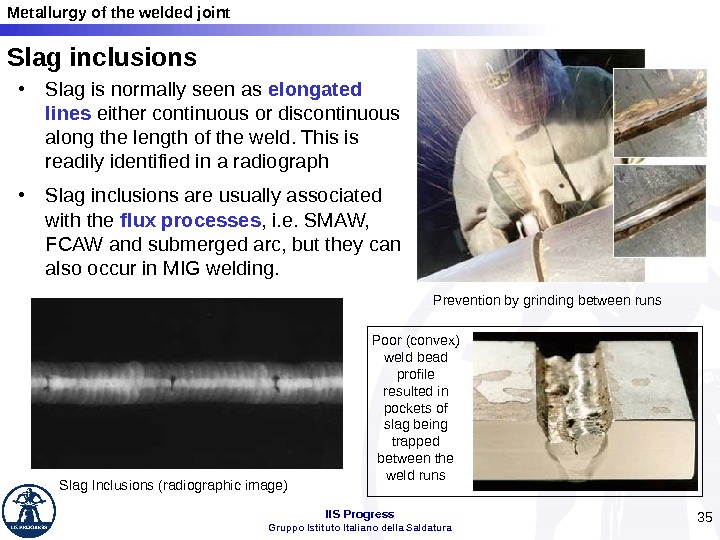
 Metallurgy of the welded joint IIS Progress Gruppo Istituto Italiano della Saldatura 35 Slag inclusions • Slag is normally seen as elongated lines either continuous or discontinuous along the length of the weld. This is readily identified in a radiograph • Slag inclusions are usually associated with the flux processes , i. e. SMAW, FCAW and submerged arc, but they can also occur in MIG welding. Prevention by grinding between runs Poor (convex) weld bead profile resulted in pockets of slag being trapped between the weld runs Slag Inclusions (radiographic image)
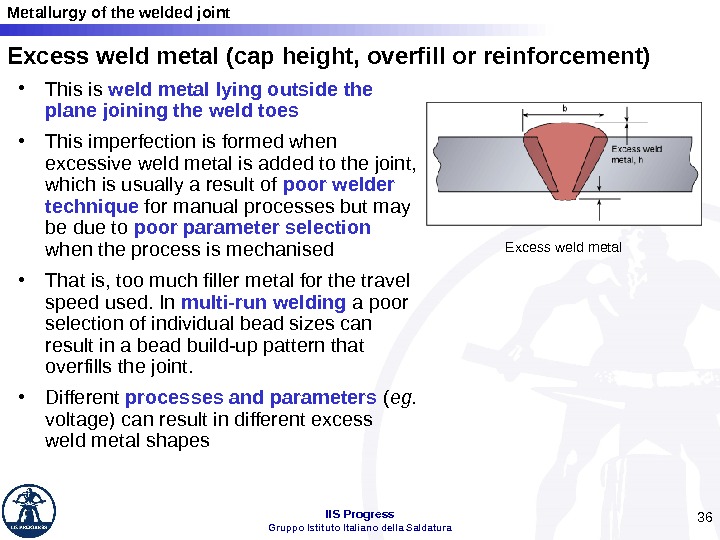
 Metallurgy of the welded joint IIS Progress Gruppo Istituto Italiano della Saldatura 36 Excess weld metal (cap height, overfill or reinforcement) • This is weld metal lying outside the plane joining the weld toes • This imperfection is formed when excessive weld metal is added to the joint, which is usually a result of poor welder technique for manual processes but may be due to poor parameter selection when the process is mechanised • That is, too much filler metal for the travel speed used. In multi-run welding a poor selection of individual bead sizes can result in a bead build-up pattern that overfills the joint. • Different processes and parameters ( eg. voltage) can result in different excess weld metal shapes Excess weld metal
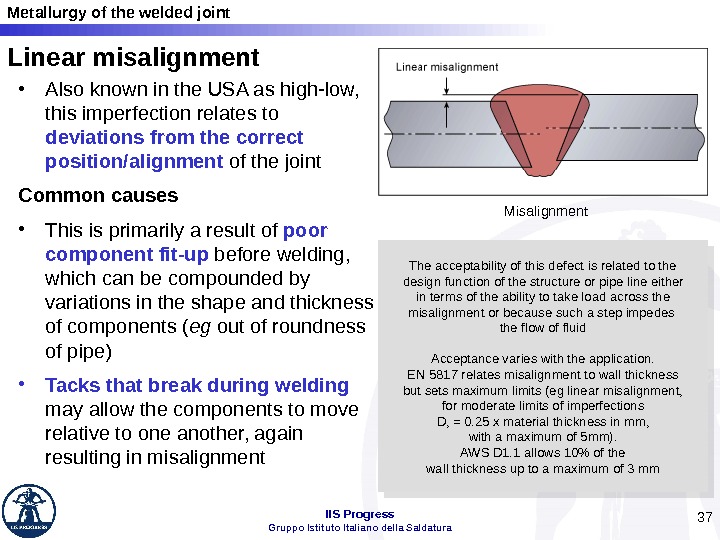
 Metallurgy of the welded joint IIS Progress Gruppo Istituto Italiano della Saldatura 37 Linear misalignment • Also known in the USA as high-low, this imperfection relates to deviations from the correct position/alignment of the joint Common causes • This is primarily a result of poor component fit-up before welding, which can be compounded by variations in the shape and thickness of components ( eg out of roundness of pipe) • Tacks that break during welding may allow the components to move relative to one another, again resulting in misalignment Misalignment The acceptability of this defect is related to the design function of the structure or pipe line either in terms of the ability to take load across the misalignment or because such a step impedes the flow of fluid Acceptance varies with the application. EN 5817 relates misalignment to wall thickness but sets maximum limits (eg linear misalignment, for moderate limits of imperfections D, = 0. 25 x material thickness in mm, with a maximum of 5 mm). AWS D 1. 1 allows 10% of the wall thickness up to a maximum of 3 mm
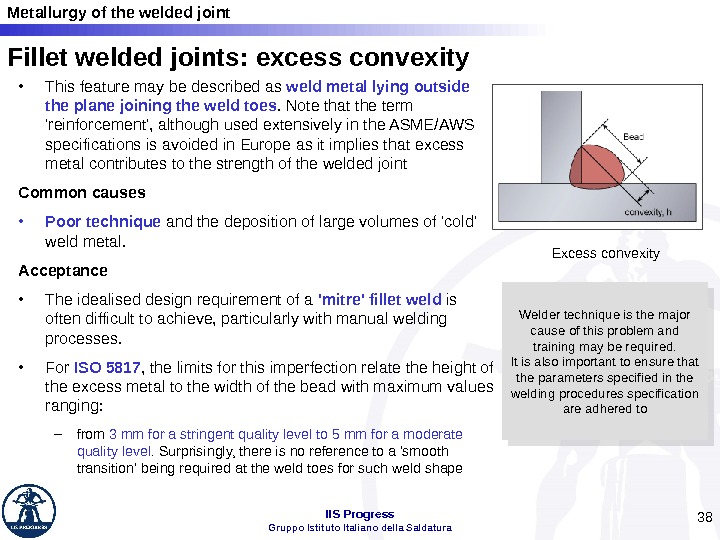
 Metallurgy of the welded joint IIS Progress Gruppo Istituto Italiano della Saldatura 38 Fillet welded joints: excess convexity • This feature may be described as weld metal lying outside the plane joining the weld toes. Note that the term ‘reinforcement’, although used extensively in the ASME/AWS specifications is avoided in Europe as it implies that excess metal contributes to the strength of the welded joint Common causes • Poor technique and the deposition of large volumes of ‘cold’ weld metal. Acceptance • The idealised design requirement of a ‘mitre’ fillet weld is often difficult to achieve, particularly with manual welding processes. • For ISO 5817 , the limits for this imperfection relate the height of the excess metal to the width of the bead with maximum values ranging: – from 3 mm for a stringent quality level to 5 mm for a moderate quality level. Surprisingly, there is no reference to a ‘smooth transition’ being required at the weld toes for such weld shape Excess convexity Welder technique is the major cause of this problem and training may be required. It is also important to ensure that the parameters specified in the welding procedures specification are adhered to
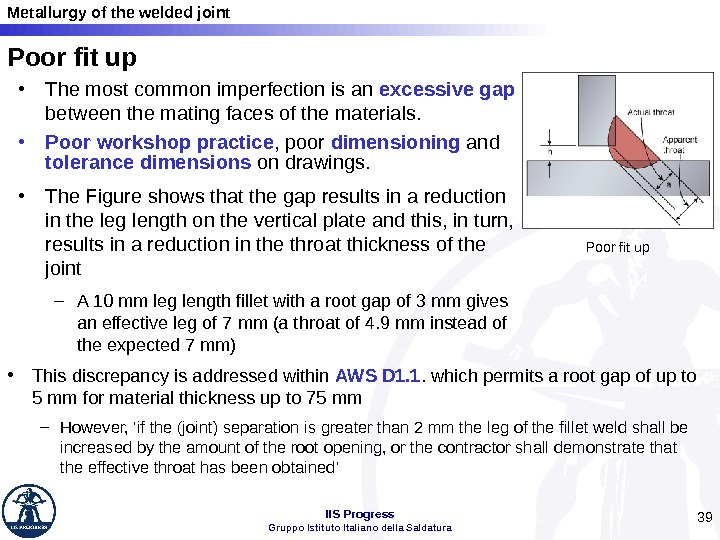
 Metallurgy of the welded joint IIS Progress Gruppo Istituto Italiano della Saldatura 39 Poor fit up • The most common imperfection is an excessive gap between the mating faces of the materials. • Poor workshop practice , poor dimensioning and tolerance dimensions on drawings. • The Figure shows that the gap results in a reduction in the leg length on the vertical plate and this, in turn, results in a reduction in the throat thickness of the joint – A 10 mm leg length fillet with a root gap of 3 mm gives an effective leg of 7 mm (a throat of 4. 9 mm instead of the expected 7 mm) • This discrepancy is addressed within AWS D 1. 1. which permits a root gap of up to 5 mm for material thickness up to 75 mm – However, ‘if the (joint) separation is greater than 2 mm the leg of the fillet weld shall be increased by the amount of the root opening, or the contractor shall demonstrate that the effective throat has been obtained’ Poor fit up
 Metallurgy of the welded joint IIS Progress Gruppo Istituto Italiano della Saldatura 40 Heat tint levels: colour charts
 Metallurgy of the welded joint IIS Progress Gruppo Istituto Italiano della Saldatura 41 Fabrication and service defects and imperfections • As the presence of imperfections in a welded joint may not render the component defective in the sense of being unsuitable for the intended application, the preferred term is imperfection rather than defect • For this reason, production quality for a component is defined in terms of a quality level in which the limits for the imperfections are clearly defined, for example Level B, C or D in accordance with the requirements of ISO 5817 The SS Schenectady, an all welded tanker, broke in two whilst lying in dock in 1943. Principal causes of this failure were poor design and bad workmanship

