7b483907ded10532bc0d79cb158dec3f.ppt
- Количество слайдов: 56
Lecture #2 BASIC GEOMETRY DRAWING & FUNCTIONS RES 112 E – COMPUTER AIDED TECHNICAL DRAWING 2015 @ ITU
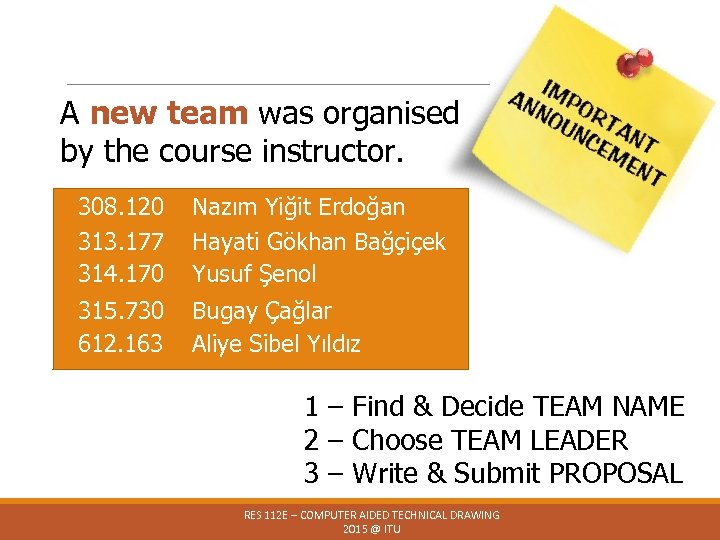
A new team was organised by the course instructor. 308. 120 313. 177 314. 170 Nazım Yiğit Erdoğan Hayati Gökhan Bağçiçek Yusuf Şenol 315. 730 612. 163 Bugay Çağlar Aliye Sibel Yıldız 1 – Find & Decide TEAM NAME 2 – Choose TEAM LEADER 3 – Write & Submit PROPOSAL RES 112 E – COMPUTER AIDED TECHNICAL DRAWING 2015 @ ITU
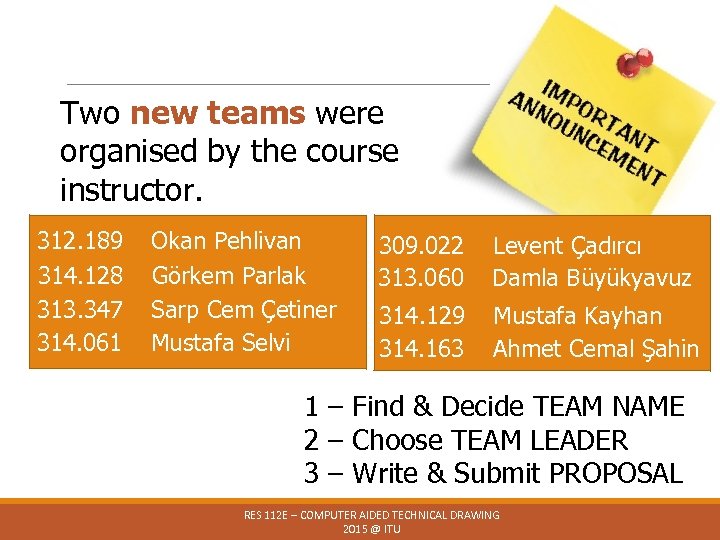
Two new teams were organised by the course instructor. 312. 189 314. 128 313. 347 314. 061 Okan Pehlivan Görkem Parlak Sarp Cem Çetiner Mustafa Selvi 309. 022 313. 060 Levent Çadırcı Damla Büyükyavuz 314. 129 314. 163 Mustafa Kayhan Ahmet Cemal Şahin 1 – Find & Decide TEAM NAME 2 – Choose TEAM LEADER 3 – Write & Submit PROPOSAL RES 112 E – COMPUTER AIDED TECHNICAL DRAWING 2015 @ ITU
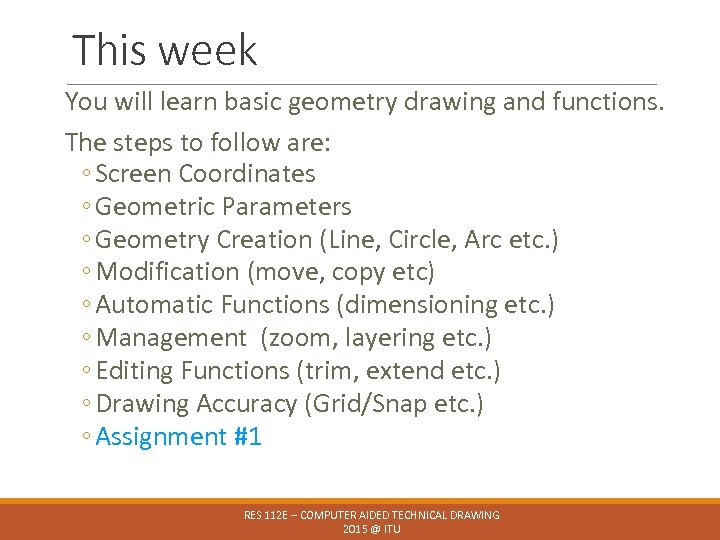
This week You will learn basic geometry drawing and functions. The steps to follow are: ◦ Screen Coordinates ◦ Geometric Parameters ◦ Geometry Creation (Line, Circle, Arc etc. ) ◦ Modification (move, copy etc) ◦ Automatic Functions (dimensioning etc. ) ◦ Management (zoom, layering etc. ) ◦ Editing Functions (trim, extend etc. ) ◦ Drawing Accuracy (Grid/Snap etc. ) ◦ Assignment #1 RES 112 E – COMPUTER AIDED TECHNICAL DRAWING 2015 @ ITU
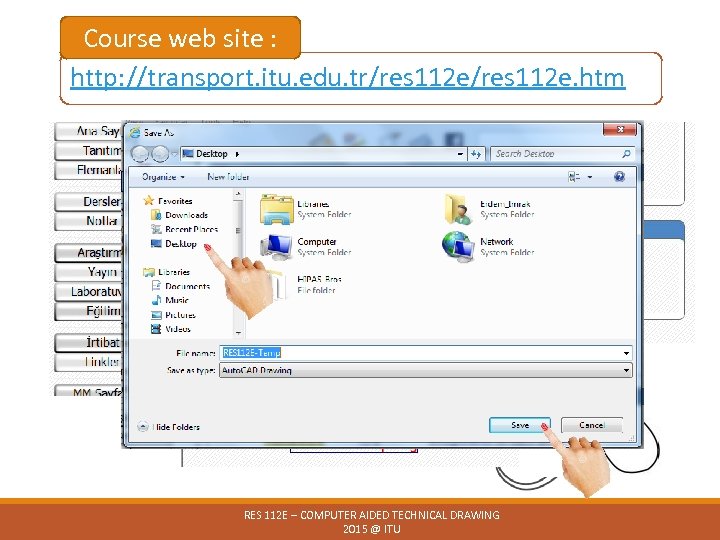
Course web site : http: //transport. itu. edu. tr/res 112 e. htm RES 112 E – COMPUTER AIDED TECHNICAL DRAWING 2015 @ ITU
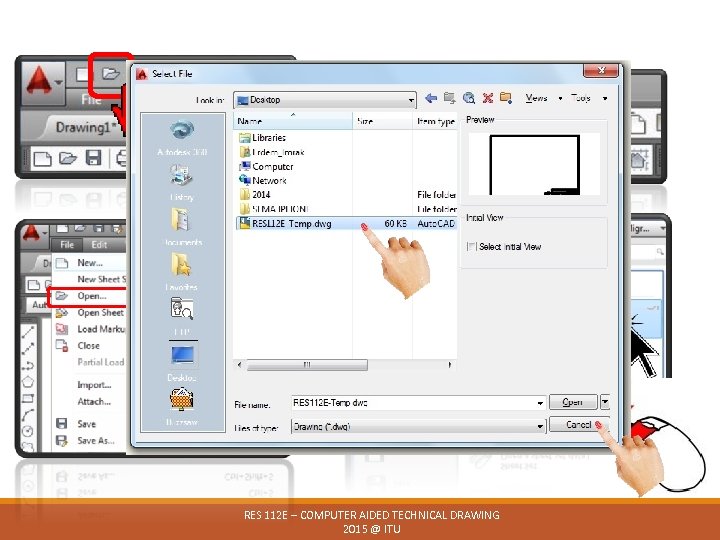
RES 112 E – COMPUTER AIDED TECHNICAL DRAWING 2015 @ ITU
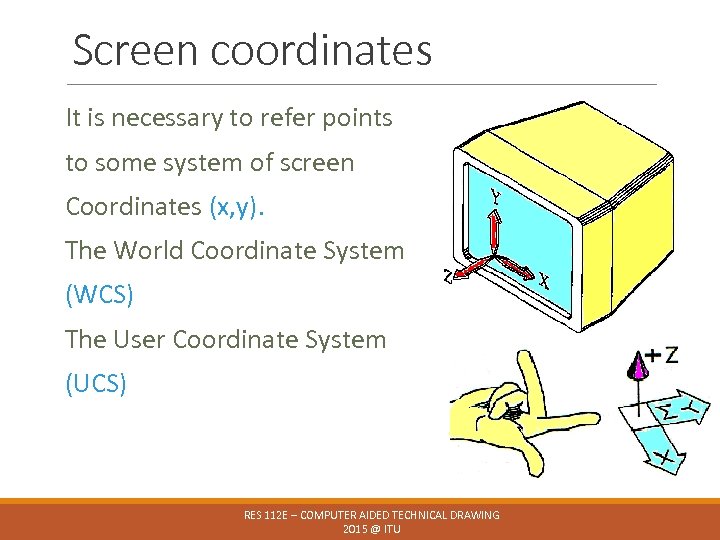
Screen coordinates It is necessary to refer points to some system of screen Coordinates (x, y). The World Coordinate System (WCS) The User Coordinate System (UCS) RES 112 E – COMPUTER AIDED TECHNICAL DRAWING 2015 @ ITU
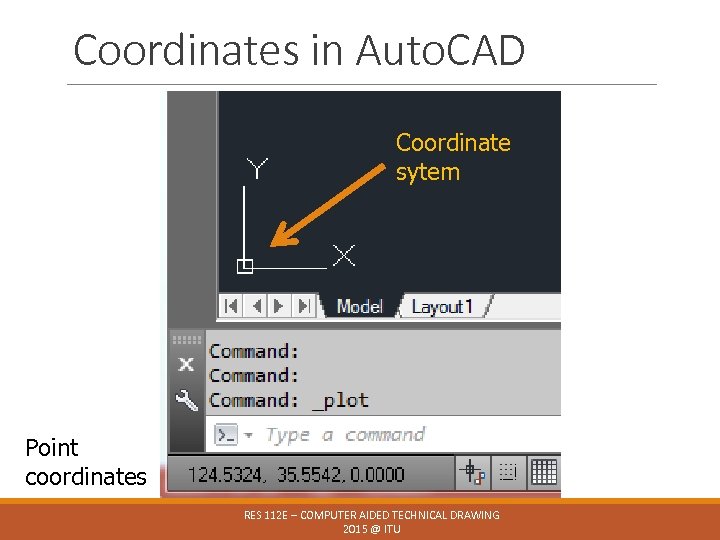
Coordinates in Auto. CAD Coordinate sytem Point coordinates X, Y, Z RES 112 E – COMPUTER AIDED TECHNICAL DRAWING 2015 @ ITU
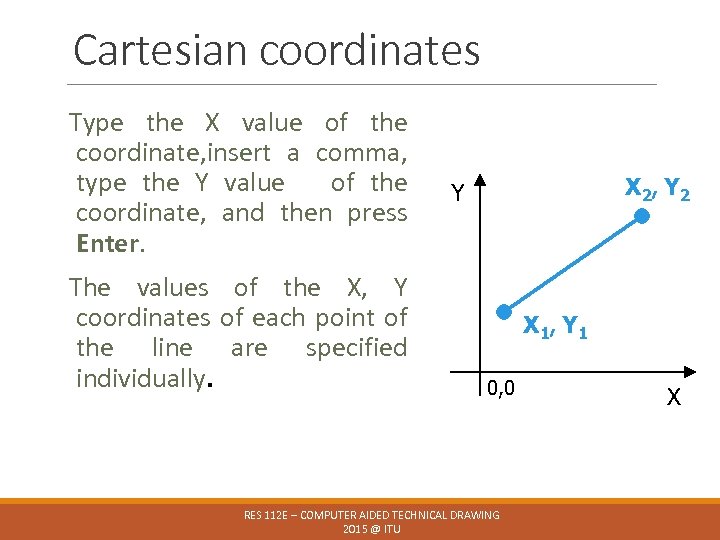
Cartesian coordinates Type the X value of the coordinate, insert a comma, type the Y value of the coordinate, and then press Enter. The values of the X, Y coordinates of each point of the line are specified individually. X 2, Y 2 Y X 1, Y 1 0, 0 RES 112 E – COMPUTER AIDED TECHNICAL DRAWING 2015 @ ITU X
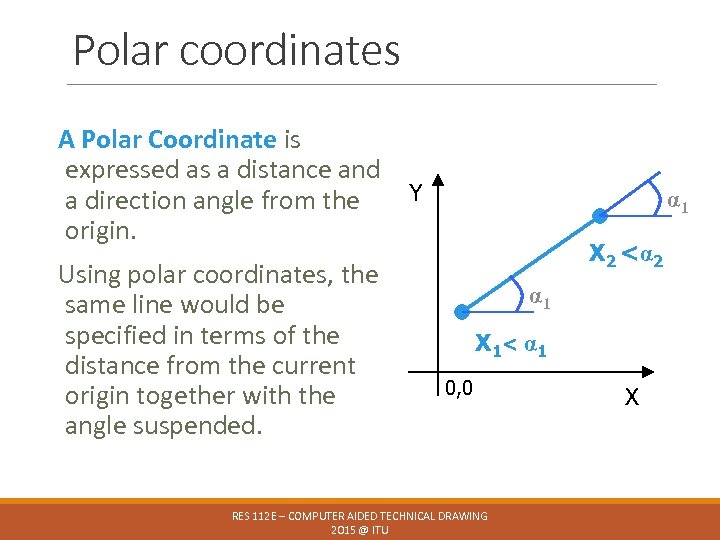
Polar coordinates A Polar Coordinate is expressed as a distance and a direction angle from the origin. Using polar coordinates, the same line would be specified in terms of the distance from the current origin together with the angle suspended. Y α 1 X 2 <α 2 α 1 X 1 < α 1 0, 0 RES 112 E – COMPUTER AIDED TECHNICAL DRAWING 2015 @ ITU X
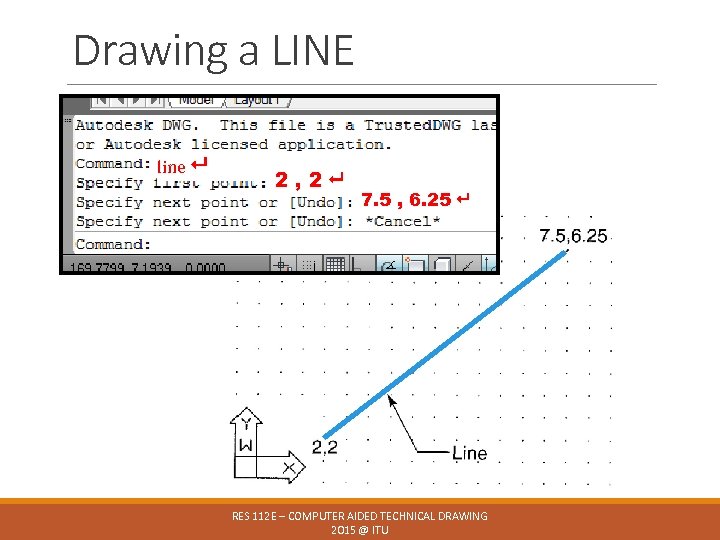
Drawing a LINE line 2, 2 7. 5 , 6. 25 RES 112 E – COMPUTER AIDED TECHNICAL DRAWING 2015 @ ITU
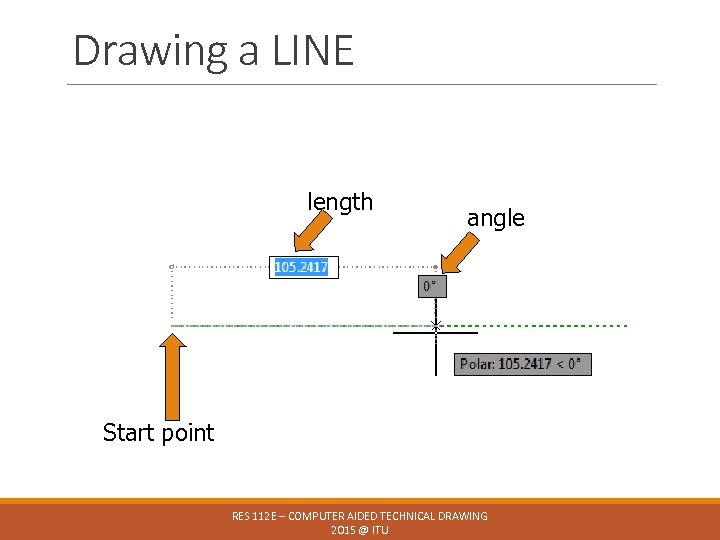
Drawing a LINE length angle Start point RES 112 E – COMPUTER AIDED TECHNICAL DRAWING 2015 @ ITU
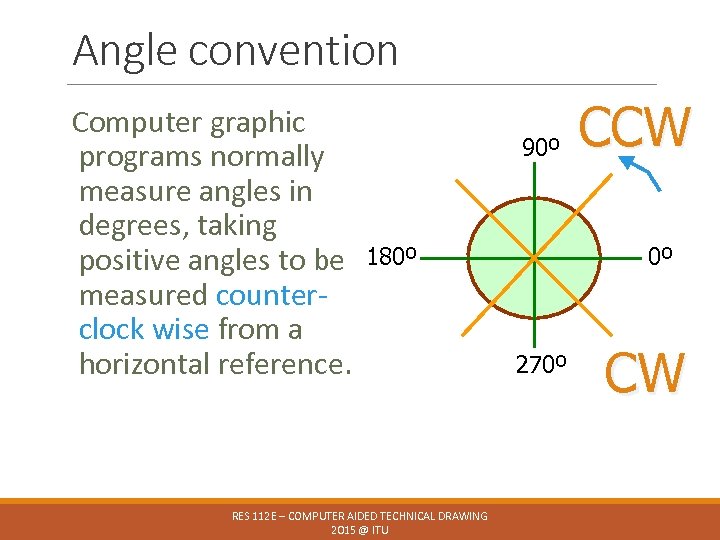
Angle convention Computer graphic programs normally measure angles in degrees, taking positive angles to be measured counterclock wise from a horizontal reference. 90º 180º RES 112 E – COMPUTER AIDED TECHNICAL DRAWING 2015 @ ITU CCW 0º 270º CW
Auto. CAD command GEOMETRY COMMANDS RES 112 E – COMPUTER AIDED TECHNICAL DRAWING 2015 @ ITU
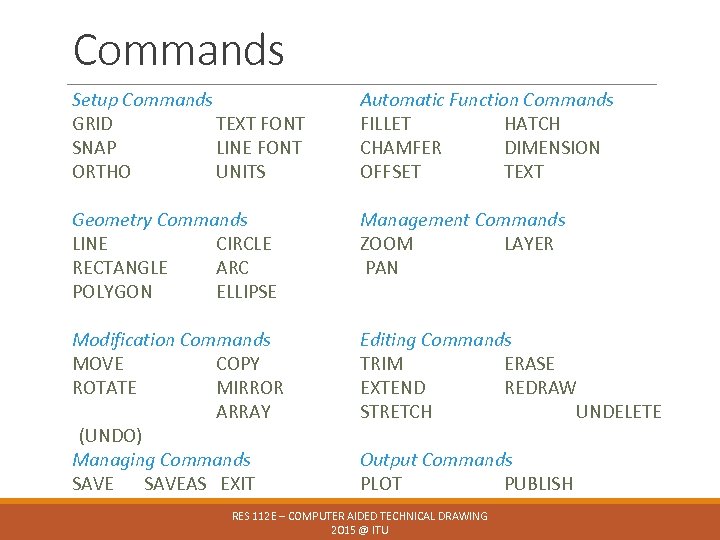
Commands Setup Commands GRID TEXT FONT SNAP LINE FONT ORTHO UNITS Automatic Function Commands FILLET HATCH CHAMFER DIMENSION OFFSET TEXT Geometry Commands LINE CIRCLE RECTANGLE ARC POLYGON ELLIPSE Management Commands ZOOM LAYER PAN Modification Commands MOVE COPY ROTATE MIRROR ARRAY (UNDO) Managing Commands SAVEAS EXIT Editing Commands TRIM ERASE EXTEND REDRAW STRETCH UNDELETE Output Commands PLOT PUBLISH RES 112 E – COMPUTER AIDED TECHNICAL DRAWING 2015 @ ITU
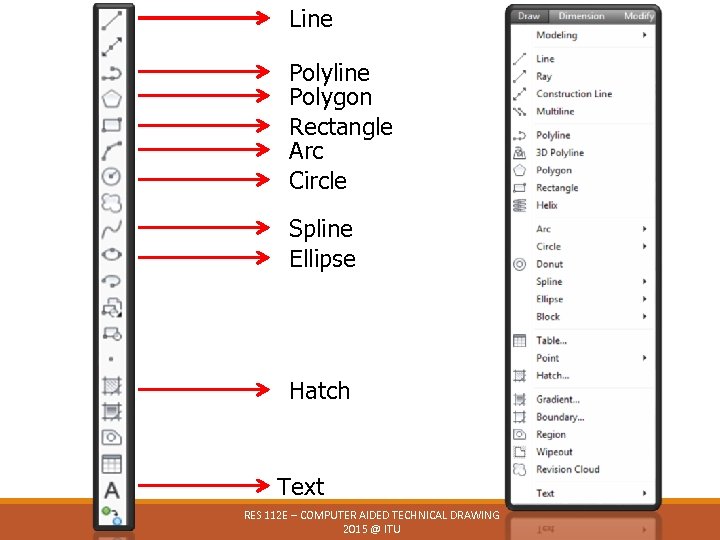
Line Polyline Polygon Rectangle Arc Circle Spline Ellipse Hatch Text RES 112 E – COMPUTER AIDED TECHNICAL DRAWING 2015 @ ITU
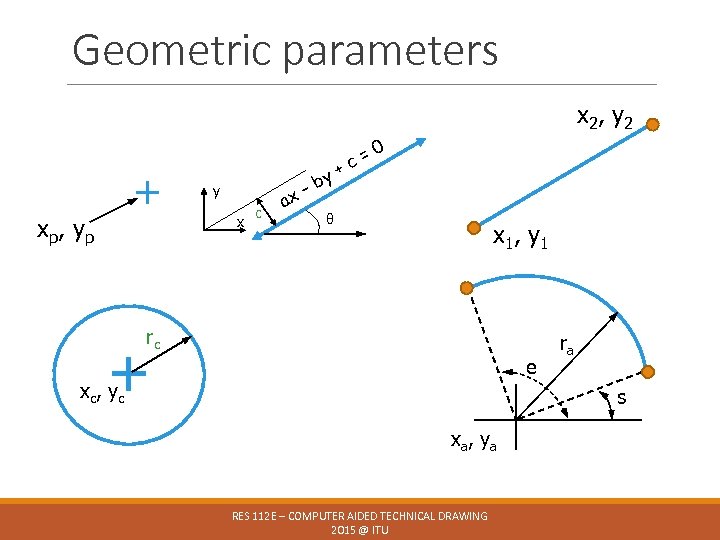
Geometric parameters x 2 , y 2 + xp , y p y x c ax y –b + =0 c θ x 1 , y 1 rc + e xc , y c ra s xa, ya RES 112 E – COMPUTER AIDED TECHNICAL DRAWING 2015 @ ITU
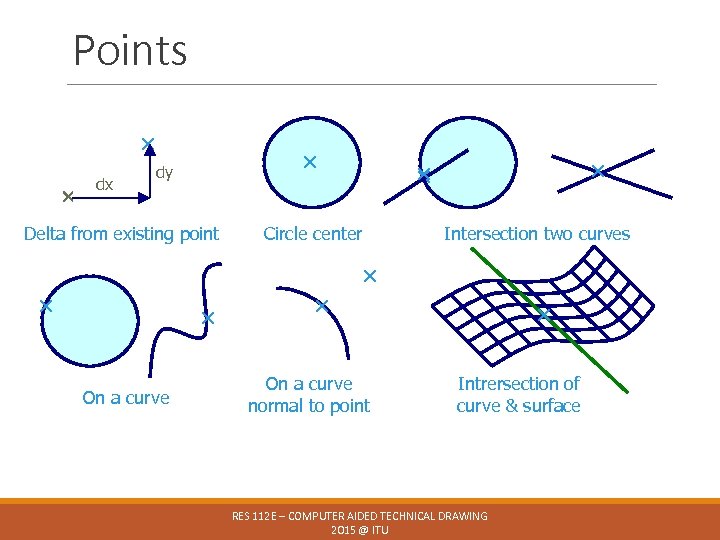
Points dx dy Delta from existing point Circle center Intersection two curves On a curve normal to point Intrersection of curve & surface RES 112 E – COMPUTER AIDED TECHNICAL DRAWING 2015 @ ITU
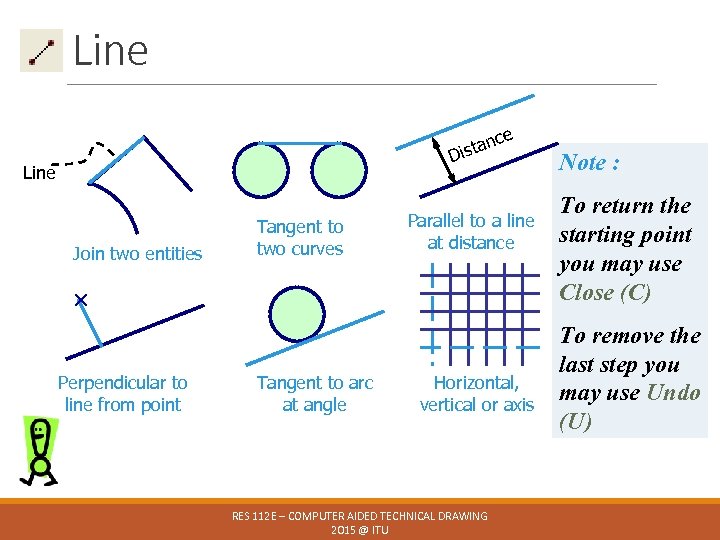
Line ce tan Dis Line Join two entities Tangent to two curves Parallel to a line at distance Perpendicular to line from point Tangent to arc at angle Horizontal, vertical or axis RES 112 E – COMPUTER AIDED TECHNICAL DRAWING 2015 @ ITU Note : To return the starting point you may use Close (C) To remove the last step you may use Undo (U)
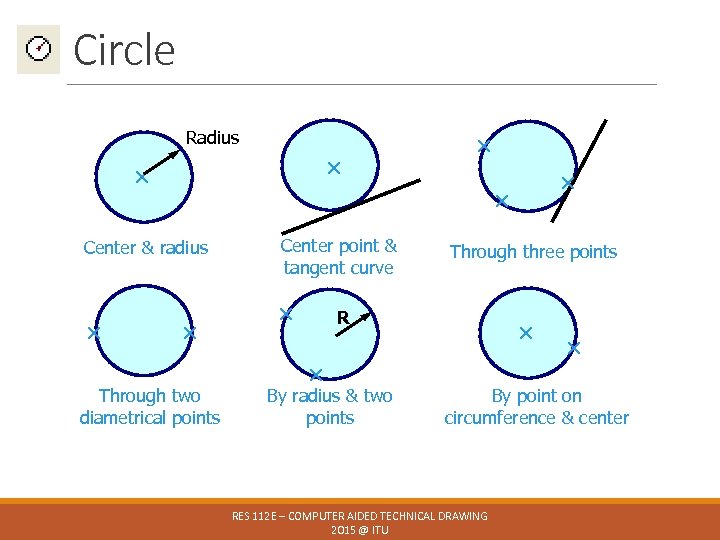
Circle Radius Center & radius Center point & tangent curve Through two diametrical points Through three points R By radius & two points By point on circumference & center RES 112 E – COMPUTER AIDED TECHNICAL DRAWING 2015 @ ITU
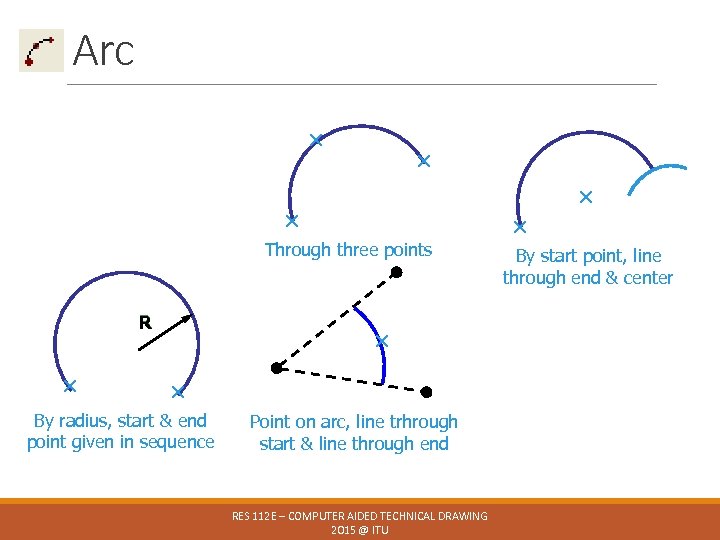
Arc Through three points R By radius, start & end point given in sequence Point on arc, line trhrough start & line through end RES 112 E – COMPUTER AIDED TECHNICAL DRAWING 2015 @ ITU By start point, line through end & center
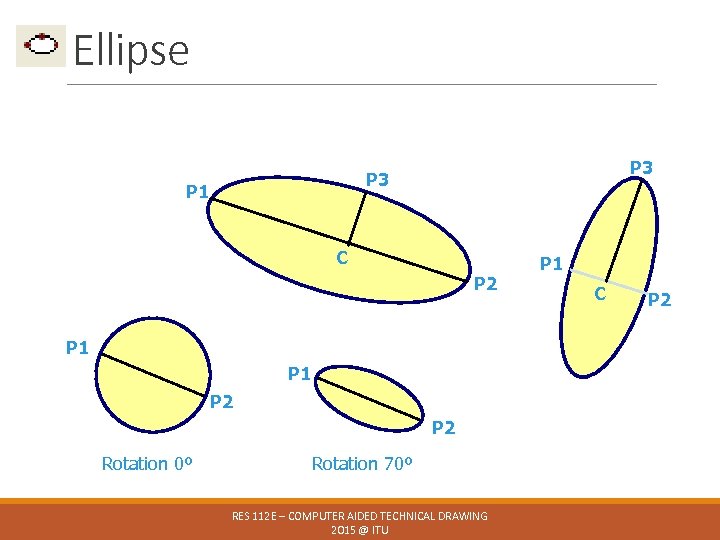
Ellipse P 3 P 1 C P 2 P 1 Ellipse P 1 P 2 Rotation 0º Rotation 70º RES 112 E – COMPUTER AIDED TECHNICAL DRAWING 2015 @ ITU P 1 C P 2
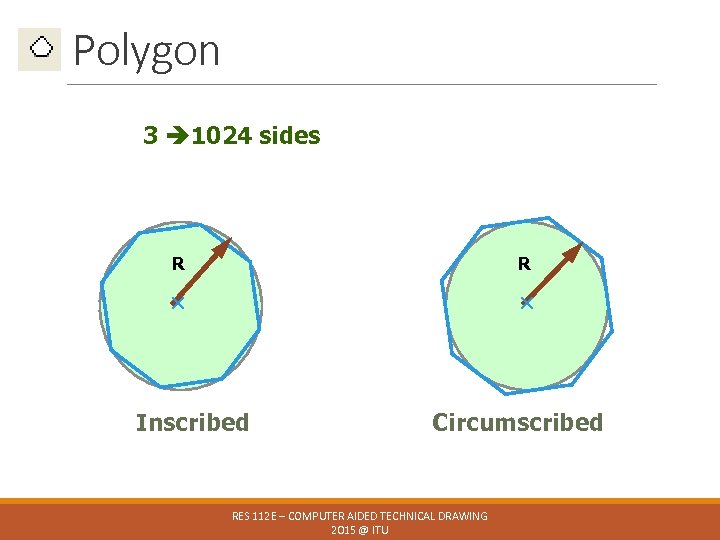
Polygon 3 1024 sides R R Inscribed Circumscribed RES 112 E – COMPUTER AIDED TECHNICAL DRAWING 2015 @ ITU
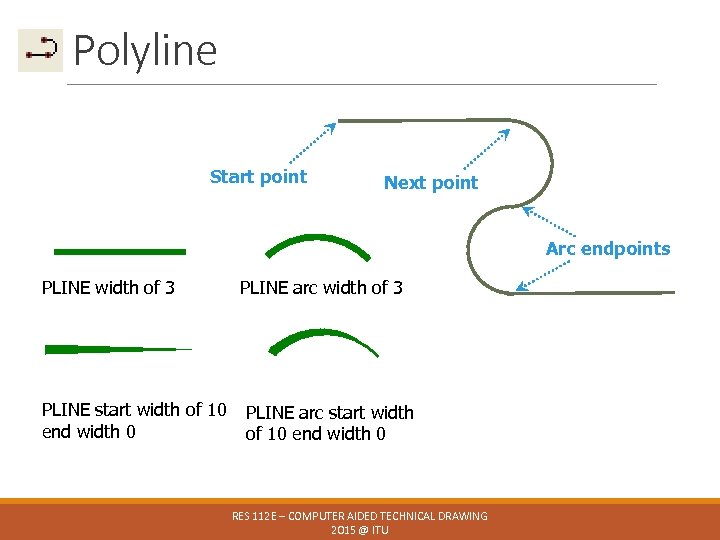
Polyline Start point Next point Arc endpoints PLINE width of 3 PLINE start width of 10 end width 0 PLINE arc width of 3 PLINE arc start width of 10 end width 0 RES 112 E – COMPUTER AIDED TECHNICAL DRAWING 2015 @ ITU

Donut, Trace & Solid Trace Donut Fill ON Solid 1 st pt 2 nd pt 3 rd pt Fill OFF 4 th pt 3 rd pt 1 st pt 2 nd pt 4 th pt 3 rd pt 4 th pt RES 112 E – COMPUTER AIDED TECHNICAL DRAWING 2015 @ ITU
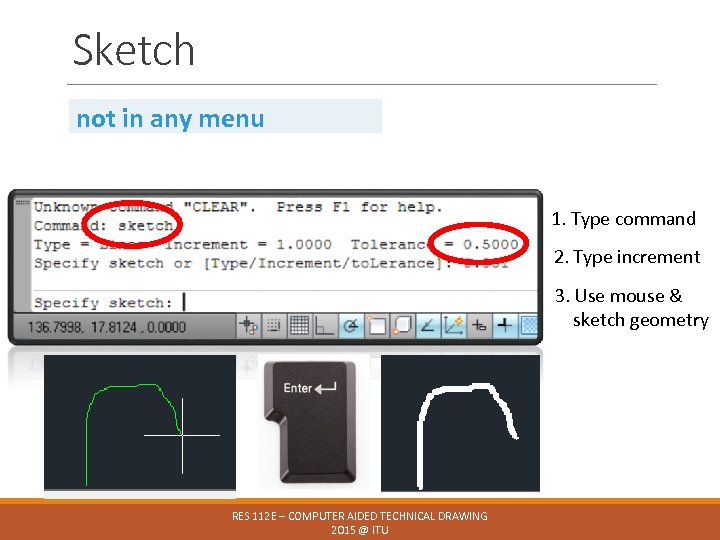
Sketch not in any menu 1. Type command 2. Type increment 3. Use mouse & sketch geometry RES 112 E – COMPUTER AIDED TECHNICAL DRAWING 2015 @ ITU
Auto. CAD command MODIFICATION COMMANDS RES 112 E – COMPUTER AIDED TECHNICAL DRAWING 2015 @ ITU
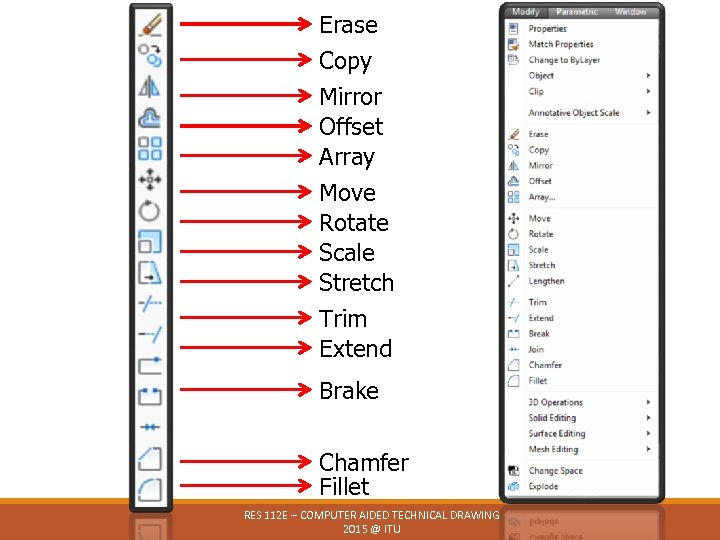
Erase Copy Mirror Offset Array Move Rotate Scale Stretch Trim Extend Brake Chamfer Fillet RES 112 E – COMPUTER AIDED TECHNICAL DRAWING 2015 @ ITU

Modification commands scaling (scale) 2: 1 translating (move) rotation (rotate) mirroring (mirror) duplicating (array) RES 112 E – COMPUTER AIDED TECHNICAL DRAWING 2015 @ ITU
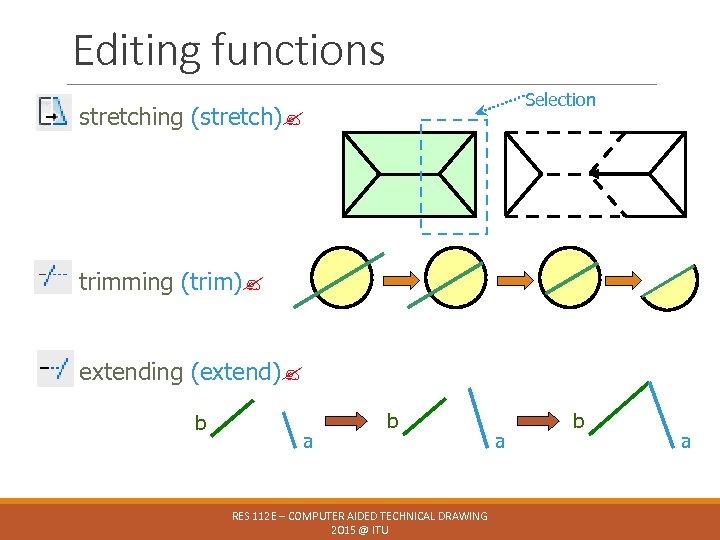
Editing functions Selection stretching (stretch) trimming (trim) extending (extend) b a b RES 112 E – COMPUTER AIDED TECHNICAL DRAWING 2015 @ ITU a b a
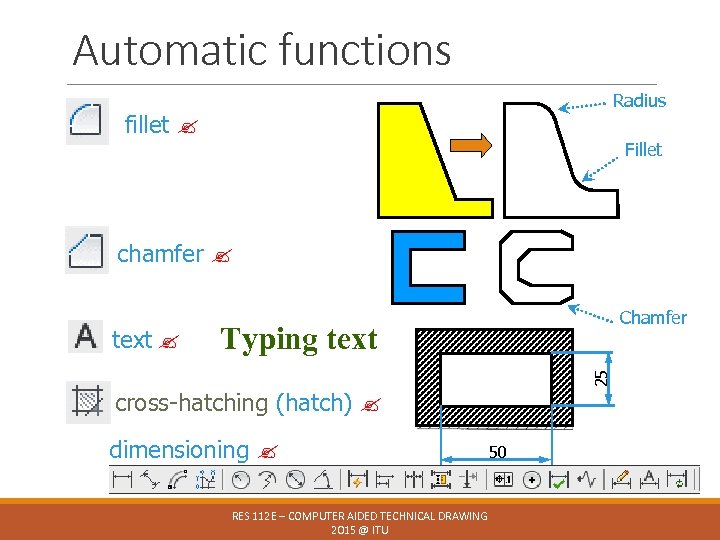
Automatic functions Radius fillet Fillet chamfer Typing text 25 text Chamfer cross-hatching (hatch) dimensioning RES 112 E – COMPUTER AIDED TECHNICAL DRAWING 2015 @ ITU 50
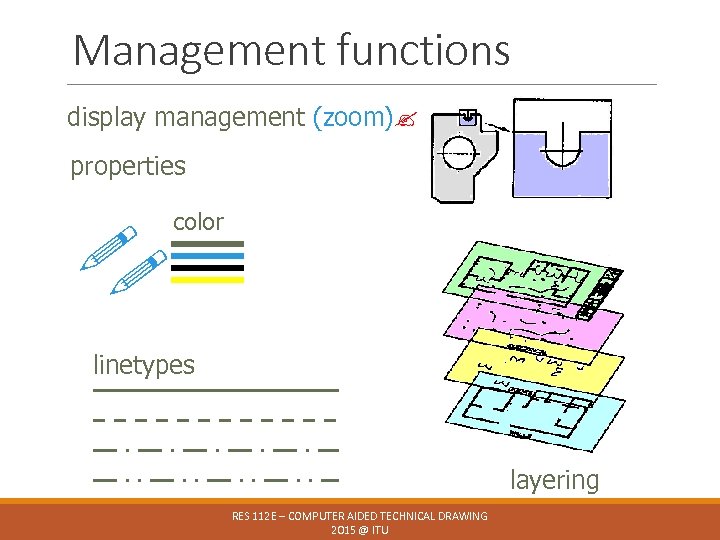
Management functions display management (zoom) properties color linetypes layering RES 112 E – COMPUTER AIDED TECHNICAL DRAWING 2015 @ ITU
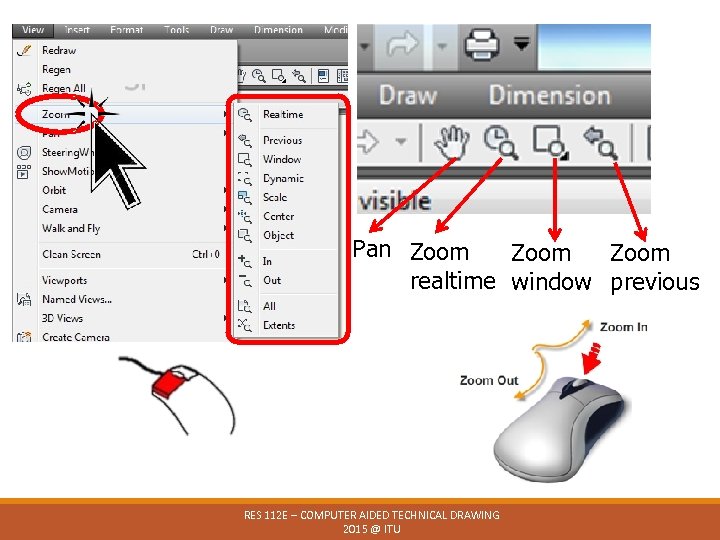
Pan Zoom realtime window previous RES 112 E – COMPUTER AIDED TECHNICAL DRAWING 2015 @ ITU
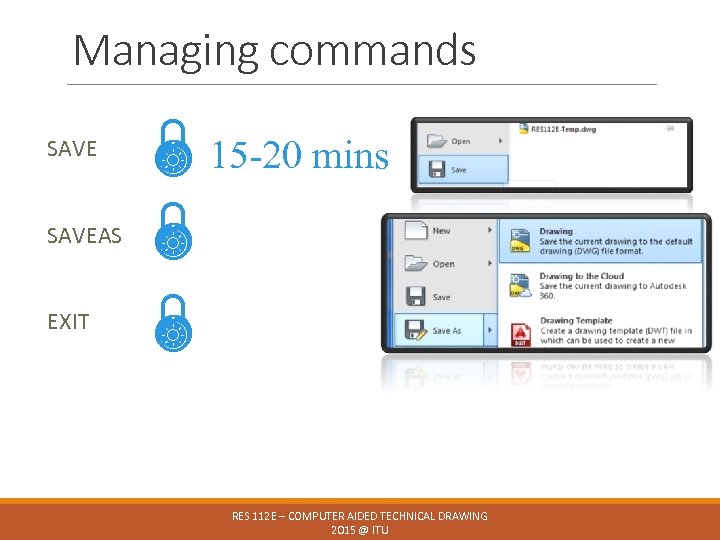
Managing commands SAVEAS EXIT 15 -20 mins RES 112 E – COMPUTER AIDED TECHNICAL DRAWING 2015 @ ITU
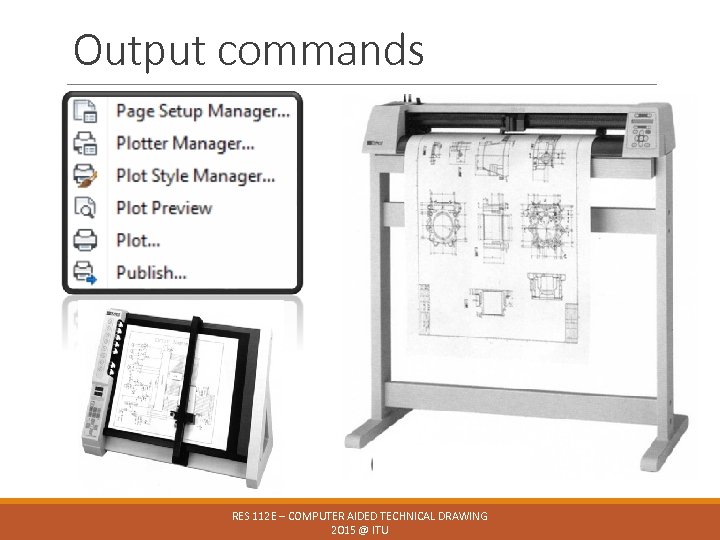
Output commands RES 112 E – COMPUTER AIDED TECHNICAL DRAWING 2015 @ ITU
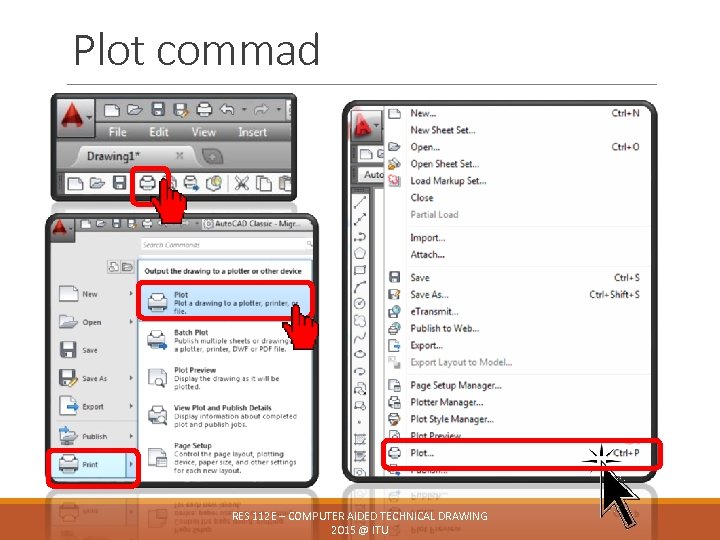
Plot commad RES 112 E – COMPUTER AIDED TECHNICAL DRAWING 2015 @ ITU
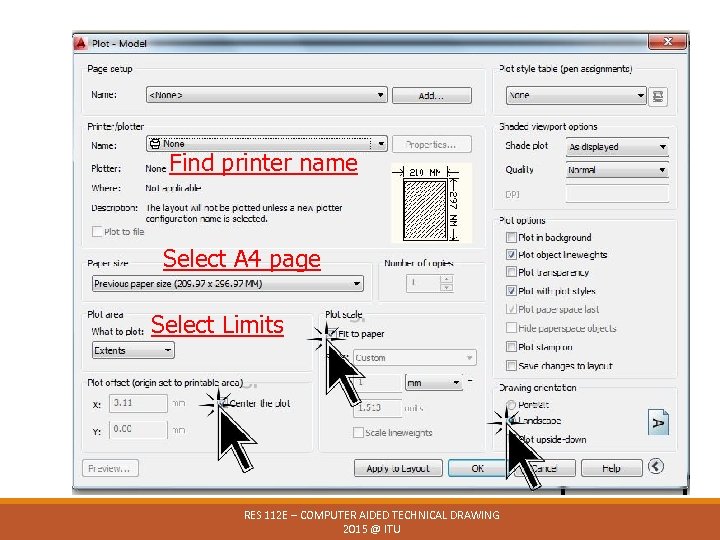
Find printer name Select A 4 page Select Limits RES 112 E – COMPUTER AIDED TECHNICAL DRAWING 2015 @ ITU
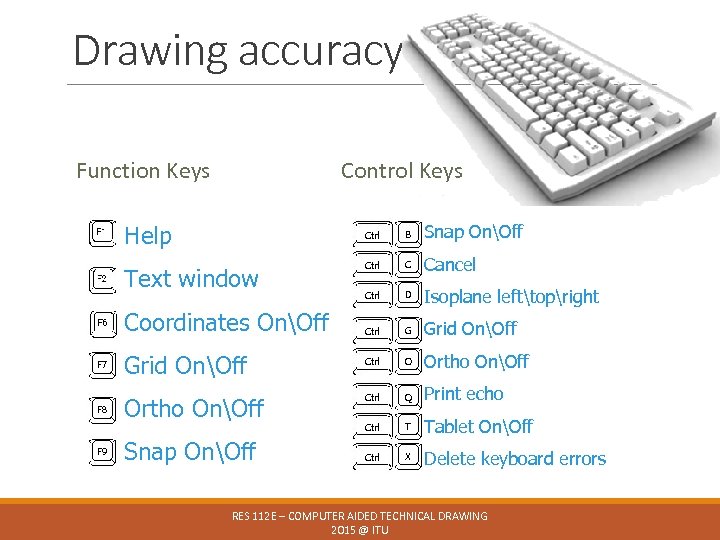
Drawing accuracy Function Keys Control Keys Help Ctrl Text window Coordinates OnOff F 7 F 8 F 9 Grid OnOff Ortho OnOff Snap OnOff B Snap OnOff Ctrl C Cancel Ctrl D Isoplane lefttopright Ctrl G Grid OnOff Ctrl O Ortho OnOff Ctrl Q Print echo Ctrl T Tablet OnOff Ctrl X Delete keyboard errors RES 112 E – COMPUTER AIDED TECHNICAL DRAWING 2015 @ ITU
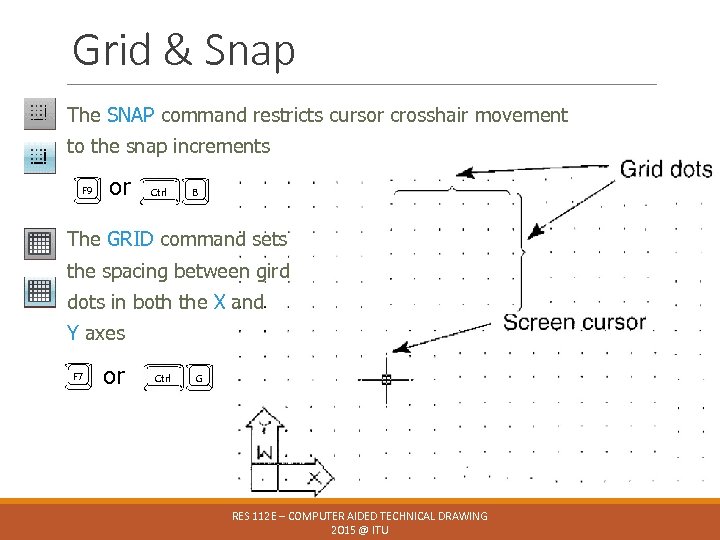
Grid & Snap The SNAP command restricts cursor crosshair movement to the snap increments F 9 or Ctrl B The GRID command sets the spacing between gird dots in both the X and Y axes F 7 or Ctrl G RES 112 E – COMPUTER AIDED TECHNICAL DRAWING 2015 @ ITU
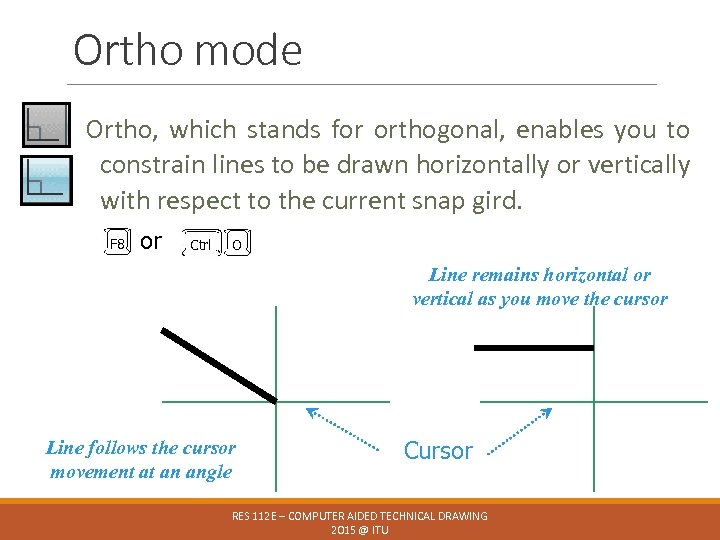
Ortho mode Ortho, which stands for orthogonal, enables you to constrain lines to be drawn horizontally or vertically with respect to the current snap gird. F 8 or Ctrl O Line remains horizontal or vertical as you move the cursor Line follows the cursor movement at an angle Cursor RES 112 E – COMPUTER AIDED TECHNICAL DRAWING 2015 @ ITU
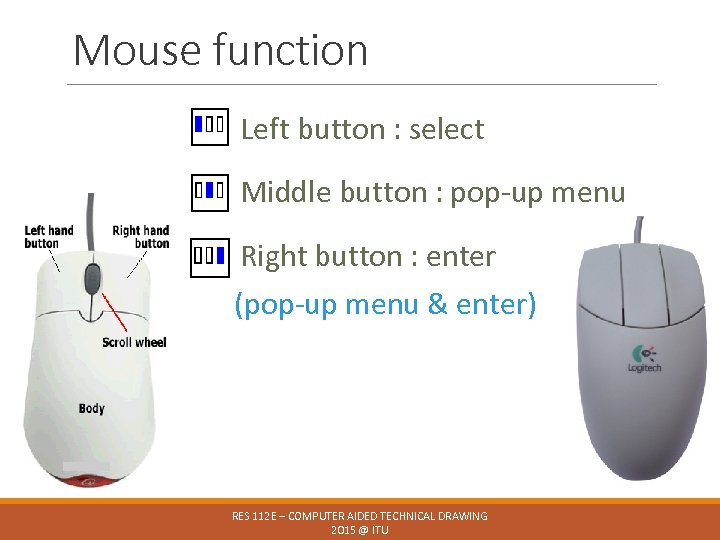
Mouse function Left button : select Middle button : pop-up menu Right button : enter (pop-up menu & enter) RES 112 E – COMPUTER AIDED TECHNICAL DRAWING 2015 @ ITU
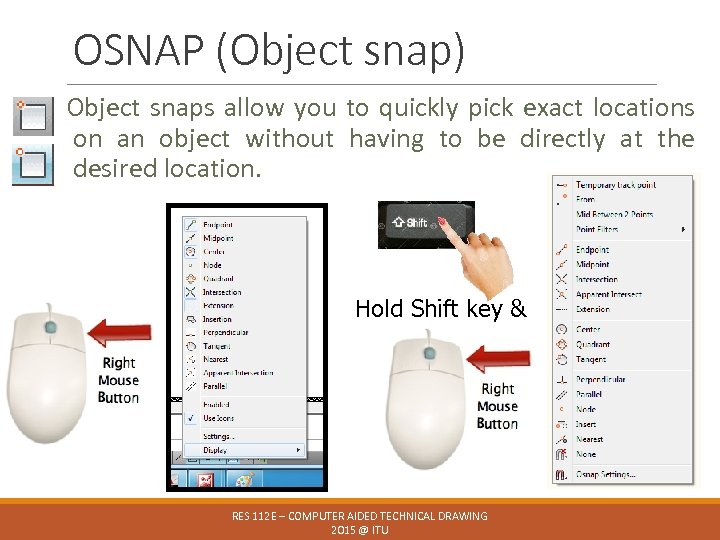
OSNAP (Object snap) Object snaps allow you to quickly pick exact locations on an object without having to be directly at the desired location. Hold Shift key & RES 112 E – COMPUTER AIDED TECHNICAL DRAWING 2015 @ ITU
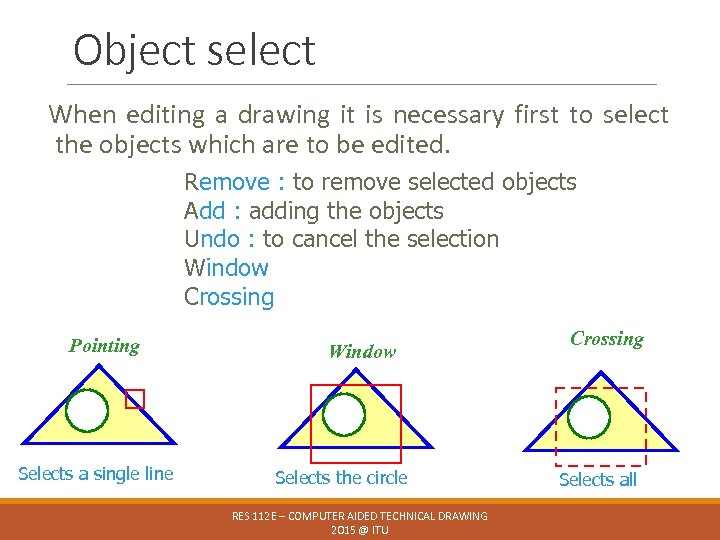
Object select When editing a drawing it is necessary first to select the objects which are to be edited. Remove : to remove selected objects Add : adding the objects Undo : to cancel the selection Window Crossing Pointing Selects a single line Window Selects the circle RES 112 E – COMPUTER AIDED TECHNICAL DRAWING 2015 @ ITU Crossing Selects all
Auto. CAD command FORMATTING RES 112 E – COMPUTER AIDED TECHNICAL DRAWING 2015 @ ITU
RES 112 E – COMPUTER AIDED TECHNICAL DRAWING 2015 @ ITU
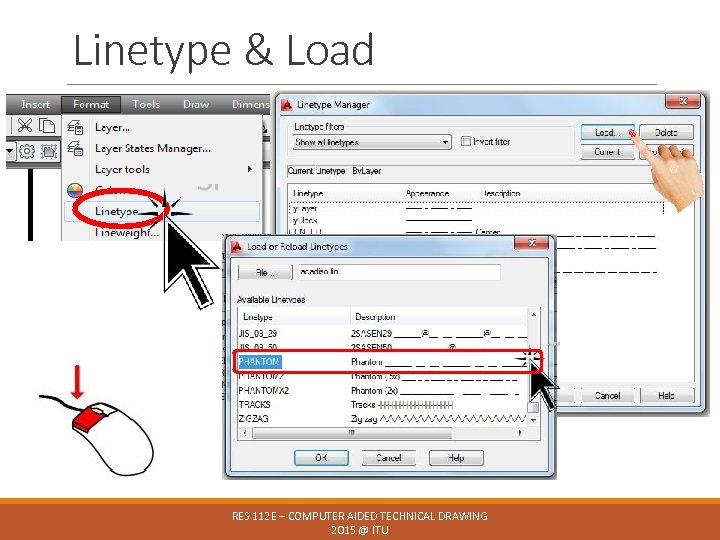
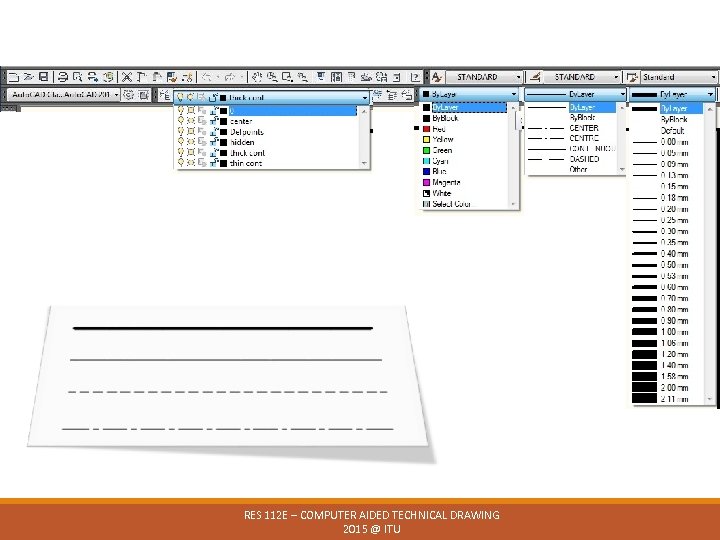
Linetype & Load RES 112 E – COMPUTER AIDED TECHNICAL DRAWING 2015 @ ITU
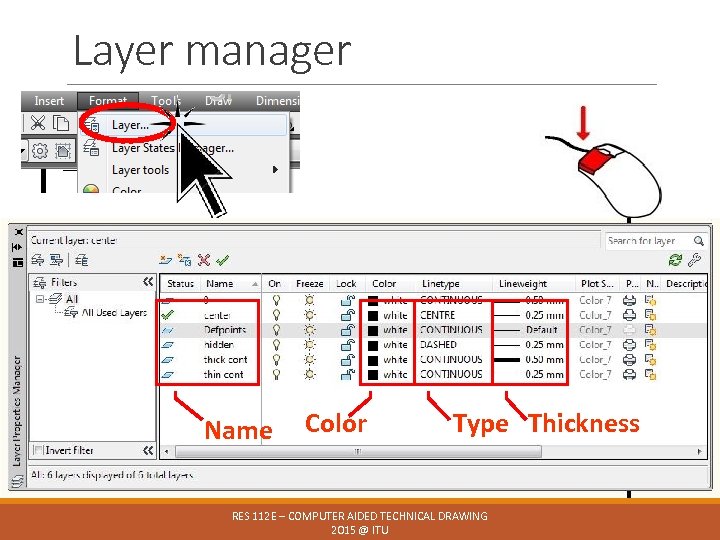
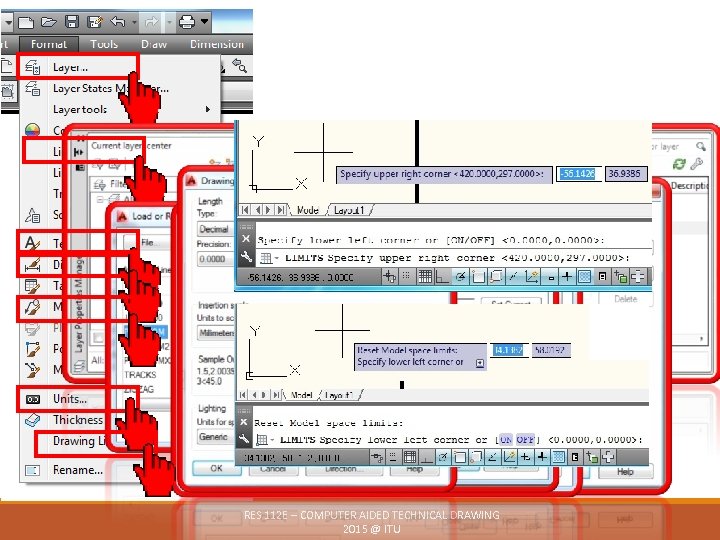
Layer manager Name Color Type Thickness RES 112 E – COMPUTER AIDED TECHNICAL DRAWING 2015 @ ITU
RES 112 E – COMPUTER AIDED TECHNICAL DRAWING 2015 @ ITU
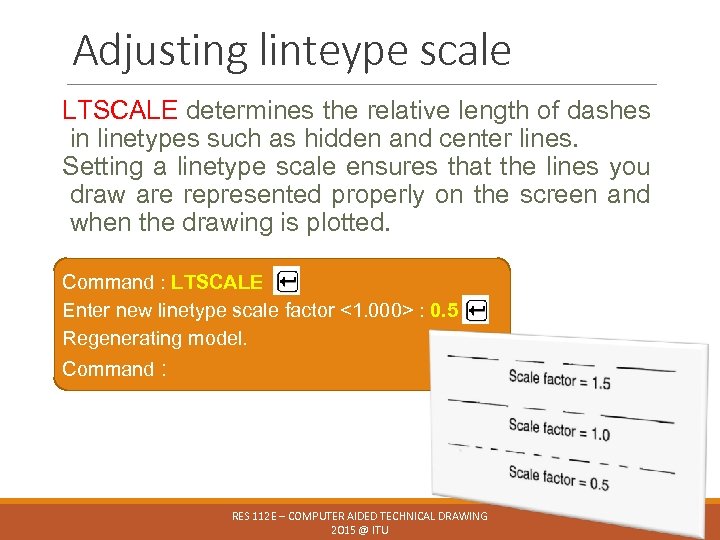
Adjusting linteype scale LTSCALE determines the relative length of dashes in linetypes such as hidden and center lines. Setting a linetype scale ensures that the lines you draw are represented properly on the screen and when the drawing is plotted. Command : LTSCALE Enter new linetype scale factor <1. 000> : 0. 5 Regenerating model. Command : RES 112 E – COMPUTER AIDED TECHNICAL DRAWING 2015 @ ITU
3. 0 RES 112 E – COMPUTER AIDED TECHNICAL DRAWING 2015 @ ITU
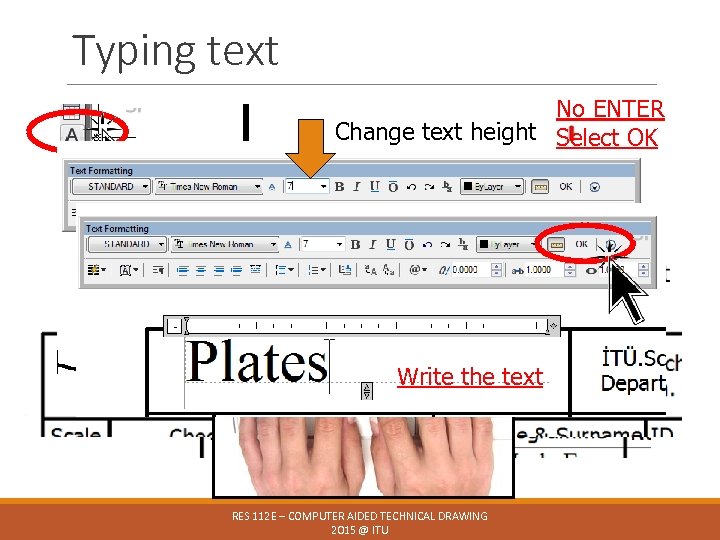
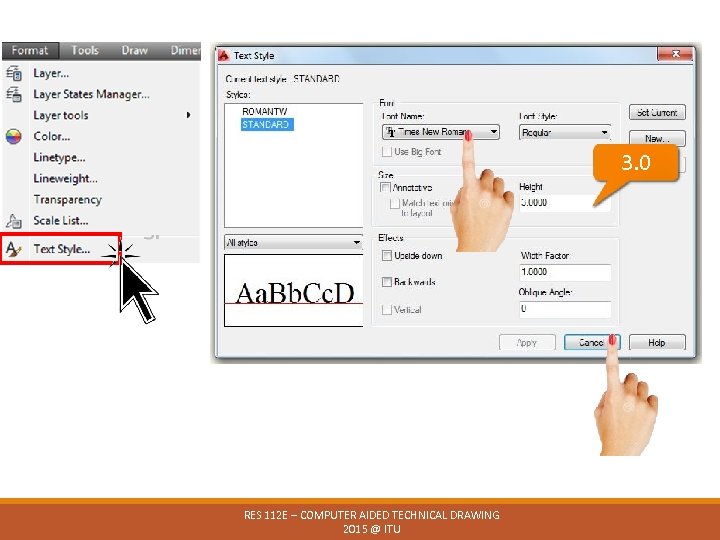
Typing text No ENTER Change text height Select OK Write the text RES 112 E – COMPUTER AIDED TECHNICAL DRAWING 2015 @ ITU
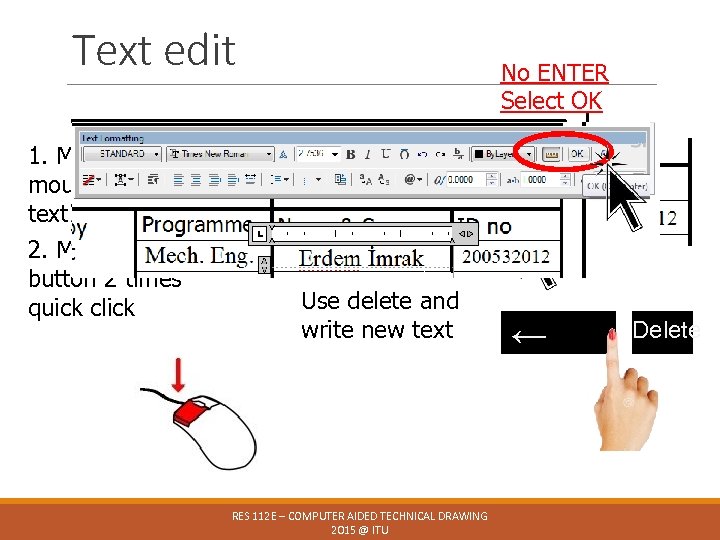
Text edit No ENTER Select OK 1. Move the mouse on the text 2. Mouse left button 2 times quick click Use delete and write new text RES 112 E – COMPUTER AIDED TECHNICAL DRAWING 2015 @ ITU ← Delete
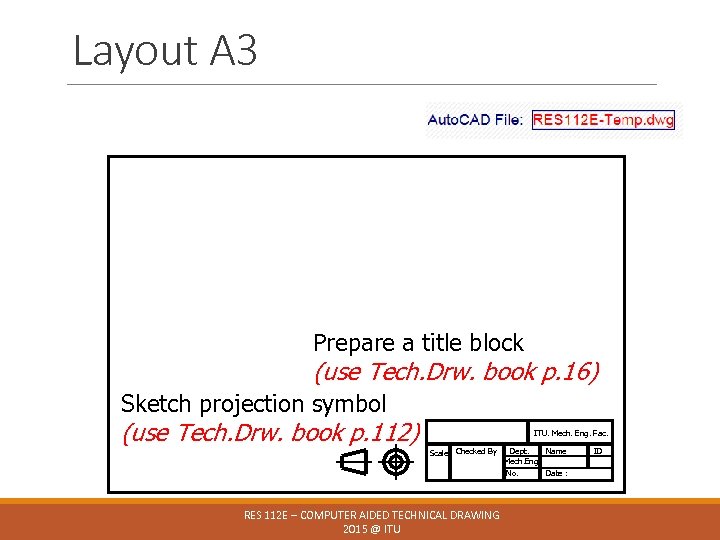
Layout A 3 Prepare a title block (use Tech. Drw. book p. 16) Sketch projection symbol (use Tech. Drw. book p. 112) ITU. Mech. Eng. Fac. Scale Checked By RES 112 E – COMPUTER AIDED TECHNICAL DRAWING 2015 @ ITU Dept. Name Mech. Eng. No. Date : ID
The following week You will learn orthographic projection and multi-view projection. The steps to follow are: ◦ Functional & Non-functional Dimensions ◦ Principles of Dimensioning ◦ Dimension Placement & Conventions ◦ Dimension Tolerances ◦ Geometric Dimensioning & Tolerancing ◦ Assignment # 2 RES 112 E – COMPUTER AIDED TECHNICAL DRAWING 2015 @ ITU
Read for more details … Chapter 37 2 D Computer Graphics: Auto. CAD 2007 Pages 600 - 670 RES 112 E – COMPUTER AIDED TECHNICAL DRAWING 2015 @ ITU
Assignment #1 Page 114 & 115 Figure 10. 50 -51 -58 You will sketch and complete views Submit the assignment on time Upload file into NINOVA RES 112 E – COMPUTER AIDED TECHNICAL DRAWING 2015 @ ITU
7b483907ded10532bc0d79cb158dec3f.ppt