d92f2b58784950b3bacd7b67f83c5312.ppt
- Количество слайдов: 25
 Lathe Operations : Tapers and Taper Turning Lecture 7 IE 102
 Self-Holding Tapers Self holding tapers, when seated properly, remain in position because of the wedging action of the small taper angle. The most common forms of self holding tapers are n the Brown & Sharpe n the Morse and n the. 750 in. per foot machine taper n See Table 54. 1 on p. 406. The smaller sizes of self holding tapered shanks are provided with a tang to help drive the cutting tool Larger sizes employ a tang drive with the shank held in by a key, or a key drive with the shank held in with a draw bolt
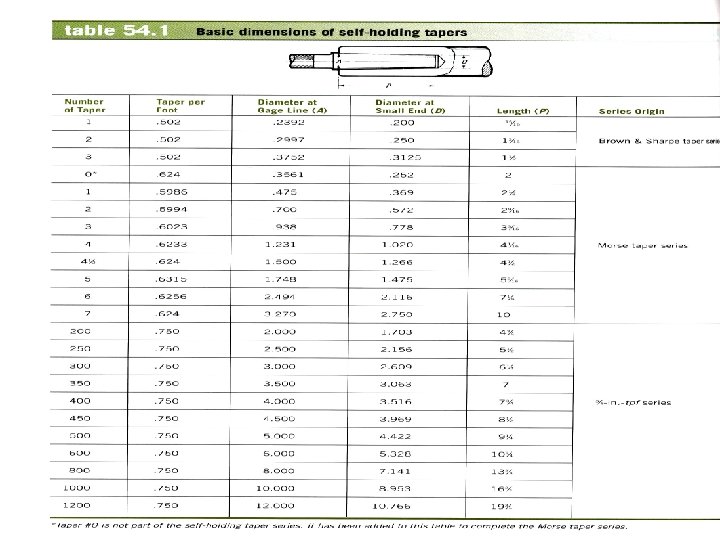
 Steep Tapers & Standard Tapers Steep (self releasing) tapers have a 3. 500 in. taper foot (tpf). This was formerly called the standard milling machine taper. It is used mainly for alignment of milling machine arbors and accessories. A steep taper has a key drive and uses a draw in bolt to hold it securely in the milling machine spindle. Although many of the tapers referred to in Table 54. 1 are taken from the Morse and Brown & Sharpe taper series, those not listed in this table are classified as nonstandard machine tapers. n n The Morse taper, which has approximately. 625 in. tpf, is used for most drills, reamers, and lathe center shanks. Morse tapers are available in eight sizes ranging from #0 to #7. The Brown & Sharpe taper, available in sizes from #4 to #12, has approximately 0. 502 in. tpf, except #10, which has a taper of. 516 in. /ft. This self holding taper is used on Brown and Sharpe machines and drive shanks. The Jarno taper, . 600 in. tpf, was used on some lathe and drill spindles in sizes from #2 to #20. The taper number indicates the large diameter in eighths of an inch and the small diameter in tenths of an inch. The taper length is indicated by the taper number divided by 2. The standard taper pins used for positioning and holding parts together have 1/4 in. tpf. Standard sizes in these pins range from #6/0 to #10.
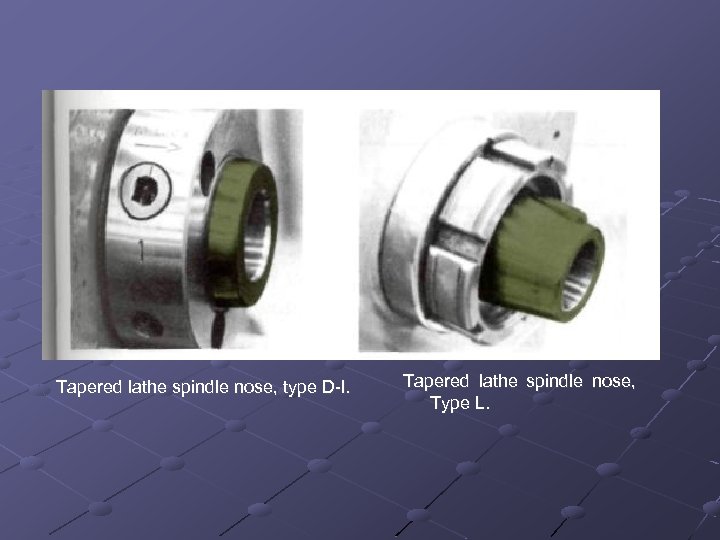 Tapered lathe spindle nose, type D l. Tapered lathe spindle nose, Type L.
 Taper Calculations CALCULATE THE TPF 1
 CALCULATE THE TAILSTOCK OFFSET
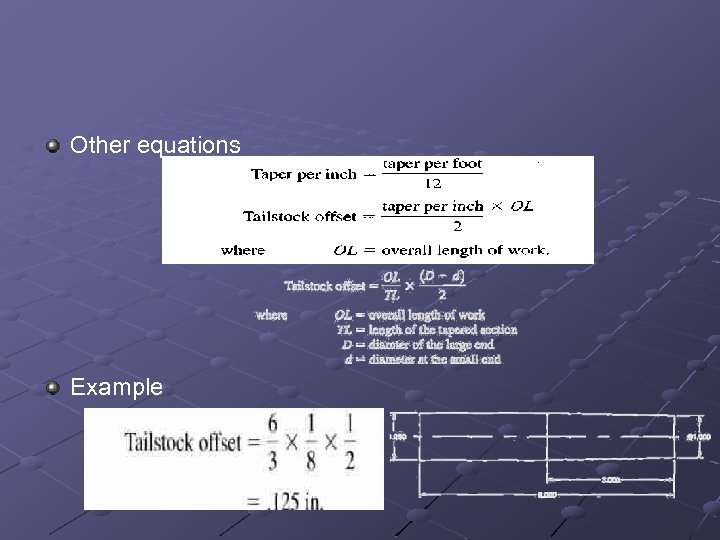 Other equations Example
 INCH TAPER ATTACHMENT OFFSET CALCULATIONS Most tapers cut on a lathe with the taper attachment are expressed in tpf. If the tpf of the taper on the workpiece is not given, it may be calculated by using the following formula: EXAMPLE: Calculate the tpf for a taper with the following dimensions: large diameter (D), 1. 375; small diameter (d), . 9375; length of tapered section (TL), 7 in.
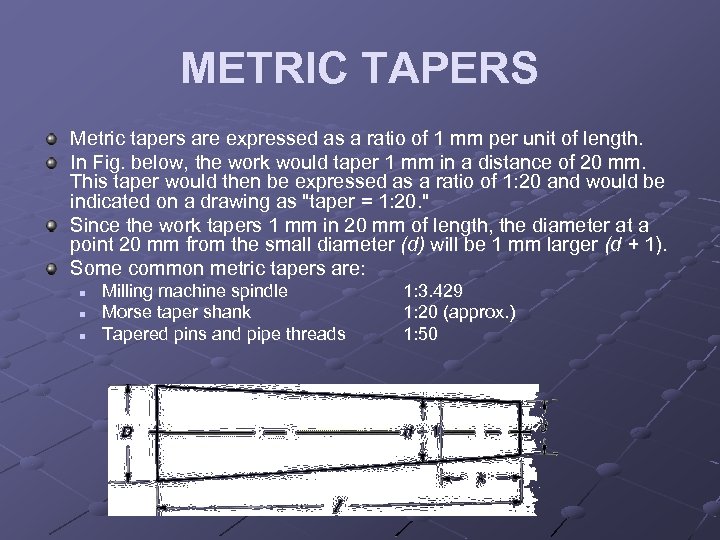 METRIC TAPERS Metric tapers are expressed as a ratio of 1 mm per unit of length. In Fig. below, the work would taper 1 mm in a distance of 20 mm. This taper would then be expressed as a ratio of 1: 20 and would be indicated on a drawing as "taper = 1: 20. " Since the work tapers 1 mm in 20 mm of length, the diameter at a point 20 mm from the small diameter (d) will be 1 mm larger (d + 1). Some common metric tapers are: n n n Milling machine spindle Morse taper shank Tapered pins and pipe threads 1: 3. 429 1: 20 (approx. ) 1: 50
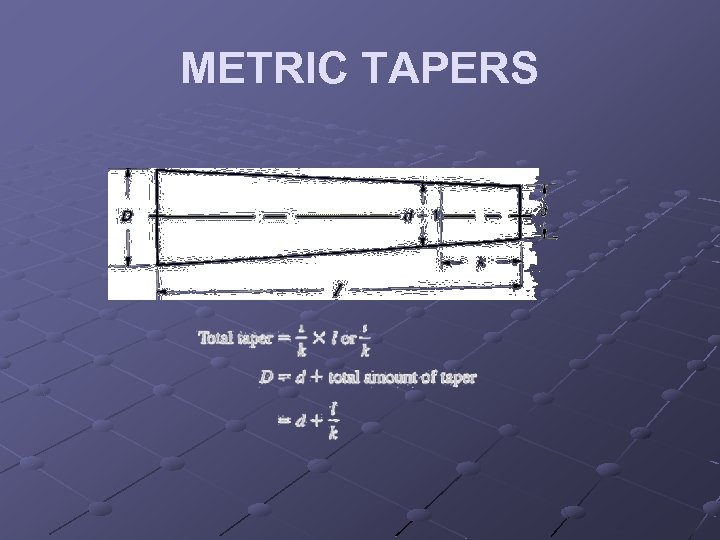 METRIC TAPERS
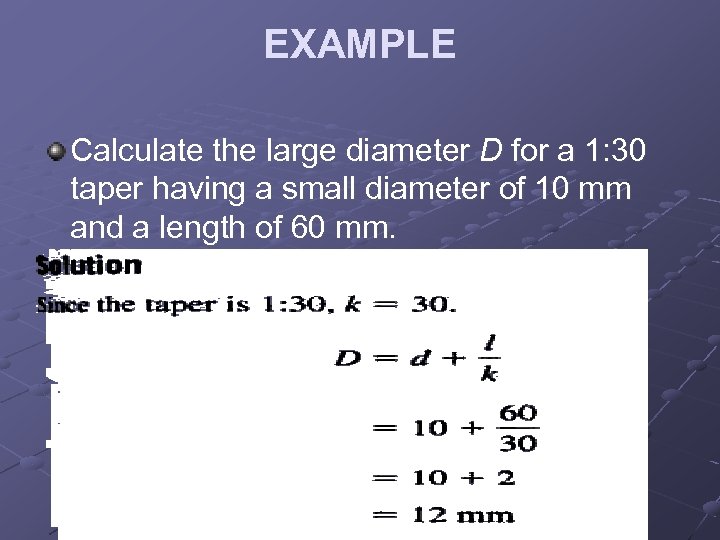 EXAMPLE Calculate the large diameter D for a 1: 30 taper having a small diameter of 10 mm and a length of 60 mm.
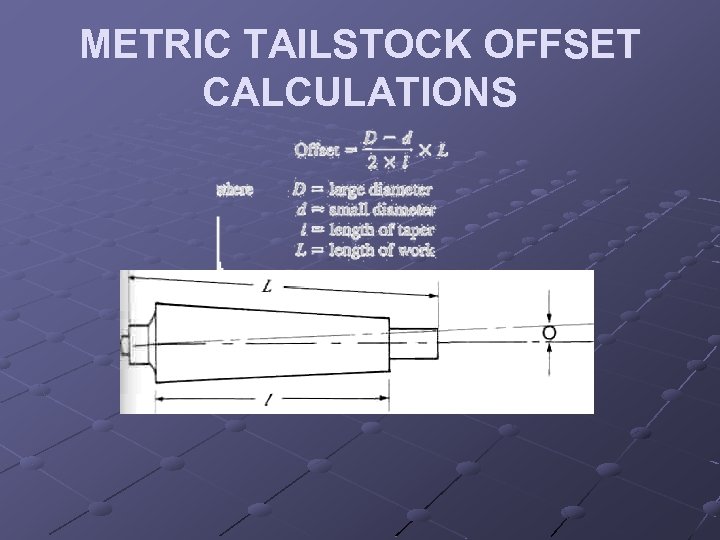 METRIC TAILSTOCK OFFSET CALCULATIONS
 EXAMPLE Calculate the tailstock offset required to turn a 1: 30 taper X 60 mm long on a workpiece 300 mm long. The small diameter of the tapered section is 20 mm.
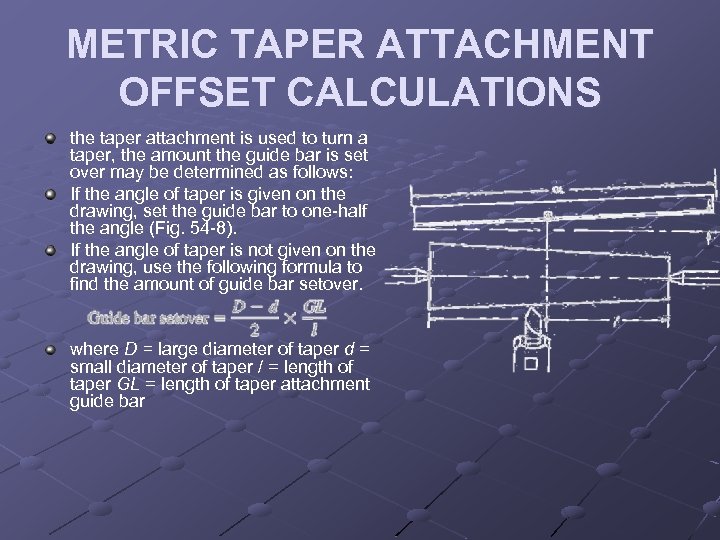 METRIC TAPER ATTACHMENT OFFSET CALCULATIONS the taper attachment is used to turn a taper, the amount the guide bar is set over may be determined as follows: If the angle of taper is given on the drawing, set the guide bar to one half the angle (Fig. 54 8). If the angle of taper is not given on the drawing, use the following formula to find the amount of guide bar setover. where D = large diameter of taper d = small diameter of taper / = length of taper GL = length of taper attachment guide bar
 Example Calculate the amount of setover for a 500 mm long guide bar to turn a 1: 50 X 250 mm long taper on a workpiece. The small diameter of the taper is 25 mm.
 Taper Turning Taper turning on a lathe can be performed on work held between centers or in a lathe chuck. There are three meth ods of producing a taper: By offsetting the tailstock By means of a taper attachment set to the proper tpf or the proper taper angle of the workpiece; on inch tapers by means of the taper attachment set to the tpf or taper angle of the workpiece; or on metric tapers by calculating the guide bar offset. By adjusting the compound rest to the angle of the taper The method used to machine any taper depends on the work length, taper angle, and number of pieces to be machined.
 TAILSTOCK OFFSET METHOD The tailstock offset method is generally used to cut a ta per when no taper attachment is available. This involves moving the tailstock center out of line with the headstock center. However, the amount that the tailstock may be off set is limited. This method will not permit steep tapers to be turned or standard tapers to be turned on the end of a long piece of work.
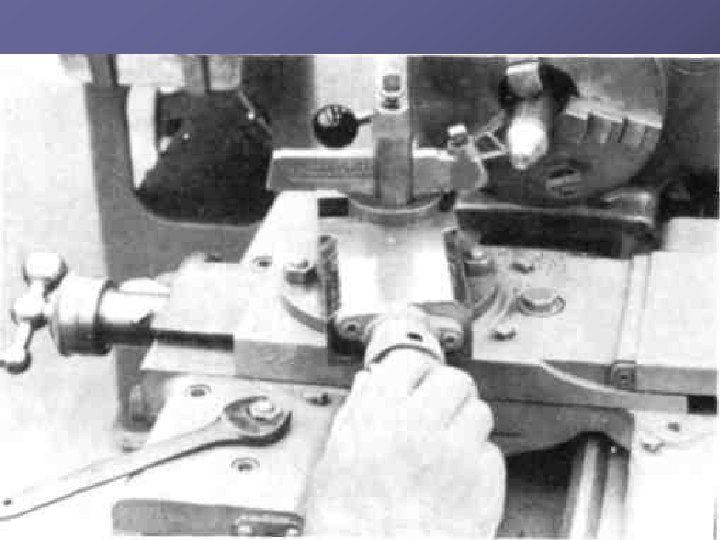
 Taper Turning Using the Taper Attachment The use of a taper attachment for taper turning provides several advantages: The lathe centers remain in alignment, preventing the distortion of centers on the workpiece. The setup is simple and permits changing from taper to parallel turning with no time lost to align the centers. The length of the workpiece does not matter, since duplicate tapers may be turned on any length of work. Tapers may be produced on work held between centers, in a chuck, or in a collet. Internal tapers can be produced by this method. Metric taper attachments are graduated in millime ters and degrees, while inch attachments are graduated in both degrees and inches of tpf. This eliminates the need for lengthy calculations and setup. 7. A wider range of tapers may be produced. There are two types of taper attachments: The plain taper attachment (Fig. 54 12) The telescopic taper attachment (Fig. 54 13) When using the plain taper attachment, remove the binding screw that holds the cross slide to the crossfeed screw nut. The binding screw is then used to connect the sliding block to the slide of the taper attachment. With theplain taper attachment, the depth of cut is made by using I the compound rest feed handle. When a telescopic taper attachment is used, the I crossfeed screw is not disengaged and the depth of cut can I be set by the crossfeed handle.
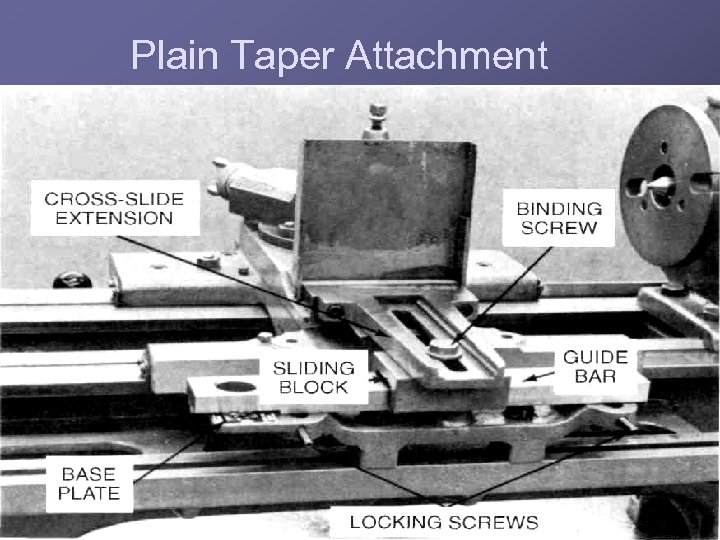 Plain Taper Attachment
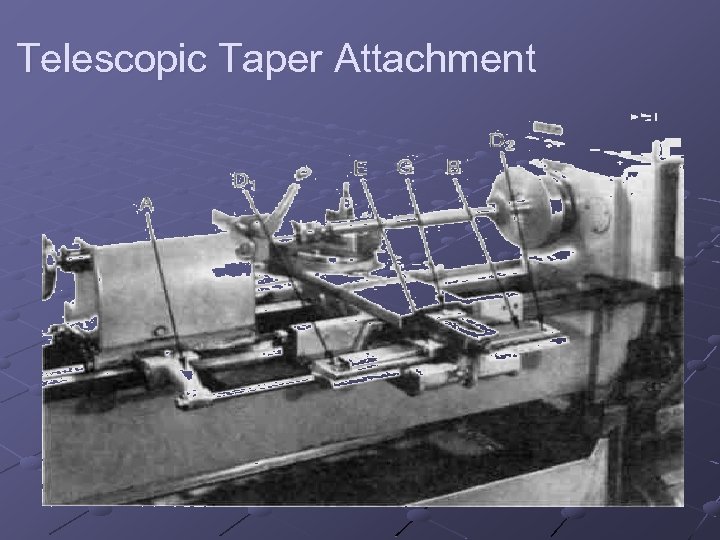 Telescopic Taper Attachment
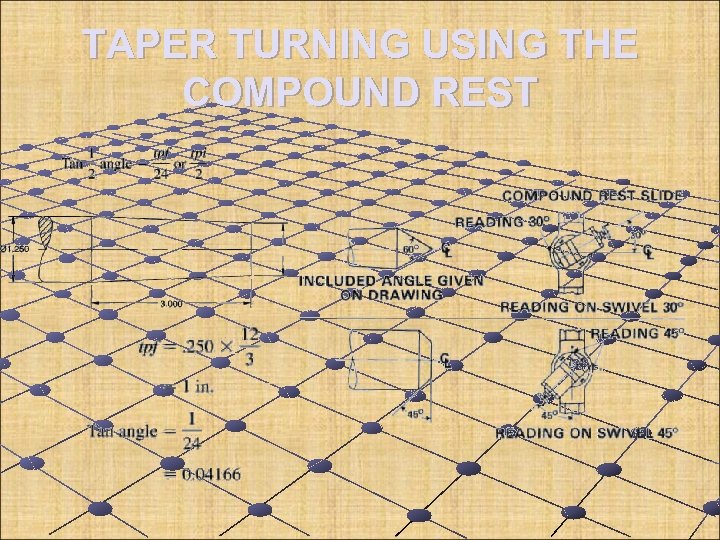 TAPER TURNING USING THE COMPOUND REST
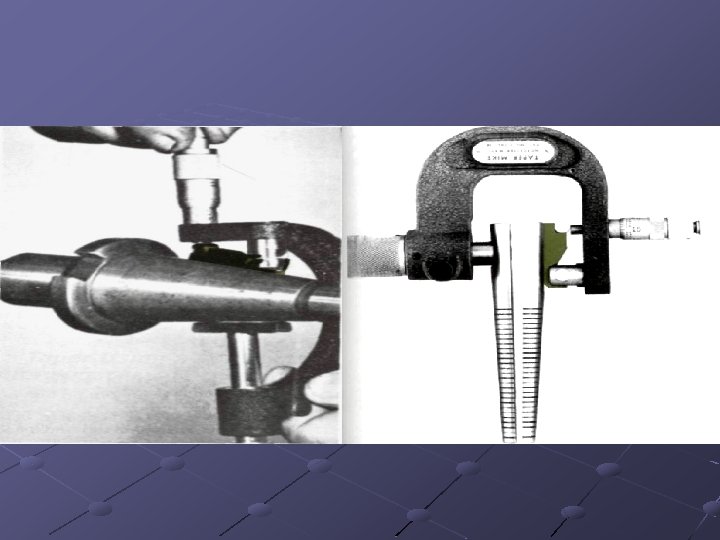
 Checking a Taper Inch tapers can be checked by scribing two lines exactly 1 in. apart on the taper and carefully measuring the taper at these points with a micrometer (Fig. 54 16). The dif ference in readings will indicate the tpi of the workpiece. Tapers may be more accurately checked by using a sine bar (see Unit 13). To obtain a more accurate taper, a taper ring gage is used to check external tapers. A taper plug gage is used to check internal tapers (see Unit 14). The taper micrometer (Fig. 54 17) measures tapers quickly and accurately while the workpiece is still in the machine. This instrument includes an adjustable anvil and a 1 in. sine bar attached to the frame, which is adjusted by the micrometer thimble. The micrometer reading indi cates thetpi, which can be readily converted to tpf or an gles. The anvil can be adjusted to accommodate a wide range of work sizes. Taper micrometers are available in various models for measuring internal tapers and dovetails (Fig. 54 18) and in bench models incorporating two indicators for quickly checking the accuracy of tapered parts. The advantages of taper micrometers are: The taper accuracy can be checked while the workpiece is still in the machine. They provide a quick and accurate means of checking tapers. They are simple to operate. The need for costly gaging equipment is eliminated. They can be used for measuring external tapers, internal tapers, and dovetails.
