

3f3f51962758f3d3a9d7e60a8c9595fd.ppt
- Количество слайдов: 96
 Input/Output Systems
 Why I/O is important How to control a motor using a PC? The motor will be regarded as an output device How can the computer communicate with the motor?
 I/O using ADu. C 832 PORT Display
 interface permits the microprocessor to communicate with the outside world,") Introduction The I/O (Input/Output) interface permits the microprocessor to communicate with the outside world, eg to control an external device How can you connect a keyboard, or a mouse, to a 8086 or P 6 microprocessor? The 8086 microprocessor can only access external components (including memory devices) via the address and data buses
Introduction The I/O (Input/Output) interface permits the microprocessor to communicate with the outside world, eg to control an external device How can you connect a keyboard, or a mouse, to a 8086 or P 6 microprocessor? The 8086 microprocessor can only access external components (including memory devices) via the address and data buses
 Concept of I/O The mechanism is similar to the memory interface because the CPU is using the same set of buses – data and address Data transfer still takes place over the multiplexed address/data bus
 I/O and Memory interface
 Minimum-mode interface To connect to external I/O devices, usually some interface circuits are required Interface circuitry is used to bridge the microprocessor and the I/O (Input/Output) devices Functions of the interface – select the I/O port (decoding), latch output data, adjust the signal levels etc Only address/data lines from 0 -15 are used for interfacing with external I/O devices
 Block diagram for IO system The control signals are same as those used in memory operations
 I/O address space The interface between the CPU and an external device is called an I/O Port (just like the Ports in 89 C 51, or ADu. C 832) but there is NO physical I/O port provided by the 8086 I/O ports is similar to address locations. When an I/O device is connected to a CPU the device will occupy an I/O port An I/O port is similar to an address in memory (i. e each Port has an unique number) Each port can support 8 -bit data If an external device requires 16 -bit data then it will occupy two ports
 (or Port numbers ) are generated by") I/O Ports I/O Port addresses (16 -bit) (or Port numbers ) are generated by the microprocessor via the ADn lines and after proper decoding, correct I/O port can be selected AD 16 to AD 19 are held at 0 for I/O operations M/IO signal is set to 0 to indicate I/O operations (this is the only different between read/write of an I/O and memory)
I/O Ports I/O Port addresses (16 -bit) (or Port numbers ) are generated by the microprocessor via the ADn lines and after proper decoding, correct I/O port can be selected AD 16 to AD 19 are held at 0 for I/O operations M/IO signal is set to 0 to indicate I/O operations (this is the only different between read/write of an I/O and memory)
 I/O ports for a PC 03 FF – 03 F 8 02 FF – 02 F 8 03 DF – 03 D 0 037 F – 0378 032 F – 0320 0063 - 0060 0043 – 0040 0023 – 0020 000 F - 0000 COM 1 COM 2 CGA adapter LPT 1 Hard disk 8255 (PPI) Timer Interrupt controller DMA controller
 I/O instructions How to read/write to/from I/O devices? In 8086, IN and OUT are I/O instructions IN - input from port into AL or AX OUT - Output from AL or AX to port IN AL, FF (move a byte in from port FF) OUT FF, AL (move a byte out from AL) IN and OUT are called direct instruction to access I/O ports Using IN, or OUT the max. port no. is 255 (FF)
 I/O instructions Can also use indirect with DX holding the port address IN AL, DX OUT DX, AL Indirect addressing can access 64 K ports (WHY? )
 Example Data are to be read in from two byte-wide input ports at address AA and A 9, respectively, and then output as a word to a word-wide Output port at address B 000. Write a sequence of instructions to Perform this I/O operation IN MOV OUT AL, AA AH, AL AL, A 9 DX, B 000 DX, AX ; move data in from port address AA ; move data from AL to AH ; move data from port address A 9 ; move port address B 000 to DX ; can I do OUT B 000, AX instead ? ? ? AH AL Data from AA Data from A 9
 I/O bus cycles READ Cycle – same as for memory operation M/IO – set to 0 to identify I/O operation /DEN – switch to 0 to signal the I/O interface circuitry when to put data onto the bus. DEN – Device ENable Write cycle – data available in the bus in T 2 and maintained during the rest of the bus cycle /WR – switches to logic 0 to signal that valid data are on the bus
 I/O read cycle
 I/O Write cycle
 circuit 8282 – Octal latch Decoder I/O") 64 Output lines (8 ports) circuit 8282 – Octal latch Decoder I/O
64 Output lines (8 ports) circuit 8282 – Octal latch Decoder I/O
 Example Refer to the previous diagram To which port are data being written when the address put on the bus during an output bus cycle is 8002(Hex) How to output the byte contents of the memory location called DATA to output Port 0 by simple assembly language?
 The input select for the 8205 is driven by A 1 A 2 and A 3 For the address 8002, the 3 bits are 001 So Port 1 is selected The control required to select the Port 0 is 8000 (refer to above, Port 1 is 8002) The instruction is Mov DX, 8000 Mov AL, DATA Out DX, AL
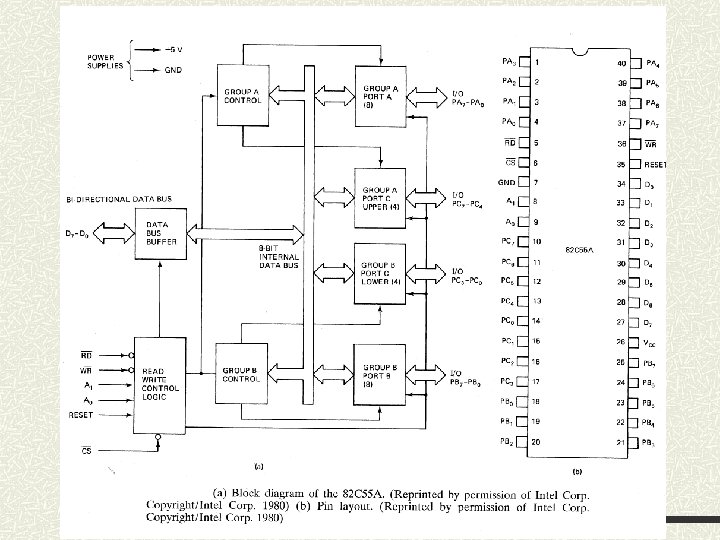
 It is an LSI peripheral designed to permit") 8255 A Programmable Peripheral Interface (PPI) It is an LSI peripheral designed to permit easy implementation of parallel I/O in the PC systems. It provides a flexible parallel interface, such as input and output ports; level-sensitive inputs; latched outputs; strobed inputs or outputs; and strobed bidirectional input/outputs. These features are selected under software control. 8255 can interface any TTL-compatible I/O device to the microprocessor. 8255 is used to interface keyboard and parallel printer port
8255 A Programmable Peripheral Interface (PPI) It is an LSI peripheral designed to permit easy implementation of parallel I/O in the PC systems. It provides a flexible parallel interface, such as input and output ports; level-sensitive inputs; latched outputs; strobed inputs or outputs; and strobed bidirectional input/outputs. These features are selected under software control. 8255 can interface any TTL-compatible I/O device to the microprocessor. 8255 is used to interface keyboard and parallel printer port
 To/From CPU To/From I/O devices
 8255 PPI It consists of 3 ports Each port is 8 -bit Address A 0 and A 1 (these are input of 8255 not 8086) are used to select the port to read/write Data are transferred through a 8 -bit bidirectional data bus Chip select (/CS) of the 8255 must be enabled
 Register-Select Code The microprocessor must apply this code to the register-select inputs A 0 and A 1 of the 8255 A.
 8255 PPI An 8255 PPI will occupy at least 4 I/O addresses The A 1 A 0 of the 8255 usually connected to address lines of the CPU. Therefore, changing the 0, 1 of the lines can provide different port numbers
 8255 decoding Decoder Address If Port A is 1238 H and Port B is 123 AH Can you identify which Two address lines are Connected to A 1 A 0? 8255 8086 /CS A 1 A 0
 Example If Port. A occupies location 1238 H and Port. B occupies 123 AH, can you determine addresses occupied by other Ports? What address lines are connected to A 1 A 0 of the 8255? 0001 0010 0011 1000 (1238 H) look for 00 Port A 0001 0010 0011 1010 (1238 H) look for 01 Port B
 Example 11000000 =C 0 Port A Determine Port Occupied By the 8255
 To/From CPU To/From I/O devices Data – connect to data bus /RD – connect to /RD of the u. P (active when reading data from 8255) /WR – connect to /WR of the u. P (active when writing data to 8255) /CS – connect to decoding device (active when reading or writing to or from 8255)
 Control of the 8255 Before you can make use of the 8255, you must configure (or program) the device The control of the 8255 is via the programming of the internal control register The register is represented by (or divided into) group A and group B control blocks Input/Output operations are controlled by different bit-patterns
 8255 PPI To program the 8255, A 1 A 0 = 11 and a write cycle is initialized so that the proper bit pattern is written to the control register After the configuration the PORTs A, B, C can be used accordingly
 Control Word bit functions D 4 Port A D 6, D 5 D 7 Port C upper Mode selection Command type 0 Mode 1 0 Output Input 00 Mode 1 1 X Group A Input 01 D 3 Mode selection Output 1 D 2 0 1 Port B Input 1 D 1 Port C lower Output 1 Group B 0 1 D 0 Mode 2 0 Bit set/reset 1 Mode set
 Control Bits D 0 – set input/output for lower 4 -bit of Port C (1 for input; 0 for output ) D 1 – set input/output for 8 -bit of Port B D 2 – mode selection (0 – mode 0; 1 – mode 1) D 3 – same as D 0 but for upper 4 -bit D 4 – same as D 1 but for Port A D 5 & D 6 – mode selection (00 – mode 0, 01 – mode 1, 1 X – mode 2) D 7 – mode set flag ( 1 - active)
 Mode Selection Mode set flag is the D 7 bit in the control, it must be at logic 1 whenever the mode operation is to be changed. There are three modes of operation which are known as mode 0, mode 1, and mode 2 respectively. We will only discuss Mode 0 and Mode 1!!!! But you should study Mode 2 by yourself!!!!!!!
 Example If control register is at Port 20 H How to configure the 8255 in Port A Mode 0 input and Port B and C mode 0 output ? Identify the control pattern 10010000 (90 H) Move this to the port MOV AL, 90 H OUT 20 H, AL
 Mode 0 – simple I/O Mode 0 selects what is called simple I/O operation, i. e. , the lines of the port can be configured as level-sensitive inputs or latched output. Output ports are latched. Input ports are not latched? ? Output ports are latched – data remain in the output port until you perform another output operation This is very similar to the Ports provided by the ADu. C 832 (the microprocessor used in the lab. )
 Example What is the mode and I/O configuration for ports A, B, and C of an 8255 A after its control register is loaded with 82 Hex The binary pattern is 10000010 (82 H) refer to the table of control word D 0 = 0 lower 4 bits of Port C are outputs D 1 = 1 Port B are inputs D 2 = 0 mode 0 operation for both Port B and the lower 4 bits of Port C D 3 = 0 upper 4 bits of Port C are outputs D 4 = 0 Port A are outputs D 6 D 5 = 00 mode 0 operation for both Port A and the upper part Of Port C D 7 =1 mode enable
 Exercise If port A is F 0 H, Port C is F 4 H First configure Port. A mode 0 output and Port. B mode 0 input Then use a loop to send 10 character via port A and read 0 byte from port B
 What are the disadvantages of the previous exercise?
 Mode 1 – Strobed I/O Mode 1 represents what is known as strobed I/O. In this mode, the A and B ports are configured as two independent byte-wide I/O ports, each of which has a 4 -bit control/data port associated with it. The control/data ports are formed from the lower and upper 4 -bit of port C respectively. Both input and output are latched Data applied to an input port must be strobed-in with a signal produced by an external hardware
 Mode 1 –Strobe I/O In computing, the term handshake usually refers to steps that need to follow in order to complete a task Handshake signal is provided for a port when in mode 1 Handshake represents the available of data, or when an external device has read these data
 An analogy of 8255 in Mode 1 CPU 8255 Device The above diagram shows the relationship between CPU, 8255 and external device 8255 is only the middle-man, so after receiving “data”, 8255 must info the CPU to read the data But since the internal buffer of the 8255 can only store 1 byte of data, therefore, 8255 also signal external device not to write again when data is already inside the buffer The handshake signal is used for such purposes.
 Example If the control register is loaded with 10111 XXX. What is the Configuration for the 8255? Port A is in mode 1 input port Upper 4 -bit of Port C is reconfigured to provide the Port A Control/data lines PC 4 – strobe input (/STBA) (to strobe data in Port A into the latch) (1 -> 0) PC 5 – input buffer full when 1 (IBFA) (output to signal external device) PC 3 – interrupt request (INTRA) (used when action should be performed by the microprocessor ) (output) PC 6, 7 – I/O PCx – PC (Port C bit x )
 Mode 1 operation Input Data come from external device STBA – issued by external device to latch data into 8255 buffer 8255 issues INTRA IBFA to signal CPU to read data INTE A – interrupt enable if this bit is set then the INTRA will be issued
 causes port A and/or port B to function") Strobe input Strobed input (mode 1) causes port A and/or port B to function as latching input devices. External data is stored in the port until the microprocessor is ready to retrieve it by issuing a /RD signal. Strobed input port captures data from the port when the /STB is activated. The /STB signal (1 ->0) causes data to be captured and it activates the IBF (Input Buffer Full) and INTR (Interrupt Request). IBF (a ‘ 1’) indicates that data are in port A. Once the microprocessor notices that data are strobed into the port, it executes an IN instruction to read the port.
Strobe input Strobed input (mode 1) causes port A and/or port B to function as latching input devices. External data is stored in the port until the microprocessor is ready to retrieve it by issuing a /RD signal. Strobed input port captures data from the port when the /STB is activated. The /STB signal (1 ->0) causes data to be captured and it activates the IBF (Input Buffer Full) and INTR (Interrupt Request). IBF (a ‘ 1’) indicates that data are in port A. Once the microprocessor notices that data are strobed into the port, it executes an IN instruction to read the port.
 Strobe Input The act of reading the port restores both IBF and INTR IBF – reset by the rising edge of /RD input INTR – reset by a falling edge of /RD
 Mode 1 Strobe Input Operation sequence External device put data into the port n Issue the strobe signal to latch data into the port n 8255 issue signal IBF and INTR to the microprocessor to indicate data is available n Microprocessor read data and issue signal /RD n After data has been read, IBF and INTR are reset n Ready to get another input data n
 Mode 1 – Input for Port. A The above will show the purpose of the INTE (interrupt enable) If you want INTR to be active, what should you put in INTE?
 Mode 1 Input timing diagram
 Strobed output Data are written to a port /OBF – output buffer full /OBF becomes a logic 0 to indicate data are present (1 ->0) External device removes the data by strobing (1 ->0) the /ACK input to the port The /ACK returns the /OBF to logic 1 this will clear the INTR as well
 Mode 1 Output
 Example When control register is 1010 XXXX then Port A is set to output PC 7 – output buffer full (/OBF) (output) When this is active (low) implying data are available at the port Outputs. Data are written by the microprocessor PC 6 – acknowledge (/ACK) (input) This is input by external device after reading the data at the port This signal also reset the /OBF with its low going edge PC 3 – interrupt (output) (INTR) Interrupt will be generated when data is read and external device acknowledge so signal the microprocessor to send other data INTR is reset when /ACK, /OBF, and INTE are ‘ 1’
 Mode 1 Output
 Mode 1 Output timing diagram
 Points to consider When using in Mode 1 output mode CPU should monitor which bit? n External device should monitor which bit? n When using in Mode 1 input mode CPU should monitor which bit? n External device should monitor which bit? n
 Example What is the purposes of the following very simple assembly codes? Hints: consider what does Bit 5 represent? Read: In AL, Port. C AND AL, #00100000 B JZ Read IN AL, Port. A Ret ; test if bit 5 of port. C is ‘ 1’
 Mode 2 – strobed bidirectional I/O The port can be either inputs or outputs, depends on the /WR and /RD signals Only Port A can be used for this mode Control register is 11 XXXXXX Inputs and outputs are both latched PC 3 -PC 7 are used for generating/accepting handshake signals PC 2 -PC 0 can still be used for I/O
 Mode 2 Bi-directional
 (low = buffer full) CPU") Mode 2 PC 7 – output buffer full (output) (low = buffer full) CPU has written data to port A PC 6 – acknowledge (input) (low) acknowledges that the previous data byte is received by the destination and the next byte may be sent by the processor PC 4 – strobe (input) to strobe in the data into the input latches PC 5 – input buffer full (output) (high = buffer full) used as an acknowledge that the data has been received by the receiver PC 3 – interrupt (output) (active high) PC 2 -0 – general purpose I/O pins and controlled by the bit set and reset command
Mode 2 PC 7 – output buffer full (output) (low = buffer full) CPU has written data to port A PC 6 – acknowledge (input) (low) acknowledges that the previous data byte is received by the destination and the next byte may be sent by the processor PC 4 – strobe (input) to strobe in the data into the input latches PC 5 – input buffer full (output) (high = buffer full) used as an acknowledge that the data has been received by the receiver PC 3 – interrupt (output) (active high) PC 2 -0 – general purpose I/O pins and controlled by the bit set and reset command
 signal to test if output") Bi-direction operation First test the /OBF (output buffer full) signal to test if output buffer is empty Buffer is empty then sent data to output buffer (using OUT instruction) External device monitors the /OBF signal to decide whether data is available If /OBF is 0 then sends /ACK to remove the data
Bi-direction operation First test the /OBF (output buffer full) signal to test if output buffer is empty Buffer is empty then sent data to output buffer (using OUT instruction) External device monitors the /OBF signal to decide whether data is available If /OBF is 0 then sends /ACK to remove the data
 Example Tran: IN Test JZ mov OUT AL, Port. C AL, bit 7 Tran AL, AH Port. A, AL ; test for output buffer
 If IBF=1, data are") Bi-directional operation To read data, test IBF (Input Buffer full) If IBF=1, data are input using the IN instruction External device sends data using /STB IBF is clear when microprocessor doing the IN Write a simple program to read data from Port. A
Bi-directional operation To read data, test IBF (Input Buffer full) If IBF=1, data are input using the IN instruction External device sends data using /STB IBF is clear when microprocessor doing the IN Write a simple program to read data from Port. A
 Example Read: IN test JZ In AL, Port. C AL, Bit 5 Read AL, Port. A ; loop until data is available
 Mode 2 Timing diagram
 Bit Set/Reset Feature This feature allows the individual bits of Port C to be set or reset. To do this, the D 7 bit in the control register must be set to 0. The relationship between the set/reset control word and input/output lines is illustrated in the followed figure.
 Control Word Set/Reset Bit Format
 Example If control register is 00001111 Then the logic level to be set is ‘ 1’ represented by D 0 The bit to be set is 111 represented by D 3 D 2 D 1 (i. e 7 in this case ) So after the control word is written PC 7 is set to 1 Why want to set the bits of Port C? In Mode 1, the bits of Port C not used for control can only be written by the set/reset feature
 3 Different Modes of 8255 A
 8255 Example 2
") 8255 Example 2 (Cont’d)
8255 Example 2 (Cont’d)
 Self test What is the major function of 8255 How to configure the 8255 Differences between the different operating modes (mode 0 and mode 1) What is the bit set/reset feature When should you use the bit set/reset feature
 Loading 8255 A Control Register
 Application of 8255 Printer PB D 0 -D 7 PC 4 Strobe PC 2 ACK
 Example Transfers ASCII character from AH to the printer via port B Port. C equ 62 H Port. B equ 61 H CMD equ 63 H Print: IN AL, Port. C AND AL, #00000010 B ; test if buffer is full JZ Print mov AL, AH out port. B, AL mov AL, 8 ; send a strobe out CMD, AL mov AL, 9 out CMD, AL
 Printer Interface ; Software that sends ASCII-coded character in BL to the printer mov BL, AL mov AL, 0 A 2 H ; control word for 8255 out 0 F 6 H, AL ; address for control word Busy: IN AL, 0 F 2 H AND AL, 08 H ; test the busy bit JZ Busy mov AL, BL out 0 F 0 H, AL ; send data to Port A NOP ; the following generate a pulse using bit in Port. C Mov AL, 08 H ; pull /strobe low Out 0 F 6 H, AL NOP MOV AL, 09 H ; raise /strobe High Out 0 F 6 H, AL HLT
") 8255 PIO (Parallel Input/Output)
8255 PIO (Parallel Input/Output)
 Parallel I/O ports Two groups of 8 8255 devices are connected to the data bus Each group has own 8205 address decoder (or multiplexer) One group is for odd-port-address, while the other group for even-port-address A 2 A 1 – select the port (A, B, or C) A 5 A 4 A 3 – select the 8255 device ( total of 8)
 Example Refer to the diagram for the Parallel I/O setup, What must be the address inputs of the even-addressed Group of 8255 if Port C of PPI 14 is to be addressed? To enable PPI 14, the lower 8205 must be enabled for operation And its 07 output switched to logic 0 (active low). This requires enable Input A 0 = 0 and chip select code A 5 A 4 A 3 = 111 A 0 = 0 to enable 8205 (the even address) A 5 A 4 A 3 = 111 select PPI 14 Port C of PPI 14 is selected with A 1 A 0 = 10 A 2 A 1 = 10 access Port C The rest of the address bits are don’t care states So the final pattern A 19 -A 6 don’t cares then 111100 = 0003 C
 8255 Parallel I/O Ports
") 8255 Parallel I/O for 386(Cont’d)
8255 Parallel I/O for 386(Cont’d)
 8255 Direct I/O Example 1
 8255 Direct I/O Port Example 2
") 8255 Direct I/O Example 2 (Cont’d)
8255 Direct I/O Example 2 (Cont’d)
") 8255 Direct I/O Connection (Cont’d)
8255 Direct I/O Connection (Cont’d)
 Memory mapped I/O Definition of memory mapped I/O - I/O devices are placed in memory address space of the microprocessor How many I/O space are available in a 8086? ? I/O ports are treated just like a memory location Some memory address space is dedicated to I/O purpose and can be accessed using memory oriented instructions
 Memory mapped I/0 Memory 1 M Memory I/O Total 1 M I/O 64 K Memory Traditional setup Memory mapped I/O
 Traditional I/O and Memory interface
 Memory mapped IO
 8255 PIO
 8255 memory mapped I/O
 Memory Mapped I/O Memory space is reduced Memory operation is slower More flexible because memory oriented instruction can be used
 Example Which I/O port is selected for operation when the memory address Output on the bus is 00402 hex? (Refer to previous diagram for memory mapped I/O) A 10 = 1 and A 0 =0 will enable the lower address decoder A 5 A 4 A 3 = 000 selects the PPI 0 A 2 A 1 = 01 select Port B
 Applications of 8255 Using a 8255 to derive 8 7 -segment display Port A is used as output to determine the pattern Port B is used to enable the different 7 -segment unit
 Application of 8255 Using a 8255 to drive a LCD display Port A supplies command data (8 -bit) Port B supplies the control signals (only 3 bits are used)
 Application of 8255