


ee0652ff021356b9f915ec7c12bf4131.ppt
- Количество слайдов: 46
 HTML Hyper Text Markup Language A simple introduction
 Agenda • • What is HTML? Basics Tools Important tags Tables & databases Forms Publishing at Stern
 What is HTML? • HTML – stands for Hyper Text Markup Language • It allows a user to “markup” a text document to indicate how one might want different parts displayed by a web browser.
 The Basics • HTML documents contain “tags” which instruct the Browser software on how to present the information within a tag. These are called “styles” • Styles can be imbedded within styles –
 tag • This tag is used for a") Adding Hypertext • The (anchor) tag • This tag is used for a clickable element which is a link to another document (or another location within the current document) • Documents can be located on any web server on the internet • A hypertext reference looks like • My home page
Adding Hypertext • The (anchor) tag • This tag is used for a clickable element which is a link to another document (or another location within the current document) • Documents can be located on any web server on the internet • A hypertext reference looks like • My home page
 Creation Tools • Unix – Pico editor – Vi – Emacs • Windows – – – Notepad Word Bbedit Dreamweaver Front Page
 Why do we need to know HTML? • There are many tools that will generate reasonable looking web sites • However, you usually need to know HTML in order to connect your web page to a data base
 Easiest Tools • Unix – Pico • cd public_html • pico file. htm • chmod o+r file. htm (makes it readable by the web server) • Windows (need to move file to websys 3) – – Notepad Word (add new ftp location to publish) Sea Monkey http: //en. wikipedia. org/wiki/Comparison_of_H TML_editors
 Advanced Tools We will use Dreamweaver • Dreamweaver – Handles Frames, Forms, Tables etc. – Generates Javascript behaviours – Handles site management details • Broken links, publishing etc. – Works with Flash and Fireworks – Latest version Supports HTML 5 – Also supports mobile devices
 A Simple Document • •
And here is some more
 HTML Basics Important Tags • Anchor statement – Text to display – Examples • Click here for myfile • Click here for myfile • Click here for myfile • Things to remember – Links are relative to current folder if not fully specified – I. e. “websys/myfile. htm” means the myfile. htm file in the folder named websys underneath the current folder – Good idea to use relative addresses whenever possible, then you can move complete sites around easily
 The IMG tag •
 • Options –
–
–
–
 Other interesting tags •
| cell 1 row 1 | cell 2 row 1 >/td> |
 Tables and Databases • Since relational data bases are stored in tables, and the result of any relational query is also a table, guess what, we tend to display data base results as HTML tables. – Actually, this is outdated, now we use divs… • But that is jumping ahead, first we need to understand the Common Gateway Interface (CGI) model and other related server side solutions. We will talk about that in a few sessions.
 Advanced tags • • Frames Forms Layers …
 Forms • A form allow users to enter data through a web page so it can be processed by a program on a server • Forms and tables are the two necessary ingredients for web enabled databases
 Form Types • • TEXT RADIO CHECKBOX LIST MENU COMBOBOX SCROLLBAR …
 Conclusion • HTML is pretty simple • Knowledge of a few tags can get you a long way. . • Have fun… • So let’s publish a web page.
 and place in") Publishing Hypertext • Need to move it to web server (computer) and place in a location the web server program can read it • You need to give the WEB server program read access to the directory and page(s), since the program runs under a different userid (than yours).
Publishing Hypertext • Need to move it to web server (computer) and place in a location the web server program can read it • You need to give the WEB server program read access to the directory and page(s), since the program runs under a different userid (than yours).
") Publishing at Stern • Dreamweaver (This is what we will use throughout the course) • Notepad
Publishing at Stern • Dreamweaver (This is what we will use throughout the course) • Notepad
 Stern File Servers Your files are shared across several servers: pages. stern. nyu. edu (the student web server) and websys 3. stern. nyu. edu (the class unix machine. ) You can only login to sales and websys 3.
 Stern File System All files in one place WWW Pages Web Server websys 3 Home Directories /homedir/grad/… Sales
 File System Standards • All grad student home directories are at: • /homedir/grad/fchar/userid – Where fchar is the first character of your userid • Undergrad files are at: • /homedir/ugrad/fchar/userid • But web pages are in – …/userid/public_html (why? ? )
 Publishing • You need to use the following address for publishing – sftp: //websys 3. stern. nyu. edu/The. Address. Of. Your. Page – I. e. • sftp: //websys 3. stern. nyu. edu/homedir/grad/e/ep 5/public_html • Where “homedir/grad/e/ep 5/public_html” is the output of the pwd command you issued – But you can view it at • http: //www. stern. nyu. edu/~userid/filename. html • http: //pages. stern. nyu. edu/~userid/filename. html – For this class, I would like you to put all of your files in a websys folder in your public_html directory.
 Editing HTML in Dreamweaver • You can either buy Dreamweaver in the bookstore, or run it from the Stern APPS server. • The advantage of buying it is that it will keep all of your settings from one session to another. • But, we will use Dreamweaver on apps for examples. • If you are budget constrained, you can use APPS for the first part of the course, and then download a demo version of Dreamweaver that will run for 30 days. • You can also buy a Dreamweaver academic license by the month
 For more info • Let’s try to create a web page…
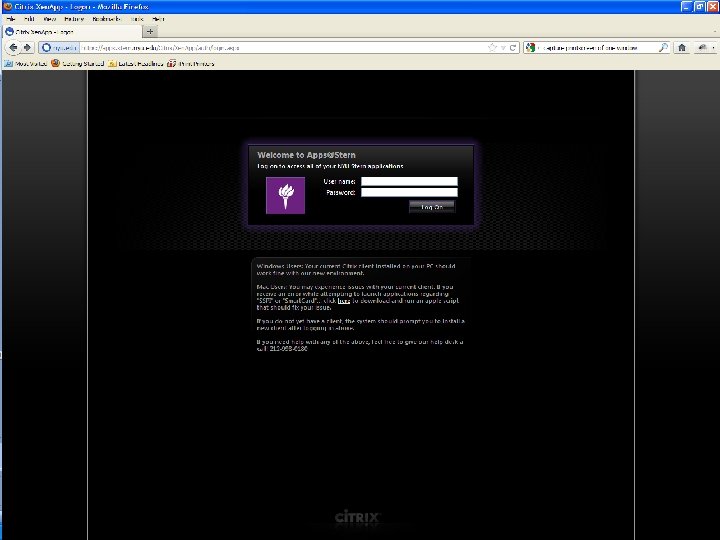
") More Details • First – ssh to websys 3. stern. nyu. edu (from PUTTY) – Login with your stern userid and password • • This should create a home directory for you. Then type “cd public_html” Type “mkdir websys” Type “exit” • Second – Go to http: //apps. stern. nyu. edu with your web browser • Third – Click on Dreamweaver (it takes a while to start)
More Details • First – ssh to websys 3. stern. nyu. edu (from PUTTY) – Login with your stern userid and password • • This should create a home directory for you. Then type “cd public_html” Type “mkdir websys” Type “exit” • Second – Go to http: //apps. stern. nyu. edu with your web browser • Third – Click on Dreamweaver (it takes a while to start)
 Click on Dreamweaver
 Click on Site
 • Click on Site, add a new site
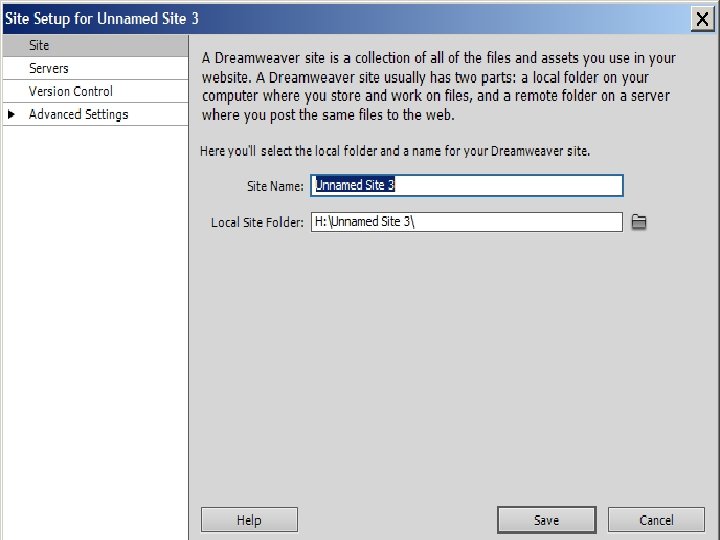
 Put local copy in your H drive, Click Save

 Click on the + to add a server

 • You now should be able to use Dreamweaver to create a web page. • The default web page is usually “index. html”. It will be displayed when you go to a location and don’t specify a file name. • You can create your own home page at Stern by putting an index. html file in your public_html directory. • But we don’t want to put one in your websys directory, so that we can list it’s contents for grading.
 • Next, we click on • File, New in Dreamweaver and create a file. • Dreamweaver can show us both what the web browser will display, as well as what the html code is if we click on the “split” tab.
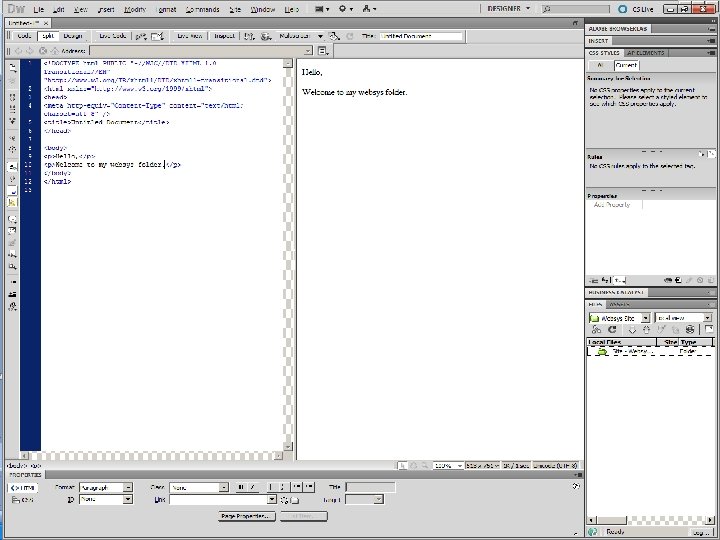
 • The click on save as • And call it Page 1
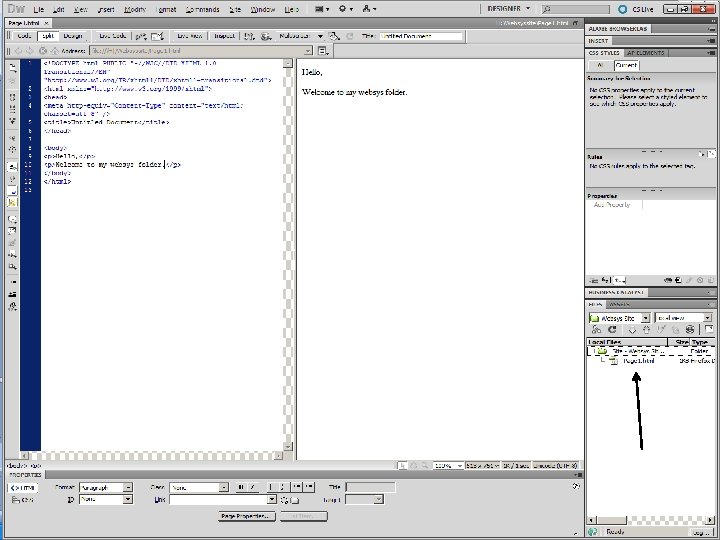
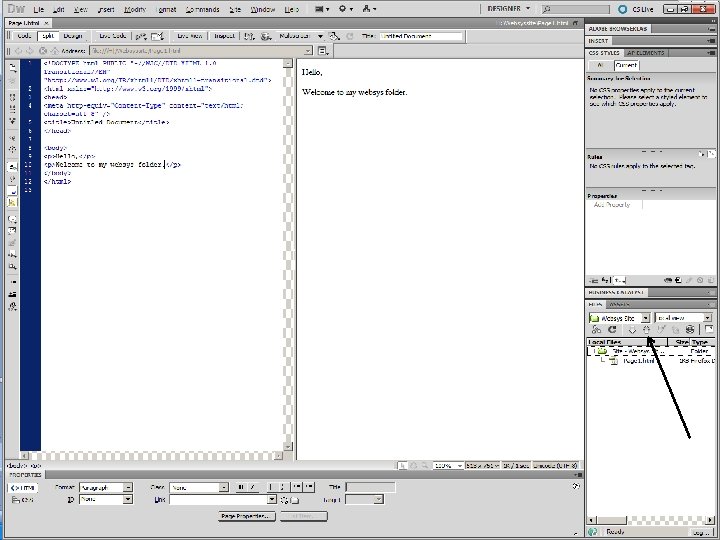
 Now we are ready to publish to the web server • If we click on the UP ARROW, it should move files to the web server where we can see them with a web browser.
 Your Homeworks • Please put all of your homeworks in the websys folder so we can find them. – Name them hw 1. htm, hw 2. htm etc. • Do NOT put an index. html file in that folder. It will hide your homeworks from us. • If you wish, you can use Dreamweaver to put an index. html file in the public_html folder, and then you will have your own web page. • To do that, create another site and make the root directory public_html
 You should now be ready to work