2b223cc78af149bd235e10bb5a742ef9.ppt
- Количество слайдов: 27
HIGH SPEED FSW MODELING Vanderbilt University: Welding and Automation Laboratory: Nashville, TN Dr. Reginald Crawford Thomas S. Bloodworth III Paul A. Fleming David H. Lammlein Tracie Prater Dr. George E. Cook Dr. Alvin M. Strauss Dr. D. Mitch Wilkes Los Alamos National Laboratory: Los Alamos, NM. Dr. Daniel A. Hartman
OVERVIEW 1. 2. 3. 4. 5. 6. 7. Introduction Experimental Method/Setup Mechanical Models Simulation Results Conclusions Current and Future Work
INTRODUCTION l Current uses of FSW: l l Aerospace (Spirit, Boeing, Airbus) Railway (Hitachi Rail) Shipbuilding/marine (Naval vessels) Construction industries and others (Audi) l Moving to lighter materials (e. g. Aluminum) l Conflict: 3 -D contours difficult with heavy duty machine tool type equipment
INTRODUCTION l Ideally see widely applicable industrial robots equipped for FSW l Benefits: l lower costs energy efficient 3 -D contours etc. l Problem: High axial forces required to FSW (1 -12+ k. N or 2252700+ lbs), difficult to maintain even using robust robots especially at large distances from the base unit l Possible solution: Utilize increased rotational speed/decreased axial force relationship to aid in developing a larger operational envelope for high speed FSW
EXPERIMENTAL METHOD l Purpose: Examine axial forces during high speed friction stir welding with respect to mechanistic defect development due to process parameter variation l Two Mechanical Models l Smooth Tool Pin (Preliminary) l Threaded Tool Pin (More Comprehensive) l Parameters (Variables) l l Rotational Speed (RS) Travel Speed (TS)
EXPERIMENTAL METHOD l Model solved with CFD package FLUENT for steady state solutions l Force simulated for the three spatial dimensions as well as torque l Experimental force and torque data recorded using a Kistler dynamometer (RCD) Type 9124 B
EXPERIMENTAL SETUP l VU FSW Test Bed: Milwaukee #2 K Universal Milling Machine utilizing a Kearney and Treker Heavy Duty Vertical Head Attachment modified to accommodate high spindle speeds. l Samples- AA 6061 -T 6: 76. 2 x 457. 2 x 6. 35 mm (3 x 18 x ¼”) l Rotational Speeds: 1000 -5000 RPM l Travel Speeds: 290 - 1600 mm min-1 (11. 4 in min-1 – 63 in min-1)
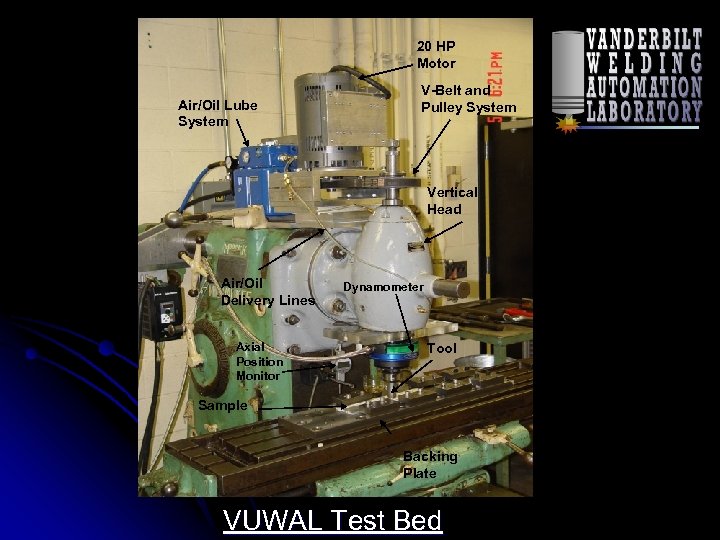
20 HP Motor Air/Oil Lube System V-Belt and Pulley System Vertical Head Air/Oil Delivery Lines Axial Position Monitor Dynamometer Tool Sample Backing Plate VUWAL Test Bed
EXPERIMENTAL SETUP l The tool was set up for a constant 2 o lead angle l Fine adjustments in plunge depth have been noted to create significant changes in force data as well as excess flash buildup l Therefore, significant care and effort was put forth to ensure constant plunge depth of 3. 683 mm (. 145”) l Shoulder plunge constant: . 1016 mm (. 0040 in)
SMOOTH PIN MODEL l l Heat transfer to the support anvil ignored Tool pin and sample finite element mesh consists of l l l 22497 tetrahedron brick elements 5152 nodes Tool properties were for H-13 tool steel (e. g. density, specific heat, and thermal conductivity) Assumed to rotate counter-clockwise at RS (LH) 12. 7 mm shank included to account for heat conduction from the tool/sample interface
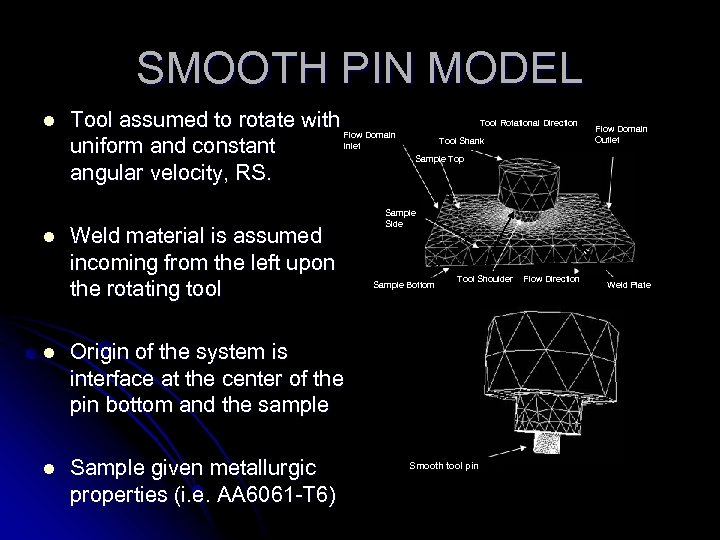
SMOOTH PIN MODEL l l Tool assumed to rotate with Flow Domain Inlet uniform and constant angular velocity, RS. Weld material is assumed incoming from the left upon the rotating tool l Sample given metallurgic properties (i. e. AA 6061 -T 6) Tool Shank Flow Domain Outlet Sample Top Sample Side Sample Bottom Tool Shoulder Origin of the system is interface at the center of the pin bottom and the sample l Tool Rotational Direction Smooth tool pin Flow Direction Weld Plate
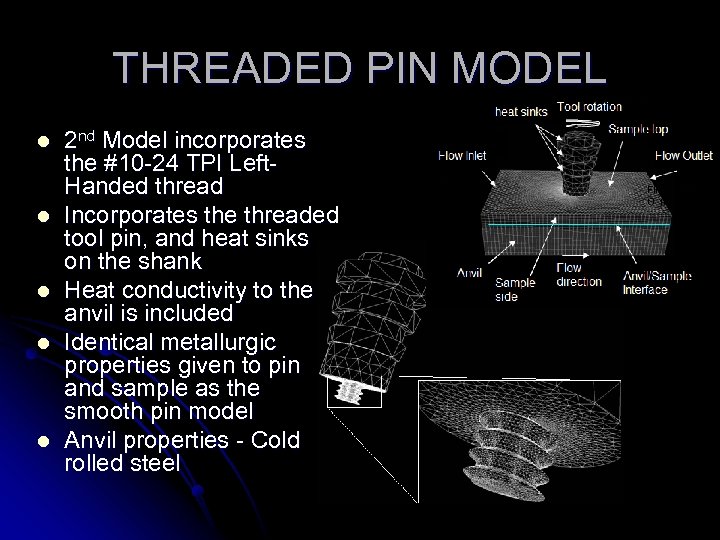
THREADED PIN MODEL l l l 2 nd Model incorporates the #10 -24 TPI Left. Handed thread Incorporates the threaded tool pin, and heat sinks on the shank Heat conductivity to the anvil is included Identical metallurgic properties given to pin and sample as the smooth pin model Anvil properties - Cold rolled steel
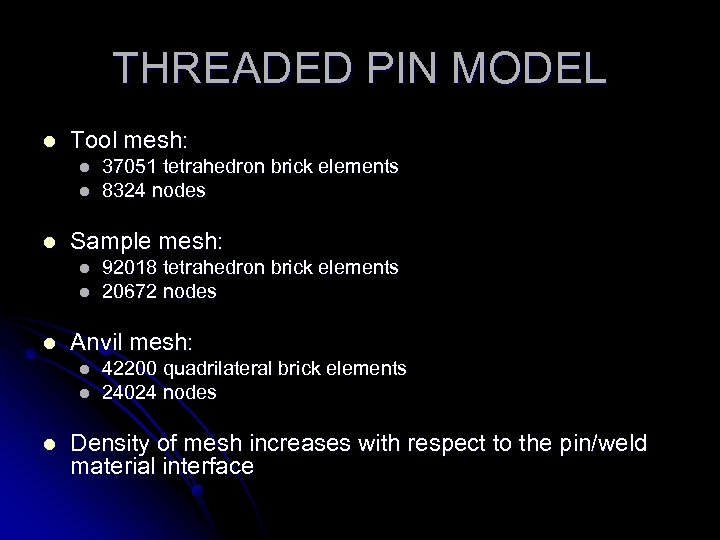
THREADED PIN MODEL l Tool mesh: l l l Sample mesh: l l l 92018 tetrahedron brick elements 20672 nodes Anvil mesh: l l l 37051 tetrahedron brick elements 8324 nodes 42200 quadrilateral brick elements 24024 nodes Density of mesh increases with respect to the pin/weld material interface
FLUENT: ASSIGNMENTS AND ASSUMPTIONS l Goal: Compare the two models’ steady state welding conditions with experimentally determined data l Flow inlet given constant flow rate (TS) l Zero heat flux condition l l No-slip (sticking) condition l l bounding regions transfer no heat to/from the weld all rotational velocity of the tool is transmitted to the weld material at the interface Temperature was simulated for both mechanical models
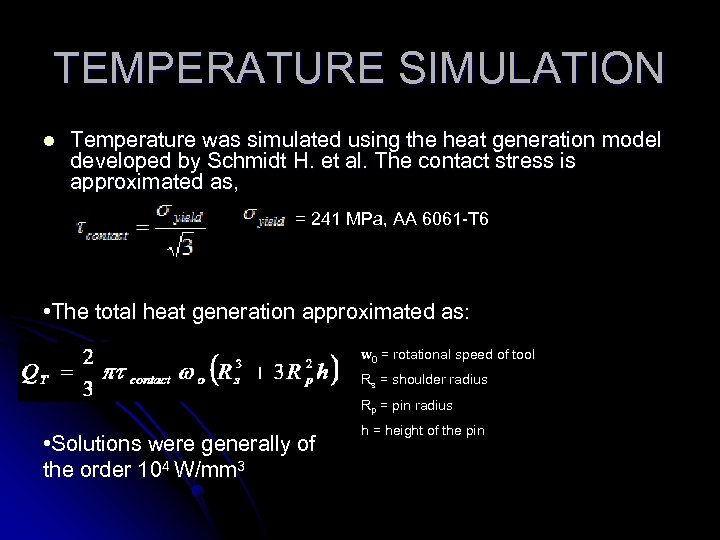
TEMPERATURE SIMULATION l Temperature was simulated using the heat generation model developed by Schmidt H. et al. The contact stress is approximated as, = 241 MPa, AA 6061 -T 6 • The total heat generation approximated as: w 0 = rotational speed of tool Rs = shoulder radius Rp = pin radius • Solutions were generally of the order 104 W/mm 3 h = height of the pin
TEMPERATURE CONTINUED l Subsequent simulations to determine welding temperature were run and input into FLUENT via user defined C code l Method inherently ignores transient state including initial plunge and TS ramp up; creates an isothermal model l The Visco Plastic model used to determine flow stress and viscosity ( and m respectively) l Weld plate region: visco-plastic material
VISCO-PLASTIC MODEL l Seidel, Ulysse, Colegrove et al. implemented VP model very successfully at relatively low wp l RS: 500 rpm l TS: 120 mm min-1 (5. 11 in min-1) l High wp implies: l Increase RS or l Decrease TS l Geometries use VP model with 10 -13 fold parametric increase accurately
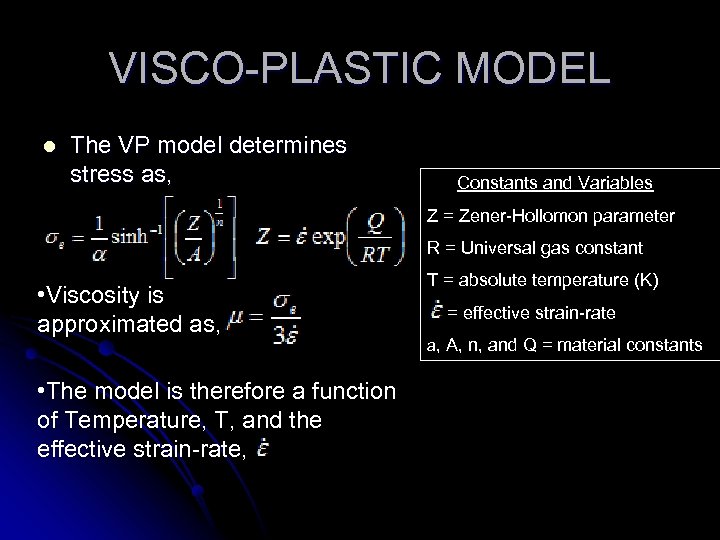
VISCO-PLASTIC MODEL l The VP model determines stress as, Constants and Variables Z = Zener-Hollomon parameter R = Universal gas constant • Viscosity is approximated as, • The model is therefore a function of Temperature, T, and the effective strain-rate, T = absolute temperature (K) = effective strain-rate a, A, n, and Q = material constants
AXIAL FORCE SIMULATION l Smooth pin model: a reference pressure was included to compensate for the lack of an anvil (open domain) l l Pref = FZ/Ap Threaded pin model includes anvil: l no reference pressure is necessary (closed domain)
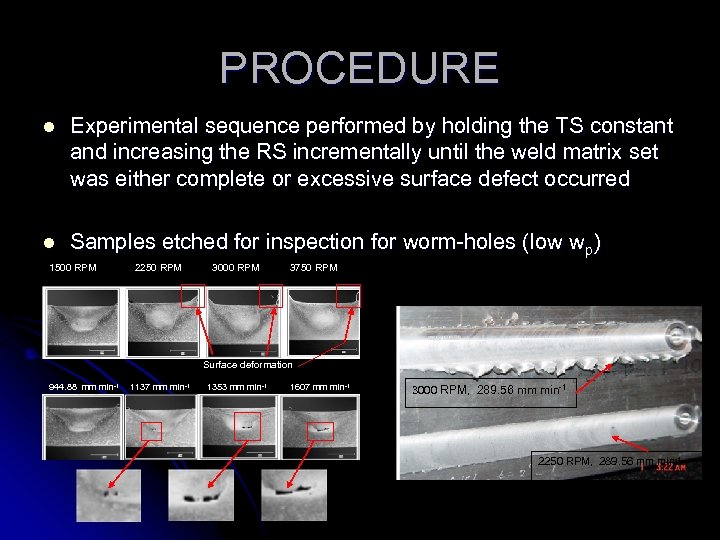
PROCEDURE l Experimental sequence performed by holding the TS constant and increasing the RS incrementally until the weld matrix set was either complete or excessive surface defect occurred l Samples etched for inspection for worm-holes (low wp) 1500 RPM 2250 RPM 3000 RPM 3750 RPM Surface deformation 944. 88 mm min-1 1137 mm min-1 1353 mm min-1 1607 mm min-1 3000 RPM, 289. 56 mm min-1 2250 RPM, 289. 56 mm min-1
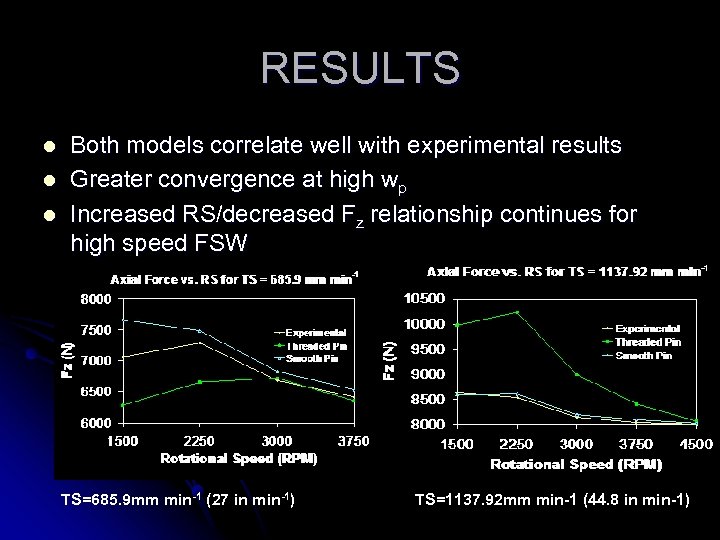
RESULTS l l l Both models correlate well with experimental results Greater convergence at high wp Increased RS/decreased Fz relationship continues for high speed FSW TS=685. 9 mm min-1 (27 in min-1) TS=1137. 92 mm min-1 (44. 8 in min-1)
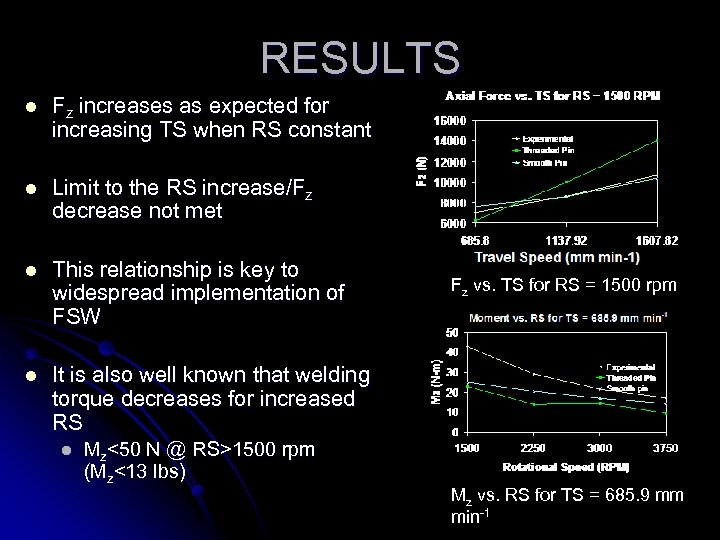
RESULTS l Fz increases as expected for increasing TS when RS constant l Limit to the RS increase/Fz decrease not met l This relationship is key to widespread implementation of FSW l It is also well known that welding torque decreases for increased RS l Mz<50 N @ RS>1500 rpm (Mz<13 lbs) Fz vs. TS for RS = 1500 rpm Mz vs. RS for TS = 685. 9 mm min-1
CONCLUSIONS l The smooth pin model correlated better than the threaded pin model for all simulations l However, threaded model more accurately represents the experimental setup l anvil, heat sinks, pin profile l Increase in RS led to greater correlation in both models with respect to the experimental data l Barrier to high speed FSW is overheating and subsequent surface flash
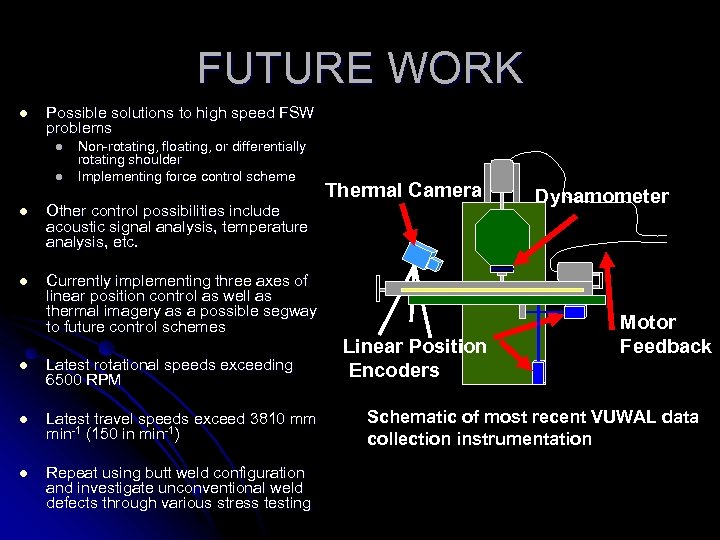
FUTURE WORK l Possible solutions to high speed FSW problems l l Non-rotating, floating, or differentially rotating shoulder Implementing force control scheme l Other control possibilities include acoustic signal analysis, temperature analysis, etc. l Currently implementing three axes of linear position control as well as thermal imagery as a possible segway to future control schemes Thermal Camera l Latest rotational speeds exceeding 6500 RPM l Latest travel speeds exceed 3810 mm min-1 (150 in min-1) l Repeat using butt weld configuration and investigate unconventional weld defects through various stress testing Linear Position Encoders Dynamometer Motor Feedback Schematic of most recent VUWAL data collection instrumentation

ACKNOWLEDGEMENTS l Completion of this was made possible through support provided by an American Welding Society and a NASA GSRP Fellowship grant l Additional funding was provided by the NASA Space Grant Consortium of Tennessee and Los Alamos Natl. Laboratory. Los Alamos, NM l Dr. Author C. Nunes of the NASA Marshall Space Flight Center provided valuable expertise and guidance through private communication which contributed to the completion of this work
REFERENCES l Cook G. E. , Crawford R. , Clark D. E. and Strauss A. M. : ‘Robotic Friction Stir Welding’. Industrial Robot 2004 31 (1) 55 -63. l Mills K. C. : Recommended Values of Thermo-physical Properties for Commercial Alloys. Cambridge, UK 2002. l Schmidt H. , Hattel J. and Wert J. : ‘An Analytical Model for the Heat Generation in Friction Stir Welding’. Modeling and Simulation in Materials Science and Engineering 2004 12 143– 57. l Crawford R: Parametric Quantification of Friction Stir Welding. M. S. Thesis, Vanderbilt University, Nashville, Tennessee 2005. l Seidel T. U. and Reynolds A. P. : ‘Two-dimensional friction stir welding process model based on fluid mechanics’. Science and Technology of Welding & Joining 2003 8 (3), 175 -83.
REFERENCES l Colgrove P. A. and Shercliff H. R. : ‘Development of Trivex friction stir welding tool Part 2 – three-dimensional flow modelling’. Science and Technology of Welding & Joining 2004, 9(3) 352 -61. l Ulysse P. : ’Three-dimensional modeling of the friction stir-welding process’ International Journal of Machine Tools & Manufacture 2002 42 1549– 57. l Sheppard T. and Jackson A. : ‘Constitutive equations for high flow stress of aluminum alloys’ Material Science and Technology 1997 13 203 -9. l FLUENT, Fluid Dynamic Analysis Package, version 6. 122 Fluid Dynamics International, Evanston, IL. l Talia G. E. and Chaudhuri J. : A Combined Experimental and Analytical modeling Approach to Understanding Friction Stir Welding. Department of Mechanical Engineering Presentation, Wichita State University, Wichita, KS 2004.
2b223cc78af149bd235e10bb5a742ef9.ppt