00355901f009eb8af16dce2cea3aad06.ppt
- Количество слайдов: 125
FOUP-Load Port Interoperability Implementation Recommendations Revision 1. 06 SEMI FOUP-Load Port Interoperability Implementation Recommendations Revision 1. 06 April 8, 2010 Global PIC Maintenance Task Force PI&C Committee SEMI Global PIC Maintenance TF, PI&C Committee April 8, 2010 1
FOUP-Load Port Interoperability Implementation Recommendations Revision 1. 06 2 Revised Page Contents • Overview • Background • Objective • Reflection Philosophy to Standards • USRD • History of Report Development • Acronyms • History of Report Development • 450 mm FOUP-Load port ¨Good use of this report is recommended as the philosophy of FOUP-Load port interoperability can be reflected onto 450 mm FOUP-Load port. • Volume 1 Interoperability Implementation • Volume 2 Measurement Methods • Revision History SEMI Global PIC Maintenance TF, PI&C Committee April 8, 2010
FOUP-Load Port Interoperability Implementation Recommendations Revision 1. 06 3 Overview w. The FOUP has been thought to be utilized as the standard carrier for the 300 mm fab, and tremendous amount of effort was invested to bring about 300 mm standardized carrier. w. Numerous problems have been found in the course of evaluation of minienvironment systems (i. e. , FOUPs and Load Ports). w. These problems include some simple non-compliance to the standards, but some are system oriented, and, thus, require “share of responsibilities” between FOUPs and Load Ports for solution. w. As the problems were internationally recognized, device makers decided to show their requirements to ensure interoperability between FOUPs and Load Ports. w. The first FOUP/Load Port Interoperability International Workshop was held at SEMICON Southwest 1999. w. This activity was followed by publication of a User System Requirements Document (USRD) for FOUP-to-Load Port Interoperability developed by J 300 E and International SEMATECH and announced at SEMICON Japan 1999. w. In the response to USRD International SEMI FOUP/Load Port Interoperability Study Group (hereafter FLI SG) was formed. w. FLI SG objective is to publish the analysis results of the problem, create action plans, encourage TF formation to the problem, and enhance the maturity of the standards. SEMI Global PIC Maintenance TF, PI&C Committee April 8, 2010
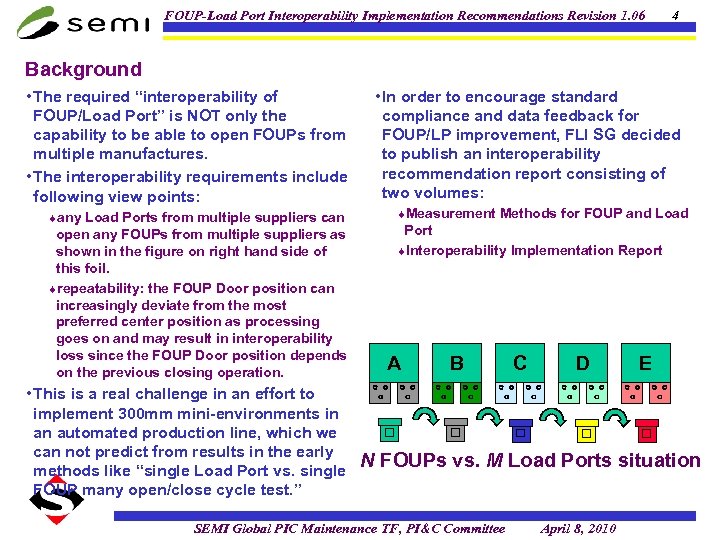
FOUP-Load Port Interoperability Implementation Recommendations Revision 1. 06 4 Background • The required “interoperability of FOUP/Load Port” is NOT only the capability to be able to open FOUPs from multiple manufactures. • The interoperability requirements include following view points: ¨any Load Ports from multiple suppliers can open any FOUPs from multiple suppliers as shown in the figure on right hand side of this foil. ¨repeatability: the FOUP Door position can increasingly deviate from the most preferred center position as processing goes on and may result in interoperability loss since the FOUP Door position depends on the previous closing operation. • This is a real challenge in an effort to implement 300 mm mini-environments in an automated production line, which we can not predict from results in the early methods like “single Load Port vs. single FOUP many open/close cycle test. ” • In order to encourage standard compliance and data feedback for FOUP/LP improvement, FLI SG decided to publish an interoperability recommendation report consisting of two volumes: ¨Measurement Methods for FOUP and Load Port ¨Interoperability Implementation Report A B C D E N FOUPs vs. M Load Ports situation SEMI Global PIC Maintenance TF, PI&C Committee April 8, 2010
FOUP-Load Port Interoperability Implementation Recommendations Revision 1. 06 5 Background (continued) • Interoperability Implementation Report ¨The FOUP Load Port Interoperability SG decided to divide the requirements into 3 categories so that reasonable solution can be obtained: • FOUP • Load Port • System • Measurement Methods ¨The FOUP Load Port Interoperability SG decided to divide the requirements into 2 categories: • FOUP • LP SEMI Global PIC Maintenance TF, PI&C Committee April 8, 2010
FOUP-Load Port Interoperability Implementation Recommendations Revision 1. 06 6 Objective • Objective of “FOUP-Load Port Interoperability Implementation Recommendations” ¨Alert suppliers and/or add minimum additional requirements to ensure interoperability while assuring compliance to all relevant SEMI Standards. ¨Give complementary explanation of standards and/or concrete explanation of properation of FOUPs and Load Ports ¨Identify the potential areas of concern and may provide several possible design recommendations. ¨Propose corresponding TF activities. • c. f. Purpose of standards are to define the minimum requirements to enable interoperability ¨Each item in “FOUP-Load Port Interoperability Implementation Recommendations” should have an outcome which may suggest changes to existing standards or inclusions in SEMI Guide, etc. SEMI Global PIC Maintenance TF, PI&C Committee April 8, 2010
FOUP-Load Port Interoperability Implementation Recommendations Revision 1. 06 7 Reflection Philosophy to Standards • How to reflect the report recommendations to SEMI documents: ¨Put in corresponding standards (E 47. 1 or E 62) as application notes for the best appeal as long as the issue is closely related to one of each documents. ¨Include high level items such as system view for interoperability in a SEMI Guide. • It is proposed to publish all the detailed recommendations in a separate SEMI Guide like the I 300 I Mini-Environment Best Practices Document while the necessary changes in SEMI Standards are added to the SEMI Standard body. • General Comment ¨In case difference of philosophy on standard exists, suggestions from regional SGs may be listed. SEMI Global PIC Maintenance TF, PI&C Committee April 8, 2010
FOUP-Load Port Interoperability Implementation Recommendations Revision 1. 06 8 USRD • User System Requirements Document for FOUP-to-Load Port Interoperability (1) E 62 -y 33 Variation for FOUP & Load Port (2) FOUP and Load Port Door/Frame Size Relation (3) Repeatability of FOUP Door Position (4) Gap between FOUP and Load Port Frames (5) Accuracy of Wafer Location Study Requirement Latch Key Operation SEMI Global PIC Maintenance TF, PI&C Committee April 8, 2010
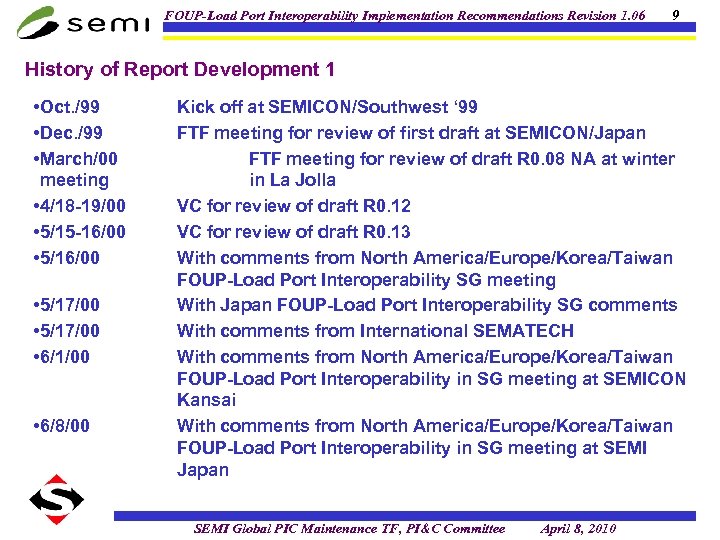
FOUP-Load Port Interoperability Implementation Recommendations Revision 1. 06 9 History of Report Development 1 • Oct. /99 • Dec. /99 • March/00 meeting • 4/18 -19/00 • 5/15 -16/00 • 5/17/00 • 6/1/00 • 6/8/00 Kick off at SEMICON/Southwest ‘ 99 FTF meeting for review of first draft at SEMICON/Japan FTF meeting for review of draft R 0. 08 NA at winter in La Jolla VC for review of draft R 0. 12 VC for review of draft R 0. 13 With comments from North America/Europe/Korea/Taiwan FOUP-Load Port Interoperability SG meeting With Japan FOUP-Load Port Interoperability SG comments With comments from International SEMATECH With comments from North America/Europe/Korea/Taiwan FOUP-Load Port Interoperability in SG meeting at SEMICON Kansai With comments from North America/Europe/Korea/Taiwan FOUP-Load Port Interoperability in SG meeting at SEMI Japan SEMI Global PIC Maintenance TF, PI&C Committee April 8, 2010
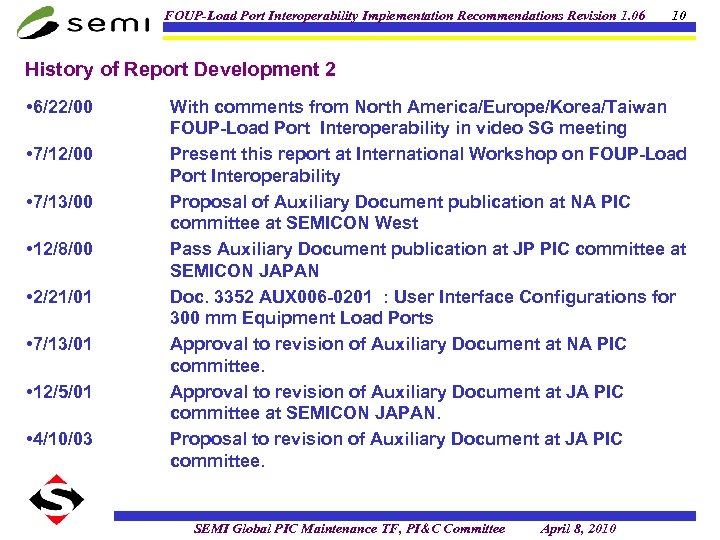
FOUP-Load Port Interoperability Implementation Recommendations Revision 1. 06 10 History of Report Development 2 • 6/22/00 • 7/13/00 • 12/8/00 • 2/21/01 • 7/13/01 • 12/5/01 • 4/10/03 With comments from North America/Europe/Korea/Taiwan FOUP-Load Port Interoperability in video SG meeting Present this report at International Workshop on FOUP-Load Port Interoperability Proposal of Auxiliary Document publication at NA PIC committee at SEMICON West Pass Auxiliary Document publication at JP PIC committee at SEMICON JAPAN Doc. 3352 AUX 006 -0201 : User Interface Configurations for 300 mm Equipment Load Ports Approval to revision of Auxiliary Document at NA PIC committee. Approval to revision of Auxiliary Document at JA PIC committee at SEMICON JAPAN. Proposal to revision of Auxiliary Document at JA PIC committee. SEMI Global PIC Maintenance TF, PI&C Committee April 8, 2010
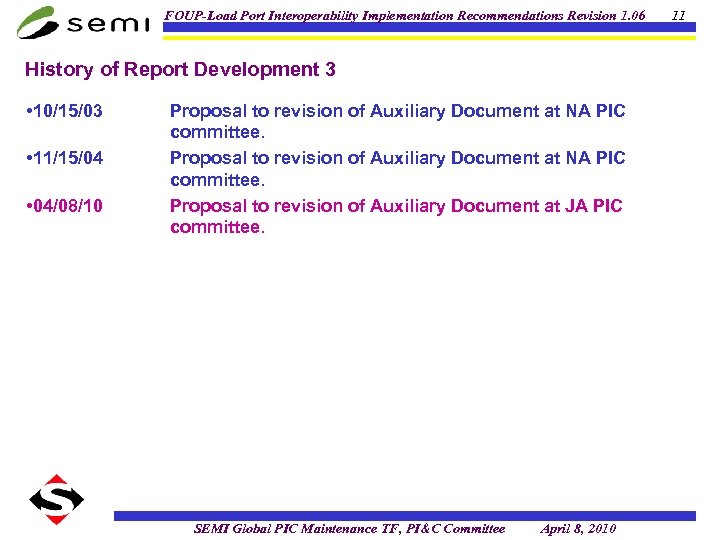
FOUP-Load Port Interoperability Implementation Recommendations Revision 1. 06 History of Report Development 3 • 10/15/03 • 11/15/04 • 04/08/10 Proposal to revision of Auxiliary Document at NA PIC committee. Proposal to revision of Auxiliary Document at JA PIC committee. SEMI Global PIC Maintenance TF, PI&C Committee April 8, 2010 11
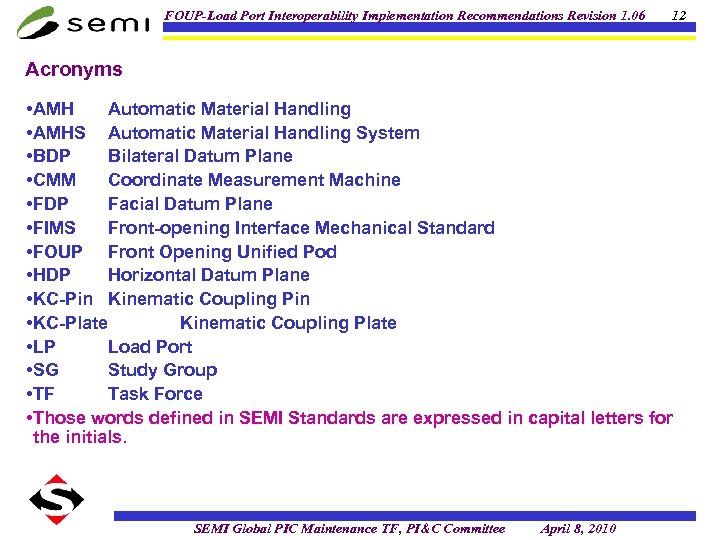
FOUP-Load Port Interoperability Implementation Recommendations Revision 1. 06 12 Acronyms • AMH Automatic Material Handling • AMHS Automatic Material Handling System • BDP Bilateral Datum Plane • CMM Coordinate Measurement Machine • FDP Facial Datum Plane • FIMS Front-opening Interface Mechanical Standard • FOUP Front Opening Unified Pod • HDP Horizontal Datum Plane • KC-Pin Kinematic Coupling Pin • KC-Plate Kinematic Coupling Plate • LP Load Port • SG Study Group • TF Task Force • Those words defined in SEMI Standards are expressed in capital letters for the initials. SEMI Global PIC Maintenance TF, PI&C Committee April 8, 2010
FOUP-Load Port Interoperability Implementation Recommendations Revision 1. 06 450 mm FOUP-Load port 13 New Page • This report is a material to assist the realization of 300 mm FOUP-Load port ( 300 mm system) interoperability. • 450 mm FOUP-Load port (450 mm system)uses front-opening method, rotary latch method, and kinematic coupling FOUP positioning method etc. like 300 mm system, so the philosophy of interoperability described in this report can be reflected onto 450 mm system. • It is recommended to apply this report effectively to 450 mm system. • Note : ¨Note that this report is for 300 mm FOUP-Load port, and names, marks and dimensions, etc in are different from those for 450 mm FOUP-Load port. • Example: The name of Registration Pins for 300 mm system is changed to Door Pins for 450 mm system. SEMI Global PIC Maintenance TF, PI&C Committee April 8, 2010
FOUP-Load Port Interoperability Implementation Recommendations Revision 1. 06 Volume 1 Interoperability Implementation SEMI Global PIC Maintenance TF, PI&C Committee April 8, 2010 14
FOUP-Load Port Interoperability Implementation Recommendations Revision 1. 06 15 Report Development Process • Step 1: Create a report draft for all issues under discussion by FLI-SG ¨To: Provide status on the discussions regarding the items in the latest report draft. ¨How: FLI-SG to post the report draft on web-site • Step 2: Suggest creation of / delegation to TFs for possible standard amendments ¨Types of standard amendments: • Change standards to remove contradiction • Add some definition to standards • Narrow the definition in standards • Add application note • Step 3: Remaining items in the report draft after Step 2 may be balloted per SEMI regulation to become a SEMI Guide SEMI Global PIC Maintenance TF, PI&C Committee April 8, 2010
FOUP-Load Port Interoperability Implementation Recommendations Revision 1. 06 Position of Document • This report has been developed by international collaboration at following TF/WG. ¨E 47. 1 TF ¨E 62 TF ¨International FOUP-Load Port Interoperability Study Group ¨International 300 mm Carrier TF ¨Global PIC Maintenance TF • TF to work on: ¨Convert suggestion of additional application notes in the report into ballots for appropriate inclusion in SEMI Standards. ¨Convert suggestion of additional requirements in the report into ballots for appropriate inclusion in SEMI Standards. ¨There are some suggestions in the report such as “gap model” and “FIMS Door Return Accuracy Requirement” which are left to TF to work on corresponding concrete numerical values. SEMI Global PIC Maintenance TF, PI&C Committee April 8, 2010 16
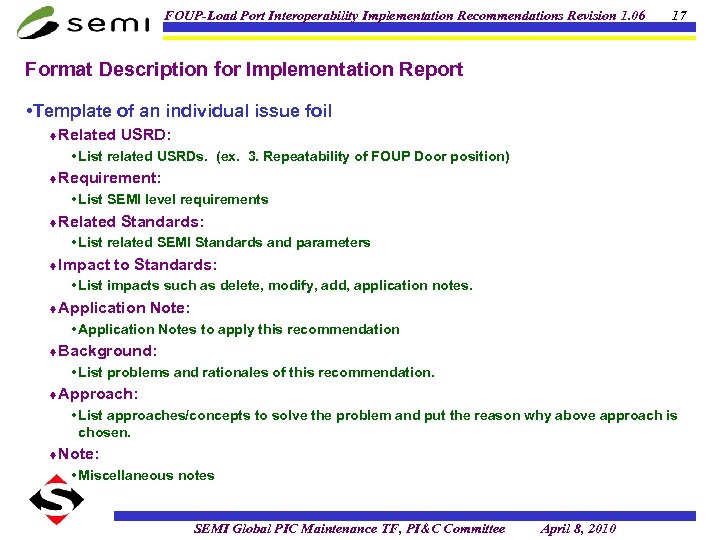
FOUP-Load Port Interoperability Implementation Recommendations Revision 1. 06 17 Format Description for Implementation Report • Template of an individual issue foil ¨Related USRD: • List related USRDs. (ex. 3. Repeatability of FOUP Door position) ¨Requirement: • List SEMI level requirements ¨Related Standards: • List related SEMI Standards and parameters ¨Impact to Standards: • List impacts such as delete, modify, add, application notes. ¨Application Note: • Application Notes to apply this recommendation ¨Background: • List problems and rationales of this recommendation. ¨Approach: • List approaches/concepts to solve the problem and put the reason why above approach is chosen. ¨Note: • Miscellaneous notes SEMI Global PIC Maintenance TF, PI&C Committee April 8, 2010
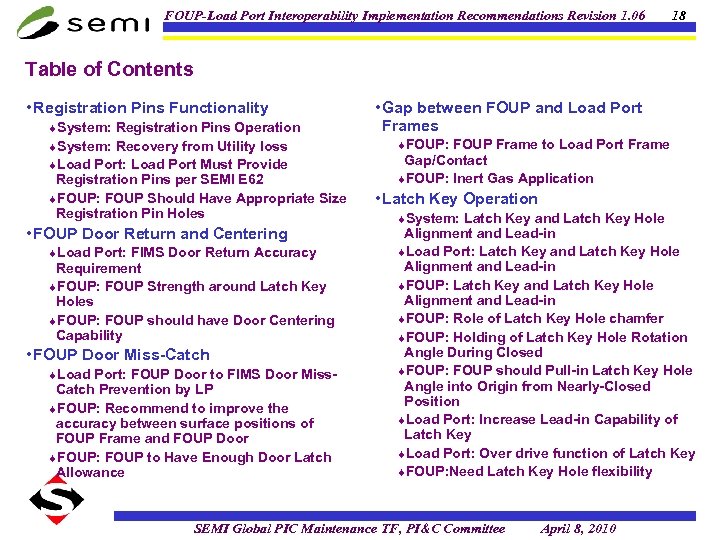
FOUP-Load Port Interoperability Implementation Recommendations Revision 1. 06 18 Table of Contents • Registration Pins Functionality ¨System: Registration Pins Operation ¨System: Recovery from Utility loss ¨Load Port: Load Port Must Provide Registration Pins per SEMI E 62 ¨FOUP: FOUP Should Have Appropriate Size Registration Pin Holes • FOUP Door Return and Centering ¨Load Port: FIMS Door Return Accuracy Requirement ¨FOUP: FOUP Strength around Latch Key Holes ¨FOUP: FOUP should have Door Centering Capability • FOUP Door Miss-Catch ¨Load Port: FOUP Door to FIMS Door Miss- Catch Prevention by LP ¨FOUP: Recommend to improve the accuracy between surface positions of FOUP Frame and FOUP Door ¨FOUP: FOUP to Have Enough Door Latch Allowance • Gap between FOUP and Load Port Frames ¨FOUP: FOUP Frame to Load Port Frame Gap/Contact ¨FOUP: Inert Gas Application • Latch Key Operation ¨System: Latch Key and Latch Key Hole Alignment and Lead-in ¨Load Port: Latch Key and Latch Key Hole Alignment and Lead-in ¨FOUP: Role of Latch Key Hole chamfer ¨FOUP: Holding of Latch Key Hole Rotation Angle During Closed ¨FOUP: FOUP should Pull-in Latch Key Hole Angle into Origin from Nearly-Closed Position ¨Load Port: Increase Lead-in Capability of Latch Key ¨Load Port: Over drive function of Latch Key ¨FOUP: Need Latch Key Hole flexibility SEMI Global PIC Maintenance TF, PI&C Committee April 8, 2010
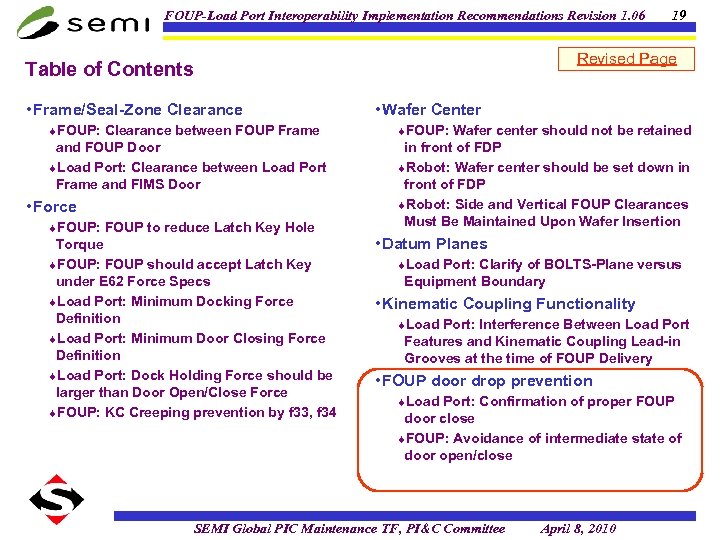
FOUP-Load Port Interoperability Implementation Recommendations Revision 1. 06 Revised Page Table of Contents • Frame/Seal-Zone Clearance 19 • Wafer Center ¨FOUP: Clearance between FOUP Frame ¨FOUP: Wafer center should not be retained and FOUP Door ¨Load Port: Clearance between Load Port Frame and FIMS Door in front of FDP ¨Robot: Wafer center should be set down in front of FDP ¨Robot: Side and Vertical FOUP Clearances Must Be Maintained Upon Wafer Insertion • Force ¨FOUP: FOUP to reduce Latch Key Hole Torque ¨FOUP: FOUP should accept Latch Key under E 62 Force Specs ¨Load Port: Minimum Docking Force Definition ¨Load Port: Minimum Door Closing Force Definition ¨Load Port: Dock Holding Force should be larger than Door Open/Close Force ¨FOUP: KC Creeping prevention by f 33, f 34 • Datum Planes ¨Load Port: Clarify of BOLTS-Plane versus Equipment Boundary • Kinematic Coupling Functionality ¨Load Port: Interference Between Load Port Features and Kinematic Coupling Lead-in Grooves at the time of FOUP Delivery • FOUP door drop prevention ¨Load Port: Confirmation of proper FOUP door close ¨FOUP: Avoidance of intermediate state of door open/close SEMI Global PIC Maintenance TF, PI&C Committee April 8, 2010
FOUP-Load Port Interoperability Implementation Recommendations Revision 1. 06 Registration Pins Functionality USRD: 3. Repeatability of FOUP Door Position SEMI Global PIC Maintenance TF, PI&C Committee April 8, 2010 20
FOUP-Load Port Interoperability Implementation Recommendations Revision 1. 06 System: Registration Pins Operation 21 E 62: Added to Application Note • Background: • Related USRD: ¨ 3. Repeatability of FOUP Door Position • Requirements: ¨Do not use Registration Pins for FOUP Door lead-in to the Load Port Door. ¨Registration Pins should be used to limit maximum displacement of the FOUP Door while on the Load Port Door. ¨Kinematic Coupling and Clamp mechanism primarily restrict six degrees of freedom of the FOUP. Door alignment by Registration Pins causes over-constraint of the FOUP to the Load Port, and this should be avoided. ¨High friction caused by over-constraint may cause particle generation. • Approach ¨The Load Port does not align the FOUP Door to the • Related Standards: ¨E 62: d 31, x 31, z 31, r 30 • Impact to Standards: ¨Neither the FOUP nor FOUP Door positions should change as a result of engaging or disengaging Registration Pins. Rewording is recommended for the Registration Pin description in SEMI Standards, as is having an Application Note describe this issue. ¨When the Load Port experiences utility loss (such as EMO, vacuum loss, electrical failure, etc. ), Registration Pins may be used to maintain the FOUP Door’s position, and to ensure the FOUP Door not to fall off. Load Port Door but keeps its position as it was. ¨Method will be an implementation issue. Vacuum holding or Latch Key grip with friction may be examples. • Note: ¨This recommendation is only related to usage of Registration Pins for the purpose of lead-in (guiding the FOUP Door onto the Load Port Door), which may very probably cause an over-constraint. Once the FOUP Door is registered on the Load Port Door, Registration Pins may be used to maintain the position of the FOUP Door once removed from the FOUP. SEMI Global PIC Maintenance TF, PI&C Committee April 8, 2010
FOUP-Load Port Interoperability Implementation Recommendations Revision 1. 06 22 System: Recovery from Utility Loss Should be Done Without FOUP Frame to FOUP Door Interference • Related USRD: • Background: ¨ 2. FOUP and FIMS Door/Frame Size Relation ¨ 3. Repeatability of FOUP Door Position • Requirement: ¨The FOUP Door should be returned safely to the FOUP (with no bumping, no scraping, etc. ) during recovery from any utility loss that might occur while the FOUP Door is open. • Related Standards: ¨E 62 Registration Pins shape • Impact to Standards: ¨None. ¨See Note. • Application Note: ¨The clearance between the Registration Pins and the Registration Pin Holes should be less than the clearance between the outer edge of the FOUP Door and the inner edge of the FOUP Door Frame. Balancing these tolerances is a FOUP design issue related to the E 62 Seal Zone specification. ¨Registration Pin Holes locations should be designed with consideration to above tolerances. ¨Utility loss (such as EMO or electrical failure) may result in a loss of the FOUP Door position while on the Load Port Door. ¨In this situation, the FOUP Door may not be able to be closed automatically if the FOUP Door position changes. ¨For cleanliness reasons, the FOUP Door support during utility loss should be considered to avoid human interruption. • Approach: ¨the Load Port to have Registration Pins per E 62. ¨the FOUP to have appropriate size of Registration Pin Holes to prevent excessive FOUP Door displacement when utilities are lost. • Note: ¨JA SG thinks this should be included in Application note of E 47. 1 whereas NA SG thinks this should be in SEMI guide. E 62: Added to Application Note SEMI Global PIC Maintenance TF, PI&C Committee April 8, 2010
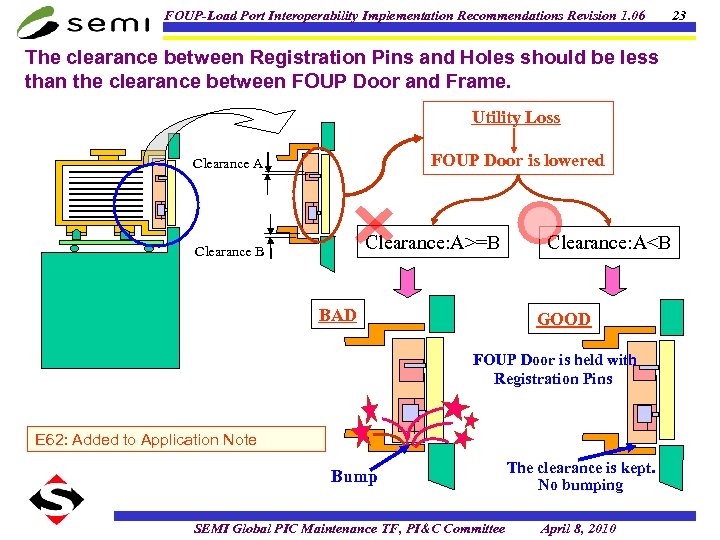
FOUP-Load Port Interoperability Implementation Recommendations Revision 1. 06 The clearance between Registration Pins and Holes should be less than the clearance between FOUP Door and Frame. Utility Loss FOUP Door is lowered Clearance A Clearance: A>=B Clearance B BAD Clearance: A<B GOOD FOUP Door is held with Registration Pins E 62: Added to Application Note Bump SEMI Global PIC Maintenance TF, PI&C Committee The clearance is kept. No bumping April 8, 2010 23
FOUP-Load Port Interoperability Implementation Recommendations Revision 1. 06 24 Load Port: Load Port Must Provide Registration Pins per SEMI E 62 • Related USRD: ¨Registration Pins are not appropriate for ¨ 3. Repeatability of FOUP Door Position • Requirement: ¨the Load Port must provide Registration Pins compliant with SEMI E 62: (d 31 etc. ) • Related Standards: ¨E 62: d 31, x 31, z 31, r 30 • Impact to Standards: FOUP Door positioning to the Load Port Door. ¨Registration Pins should be used to limit the maximum displacement of the FOUP Door while it is engaged onto the Load Port Door. • Approach: ¨Non-interference error recovery from ¨None. ¨Compliance required with E 62. • Application Note: ¨Registration Pins may be used to enable non-interference error recovery from lost position due to utility loss. • Background: ¨Due to several Load Ports in production having non-compliant Registration Pins to avoid over-constraint, these recommendations were developed to serve as an implementation guide for using SEMI Standard equipment. position loss due to power loss should be considered. • Note: ¨Common non-compliances and reinforcement messages may be collected as a section in some SEMI Guide Document or the like. ¨Registration Pins may be used as reference points to measure the Load Port Door position and features. E 62: Added to Application Note SEMI Global PIC Maintenance TF, PI&C Committee April 8, 2010
FOUP-Load Port Interoperability Implementation Recommendations Revision 1. 06 25 FOUP: FOUP Should Have Appropriate Size Registration Pin Holes • Related USRD: ¨The diameter of the Registration Pin Holes should ¨ 3. Repeatability of FOUP Door Position • Requirements: ¨The FOUP should have Registration Pin Holes of an appropriate size to avoid over-constraint caused by the positioning error resulting from possible FOUP tolerances (not defined in SEMI Standards) and Registration Pin tolerances (defined in E 62. ) ¨The relation between Registration Pin Holes size and the FOUP Frame to FOUP Door gap should be considered to enable non-interference error recovery from lost position of the FOUP Door due to utility loss. • Related Standards: be designed to accommodate the Registration Pin tolerance defined in E 62 (x 31, z 31, d 31) and the Registration Pin Hole location tolerance in a FOUP. • Background: ¨Registration Pins are not appropriate for FOUP Door positioning to the Load Port Door. ¨Registration Pins should be used to limit the maximum displacement of the FOUP Door while it is engaged onto the Load Port Door. • Approach: ¨Non-interference error recovery from position loss due to power loss should be considered. • Note: ¨It is proposed to add a note to the SEMI Guide to ¨E 62: d 31, x 31, z 31, r 30 alert FOUP suppliers of design considerations when determining the size of the hole for Registration Pins while adding an Application note to SEMI E 47. 1. • Impact to Standards: ¨None. • Application Note: ¨The clearance between the Registration Pins and the Registration Pin Holes should be less than the clearance between the outer edge of the FOUP Door and the inner edge of the FOUP Door Frame. Balancing these tolerances is a FOUP design issue related to the E 62 Seal Zone specification. E 62: Added to Application Note SEMI Global PIC Maintenance TF, PI&C Committee April 8, 2010
FOUP-Load Port Interoperability Implementation Recommendations Revision 1. 06 FOUP Door Return and Centering USRD: 3. Repeatability of FOUP Door Position SEMI Global PIC Maintenance TF, PI&C Committee April 8, 2010 26
FOUP-Load Port Interoperability Implementation Recommendations Revision 1. 06 Load Port: FIMS Door Return Accuracy 27 E 62: Added 5. 10 FIMS Requirement Door return repeatability • Application Note: • Related USRD: ¨ 3. When closing the FOUP, the Load Port must return the FOUP Door to the same location from which it was taken. • Requirement: ¨The Load Port should return the Load Port Door to the position where the Load Port Door was within an accuracy that should be determined in the relevant TF. • Related Standards: ¨E 62 • Impact to Standards: ¨No contradiction. ¨Better to add Load Port Door return accuracy in E 62. ¨E 62 Rev. TF should work out the followings: • Need to revise E 62 (Figure 1, for example) to clarify how the Load Port Door repeatability is to be included in dimensions. • Specify requirement only for X and Z directions in this Standard ammendment. • There needs to be clarification of the FOUP Door to the Load Port Door repeatability. ¨Example of FOUP Door holding • Vacuum holding • Clamping by Latch Key with friction. • Background: ¨To avoid the FOUP Frame from contacting the FOUP Door during FOUP Door closing, at least the FOUP Frame to FOUP Door clearance (dynamic) or the FOUP Door return accuracy by the Load Port must be defined. ¨Displacement should be as small as possible to avoid particle generation due to the FOUP Door sliding in the FOUP Frame. ¨The FOUP is expected to keep its Door centered to prevent the FOUP Door from creeping due to accumulation of Door return position errors. ¨The current +/-0. 1 mm FIMS Door per E 62 (x 30, x 31, z 30, z 31) is to be further examined from the view point of tolerance and repeatability. The question here is if E 62 intends to include the Load Port Door return repeatability tolerance. • Approach: ¨Define the Load Port Door return accuracy of the Load Port. SEMI Global PIC Maintenance TF, PI&C Committee April 8, 2010
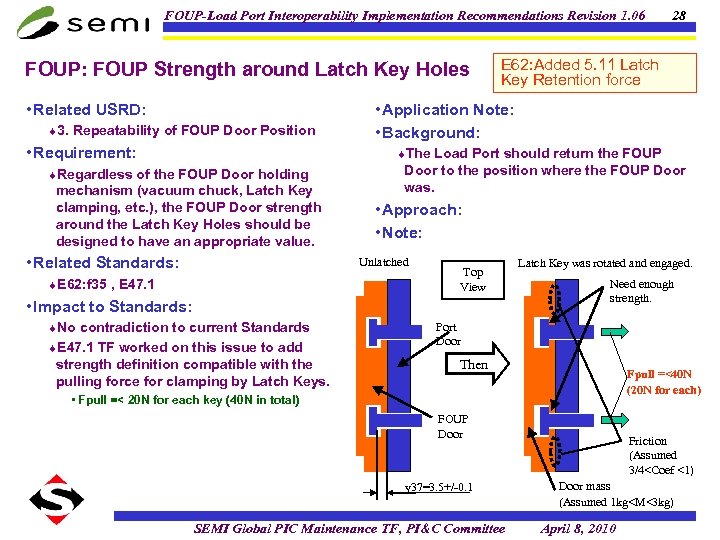
FOUP-Load Port Interoperability Implementation Recommendations Revision 1. 06 FOUP: FOUP Strength around Latch Key Holes • Related USRD: ¨ 3. Repeatability of FOUP Door Position • Requirement: 28 E 62: Added 5. 11 Latch Key Retention force • Application Note: • Background: ¨The Load Port should return the FOUP ¨Regardless of the FOUP Door holding mechanism (vacuum chuck, Latch Key clamping, etc. ), the FOUP Door strength around the Latch Key Holes should be designed to have an appropriate value. • Related Standards: Door to the position where the FOUP Door was. • Approach: • Note: Unlatched ¨E 62: f 35 , E 47. 1 Top View • Impact to Standards: ¨No contradiction to current Standards ¨E 47. 1 TF worked on this issue to add strength definition compatible with the pulling force for clamping by Latch Keys. Latch Key was rotated and engaged. Need enough strength. Port Door Then Fpull =<40 N (20 N for each) • Fpull =< 20 N for each key (40 N in total) FOUP Door y 37=3. 5+/-0. 1 SEMI Global PIC Maintenance TF, PI&C Committee Friction (Assumed 3/4<Coef <1) Door mass (Assumed 1 kg<M<3 kg) April 8, 2010
FOUP-Load Port Interoperability Implementation Recommendations Revision 1. 06 29 FOUP: FOUP should have Door Centering Capability • Related USRD: • Background: ¨ 2. FOUP and Load Port Door/Frame Size Relation ¨ 3. Repeatability of FOUP Door Position • Requirement ¨The FOUP should have a capability to roughly center the FOUP Door in the FOUP Frame during the FOUP Door close sequence (during either return of the FOUP Door and/or during latching of the FOUP Door). ¨This centering capability should keep the clearance between the FOUP Frame and the FOUP Door larger than sum of the FOUP (self) tolerance and the E 62 Registration Pin tolerance along with the FOUP Door’s circumference. • Related Standards: ¨There is an over-constrain issue between the “FOUP Door Return to the same position” function of the Load Port and the “FOUP Door centering” function of the FOUP. This expected to be solved within the mechanical compliance of both the FOUP and the Load Port. ¨Even though the Load Port Door tries to return the FOUP Door to the position where it was, accumulation of system error can occur, and, the FOUP Door may creep to hit the FOUP Frame. • Approach: ¨The Load Port has a function to return the FOUP Door where it was and cannot have a centering function at the same time. ¨The FOUP is expected to keep the FOUP Door centered to prevent Door creeping due to an accumulation of Door return errors. ¨E 62 -z 33, z 34, x 33, x 34 • Impact to Standards: ¨None (See Note). • Application Note: ¨The intention of this recommendation is not to imply an accurate centering toward an ideal center but to keep the FOUP Frame to FOUP Door clearance appropriate for Latch Key insertion into the FOUP Door. ¨Candidate examples may include centering by latch motion and centering by slope between the FOUP Frame and the FOUP Door. • Note: ¨It is recommended that the FOUP Door centering function be highlighted as an Application Note in E 47. 1. ¨It is believed that most FOUPs already have this. E 47. 1: Added application note SEMI Global PIC Maintenance TF, PI&C Committee April 8, 2010
FOUP-Load Port Interoperability Implementation Recommendations Revision 1. 06 FOUP Door Miss-Catch 1: E 62 -y 33 Variation for FOUP & Load Port SEMI Global PIC Maintenance TF, PI&C Committee April 8, 2010 30
FOUP-Load Port Interoperability Implementation Recommendations Revision 1. 06 31 E 47. 1: y 52 was changed 166 mm Max. to 165. 5+/- 0. 5 mm E 62: y 33 was deleted Load Port: Gap control between FOUP and Load Port Frames • Related USRD: • Application Note: ¨ 1: E 62 -y 33 Variation for FOUP & Load Port • Requirements: ¨The gap between the FOUP Frame and the Load Port Frame when a FOUP is docked and opened should be controlled less than the minimum value deduced from relevant tolerances. • The gap can be zero in the case of “Soft Contact. ” ¨The range of this gap should be discussed in joint TF of E 47. 1 and E 62. • Related Standards: ¨E 62 -y 33: Frame ¨E 47. 1 -y 33 (y 52) : Frame • Impact to Standards: ¨TF to propose an application note that clarifies the relation between y 52 (frame) in E 47. 1 and y 33 (frame) in E 62. ¨TF to create a consistent gap model in which relevant dimensions and operation are shown. See the figure in the following page ¨E 47. 1 TF to propose of an application note regarding y 52 (Frame) in E 47. 1. ¨The current standard individually gives y 33 (FOUP Frame) and y 33 (Load Port Frame) tolerances of +/-0. 5 mm and +/-0. 5 mm, respectively. Since these tolerances are independent to each other, the Load Port has to advance the FOUP so as to have the nominal FOUP Frame location at 1 mm before the nominal Load Port Frame location in order to avoid a collision between Frames. ¨It can be that the actual FOUP Frame plane is 0. 5 mm before the nominal location and, at the same time, that the actual Load Port Frame plane is 0. 5 mm further into equipment from the nominal location. This situation will give a 2 mm wide gap, and which is thought to be too large. • Background: ¨The system is required to be designed to leave a gap between the FOUP Frame and the Load Port Frame to avoid a collision between the two when the FOUP is docked (soft contact is OK). ¨The reasons are to prevent: • 1. wafer center location displacement from docked FDP. • 2. particle generation from rubbing between the FOUP Frame and the Load Port Frame. SEMI Global PIC Maintenance TF, PI&C Committee April 8, 2010
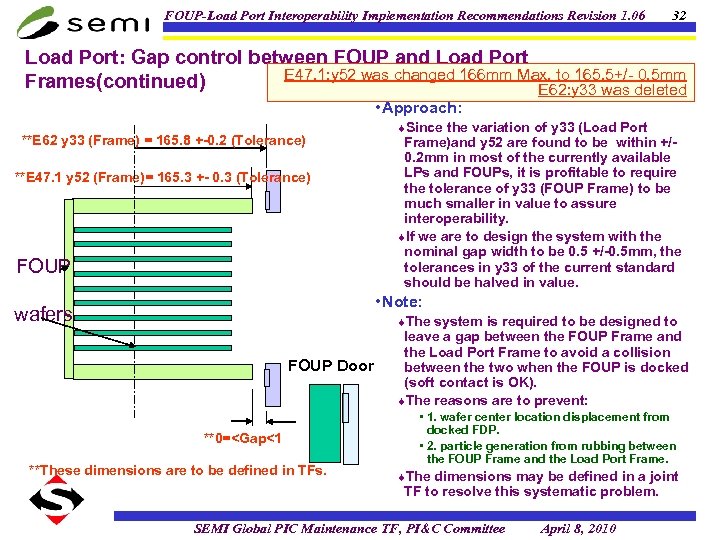
FOUP-Load Port Interoperability Implementation Recommendations Revision 1. 06 32 Load Port: Gap control between FOUP and Load Port E 47. 1: y 52 was changed 166 mm Max. to 165. 5+/- 0. 5 mm Frames(continued) E 62: y 33 was deleted • Approach: **E 62 y 33 (Frame) = 165. 8 +-0. 2 (Tolerance) **E 47. 1 y 52 (Frame)= 165. 3 +- 0. 3 (Tolerance) FOUP ¨Since the variation of y 33 (Load Port Frame)and y 52 are found to be within +/0. 2 mm in most of the currently available LPs and FOUPs, it is profitable to require the tolerance of y 33 (FOUP Frame) to be much smaller in value to assure interoperability. ¨If we are to design the system with the nominal gap width to be 0. 5 +/-0. 5 mm, the tolerances in y 33 of the current standard should be halved in value. • Note: wafers ¨The system is required to be designed to FOUP Door **0=<Gap<1 **These dimensions are to be defined in TFs. leave a gap between the FOUP Frame and the Load Port Frame to avoid a collision between the two when the FOUP is docked (soft contact is OK). ¨The reasons are to prevent: • 1. wafer center location displacement from docked FDP. • 2. particle generation from rubbing between the FOUP Frame and the Load Port Frame. ¨The dimensions may be defined in a joint TF to resolve this systematic problem. SEMI Global PIC Maintenance TF, PI&C Committee April 8, 2010
FOUP-Load Port Interoperability Implementation Recommendations Revision 1. 06 33 Load Port: FOUP Door to Load Port Door Miss-Catch Prevention by E 62: y 33 , y 34 were deleted. LP • Related USRD: ¨ 1: E 62 -y 33 Variation for FOUP & Load Port • Requirement: ¨The Load Port should have a function to absorb variation in the FOUP Door surface position (facing the Load Port Door) due to the tolerance of the FOUP and the Load Port in order to prevent a miss-catch of the FOUP Door by the Load Port Door. • Related Standards: ¨In addition, NA SG proposes; • Generate a proposal for clearly defining the FOUP dimension range currently referenced from y 33. • Also include an Application Note about FIMS cushioning ability from USRD. • Application Note: ¨An angular variation compliance function may be needed. • Background: ¨Due to the following factors, the FOUP Door and the Load Port Door may cause a miss-catch; ¨E 62 -y 33 ¨E 47. 1 -y 33 (y 52) • Impact to Standards: ¨Remove y 33 in E 47. 1. ¨Propose an application note that clarifies the relation between y 52 in E 47. 1 and y 33 in E 62. ¨Create a consistent gap model in which relevant dimensions and operations such as door catching can be analyzed and explained. ¨In addition, JP-SG proposes • y 33 in E 62 has to be redefined as “compliance range” for rather than “tolerance”as is currently defined. • Generate a proposal of an application note regarding y 52 in E 47. 1. • Tilt of the FOUP Door • Distribution of y 52 along the FOUP Door surface • Tilt of the Load Port Door • Docking stroke repeatability • Approach: ¨The Load Port must absorb this mismatch because the FOUP has a bigger restriction on its tolerance improvement. ¨Relative errors such as system alignment error in E 62 should also be absorbed by the Load Port side which is more flexible to design. • Note: ¨This function may have influence on the FOUP Door holding repeatability of the Load Port. Careful design is required. SEMI Global PIC Maintenance TF, PI&C Committee April 8, 2010
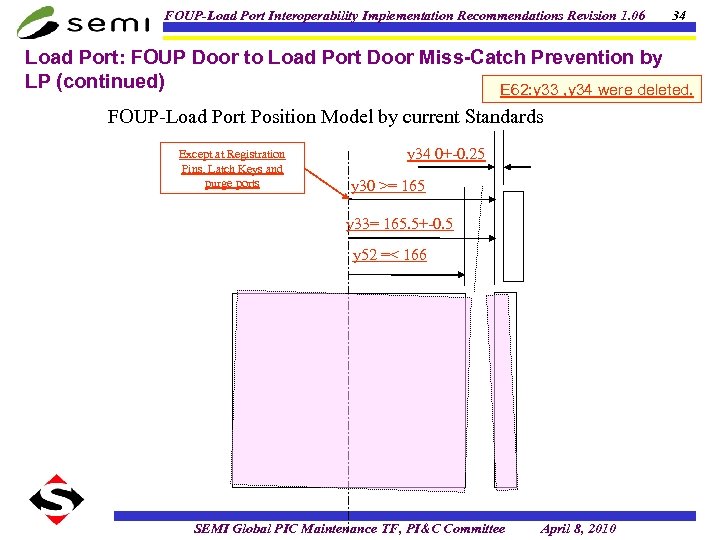
FOUP-Load Port Interoperability Implementation Recommendations Revision 1. 06 34 Load Port: FOUP Door to Load Port Door Miss-Catch Prevention by LP (continued) E 62: y 33 , y 34 were deleted. FOUP-Load Port Position Model by current Standards Except at Registration Pins, Latch Keys and purge ports y 34 0+-0. 25 y 30 >= 165 y 33= 165. 5+-0. 5 y 52 =< 166 SEMI Global PIC Maintenance TF, PI&C Committee April 8, 2010
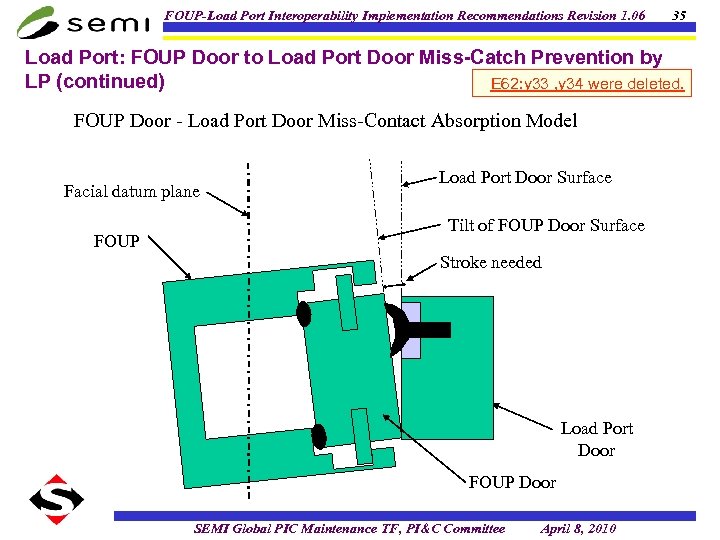
FOUP-Load Port Interoperability Implementation Recommendations Revision 1. 06 35 Load Port: FOUP Door to Load Port Door Miss-Catch Prevention by LP (continued) E 62: y 33 , y 34 were deleted. FOUP Door - Load Port Door Miss-Contact Absorption Model Facial datum plane FOUP Load Port Door Surface Tilt of FOUP Door Surface Stroke needed Load Port Door FOUP Door SEMI Global PIC Maintenance TF, PI&C Committee April 8, 2010
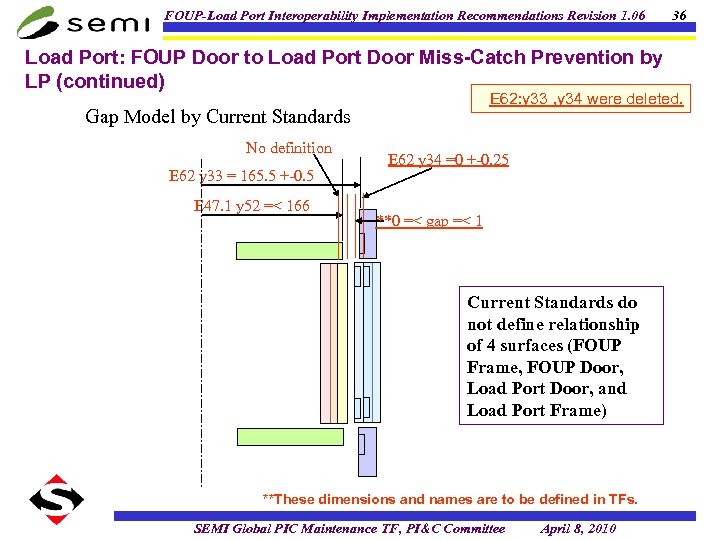
FOUP-Load Port Interoperability Implementation Recommendations Revision 1. 06 Load Port: FOUP Door to Load Port Door Miss-Catch Prevention by LP (continued) E 62: y 33 , y 34 were deleted. Gap Model by Current Standards No definition E 62 y 33 = 165. 5 +-0. 5 E 47. 1 y 52 =< 166 36 E 62 y 34 =0 +-0. 25 **0 =< gap =< 1 Current Standards do not define relationship of 4 surfaces (FOUP Frame, FOUP Door, Load Port Door, and Load Port Frame) **These dimensions and names are to be defined in TFs. SEMI Global PIC Maintenance TF, PI&C Committee April 8, 2010
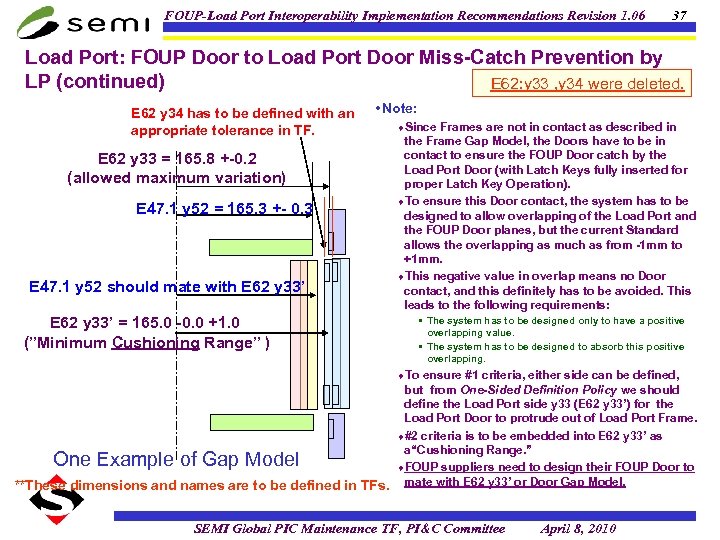
FOUP-Load Port Interoperability Implementation Recommendations Revision 1. 06 37 Load Port: FOUP Door to Load Port Door Miss-Catch Prevention by LP (continued) E 62: y 33 , y 34 were deleted. E 62 y 34 has to be defined with an appropriate tolerance in TF. E 62 y 33 = 165. 8 +-0. 2 (allowed maximum variation) E 47. 1 y 52 = 165. 3 +- 0. 3 E 47. 1 y 52 should mate with E 62 y 33’ = 165. 0 -0. 0 +1. 0 (”Minimum Cushioning Range” ) • Note: ¨Since Frames are not in contact as described in the Frame Gap Model, the Doors have to be in contact to ensure the FOUP Door catch by the Load Port Door (with Latch Keys fully inserted for proper Latch Key Operation). ¨To ensure this Door contact, the system has to be designed to allow overlapping of the Load Port and the FOUP Door planes, but the current Standard allows the overlapping as much as from -1 mm to +1 mm. ¨This negative value in overlap means no Door contact, and this definitely has to be avoided. This leads to the following requirements: • The system has to be designed only to have a positive overlapping value. • The system has to be designed to absorb this positive overlapping. ¨To ensure #1 criteria, either side can be defined, but from One-Sided Definition Policy we should define the Load Port side y 33 (E 62 y 33’) for the Load Port Door to protrude out of Load Port Frame. ¨#2 criteria is to be embedded into E 62 y 33’ as a“Cushioning Range. ” ¨FOUP suppliers need to design their FOUP Door to **These dimensions and names are to be defined in TFs. mate with E 62 y 33’ or Door Gap Model. One Example of Gap Model SEMI Global PIC Maintenance TF, PI&C Committee April 8, 2010
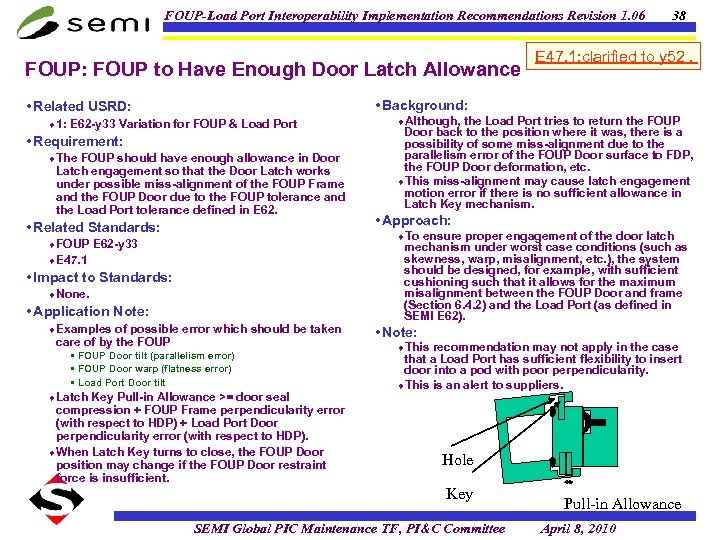
FOUP-Load Port Interoperability Implementation Recommendations Revision 1. 06 FOUP: FOUP to Have Enough Door Latch Allowance 38 E 47. 1: clarified to y 52 , • Background: • Related USRD: ¨ 1: E 62 -y 33 Variation for FOUP & Load Port • Requirement: ¨The FOUP should have enough allowance in Door Latch engagement so that the Door Latch works under possible miss-alignment of the FOUP Frame and the FOUP Door due to the FOUP tolerance and the Load Port tolerance defined in E 62. • Related Standards: ¨Although, the Load Port tries to return the FOUP Door back to the position where it was, there is a possibility of some miss-alignment due to the parallelism error of the FOUP Door surface to FDP, the FOUP Door deformation, etc. ¨This miss-alignment may cause latch engagement motion error if there is no sufficient allowance in Latch Key mechanism. • Approach: ¨To ensure proper engagement of the door latch ¨FOUP E 62 -y 33 ¨E 47. 1 • Impact to Standards: ¨None. • Application Note: ¨Examples of possible error which should be taken care of by the FOUP • FOUP Door tilt (parallelism error) • FOUP Door warp (flatness error) • Load Port Door tilt ¨Latch Key Pull-in Allowance >= door seal compression + FOUP Frame perpendicularity error (with respect to HDP) + Load Port Door perpendicularity error (with respect to HDP). ¨When Latch Key turns to close, the FOUP Door position may change if the FOUP Door restraint force is insufficient. mechanism under worst case conditions (such as skewness, warp, misalignment, etc. ), the system should be designed, for example, with sufficient cushioning such that it allows for the maximum misalignment between the FOUP Door and frame (Section 6. 4. 2) and the Load Port (as defined in SEMI E 62). • Note: ¨This recommendation may not apply in the case that a Load Port has sufficient flexibility to insert door into a pod with poor perpendicularity. ¨This is an alert to suppliers. Hole Key SEMI Global PIC Maintenance TF, PI&C Committee Pull-in Allowance April 8, 2010
FOUP-Load Port Interoperability Implementation Recommendations Revision 1. 06 Gap between FOUP and Load Port Frames 4. Gap between FOUP and Load Port Frames SEMI Global PIC Maintenance TF, PI&C Committee April 8, 2010 39
FOUP-Load Port Interoperability Implementation Recommendations Revision 1. 06 40 FOUP: FOUP Frame to Load Port Frame Gap/Contact • Related USRD: • Background: ¨ 4. Gap between FOUP and Load Port Frames • Requirement: ¨The FOUP Frame surface (y 52 plane) should be in a 1 mm thick volume. • Related Standards: ¨E 47. 1: y 52, y 33 ¨The FOUP Frame and the Load Port Frame better not contact. ¨If they contact, the Wafer Plane should be kept within appropriate accuracy under the deformation due to the contact force. No particle generation should result due to FOUP and Load Port Frame contact. • Approach: ¨E 62: y 33 • Impact to Standards: ¨Modification of E 47. 1: y 52 ¨NA SG believes that this issue is sufficiently covered by E 47. 1 6. 4. 2. • Application Note: • Note: ¨This is a reminder of reexamination of the gap. ¨This gap has to be analyzed for the clarity of 1 mm budget in addition to y 42. ¨See “Gap Model by Current Standards” and “An Example of Gap Model”. E 47. 1: Added to text SEMI Global PIC Maintenance TF, PI&C Committee April 8, 2010
FOUP-Load Port Interoperability Implementation Recommendations Revision 1. 06 41 FOUP: Inert Gas Application • Related USRD: • Application Note: ¨ 4. Gap between FOUP and Load Port Frames • Requirement: ¨The FOUP Frame (body) should be airtight in order to seal inert gas pressure. ¨The Load Port may use a contact seal in the Seal Zone. ¨The Load Port may have to clamp the FOUP Frame to get enough seal capability. • Related Standards: ¨E 62 -y 33, E 47. 1 -y 33 • Impact to Standards: ¨The Load Port should be carefully designed not to deform the FOUP nor change the wafer plane. • Background: ¨Inert gas purge of wafer transportation area may be required for heat process equipment to prevent any unexpected oxidization. ¨In order to reduce equipment footprint and cost, the FOUP should be a part of the environmental seal. • Approach: ¨Need standard modification of the FOUP to be compliant with Frame Clamp. ¨Need addition of clamping exclusion zones in E 47. 1, and an Application Note discussing airtightness and purging. It can be a concern that clamping may cause the FOUP and the FOUP Door positions to change. • Note: E 47. 1: Added to Front Clamping Feature Z 66, 67, 68, 69, x 62, y 61, SEMI Global PIC Maintenance TF, PI&C Committee April 8, 2010
FOUP-Load Port Interoperability Implementation Recommendations Revision 1. 06 Latch Key Operation USRD: 3. Repeatability of FOUP Door Position USRD: 6. Study Requirement SEMI Global PIC Maintenance TF, PI&C Committee April 8, 2010 42
FOUP-Load Port Interoperability Implementation Recommendations Revision 1. 06 43 E 62&47. 1: Added to Text & application note System: Latch Key and Latch Key Hole Alignment and Lead-in • Related USRD: ¨ 3. Repeatability of FOUP Door Position ¨ 6. Study Requirement • Requirement: ¨This alignment/lead-in method should absorb the FOUP tolerance and the Load Port tolerance defined in E 62. ¨Alignment: ¨Since the Load Port Door may be displaced as Latch Key engagement proceeds, the Load Port and FOUP Door positions will move after the FOUP Door is opened because of the stress release. Latch Key insertion is preferred to be done with a force that does not cause Load Port Door displacement. ¨Explanation is necessary for FOUPs to compensate for Load Port error in addition to FOUP error. • Latch Key Hole and Latch Key should mate themselves under the condition that the Latch Key Hole to Latch Key alignment is not done by Registration Pins. • Background: • Latch Key insertion should not be used to position the FOUP Door. ¨Since Registration Pins will not be used for ¨Rotation angle: • Latch Key rotation should be done properly within Latch Key rotation tolerance defined in E 62. • Latch Key Hole should hold the rotated angle after Latch Key retraction. • Related Standards: ¨E 47. 1 ¨E 62 -x 30, x 36, z 30, r 36 lead-in to position door, it is imperative to ensure Latch Keys enter Latch Key Holes. ¨Latch Key may hit Latch Key Hole in case the FOUP Latch Key Hole does not sufficiently return toward center due to a gap between the Latch Key and the Latch Key Hole. See figure. • Approach: ¨It is recommended to add an application note in • Note: • Impact to Standards: E 47. 1 and create a page which combines all relevant recommendations such as lead-in for Latch Keys Holes, etc. in the SEMI Guide. • Application Note: ¨FOUP suppliers should consider their FOUP tolerance in designing Latch Key Holes. ¨This recommendation does not intend to address the Latch Key lead-in function that realigns the FOUP Door in any way. Rather, it intends to allow reliable Latch Key insertion with FOUP Door position error in the FOUP Frame. SEMI Global PIC Maintenance TF, PI&C Committee April 8, 2010
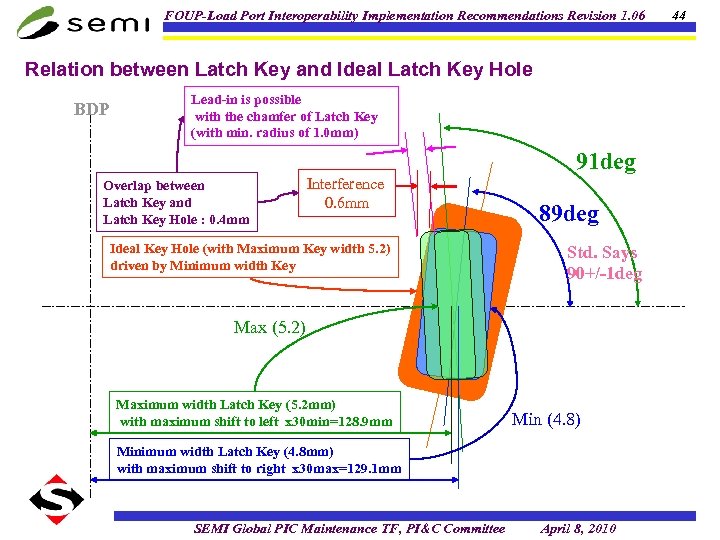
FOUP-Load Port Interoperability Implementation Recommendations Revision 1. 06 Relation between Latch Key and Ideal Latch Key Hole BDP Lead-in is possible with the chamfer of Latch Key (with min. radius of 1. 0 mm) 91 deg Overlap between Latch Key and Latch Key Hole : 0. 4 mm Interference 0. 6 mm Ideal Key Hole (with Maximum Key width 5. 2) driven by Minimum width Key 89 deg Std. Says 90+/-1 deg Max (5. 2) Maximum width Latch Key (5. 2 mm) with maximum shift to left x 30 min=128. 9 mm Min (4. 8) Minimum width Latch Key (4. 8 mm) with maximum shift to right x 30 max=129. 1 mm SEMI Global PIC Maintenance TF, PI&C Committee April 8, 2010 44
FOUP-Load Port Interoperability Implementation Recommendations Revision 1. 06 45 Load Port: Latch Key and Latch Key Hole Alignment and Lead-in • Related USRD: • Application Note: ¨ 3. Repeatability of FOUP Door Position ¨ 6. Study Requirement • Requirement: ¨Compliance with SEMI E 62 • Related Standards: ¨E 62 (r 41) ¨E 47. 1 ¨Since the Load Port Door may be displaced as the Latch Key engagement proceeds, the Load Port and FOUP Door positions will move after the FOUP Door is opened because of stress release. Latch Key insertion is preferred to be done with a force that does not cause Load Port Door displacement. • Background: • Impact to Standards: ¨Chamfer of Latch Key for lead-in is enough ¨None. ¨Common non-compliances and reinforcement messages may be collected as a section in some SEMI Guide document or the like. to absorb following error • Load Port tolerance • Approach: • Note: ¨Important Reminder E 62: Added to application note SEMI Global PIC Maintenance TF, PI&C Committee April 8, 2010
FOUP-Load Port Interoperability Implementation Recommendations Revision 1. 06 46 E 47. 1: Added to application note FOUP: Latch Key and Latch Key Hole Alignment and Lead-in • Application Note: • Related USRD: ¨ 3. Repeatability of FOUP Door Position ¨ 6. Study Requirement • Requirement: ¨The FOUP should have a lead-in mechanism on its Latch Key Holes. This lead-in mechanism should compensate for the FOUP’s Latch Key Hole location error and mate with E 62. (See previous page) ¨The FOUP is assumed to be able to hold the driven angle of Latch Key Hole by itself as it is driven to the close angle position after Latch Key is retracted. ¨It is recommended to add an application note in E 47. 1 and to create a page that combines all relevant recommendations such as lead-in for Latch Keys Holes, etc. in a SEMI Guide. • Related Standards: ¨E 62, (E 47. 1) • Impact to Standards: ¨None. ¨The lead-in mechanism should not require large lead-in force, so that docking motion is not disturbed. ¨Since the Load Port Door may be displaced as Latch Key engagement proceeds, the Load Port and FOUP Door positions will move after the FOUP Door is opened because of stress release. Latch Key insertion is preferred to be done with a force that does not cause Load Port Door displacement. • Background: ¨The Latch Key of the Load Port should be SEMI E 62 compliant. ¨The Load Port cannot use Registration Pins for lead-in. This function is intended to be used not for FOUP Door positioning to the Load Port upon Latch Key insertion but for Latch Key insertion under Latch Key Hole location error. • Approach: ¨The FOUP should have reasonable Latch Key lead-in based on its respective overall tolerances. • Note: ¨The following two slides discuss Latch Key chamfer and Latch Key Hole alignment. SEMI Global PIC Maintenance TF, PI&C Committee April 8, 2010
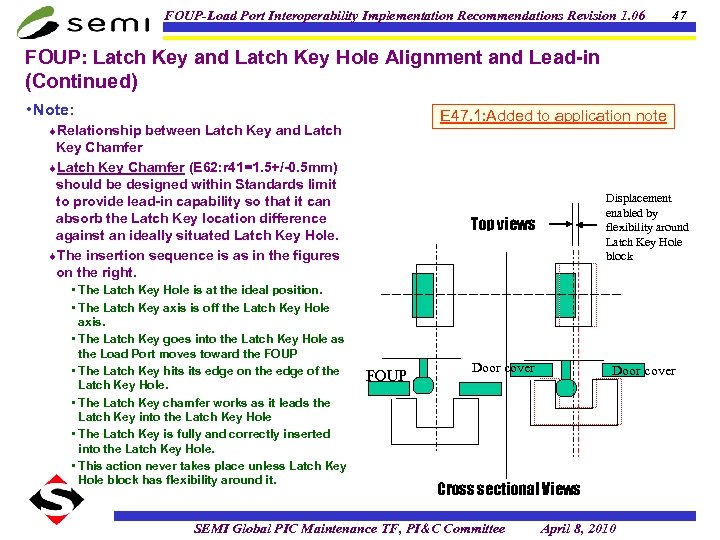
FOUP-Load Port Interoperability Implementation Recommendations Revision 1. 06 47 FOUP: Latch Key and Latch Key Hole Alignment and Lead-in (Continued) • Note: E 47. 1: Added to application note ¨Relationship between Latch Key and Latch Key Chamfer ¨Latch Key Chamfer (E 62: r 41=1. 5+/-0. 5 mm) should be designed within Standards limit to provide lead-in capability so that it can absorb the Latch Key location difference against an ideally situated Latch Key Hole. ¨The insertion sequence is as in the figures on the right. • The Latch Key Hole is at the ideal position. • The Latch Key axis is off the Latch Key Hole axis. • The Latch Key goes into the Latch Key Hole as the Load Port moves toward the FOUP • The Latch Key hits edge on the edge of the Latch Key Hole. • The Latch Key chamfer works as it leads the Latch Key into the Latch Key Hole • The Latch Key is fully and correctly inserted into the Latch Key Hole. • This action never takes place unless Latch Key Hole block has flexibility around it. Displacement enabled by flexibility around Latch Key Hole block Top views FOUP Door cover Cross sectional Views SEMI Global PIC Maintenance TF, PI&C Committee April 8, 2010
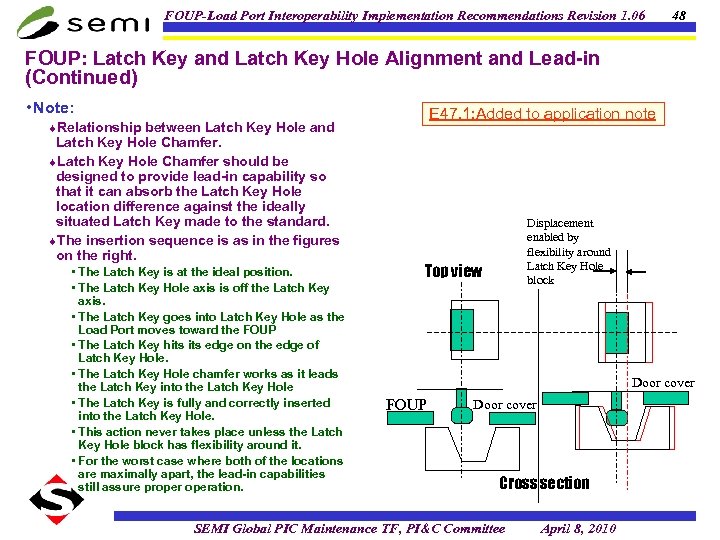
FOUP-Load Port Interoperability Implementation Recommendations Revision 1. 06 48 FOUP: Latch Key and Latch Key Hole Alignment and Lead-in (Continued) • Note: E 47. 1: Added to application note ¨Relationship between Latch Key Hole and Latch Key Hole Chamfer. ¨Latch Key Hole Chamfer should be designed to provide lead-in capability so that it can absorb the Latch Key Hole location difference against the ideally situated Latch Key made to the standard. ¨The insertion sequence is as in the figures on the right. • The Latch Key is at the ideal position. • The Latch Key Hole axis is off the Latch Key axis. • The Latch Key goes into Latch Key Hole as the Load Port moves toward the FOUP • The Latch Key hits edge on the edge of Latch Key Hole. • The Latch Key Hole chamfer works as it leads the Latch Key into the Latch Key Hole • The Latch Key is fully and correctly inserted into the Latch Key Hole. • This action never takes place unless the Latch Key Hole block has flexibility around it. • For the worst case where both of the locations are maximally apart, the lead-in capabilities still assure properation. Displacement enabled by flexibility around Latch Key Hole block Top view Door cover FOUP Door cover Cross section SEMI Global PIC Maintenance TF, PI&C Committee April 8, 2010
FOUP-Load Port Interoperability Implementation Recommendations Revision 1. 06 49 FOUP: Holding of Latch Key Hole Rotation Angle During Closed • Related USRD: • Background: ¨Study Requirement ¨Without an angle holding function, the • Requirement: ¨The FOUP should hold the rotation angle of the Latch Key Hole within a determined angle while the FOUP Door is closed. ¨This angle should be proposed by TF. • Related Standards: Latch Key Holes may rotate after Latch Key release. This may cause Latch Key to Latch Key Hole miss-alignment in the next docking sequence. • Approach: • Note: ¨E 62: Ψ (Phi) • Impact to Standards: ¨No conflict. ¨Add holding tolerance to E 47. 1. ¨It is recommended to add an application note in E 47. 1 and to create a page that combines all relevant recommendations relevant to Latch Keys or Latch Key Holes, etc. in a SEMI Guide. • Application Note: Not balloted yet SEMI Global PIC Maintenance TF, PI&C Committee April 8, 2010
FOUP-Load Port Interoperability Implementation Recommendations Revision 1. 06 50 FOUP: FOUP should Pull-in Latch Key Hole Angle into Origin from Nearly-Closed Position • Related USRD: • Background: ¨Study Requirement ¨Although the Load Port may drive the • Requirement: ¨The FOUP should actively return the Latch Key Hole to its original position from a nearly closed position • Related Standards: ¨E 62, f 30 • Impact to Standards: ¨No change, but potential addition. • E 62 and similar dimension for E 47. 1 • Application Note: ¨Use a hard Latch Key Hole stop in addition to a wider active pull-in allowance • The pull-in allowance angle > (Latch Key-to. Latch Key Hole clearance 0. 5 mm (r 36=6. 75 mm)) + Latch Key angular error 1 eg = 5. 2 deg. ¨The torque required to engage the hard Latch Key back to a center origin, the FOUP Latch Key Hole may have an angular offset due to excessive clearance, etc. which may cause a mismatch between this FOUP and the Latch Key of the next Load Port. ¨Refer to drawing on page 50 (FOUP: Need Latch Key Hole flexibility) • Approach: • Note: ¨An overdrive mechanism for the Latch Key on the Load Port side may be a solution. ¨In the FOUP cleaner case, Latch Key Hole angular position should be maintained. ¨The application of this recommendation may be complex, and therefore cleanability and dryability should be carefully considered. stop should not exceed E 62 -f 30. E 47. 1: Added to application note SEMI Global PIC Maintenance TF, PI&C Committee April 8, 2010
FOUP-Load Port Interoperability Implementation Recommendations Revision 1. 06 51 Load Port: Increase Lead-in Capability of Latch Key • Related USRD: • Background: ¨<Study requirement> Latch Key Operation • Requirement: ¨Apply steeper lead-in feature to Latch Key top. • Related Standards: ¨E 62 -y 36 Latch Key back to a center origin, the Latch Key Hole may have an angular offset due to excessive clearance, etc. which may cause a mismatch between this FOUP and the Latch Key of the next Load Port. • Approach: • Impact to Standards: ¨A steeper Latch Key shape may help lead- ¨E 62 Latch Key shape change • Application Note: ¨Although the Load Port may drive the in as well as centering. ¨An overdrive mechanism for the Latch Key on the Load Port side may be a solution, but it increases complexity and should be avoided if possible. • Note: ¨Optimization of the key shape is needed. Not balloted yet Adopt only in case other recommendations are not enough to solve the problem SEMI Global PIC Maintenance TF, PI&C Committee April 8, 2010
FOUP-Load Port Interoperability Implementation Recommendations Revision 1. 06 52 Load Port: Over drive function of Latch Key • Related USRD: • Background: ¨<Study requirement> Latch Key Operation • Requirement: ¨The Load Port should drive the Latch Key beyond 90 degrees, and then return the key to the original center position. • Related Standards: ¨E 62 -Y • Impact to Standards: ¨Although the Load Port may drive the Latch Key back to center origin, the Latch Key Hole may have an angular offset due to excessive clearance, etc. which may cause a mismatch between this FOUP and the Latch Key of the next Load Port. ¨It may be difficult to implement a hard stop mechanism in the FOUP Door. • Approach: ¨Add definition of overdrive angle. • Application Note: • Note: ¨Overdrive angle (radian) = Latch Key and Latch Key Hole clearance ¸ r 36 (E 62) Not balloted yet ¨It is difficult for equipment to implement this capability Adopt only in case other recommendations are not enough to solve the problem SEMI Global PIC Maintenance TF, PI&C Committee April 8, 2010
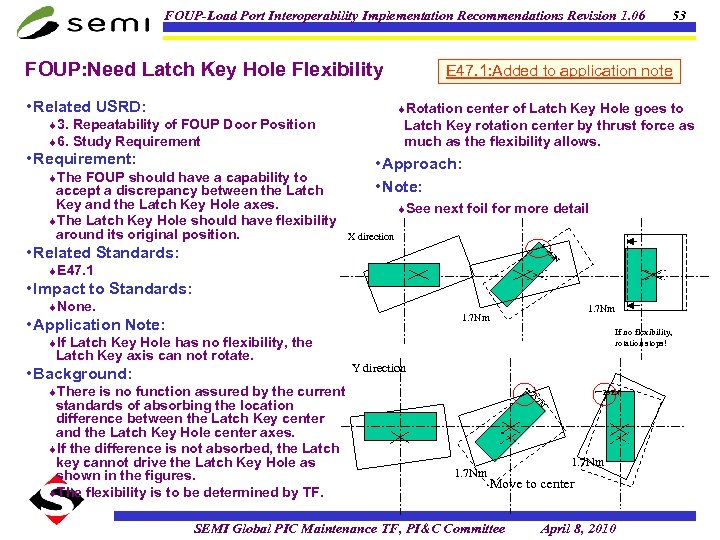
FOUP-Load Port Interoperability Implementation Recommendations Revision 1. 06 FOUP: Need Latch Key Hole Flexibility • Related USRD: 53 E 47. 1: Added to application note ¨Rotation center of Latch Key Hole goes to ¨ 3. Repeatability of FOUP Door Position ¨ 6. Study Requirement • Requirement: ¨The FOUP should have a capability to accept a discrepancy between the Latch Key and the Latch Key Hole axes. ¨The Latch Key Hole should have flexibility around its original position. Latch Key rotation center by thrust force as much as the flexibility allows. • Approach: • Note: ¨See next foil for more detail X direction 2 N 25 ← • Related Standards: ¨E 47. 1 • Impact to Standards: ¨None. 1. 7 Nm • Application Note: If no flexibility, rotation stops! ¨If Latch Key Hole has no flexibility, the Latch Key axis can not rotate. • Background: Y direction 2 N 25 standards of absorbing the location difference between the Latch Key center and the Latch Key Hole center axes. ¨If the difference is not absorbed, the Latch key cannot drive the Latch Key Hole as shown in the figures. ¨The flexibility is to be determined by TF. ← 252 N ← ¨There is no function assured by the current 1. 7 Nm Move to center SEMI Global PIC Maintenance TF, PI&C Committee April 8, 2010
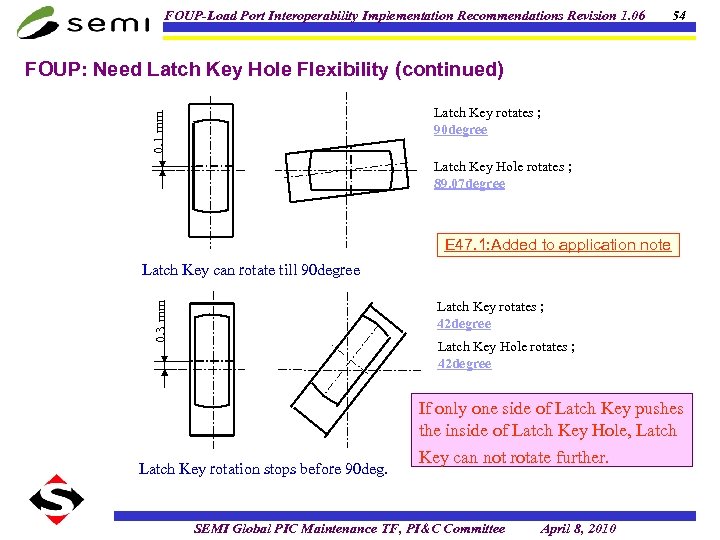
FOUP-Load Port Interoperability Implementation Recommendations Revision 1. 06 54 FOUP: Need Latch Key Hole Flexibility (continued) 0. 1 mm Latch Key rotates ; 90 degree Latch Key Hole rotates ; 89. 07 degree E 47. 1: Added to application note Latch Key can rotate till 90 degree 0. 3 mm Latch Key rotates ; 42 degree Latch Key Hole rotates ; 42 degree If only one side of Latch Key pushes the inside of Latch Key Hole, Latch Key rotation stops before 90 deg. Key can not rotate further. SEMI Global PIC Maintenance TF, PI&C Committee April 8, 2010
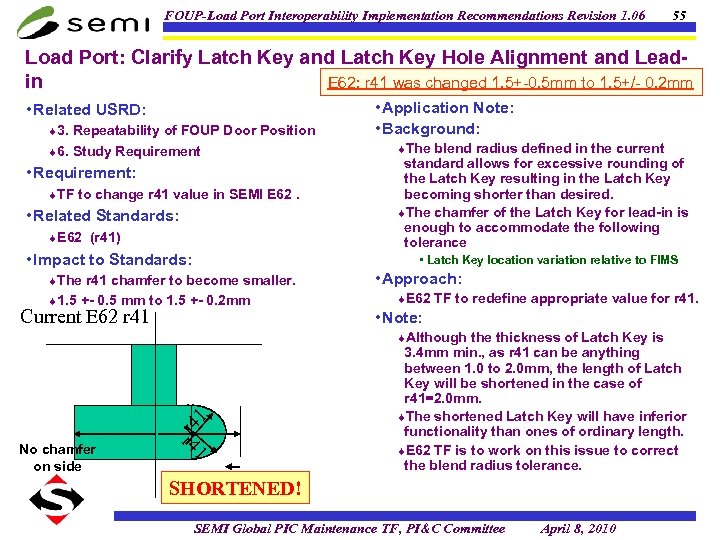
FOUP-Load Port Interoperability Implementation Recommendations Revision 1. 06 55 Load Port: Clarify Latch Key and Latch Key Hole Alignment and Lead. E 62: r 41 was changed 1. 5+-0. 5 mm to 1. 5+/- 0. 2 mm in • Related USRD: ¨ 3. Repeatability of FOUP Door Position • Application Note: • Background: ¨The blend radius defined in the current ¨ 6. Study Requirement • Requirement: ¨TF to change r 41 value in SEMI E 62. • Related Standards: ¨E 62 (r 41) • Impact to Standards: standard allows for excessive rounding of the Latch Key resulting in the Latch Key becoming shorter than desired. ¨The chamfer of the Latch Key for lead-in is enough to accommodate the following tolerance • Latch Key location variation relative to FIMS ¨The r 41 chamfer to become smaller. ¨ 1. 5 +- 0. 5 mm to 1. 5 +- 0. 2 mm Current E 62 r 41 • Approach: ¨E 62 TF to redefine appropriate value for r 41. • Note: ¨Although the thickness of Latch Key is 1 r 4 No chamfer on side 3. 4 mm min. , as r 41 can be anything between 1. 0 to 2. 0 mm, the length of Latch Key will be shortened in the case of r 41=2. 0 mm. ¨The shortened Latch Key will have inferior functionality than ones of ordinary length. ¨E 62 TF is to work on this issue to correct the blend radius tolerance. SHORTENED! SEMI Global PIC Maintenance TF, PI&C Committee April 8, 2010
FOUP-Load Port Interoperability Implementation Recommendations Revision 1. 06 Frame/Seal-Zone Clearance USRD: 2: FOUP and Load Port Door/Frame Size Relation SEMI Global PIC Maintenance TF, PI&C Committee April 8, 2010 56
FOUP-Load Port Interoperability Implementation Recommendations Revision 1. 06 57 FOUP: Clearance between FOUP Frame and FOUP Door • Related USRD: • Background: ¨ 2: FOUP and Load Port Door/Frame Size Relation • Requirement: ¨The outline of the FOUP Door should be smaller than the associated edge of the Seal Zones. ¨The outline of the FOUP Frame should be larger than the associated edge of the Seal Zones. • Related Standards: ¨There is no definition on seal zone overlap between the FOUP and the Load Port (at the FIMS interface). ¨The 1. 5 mm (minimum) clearance between the Frame Seal Zone and the Door Seal Zone is not sufficient (E 62). ¨A design that allows the largest possible gap between the FOUP Frame and the FOUP Door is preferred to avoid potential particle generation. • Approach: ¨E 62 ¨E 47. 1 • Note: • Impact to Standards: ¨It is recommended submitting a line item ¨See the following figures. ballot to E 62 to make the Load Port Door opening no smaller than the inner edge of the frame seal zone defined by x 34, z 34, and r 34. • Application Note: E 47. 1: Added to text at section 5. 6 SEMI Global PIC Maintenance TF, PI&C Committee April 8, 2010
FOUP-Load Port Interoperability Implementation Recommendations Revision 1. 06 58 Load Port: Clearance between Load Port Frame and FIMS Door • Background: • Related USRD: ¨ 2: FOUP and Load Port Door/Frame Size Relation • Requirement: ¨The outline of the Load Port Frame facing the FOUP Frame and the Load Port Door facing the FOUP Door should be equal to the respective associated Seal Zones. • Related Standards: ¨E 62: x 33, x 34, z 33, z 34 • Impact to Standards: ¨No conflict. (Currently no definition about the Load Port Door and frame) ¨Add outline dimensions of the Load Port Frame and the Load Port Door in E 62. • Application Note: ¨There is no definition on seal zone overlap between the FOUP and the Load Port (at the FIMS interface). Dimensions z 34, y 34, and r 34 define the INSIDE EDGE of the FRAME SEAL ZONE, but NOT the opening size. This is the most frequently heard misunderstanding, and this is missing from current Standards. ¨The 1. 5 mm (minimum) clearance between Frame Seal Zone and Door Seal Zone is not sufficient (E 62). ¨A design that allows the largest possible gap between the FOUP Frame and the FOUP Door is preferred to avoid potential particle generation. • Approach: • Note: ¨This recommendation is expecting “FOUP: E 62: Added to Text Clearance between FOUP Frame and FOUP Door” at the same time. ¨Need a clear gap model studied by TF. ¨See the following notes. SEMI Global PIC Maintenance TF, PI&C Committee April 8, 2010
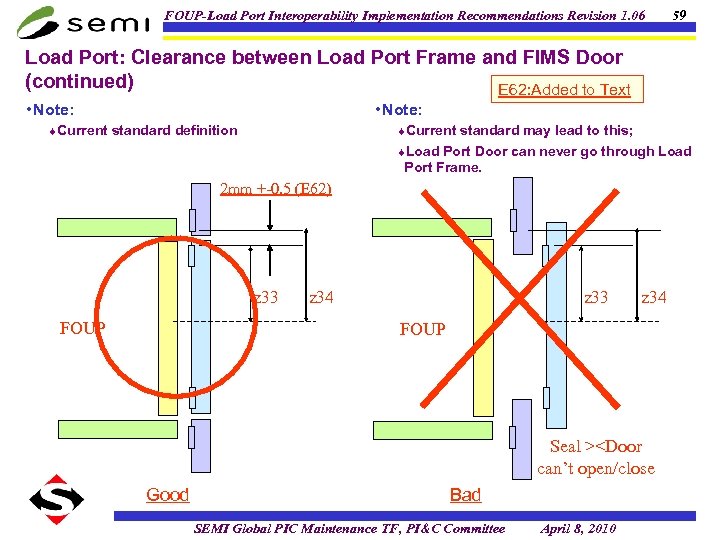
FOUP-Load Port Interoperability Implementation Recommendations Revision 1. 06 59 Load Port: Clearance between Load Port Frame and FIMS Door (continued) E 62: Added to Text • Note: ¨Current standard definition ¨Current standard may lead to this; ¨Load Port Door can never go through Load Port Frame. 2 mm +-0. 5 (E 62) z 33 FOUP z 34 z 33 z 34 FOUP Seal ><Door can’t open/close Good Bad SEMI Global PIC Maintenance TF, PI&C Committee April 8, 2010
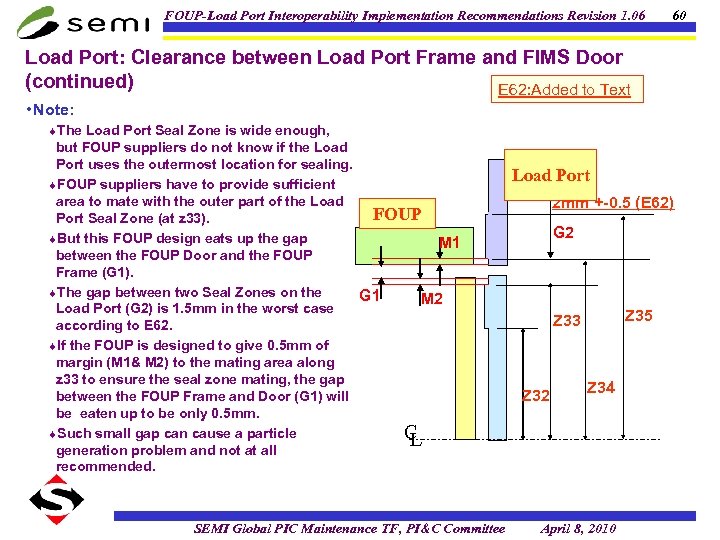
FOUP-Load Port Interoperability Implementation Recommendations Revision 1. 06 60 Load Port: Clearance between Load Port Frame and FIMS Door (continued) E 62: Added to Text • Note: ¨The Load Port Seal Zone is wide enough, but FOUP suppliers do not know if the Load Port uses the outermost location for sealing. ¨FOUP suppliers have to provide sufficient area to mate with the outer part of the Load FOUP Port Seal Zone (at z 33). ¨But this FOUP design eats up the gap M 1 between the FOUP Door and the FOUP Frame (G 1). ¨The gap between two Seal Zones on the G 1 M 2 Load Port (G 2) is 1. 5 mm in the worst case according to E 62. ¨If the FOUP is designed to give 0. 5 mm of margin (M 1& M 2) to the mating area along z 33 to ensure the seal zone mating, the gap between the FOUP Frame and Door (G 1) will be eaten up to be only 0. 5 mm. ¨Such small gap can cause a particle C L generation problem and not at all recommended. SEMI Global PIC Maintenance TF, PI&C Committee Load Port 2 mm +-0. 5 (E 62) G 2 Z 35 Z 33 Z 32 Z 34 April 8, 2010
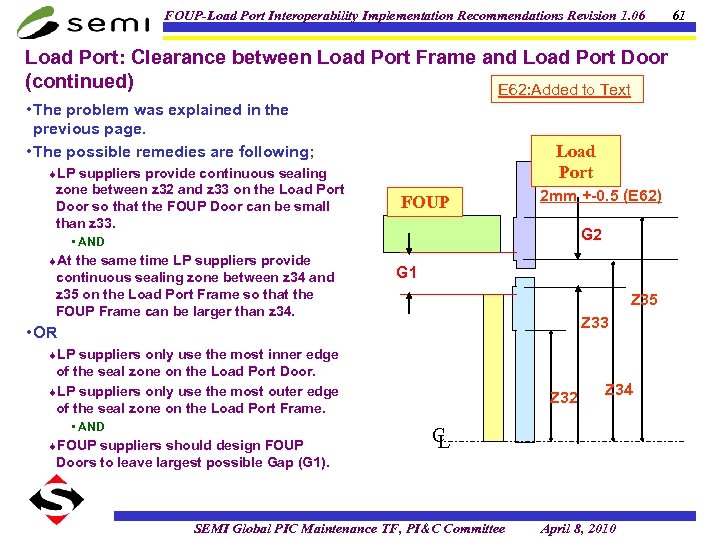
FOUP-Load Port Interoperability Implementation Recommendations Revision 1. 06 Load Port: Clearance between Load Port Frame and Load Port Door (continued) E 62: Added to Text • The problem was explained in the previous page. • The possible remedies are following; Load Port ¨LP suppliers provide continuous sealing zone between z 32 and z 33 on the Load Port Door so that the FOUP Door can be small than z 33. FOUP 2 mm +-0. 5 (E 62) G 2 • AND ¨At the same time LP suppliers provide continuous sealing zone between z 34 and z 35 on the Load Port Frame so that the FOUP Frame can be larger than z 34. G 1 Z 35 Z 33 • OR ¨LP suppliers only use the most inner edge of the seal zone on the Load Port Door. ¨LP suppliers only use the most outer edge of the seal zone on the Load Port Frame. • AND ¨FOUP suppliers should design FOUP Z 32 Z 34 C L Doors to leave largest possible Gap (G 1). SEMI Global PIC Maintenance TF, PI&C Committee April 8, 2010 61
FOUP-Load Port Interoperability Implementation Recommendations Revision 1. 06 Force SEMI Global PIC Maintenance TF, PI&C Committee April 8, 2010 62
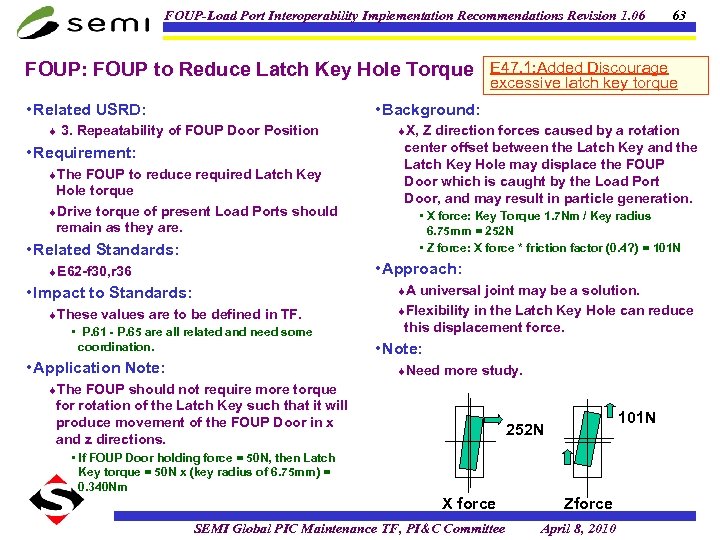
FOUP-Load Port Interoperability Implementation Recommendations Revision 1. 06 FOUP: FOUP to Reduce Latch Key Hole Torque • Related USRD: 63 E 47. 1: Added Discourage excessive latch key torque • Background: ¨ 3. Repeatability of FOUP Door Position • Requirement: ¨The FOUP to reduce required Latch Key Hole torque ¨Drive torque of present Load Ports should remain as they are. • Related Standards: ¨X, Z direction forces caused by a rotation center offset between the Latch Key and the Latch Key Hole may displace the FOUP Door which is caught by the Load Port Door, and may result in particle generation. • X force: Key Torque 1. 7 Nm / Key radius 6. 75 mm = 252 N • Z force: X force * friction factor (0. 4? ) = 101 N • Approach: ¨E 62 -f 30, r 36 ¨A universal joint may be a solution. • Impact to Standards: ¨These values are to be defined in TF. • P. 61 - P. 65 are all related and need some coordination. • Application Note: ¨Flexibility in the Latch Key Hole can reduce this displacement force. • Note: ¨Need more study. ¨The FOUP should not require more torque for rotation of the Latch Key such that it will produce movement of the FOUP Door in x and z directions. 101 N 252 N • If FOUP Door holding force = 50 N, then Latch Key torque = 50 N x (key radius of 6. 75 mm) = 0. 340 Nm X force SEMI Global PIC Maintenance TF, PI&C Committee Zforce April 8, 2010
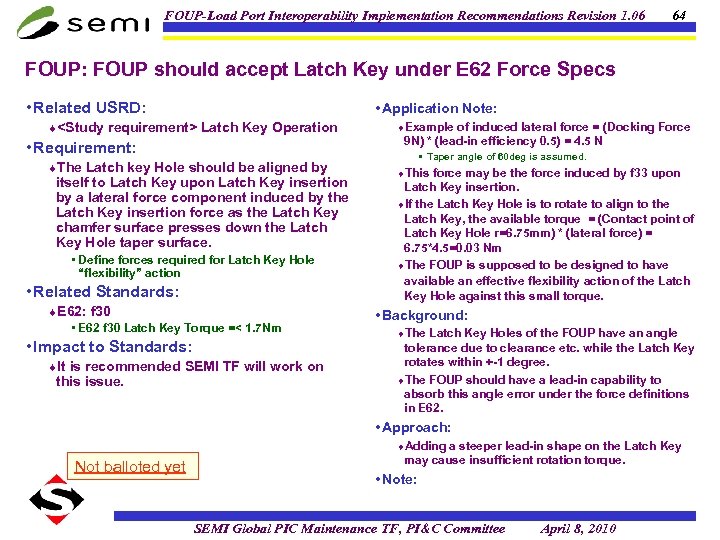
FOUP-Load Port Interoperability Implementation Recommendations Revision 1. 06 64 FOUP: FOUP should accept Latch Key under E 62 Force Specs • Related USRD: • Application Note: ¨<Study requirement> Latch Key Operation • Requirement: ¨The Latch key Hole should be aligned by itself to Latch Key upon Latch Key insertion by a lateral force component induced by the Latch Key insertion force as the Latch Key chamfer surface presses down the Latch Key Hole taper surface. • Define forces required for Latch Key Hole “flexibility” action • Related Standards: ¨E 62: f 30 • E 62 f 30 Latch Key Torque =< 1. 7 Nm • Impact to Standards: ¨It is recommended SEMI TF will work on this issue. ¨Example of induced lateral force = (Docking Force 9 N) * (lead-in efficiency 0. 5) = 4. 5 N • Taper angle of 60 deg is assumed. ¨This force may be the force induced by f 33 upon Latch Key insertion. ¨If the Latch Key Hole is to rotate to align to the Latch Key, the available torque = (Contact point of Latch Key Hole r=6. 75 mm) * (lateral force) = 6. 75*4. 5=0. 03 Nm ¨The FOUP is supposed to be designed to have available an effective flexibility action of the Latch Key Hole against this small torque. • Background: ¨The Latch Key Holes of the FOUP have an angle tolerance due to clearance etc. while the Latch Key rotates within +-1 degree. ¨The FOUP should have a lead-in capability to absorb this angle error under the force definitions in E 62. • Approach: ¨Adding a steeper lead-in shape on the Latch Key Not balloted yet may cause insufficient rotation torque. • Note: SEMI Global PIC Maintenance TF, PI&C Committee April 8, 2010
FOUP-Load Port Interoperability Implementation Recommendations Revision 1. 06 65 Load Port: Minimum Docking Force Definition • Related USRD: • Background: ¨ 3. Repeatability of FOUP Door Position • Requirement: ¨The Load Port should have sufficient ¨Friction due to Latch Key lead-in, FOUP Door centering force, etc. may impede docking force to enable insertion. • Approach: • Related Standards: ¨E 62 -f 33<9 N、f 34<9 N • Note: • Impact to Standards: ¨Add a definition of minimum docking force to E 62. ¨It is recommended that “FOUP: FOUP to Reduce Latch Key Hole Torque” to “Load Port: Dock Holding Force should be larger than Door Open/Close Force” are all related and can be addressed by clarification in the respective SEMI Standards. ¨Upper limits defined in E 62 f 33, f 34 may be too small. • Application Note: E 62: f 34 was changed to more than 9 N f 33 was deleted. SEMI Global PIC Maintenance TF, PI&C Committee April 8, 2010
FOUP-Load Port Interoperability Implementation Recommendations Revision 1. 06 66 Load Port: Minimum Door Closing Force Definition • Related USRD: • Background: ¨ 3. Repeatability of FOUP Door Position • Requirement: ¨The Load Port should close the FOUP Door with enough force to overcome resistance caused by use of elastomers, retainers, etc. in the FOUP. ¨It is recommended that “FOUP: FOUP to Reduce Latch Key Hole Torque” to “Load Port: Dock Holding Force should be larger than Door Open/Close Force” are all related and can be addressed by clarification in respective SEMI Standards. ¨If maximum vibration acceleration of 1 G is assumed during AMHS handling, each retainer for a wafer should be capable of providing 127 g*1 G force, and this ends up with 31 N for 25 wafers. The closing of the FOUP Door should overcome this force. • Approach: • Note: ¨More study needed. • Related Standards: ¨E 62 -f 33<9 N、f 34<9 N • Impact to Standards: ¨These dimensions are to be defined in TFs. • Application Note: E 62: f 34 was changed to more than 9 N f 33 was deleted. SEMI Global PIC Maintenance TF, PI&C Committee April 8, 2010
FOUP-Load Port Interoperability Implementation Recommendations Revision 1. 06 67 Load Port: Dock Holding Force should be larger than Door Open/Close Force • Related USRD: • Background: ¨ 3. Repeatability of FOUP Door Position • Requirement: ¨Docking force (E 62 f 33) should be larger than Door closing force (E 62 f 34) ¨Docking motion may be pushed back by wafer retainer force during FOUP Door closing. • Approach: • E 62 f 34 < E 62 f 33 • Related Standards: • Note ¨E 62: f 33<9 N, f 34<9 N ¨f 34 tends to be larger. • Impact to Standards: ¨Upper limits defined in E 62 f 33, f 34 may be ¨No contradiction to current SEMI too small. Standards. ¨Better to add f 34 < f 33 in E 62 ¨P. 61 - P. 65 are all related and can be addressed by clarification in respective SEMI Standards. • Application Note: E 62: f 34 was changed to more than 9 N. f 33 was deleted. SEMI Global PIC Maintenance TF, PI&C Committee April 8, 2010
FOUP-Load Port Interoperability Implementation Recommendations Revision 1. 06 FOUP: KC Creeping prevention by f 33, f 34 68 Not balloted yet ¨The FOUP can displace as KC-pins move • Related USRD: ¨ 3. Repeatability of FOUP Door Position • Requirement: ¨The FOUP should hold its position against lateral force f 33 or f 34 so as not to allow the FOUP to creep up along the V-groove surface. • Related Standards: ¨E 57、E 47. 1 • Impact to Standards: ¨No contradiction. • Application Note: ¨Reminder: f 60 should comply with the standard (175 N). along the surface of the V-groove wall. The rear KC-pin can move along the direction of its V- groove freely. Furthermore, as the FOUP moves upward, the lower edge of the FOUP Door can collide with the bottom inside of the FOUP Frame. ¨In the FOUP Door opening sequence, when the FOUP Door is opened, suddenly the retainers will push back wafers in the FOUP and cause FOUP displacement from its docked position. ¨This FOUP displacement will push up the FOUP Frame, and induce a lower edge collision of the FOUP Door with the bottom inside of the FOUP Frame. • Approach: ¨Clamping may prevent the FOUP from • Background: ¨As the FOUP Door enters the FOUP Frame, the FOUP Door retainers first come in contact with the wafers in the FOUP. The retainers will be pushed back by wafers, or in other words, the FOUP will escape from docking position as the FOUP Door is closed. creeping. ¨Changing the direction of the V-grooves may be an answer. ¨Combination of grooves as described in E 57 appendix Figure 5 may be an answer. ¨This will require more discussion. • Note: ¨See figures in the following page. SEMI Global PIC Maintenance TF, PI&C Committee April 8, 2010
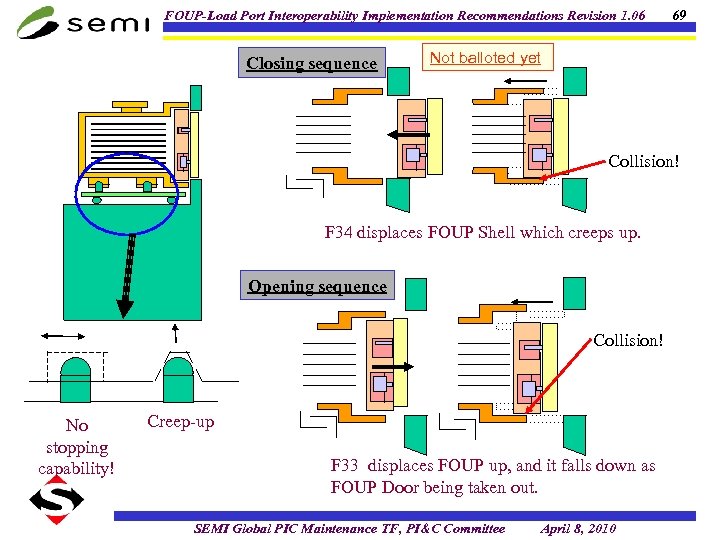
FOUP-Load Port Interoperability Implementation Recommendations Revision 1. 06 Closing sequence 69 Not balloted yet Collision! F 34 displaces FOUP Shell which creeps up. Opening sequence Collision! No stopping capability! Creep-up F 33 displaces FOUP up, and it falls down as FOUP Door being taken out. SEMI Global PIC Maintenance TF, PI&C Committee April 8, 2010
FOUP-Load Port Interoperability Implementation Recommendations Revision 1. 06 Wafer Center SEMI Global PIC Maintenance TF, PI&C Committee April 8, 2010 70
FOUP-Load Port Interoperability Implementation Recommendations Revision 1. 06 71 FOUP: Wafer center should not be retained in front of FDP • Related USRD: • Background: ¨ 5. Accuracy of Wafer Location ¨r 1≤ 151 is defined wafer pick-up volume and distance between FDP and the rear support. • Requirement: ¨Wafer center position should not exceed FDP towards front door side of FOUP when FOUP retains wafers. • Related Standards: • Wafer pick-up volume needs minimum wafer size of 150 mm • r 1 is from minimum 150 to 151 and below 150 is impossible. ¨Robot calibration is usually done with actual FOUP. ¨E 1. 9, E 47. 1 • Impact to Standards: ¨None • Application Note: ¨Measurement Method: Refer to Wafer Center Location, FOUP Measurement Methods in Auxiliary Information: FOUPLoad port Interoperability Implementation Recommendations • Wafer edge may hit FOUP at its placement if; robot is adjusted with a FOUP that is designed to retain wafer closer to rear of FOUP, and wafer is placed into a FOUP that is designed to retain wafer closer to front • Approach: ¨FOUP should be designed to retain wafer at a position so that the wafer center do not exceed FDP towards front of FOUP. ¨FOUP door close action pushes the wafer to the retained position of the FOUP by sliding it on the wafer support, if the wafer is placed forward of FDP. SEMI Global PIC Maintenance TF, PI&C Committee April 8, 2010
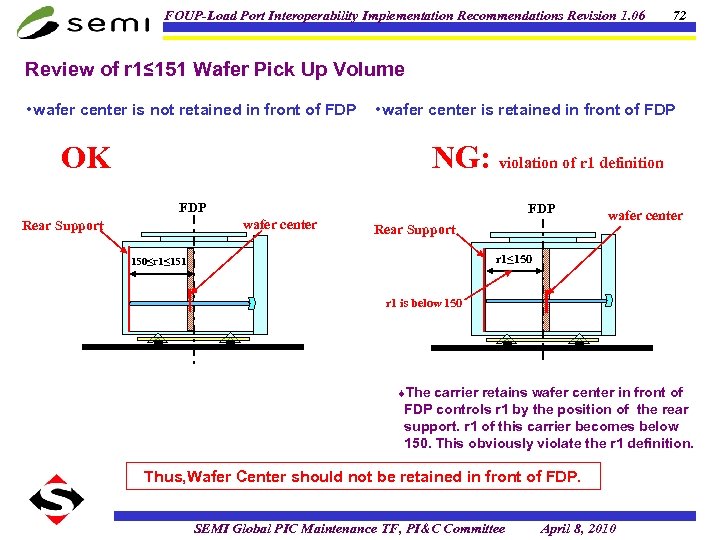
FOUP-Load Port Interoperability Implementation Recommendations Revision 1. 06 72 Review of r 1≤ 151 Wafer Pick Up Volume • wafer center is not retained in front of FDP OK • wafer center is retained in front of FDP NG: violation of r 1 definition FDP wafer center Rear Support wafer center r 1≤ 150≤r 1≤ 151 r 1 is below 150 ¨The carrier retains wafer center in front of FDP controls r 1 by the position of the rear support. r 1 of this carrier becomes below 150. This obviously violate the r 1 definition. Thus, Wafer Center should not be retained in front of FDP. SEMI Global PIC Maintenance TF, PI&C Committee April 8, 2010
FOUP-Load Port Interoperability Implementation Recommendations Revision 1. 06 Robot: Wafer center should be set down in front of FDP • Background: • Related USRD: ¨ 5. Accuracy of Wafer Location • Requirement: ¨Wafer center position should not exceed FDP towards rear of FOUP when robot places wafer to FOUP. • Related Standards: ¨E 1. 9, E 47. 1 • Impact to Standards: ¨None. • Application Note: ¨None. ¨r 1≤ 151 is defined wafer pick-up volume and distance between FDP and the rear support. • Wafer pick-up volume needs minimum wafer size of 150 mm • r 1 is from minimum 150 to 151 and below 150 is impossible. ¨Robot calibration is usually done with actual FOUP. • Wafer edge may hit FOUP at its placement if; robot is adjusted with a FOUP that is designed to retain wafer closer to rear of FOUP, and wafer is placed into a FOUP that is designed to retain wafer closer to front • Approach: ¨Robot should be calibrated to place wafer at a position so that the wafer center do not exceed FDP towards rear of FOUP. • Use of calibration tool is recommended instead of calibrating with actual FOUP. • Note: ¨Particle generation caused by wafer sliding on wafer support is less than that of wafer edge hitting FOUP at its placement. SEMI Global PIC Maintenance TF, PI&C Committee April 8, 2010 73
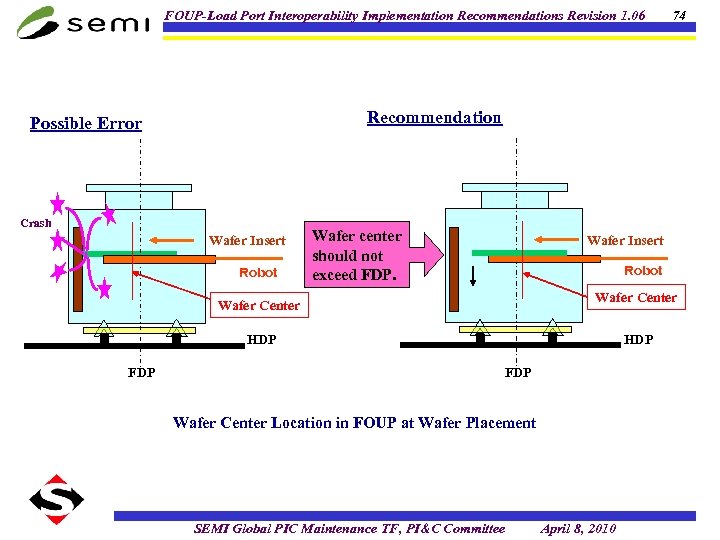
FOUP-Load Port Interoperability Implementation Recommendations Revision 1. 06 Recommendation Possible Error Crash Wafer Insert Robot Wafer center should not exceed FDP. Wafer Insert Robot Wafer Center HDP FDP 74 FDP Wafer Center Location in FOUP at Wafer Placement SEMI Global PIC Maintenance TF, PI&C Committee April 8, 2010
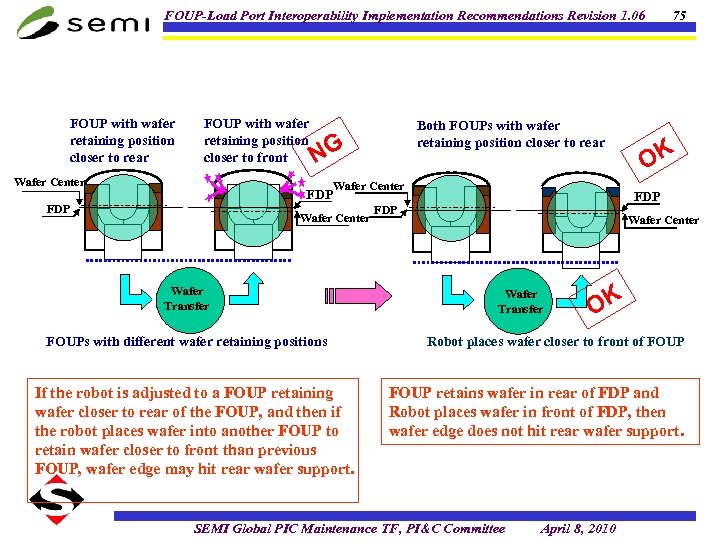
FOUP-Load Port Interoperability Implementation Recommendations Revision 1. 06 FOUP with wafer retaining position closer to rear FOUP with wafer retaining position closer to front Wafer Center NG FDP Both FOUPs with wafer retaining position closer to rear Wafer Center Wafer Transfer FOUPs with different wafer retaining positions If the robot is adjusted to a FOUP retaining wafer closer to rear of the FOUP, and then if the robot places wafer into another FOUP to retain wafer closer to front than previous FOUP, wafer edge may hit rear wafer support. 75 OK FDP Wafer Center Wafer Transfer OK Robot places wafer closer to front of FOUP retains wafer in rear of FDP and Robot places wafer in front of FDP, then wafer edge does not hit rear wafer support. SEMI Global PIC Maintenance TF, PI&C Committee April 8, 2010
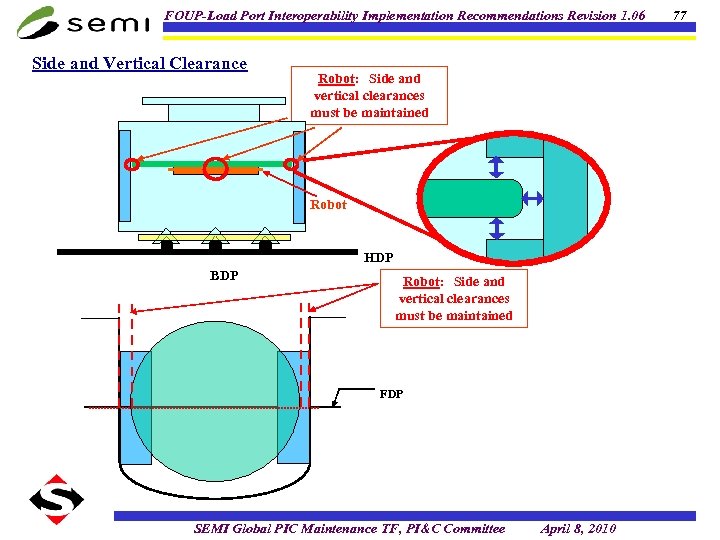
FOUP-Load Port Interoperability Implementation Recommendations Revision 1. 06 76 Robot: Side and Vertical FOUP Clearances Must Be Maintained Upon Wafer Insertion • Related USRD: • Background: ¨ None ¨ Wafer may hit FOUP at its placement if; • Requirement: ¨ To avoid wafer and FOUP collision, side and vertical FOUP clearances must be maintained upon wafer insertion • Related Standards: ¨ E 1. 9, E 47. 1 • Impact to Standards: ¨ No change. • robot is aligned to insert a wafer at an angle from the BDP • Approach: ¨ Robot should be calibrated to place wafer at a position so that the side and vertical clearances provided by the FOUP are maintained. • Use of calibration tool is recommended instead of calibrating with actual FOUP. • Application Note: ¨ None. SEMI Global PIC Maintenance TF, PI&C Committee April 8, 2010
FOUP-Load Port Interoperability Implementation Recommendations Revision 1. 06 Side and Vertical Clearance Robot: Side and vertical clearances must be maintained Robot HDP BDP Robot: Side and vertical clearances must be maintained FDP SEMI Global PIC Maintenance TF, PI&C Committee April 8, 2010 77
FOUP-Load Port Interoperability Implementation Recommendations Revision 1. 06 Datum Planes SEMI Global PIC Maintenance TF, PI&C Committee April 8, 2010 78
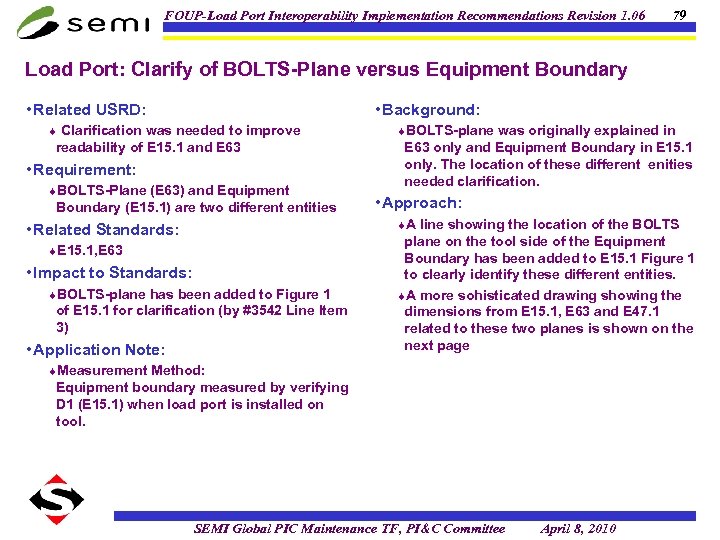
FOUP-Load Port Interoperability Implementation Recommendations Revision 1. 06 79 Load Port: Clarify of BOLTS-Plane versus Equipment Boundary • Related USRD: • Background: ¨ Clarification was needed to improve readability of E 15. 1 and E 63 • Requirement: ¨BOLTS-Plane (E 63) and Equipment Boundary (E 15. 1) are two different entities ¨BOLTS-plane was originally explained in E 63 only and Equipment Boundary in E 15. 1 only. The location of these different enities needed clarification. • Approach: ¨A line showing the location of the BOLTS • Related Standards: ¨E 15. 1, E 63 • Impact to Standards: ¨BOLTS-plane has been added to Figure 1 of E 15. 1 for clarification (by #3542 Line Item 3) • Application Note: plane on the tool side of the Equipment Boundary has been added to E 15. 1 Figure 1 to clearly identify these different entities. ¨A more sohisticated drawing showing the dimensions from E 15. 1, E 63 and E 47. 1 related to these two planes is shown on the next page ¨Measurement Method: Equipment boundary measured by verifying D 1 (E 15. 1) when load port is installed on tool. SEMI Global PIC Maintenance TF, PI&C Committee April 8, 2010
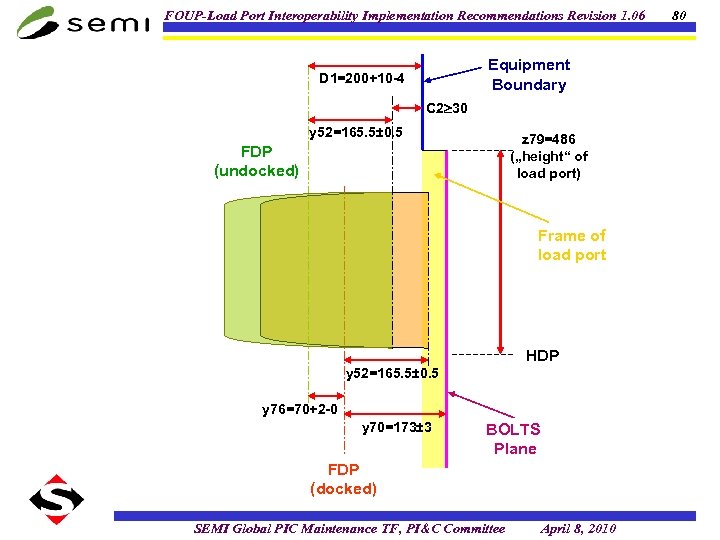
FOUP-Load Port Interoperability Implementation Recommendations Revision 1. 06 Equipment Boundary D 1=200+10 -4 C 2 30 y 52=165. 5± 0. 5 z 79=486 („height“ of load port) FDP (undocked) Frame of load port HDP y 52=165. 5± 0. 5 y 76=70+2 -0 y 70=173± 3 BOLTS Plane FDP (docked) SEMI Global PIC Maintenance TF, PI&C Committee April 8, 2010 80
FOUP-Load Port Interoperability Implementation Recommendations Revision 1. 06 Kinematic Coupling Functionality SEMI Global PIC Maintenance TF, PI&C Committee April 8, 2010 81
FOUP-Load Port Interoperability Implementation Recommendations Revision 1. 06 82 Load Port: Interference Between Load Port Features and Kinematic Coupling Lead-in Grooves at the time of FOUP Delivery • Related USRD: • Background: ¨ None ¨ Features that extend above the imaginary • Requirement: ¨ To avoid interference between FOUP and LP features except KC-pins, lead-in function should be considered. • Related Standards: ¨ E 15. 1, E 47. 1, E 57 • Impact to Standards: ¨ No change • Application Note: ¨ None. plane created by the three kinematic pins have been found to compromise the function of the 10 mm lead-in provided by the kinematic coupling. • Critical area – the FOUP clamping mechanism must not collide with the bottom of the FOUP • Approach: ¨ Ensure that no equipment features compromise the lead-in function provided by the kinematic coupling mechanisms. • Note: ¨ The following page presents the interference issue described herein. SEMI Global PIC Maintenance TF, PI&C Committee April 8, 2010
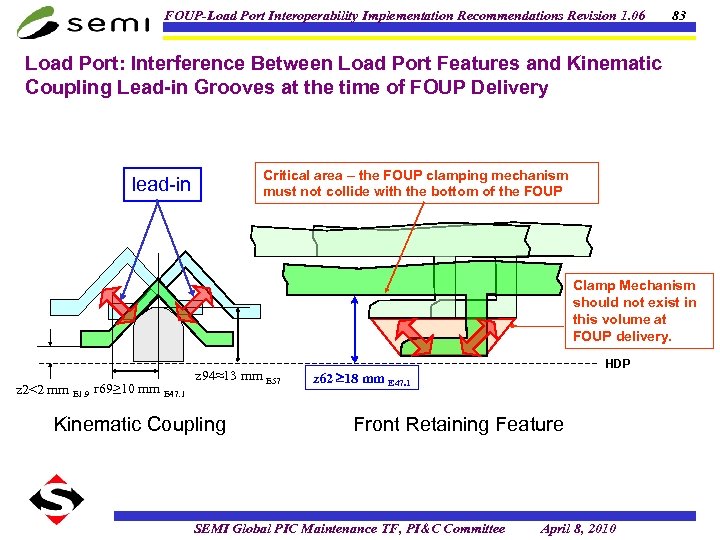
FOUP-Load Port Interoperability Implementation Recommendations Revision 1. 06 83 Load Port: Interference Between Load Port Features and Kinematic Coupling Lead-in Grooves at the time of FOUP Delivery Critical area – the FOUP clamping mechanism must not collide with the bottom of the FOUP lead-in Clamp Mechanism should not exist in this volume at FOUP delivery. z 2<2 mm E 1. 9 r 69≥ 10 mm E 47. 1 z 94≈13 mm E 57 Kinematic Coupling HDP z 62 18 mm E 47. 1 Front Retaining Feature SEMI Global PIC Maintenance TF, PI&C Committee April 8, 2010
FOUP-Load Port Interoperability Implementation Recommendations Revision 1. 06 84 New Page FOUP door drop prevention SEMI Global PIC Maintenance TF, PI&C Committee April 8, 2010
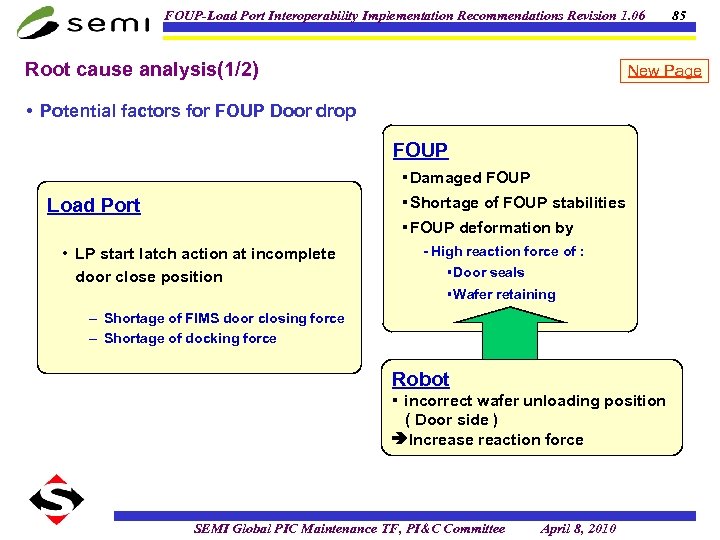
FOUP-Load Port Interoperability Implementation Recommendations Revision 1. 06 Root cause analysis(1/2) New Page • Potential factors for FOUP Door drop FOUP ・Damaged FOUP Load Port ・Shortage of FOUP stabilities ・FOUP deformation by • LP start latch action at incomplete door close position 85 - High reaction force of : ・Door seals ・Wafer retaining – Shortage of FIMS door closing force – Shortage of docking force Robot ・ incorrect wafer unloading position ( Door side ) Increase reaction force SEMI Global PIC Maintenance TF, PI&C Committee April 8, 2010
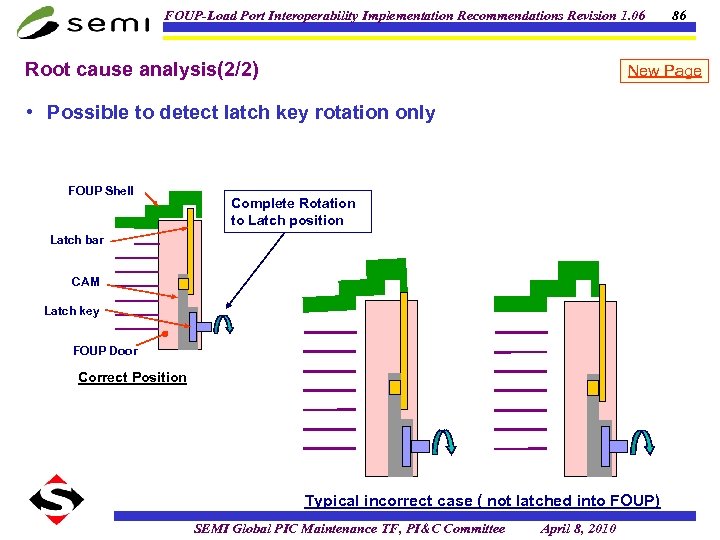
FOUP-Load Port Interoperability Implementation Recommendations Revision 1. 06 Root cause analysis(2/2) New Page • Possible to detect latch key rotation only FOUP Shell 86 Complete Rotation to Latch position Latch bar CAM Latch key FOUP Door Correct Position Typical incorrect case ( not latched into FOUP) SEMI Global PIC Maintenance TF, PI&C Committee April 8, 2010
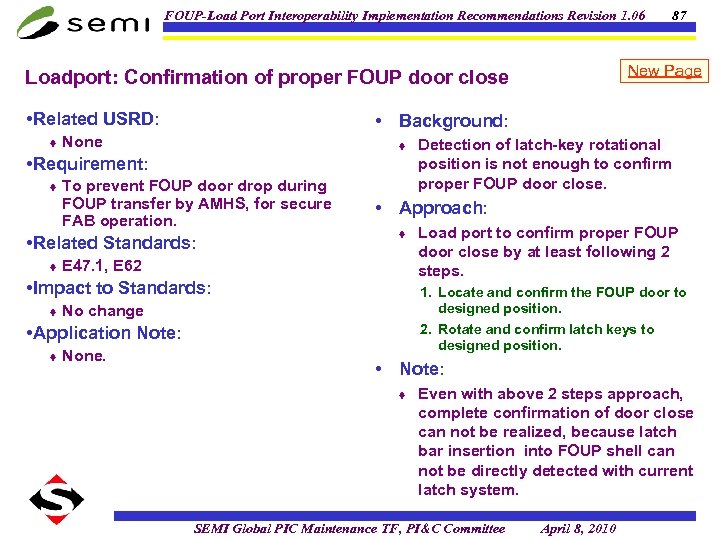
FOUP-Load Port Interoperability Implementation Recommendations Revision 1. 06 New Page Loadport: Confirmation of proper FOUP door close • Related USRD: ¨ • Background: None ¨ • Requirement: ¨ To prevent FOUP door drop during FOUP transfer by AMHS, for secure FAB operation. • Related Standards: ¨ ¨ E 47. 1, E 62 No change None. Load port to confirm proper FOUP door close by at least following 2 steps. 1. Locate and confirm the FOUP door to designed position. 2. Rotate and confirm latch keys to designed position. • Application Note: ¨ Detection of latch-key rotational position is not enough to confirm proper FOUP door close. • Approach: • Impact to Standards: ¨ 87 • Note: ¨ Even with above 2 steps approach, complete confirmation of door close can not be realized, because latch bar insertion into FOUP shell can not be directly detected with current latch system. SEMI Global PIC Maintenance TF, PI&C Committee April 8, 2010
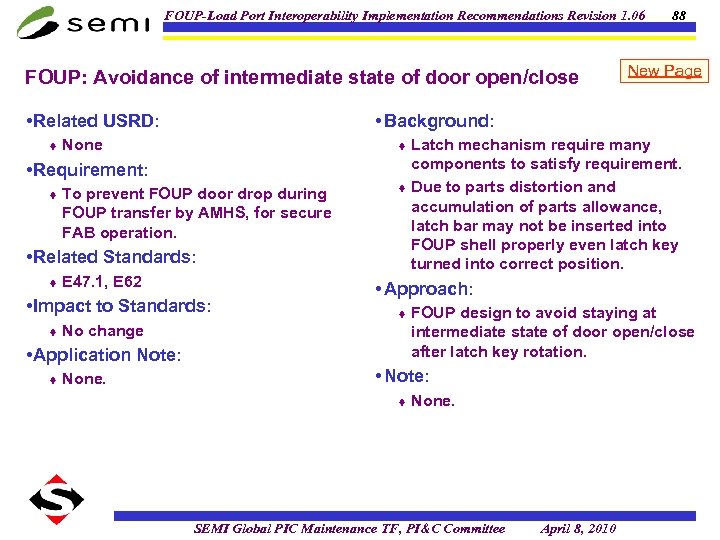
FOUP-Load Port Interoperability Implementation Recommendations Revision 1. 06 FOUP: Avoidance of intermediate state of door open/close • Related USRD: ¨ None To prevent FOUP door drop during FOUP transfer by AMHS, for secure FAB operation. E 47. 1, E 62 • Impact to Standards: ¨ No change Latch mechanism require many components to satisfy requirement. ¨ Due to parts distortion and accumulation of parts allowance, latch bar may not be inserted into FOUP shell properly even latch key turned into correct position. ¨ • Related Standards: ¨ • Approach: ¨ • Application Note: ¨ None. New Page • Background: • Requirement: ¨ 88 FOUP design to avoid staying at intermediate state of door open/close after latch key rotation. • Note: ¨ None. SEMI Global PIC Maintenance TF, PI&C Committee April 8, 2010
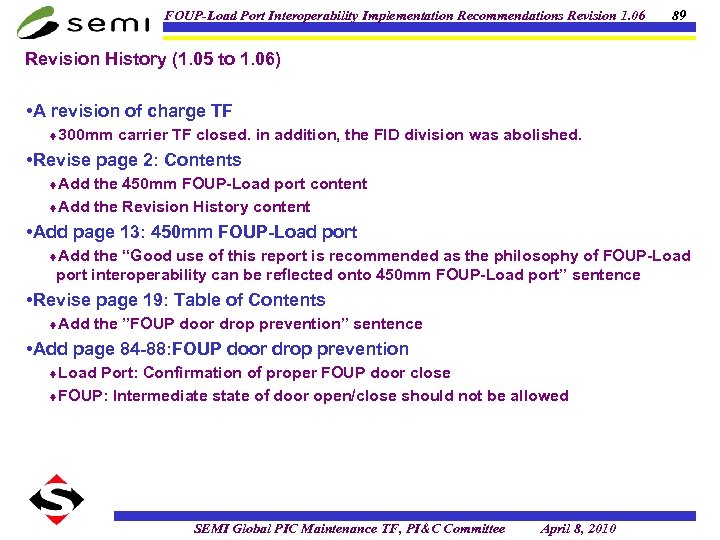
FOUP-Load Port Interoperability Implementation Recommendations Revision 1. 06 89 Revision History (1. 05 to 1. 06) • A revision of charge TF ¨ 300 mm carrier TF closed. in addition, the FID division was abolished. • Revise page 2: Contents ¨Add the 450 mm FOUP-Load port content ¨Add the Revision History content • Add page 13: 450 mm FOUP-Load port ¨Add the “Good use of this report is recommended as the philosophy of FOUP-Load port interoperability can be reflected onto 450 mm FOUP-Load port” sentence • Revise page 19: Table of Contents ¨Add the ”FOUP door drop prevention” sentence • Add page 84 -88: FOUP door drop prevention ¨Load Port: Confirmation of proper FOUP door close ¨FOUP: Intermediate state of door open/close should not be allowed SEMI Global PIC Maintenance TF, PI&C Committee April 8, 2010
FOUP-Load Port Interoperability Implementation Recommendations Revision 1. 06 Volume 2 Measurement Methods SEMI Global PIC Maintenance TF, PI&C Committee April 8, 2010 90
FOUP-Load Port Interoperability Implementation Recommendations Revision 1. 06 Contents • Purpose • Measurement Methods Development Process • Position of Documents • Format Description for Measurement Methods • Load Port Measurement Methods • FOUP Measurement Methods SEMI Global PIC Maintenance TF, PI&C Committee April 8, 2010 91
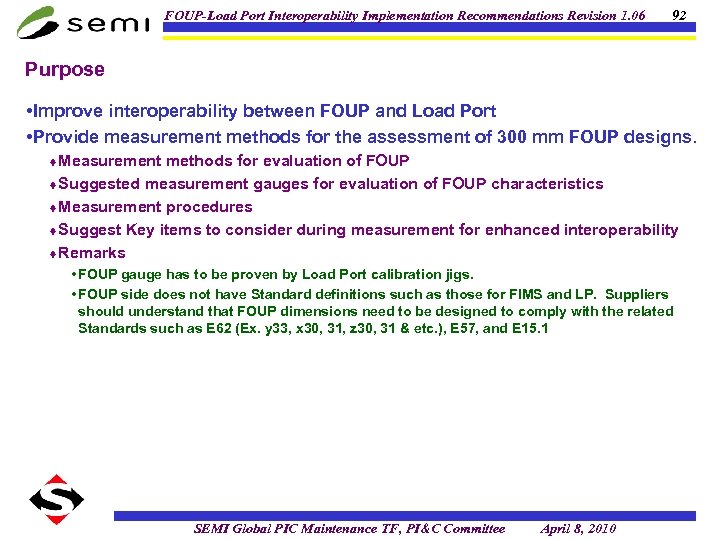
FOUP-Load Port Interoperability Implementation Recommendations Revision 1. 06 92 Purpose • Improve interoperability between FOUP and Load Port • Provide measurement methods for the assessment of 300 mm FOUP designs. ¨Measurement methods for evaluation of FOUP ¨Suggested measurement gauges for evaluation of FOUP characteristics ¨Measurement procedures ¨Suggest Key items to consider during measurement for enhanced interoperability ¨Remarks • FOUP gauge has to be proven by Load Port calibration jigs. • FOUP side does not have Standard definitions such as those for FIMS and LP. Suppliers should understand that FOUP dimensions need to be designed to comply with the related Standards such as E 62 (Ex. y 33, x 30, 31, z 30, 31 & etc. ), E 57, and E 15. 1 SEMI Global PIC Maintenance TF, PI&C Committee April 8, 2010
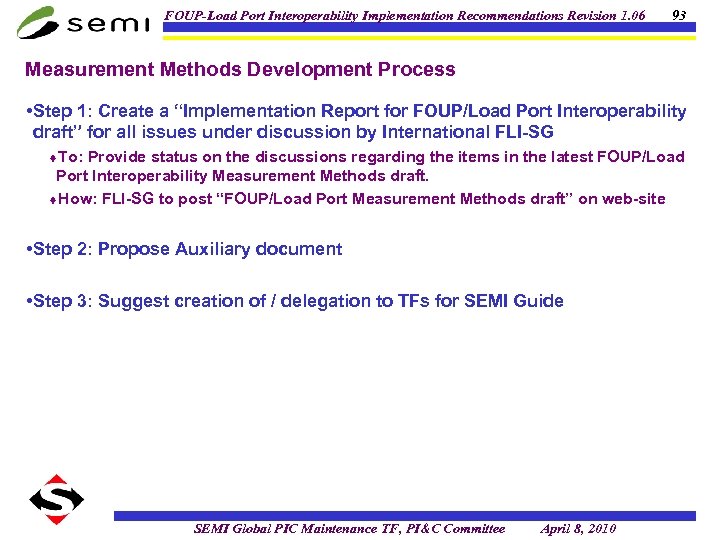
FOUP-Load Port Interoperability Implementation Recommendations Revision 1. 06 93 Measurement Methods Development Process • Step 1: Create a “Implementation Report for FOUP/Load Port Interoperability draft” for all issues under discussion by International FLI-SG ¨To: Provide status on the discussions regarding the items in the latest FOUP/Load Port Interoperability Measurement Methods draft. ¨How: FLI-SG to post “FOUP/Load Port Measurement Methods draft” on web-site • Step 2: Propose Auxiliary document • Step 3: Suggest creation of / delegation to TFs for SEMI Guide SEMI Global PIC Maintenance TF, PI&C Committee April 8, 2010
FOUP-Load Port Interoperability Implementation Recommendations Revision 1. 06 Position of Documents • Measurement Methods requires TF activity for SEMI Guide. ¨E 47. 1 ¨E 62 • this may include E 57 ¨Formation of an International FOUP/Load Port Interoperability TF is planned. SEMI Global PIC Maintenance TF, PI&C Committee April 8, 2010 94
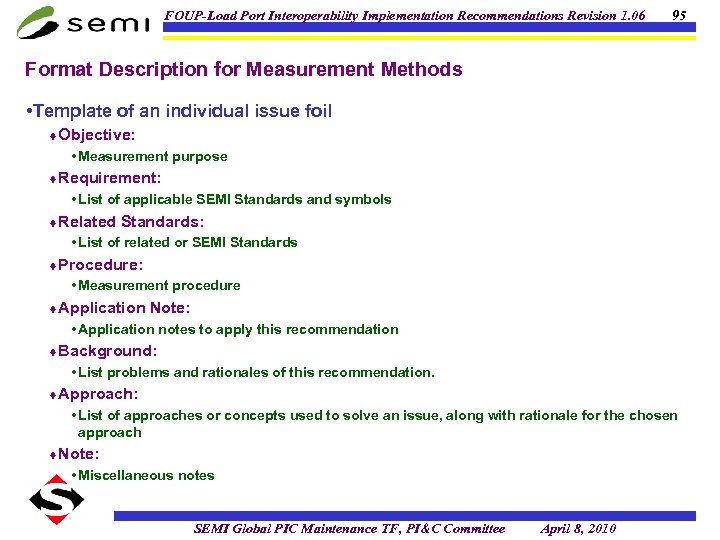
FOUP-Load Port Interoperability Implementation Recommendations Revision 1. 06 95 Format Description for Measurement Methods • Template of an individual issue foil ¨Objective: • Measurement purpose ¨Requirement: • List of applicable SEMI Standards and symbols ¨Related Standards: • List of related or SEMI Standards ¨Procedure: • Measurement procedure ¨Application Note: • Application notes to apply this recommendation ¨Background: • List problems and rationales of this recommendation. ¨Approach: • List of approaches or concepts used to solve an issue, along with rationale for the chosen approach ¨Note: • Miscellaneous notes SEMI Global PIC Maintenance TF, PI&C Committee April 8, 2010
FOUP-Load Port Interoperability Implementation Recommendations Revision 1. 06 Load Port Measurement Methods SEMI Global PIC Maintenance TF, PI&C Committee April 8, 2010 96
FOUP-Load Port Interoperability Implementation Recommendations Revision 1. 06 Contents • Kinematic Pin Shape - HDP Determination • Relative Location of the Horizontal Datum Plane (HDP) in the Undocked Position • Spatial Location of Kinematic Coupling Pins • Docking Stroke • y 33 of Load Port • Registration Pin Shape, Dimension, and Position • Latch Key, Dimension, and Position • Measurement of FOUP Docking and Door Closing Forces (f 33, f 34) • Latch Key Torque Measurement (f 30) • Fixtures referred in Implementation Report for FOUP/Load Port Interoperability SEMI Global PIC Maintenance TF, PI&C Committee April 8, 2010 97
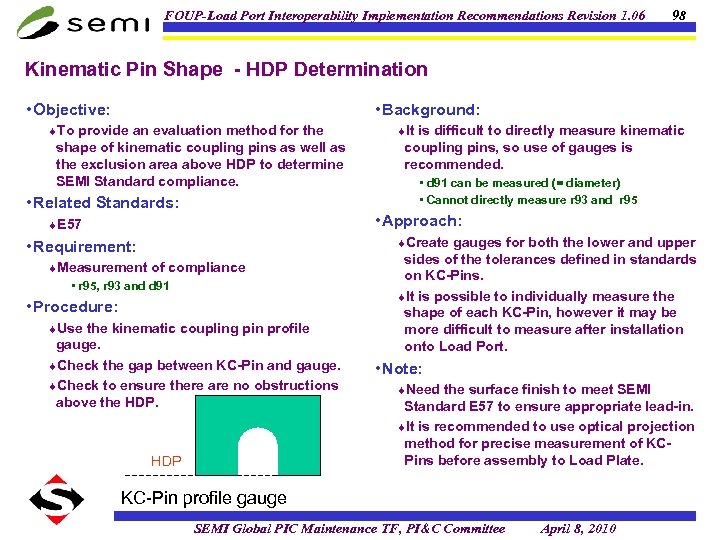
FOUP-Load Port Interoperability Implementation Recommendations Revision 1. 06 98 Kinematic Pin Shape - HDP Determination • Objective: • Background: ¨To provide an evaluation method for the shape of kinematic coupling pins as well as the exclusion area above HDP to determine SEMI Standard compliance. • Related Standards: ¨It is difficult to directly measure kinematic coupling pins, so use of gauges is recommended. • d 91 can be measured (= diameter) • Cannot directly measure r 93 and r 95 • Approach: ¨E 57 ¨Create gauges for both the lower and upper • Requirement: ¨Measurement of compliance • r 95, r 93 and d 91 • Procedure: ¨Use the kinematic coupling pin profile gauge. ¨Check the gap between KC-Pin and gauge. ¨Check to ensure there are no obstructions above the HDP sides of the tolerances defined in standards on KC-Pins. ¨It is possible to individually measure the shape of each KC-Pin, however it may be more difficult to measure after installation onto Load Port. • Note: ¨Need the surface finish to meet SEMI Standard E 57 to ensure appropriate lead-in. ¨It is recommended to use optical projection method for precise measurement of KCPins before assembly to Load Plate. KC-Pin profile gauge SEMI Global PIC Maintenance TF, PI&C Committee April 8, 2010
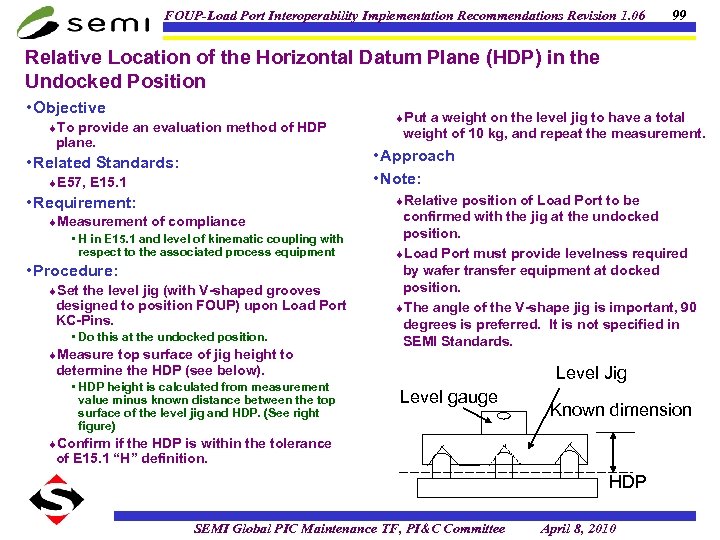
FOUP-Load Port Interoperability Implementation Recommendations Revision 1. 06 99 Relative Location of the Horizontal Datum Plane (HDP) in the Undocked Position • Objective ¨To provide an evaluation method of HDP plane. ¨Put a weight on the level jig to have a total weight of 10 kg, and repeat the measurement. • Approach • Note: • Related Standards: ¨E 57, E 15. 1 ¨Relative position of Load Port to be • Requirement: ¨Measurement of compliance • H in E 15. 1 and level of kinematic coupling with respect to the associated process equipment • Procedure: ¨Set the level jig (with V-shaped grooves designed to position FOUP) upon Load Port KC-Pins. • Do this at the undocked position. ¨Measure top surface of jig height to confirmed with the jig at the undocked position. ¨Load Port must provide levelness required by wafer transfer equipment at docked position. ¨The angle of the V-shape jig is important, 90 degrees is preferred. It is not specified in SEMI Standards. determine the HDP (see below). • HDP height is calculated from measurement value minus known distance between the top surface of the level jig and HDP. (See right figure) Level Jig Level gauge Known dimension ¨Confirm if the HDP is within the tolerance of E 15. 1 “H” definition. HDP SEMI Global PIC Maintenance TF, PI&C Committee April 8, 2010
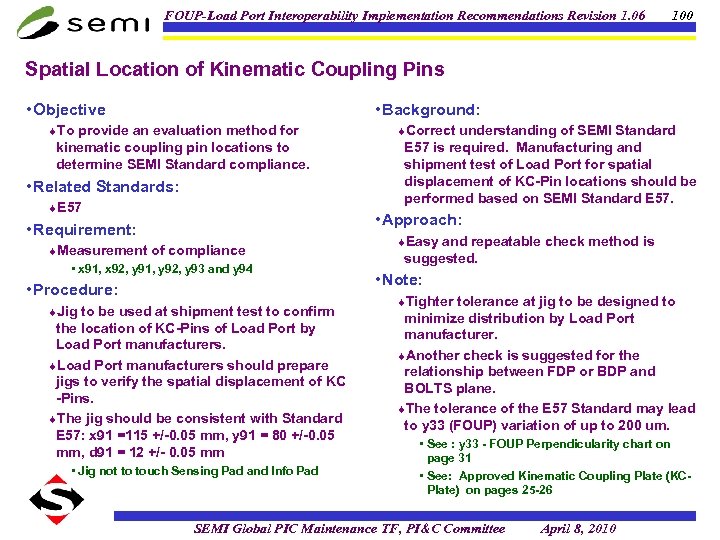
FOUP-Load Port Interoperability Implementation Recommendations Revision 1. 06 100 Spatial Location of Kinematic Coupling Pins • Objective • Background: ¨To provide an evaluation method for kinematic coupling pin locations to determine SEMI Standard compliance. • Related Standards: ¨E 57 ¨Correct understanding of SEMI Standard E 57 is required. Manufacturing and shipment test of Load Port for spatial displacement of KC-Pin locations should be performed based on SEMI Standard E 57. • Approach: • Requirement: ¨Measurement of compliance • x 91, x 92, y 91, y 92, y 93 and y 94 • Procedure: ¨Jig to be used at shipment test to confirm the location of KC-Pins of Load Port by Load Port manufacturers. ¨Load Port manufacturers should prepare jigs to verify the spatial displacement of KC -Pins. ¨The jig should be consistent with Standard E 57: x 91 =115 +/-0. 05 mm, y 91 = 80 +/-0. 05 mm, d 91 = 12 +/- 0. 05 mm • Jig not to touch Sensing Pad and Info Pad ¨Easy and repeatable check method is suggested. • Note: ¨Tighter tolerance at jig to be designed to minimize distribution by Load Port manufacturer. ¨Another check is suggested for the relationship between FDP or BDP and BOLTS plane. ¨The tolerance of the E 57 Standard may lead to y 33 (FOUP) variation of up to 200 um. • See : y 33 - FOUP Perpendicularity chart on page 31 • See: Approved Kinematic Coupling Plate (KCPlate) on pages 25 -26 SEMI Global PIC Maintenance TF, PI&C Committee April 8, 2010
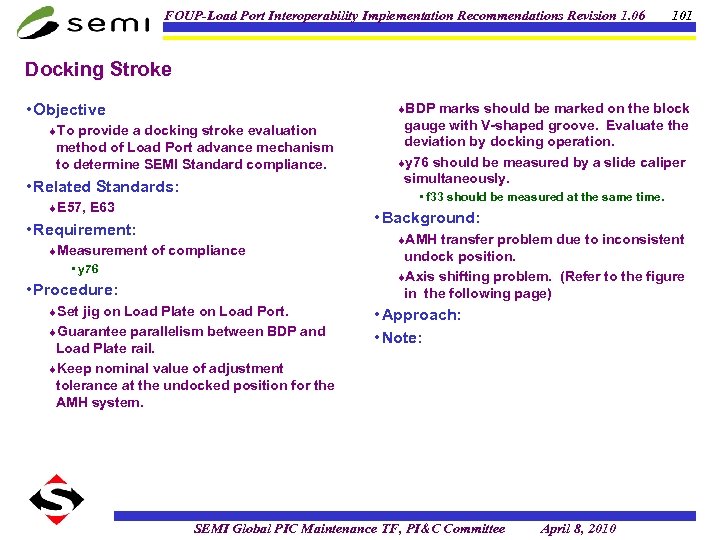
FOUP-Load Port Interoperability Implementation Recommendations Revision 1. 06 101 Docking Stroke • Objective ¨BDP marks should be marked on the block ¨To provide a docking stroke evaluation method of Load Port advance mechanism to determine SEMI Standard compliance. • Related Standards: gauge with V-shaped groove. Evaluate the deviation by docking operation. ¨y 76 should be measured by a slide caliper simultaneously. • f 33 should be measured at the same time. ¨E 57, E 63 • Background: • Requirement: ¨Measurement of compliance • y 76 • Procedure: ¨Set jig on Load Plate on Load Port. ¨Guarantee parallelism between BDP and Load Plate rail. ¨Keep nominal value of adjustment tolerance at the undocked position for the AMH system. ¨AMH transfer problem due to inconsistent undock position. ¨Axis shifting problem. (Refer to the figure in the following page) • Approach: • Note: SEMI Global PIC Maintenance TF, PI&C Committee April 8, 2010
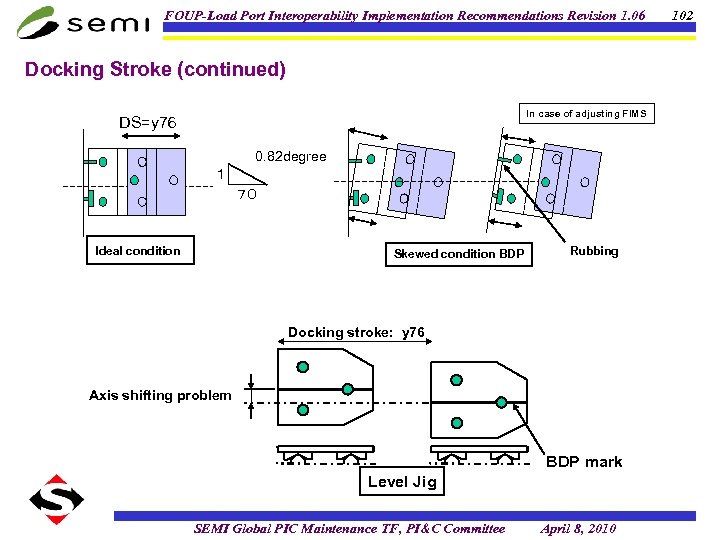
FOUP-Load Port Interoperability Implementation Recommendations Revision 1. 06 Docking Stroke (continued) In case of adjusting FIMS DS=y 76 0. 82 degree 1 70 Ideal condition Skewed condition BDP Rubbing Docking stroke: y 76 Axis shifting problem BDP mark Level Jig SEMI Global PIC Maintenance TF, PI&C Committee April 8, 2010 102
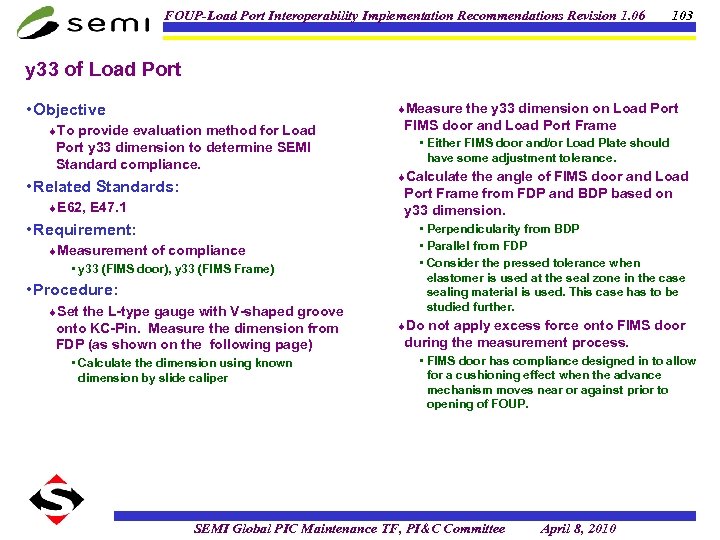
FOUP-Load Port Interoperability Implementation Recommendations Revision 1. 06 103 y 33 of Load Port • Objective ¨Measure the y 33 dimension on Load Port ¨To provide evaluation method for Load Port y 33 dimension to determine SEMI Standard compliance. • Related Standards: FIMS door and Load Port Frame • Either FIMS door and/or Load Plate should have some adjustment tolerance. ¨Calculate the angle of FIMS door and Load Port Frame from FDP and BDP based on y 33 dimension. ¨E 62, E 47. 1 • Requirement: ¨Measurement of compliance • y 33 (FIMS door), y 33 (FIMS Frame) • Procedure: ¨Set the L-type gauge with V-shaped groove onto KC-Pin. Measure the dimension from FDP (as shown on the following page) • Calculate the dimension using known dimension by slide caliper • Perpendicularity from BDP • Parallel from FDP • Consider the pressed tolerance when elastomer is used at the seal zone in the case sealing material is used. This case has to be studied further. ¨Do not apply excess force onto FIMS door during the measurement process. • FIMS door has compliance designed in to allow for a cushioning effect when the advance mechanism moves near or against prior to opening of FOUP. SEMI Global PIC Maintenance TF, PI&C Committee April 8, 2010
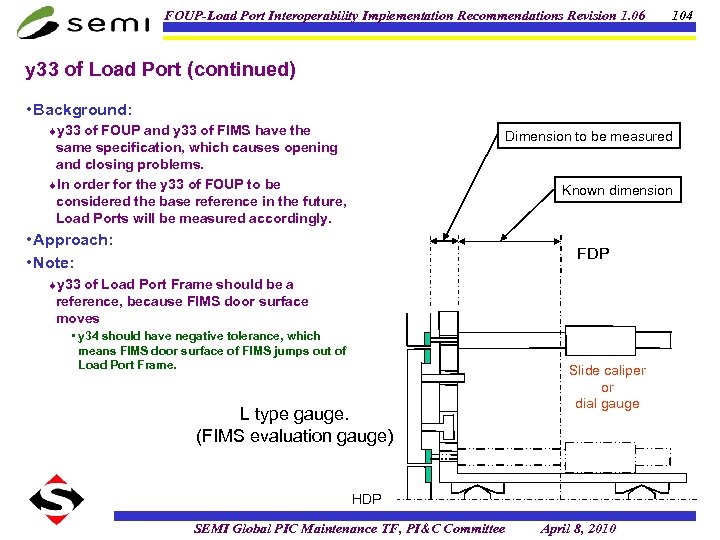
FOUP-Load Port Interoperability Implementation Recommendations Revision 1. 06 104 y 33 of Load Port (continued) • Background: ¨y 33 of FOUP and y 33 of FIMS have the Dimension to be measured same specification, which causes opening and closing problems. ¨In order for the y 33 of FOUP to be considered the base reference in the future, Load Ports will be measured accordingly. Known dimension • Approach: • Note: FDP ¨y 33 of Load Port Frame should be a reference, because FIMS door surface moves • y 34 should have negative tolerance, which means FIMS door surface of FIMS jumps out of Load Port Frame. L type gauge. (FIMS evaluation gauge) Slide caliper or dial gauge HDP SEMI Global PIC Maintenance TF, PI&C Committee April 8, 2010
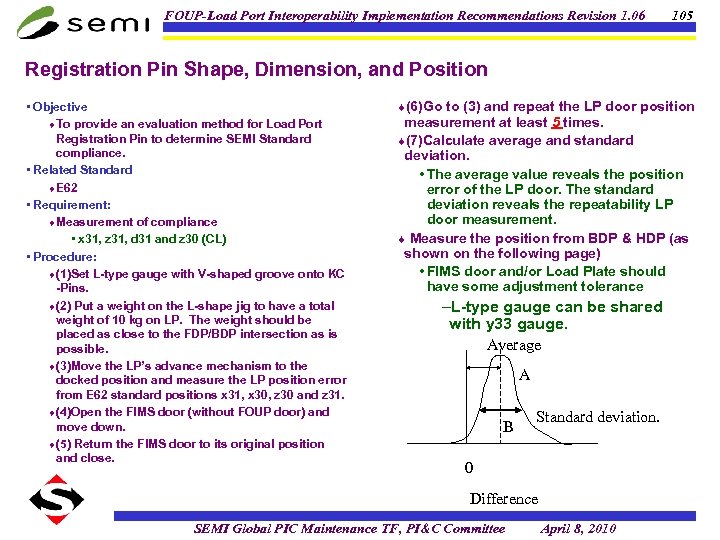
FOUP-Load Port Interoperability Implementation Recommendations Revision 1. 06 105 Registration Pin Shape, Dimension, and Position • Objective ¨To provide an evaluation method for Load Port Registration Pin to determine SEMI Standard compliance. • Related Standard ¨E 62 • Requirement: ¨Measurement of compliance • x 31, z 31, d 31 and z 30 (CL) • Procedure: ¨(1)Set L-type gauge with V-shaped groove onto KC -Pins. ¨(2) Put a weight on the L-shape jig to have a total weight of 10 kg on LP. The weight should be placed as close to the FDP/BDP intersection as is possible. ¨(3)Move the LP’s advance mechanism to the docked position and measure the LP position error from E 62 standard positions x 31, x 30, z 30 and z 31. ¨(4)Open the FIMS door (without FOUP door) and move down. ¨(5) Return the FIMS door to its original position and close. ¨(6)Go to (3) and repeat the LP door position measurement at least 5 times. ¨(7)Calculate average and standard deviation. • The average value reveals the position error of the LP door. The standard deviation reveals the repeatability LP door measurement. ¨ Measure the position from BDP & HDP (as shown on the following page) • FIMS door and/or Load Plate should have some adjustment tolerance –L-type gauge can be shared with y 33 gauge. Average A B Standard deviation. 0 Difference SEMI Global PIC Maintenance TF, PI&C Committee April 8, 2010
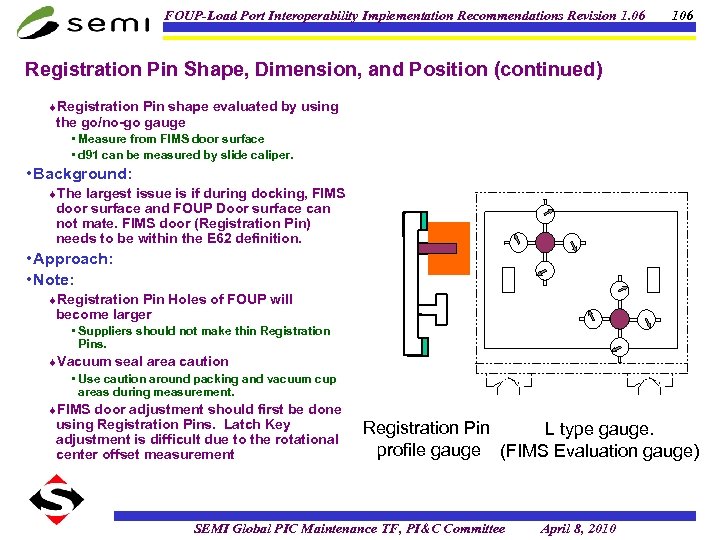
FOUP-Load Port Interoperability Implementation Recommendations Revision 1. 06 106 Registration Pin Shape, Dimension, and Position (continued) ¨Registration Pin shape evaluated by using the go/no-go gauge • Measure from FIMS door surface • d 91 can be measured by slide caliper. • Background: ¨The largest issue is if during docking, FIMS door surface and FOUP Door surface can not mate. FIMS door (Registration Pin) needs to be within the E 62 definition. • Approach: • Note: ¨Registration Pin Holes of FOUP will become larger • Suppliers should not make thin Registration Pins. ¨Vacuum seal area caution • Use caution around packing and vacuum cup areas during measurement. ¨FIMS door adjustment should first be done using Registration Pins. Latch Key adjustment is difficult due to the rotational center offset measurement Registration Pin L type gauge. profile gauge (FIMS Evaluation gauge) SEMI Global PIC Maintenance TF, PI&C Committee April 8, 2010
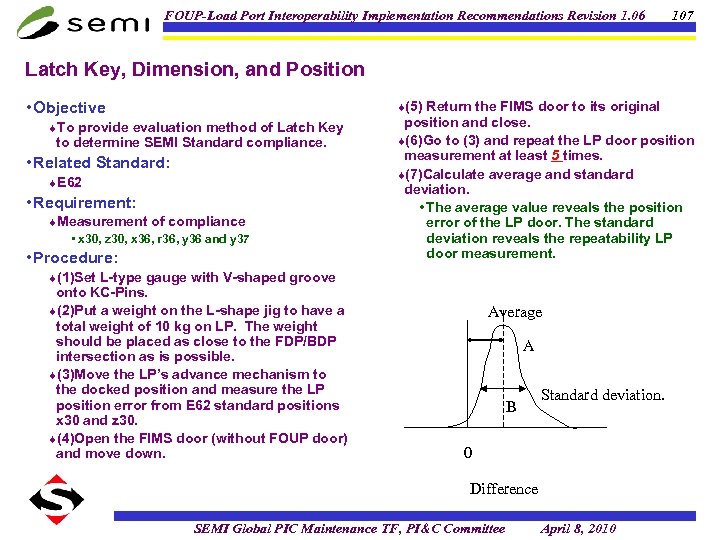
FOUP-Load Port Interoperability Implementation Recommendations Revision 1. 06 107 Latch Key, Dimension, and Position • Objective ¨(5) Return the FIMS door to its original ¨To provide evaluation method of Latch Key to determine SEMI Standard compliance. • Related Standard: ¨E 62 • Requirement: ¨Measurement of compliance • x 30, z 30, x 36, r 36, y 36 and y 37 • Procedure: position and close. ¨(6)Go to (3) and repeat the LP door position measurement at least 5 times. ¨(7)Calculate average and standard deviation. • The average value reveals the position error of the LP door. The standard deviation reveals the repeatability LP door measurement. ¨(1)Set L-type gauge with V-shaped groove onto KC-Pins. ¨(2)Put a weight on the L-shape jig to have a total weight of 10 kg on LP. The weight should be placed as close to the FDP/BDP intersection as is possible. ¨(3)Move the LP’s advance mechanism to the docked position and measure the LP position error from E 62 standard positions x 30 and z 30. ¨(4)Open the FIMS door (without FOUP door) and move down. Average A B Standard deviation. 0 Difference SEMI Global PIC Maintenance TF, PI&C Committee April 8, 2010
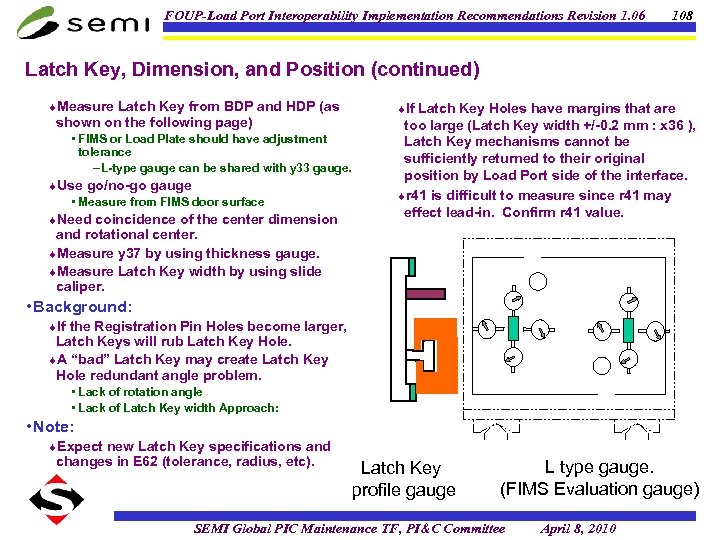
FOUP-Load Port Interoperability Implementation Recommendations Revision 1. 06 108 Latch Key, Dimension, and Position (continued) ¨Measure Latch Key from BDP and HDP (as ¨If Latch Key Holes have margins that are shown on the following page) • FIMS or Load Plate should have adjustment tolerance – L-type gauge can be shared with y 33 gauge. ¨Use go/no-go gauge • Measure from FIMS door surface ¨Need coincidence of the center dimension too large (Latch Key width +/-0. 2 mm : x 36 ), Latch Key mechanisms cannot be sufficiently returned to their original position by Load Port side of the interface. ¨r 41 is difficult to measure since r 41 may effect lead-in. Confirm r 41 value. and rotational center. ¨Measure y 37 by using thickness gauge. ¨Measure Latch Key width by using slide caliper. • Background: ¨If the Registration Pin Holes become larger, Latch Keys will rub Latch Key Hole. ¨A “bad” Latch Key may create Latch Key Hole redundant angle problem. • Lack of rotation angle • Lack of Latch Key width Approach: • Note: ¨Expect new Latch Key specifications and changes in E 62 (tolerance, radius, etc). Latch Key profile gauge L type gauge. (FIMS Evaluation gauge) SEMI Global PIC Maintenance TF, PI&C Committee April 8, 2010
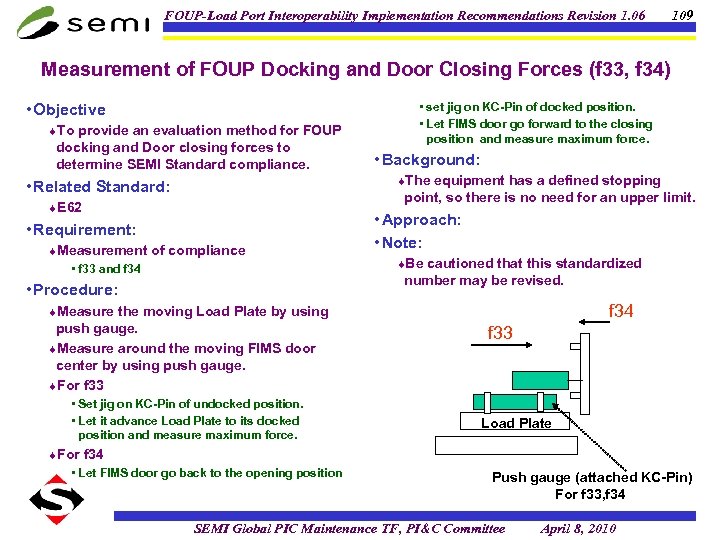
FOUP-Load Port Interoperability Implementation Recommendations Revision 1. 06 109 Measurement of FOUP Docking and Door Closing Forces (f 33, f 34) • Objective ¨To provide an evaluation method for FOUP docking and Door closing forces to determine SEMI Standard compliance. • set jig on KC-Pin of docked position. • Let FIMS door go forward to the closing position and measure maximum force. • Background: ¨The equipment has a defined stopping • Related Standard: point, so there is no need for an upper limit. ¨E 62 • Requirement: ¨Measurement of compliance • f 33 and f 34 • Approach: • Note: ¨Be cautioned that this standardized number may be revised. • Procedure: f 34 ¨Measure the moving Load Plate by using push gauge. ¨Measure around the moving FIMS door center by using push gauge. ¨For f 33 • Set jig on KC-Pin of undocked position. • Let it advance Load Plate to its docked position and measure maximum force. f 33 Load Plate ¨For f 34 • Let FIMS door go back to the opening position Push gauge (attached KC-Pin) For f 33, f 34 SEMI Global PIC Maintenance TF, PI&C Committee April 8, 2010
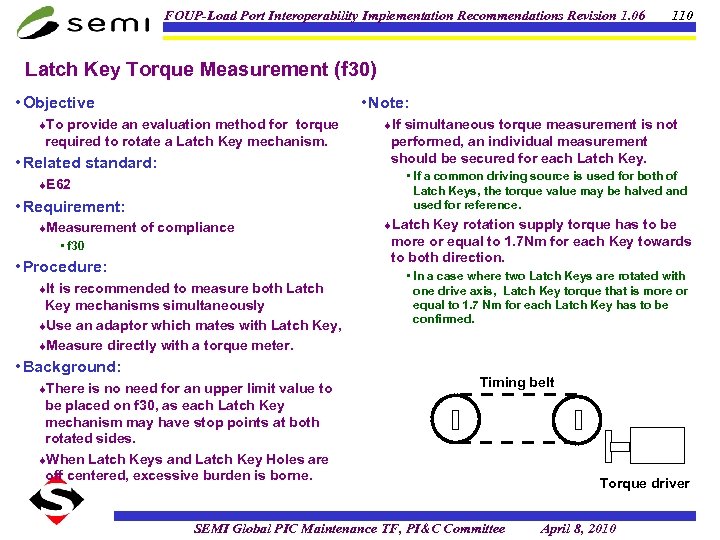
FOUP-Load Port Interoperability Implementation Recommendations Revision 1. 06 110 Latch Key Torque Measurement (f 30) • Objective • Note: ¨To provide an evaluation method for torque required to rotate a Latch Key mechanism. • Related standard: ¨If simultaneous torque measurement is not performed, an individual measurement should be secured for each Latch Key. • If a common driving source is used for both of Latch Keys, the torque value may be halved and used for reference. ¨E 62 • Requirement: ¨Measurement of compliance • f 30 • Procedure: ¨It is recommended to measure both Latch Key mechanisms simultaneously ¨Use an adaptor which mates with Latch Key, ¨Measure directly with a torque meter. • Background: ¨There is no need for an upper limit value to ¨Latch Key rotation supply torque has to be more or equal to 1. 7 Nm for each Key towards to both direction. • In a case where two Latch Keys are rotated with one drive axis, Latch Key torque that is more or equal to 1. 7 Nm for each Latch Key has to be confirmed. Timing belt be placed on f 30, as each Latch Key mechanism may have stop points at both rotated sides. ¨When Latch Keys and Latch Key Holes are off centered, excessive burden is borne. SEMI Global PIC Maintenance TF, PI&C Committee Torque driver April 8, 2010
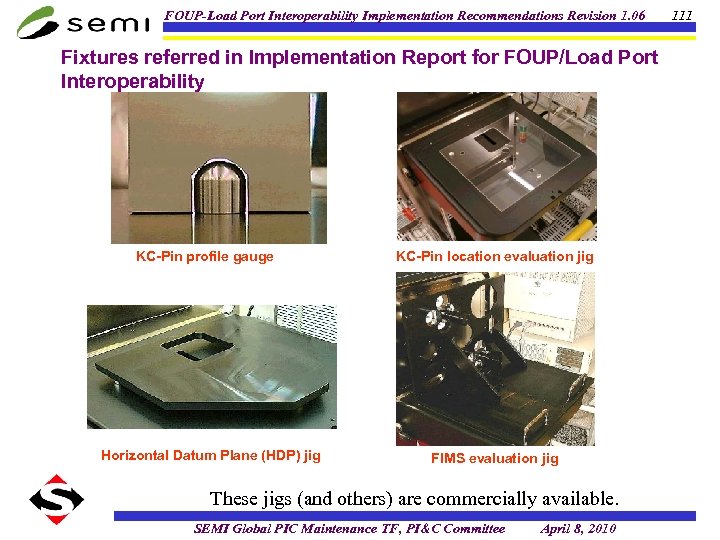
FOUP-Load Port Interoperability Implementation Recommendations Revision 1. 06 Fixtures referred in Implementation Report for FOUP/Load Port Interoperability KC-Pin profile gauge Horizontal Datum Plane (HDP) jig KC-Pin location evaluation jig FIMS evaluation jig These jigs (and others) are commercially available. SEMI Global PIC Maintenance TF, PI&C Committee April 8, 2010 111
FOUP-Load Port Interoperability Implementation Recommendations Revision 1. 06 FOUP Measurement Methods SEMI Global PIC Maintenance TF, PI&C Committee April 8, 2010 112
FOUP-Load Port Interoperability Implementation Recommendations Revision 1. 06 Contents • Approved Kinematic Coupling Plate (KC-Plate) • Wafer Plane by Using a Perfect Flat Wafer • Wafer Plane Measurement using a Prime Wafer • Wafer Center Location • Shape and Position of Latch Key Holes • Shape and Position of Registration Pin Holes • y 52 (FOUP) and Perpendicularity • Necessary Torque for Latch Key Mechanism Rotation (f 30) SEMI Global PIC Maintenance TF, PI&C Committee April 8, 2010 113
FOUP-Load Port Interoperability Implementation Recommendations Revision 1. 06 114 Approved Kinematic Coupling Plate (KC-Plate) • Object ¨The rule of thumb is variation of KC-Pin location ¨KC-Plate used for FOUP measurement should be approved for its accuracy according to the measurement methods shown for Load Port measurement but with narrower tolerances which are shown in requirement in this foil. • Related Standard may yield as much as 1. 7 times variation in y 33 (FOUP). ¨The current KC-Plate Jig used at Selete has tolerance of 2 mm (verified). • Notes ¨The measurement error induced due to KC- Plate ¨E 57 • Requirement ¨Shape of KC-Pin • E 57: r 95 with +/- 17 mm tolerances ¨Location of KC-Pin • E 57: X 91, y 91 both with +/- 17 mm tolerances ¨Level of KC-Pin • Height : Surface of the level jig within +/- 50 mm • Procedure ¨Refer LP measurement methods ¨Shape of KC-Pin : Use optical projection method for precise measurement of KC-pins before assembly to KC-Plate. • Background ¨KC-Plate with SEMI Standard may have as much as +/- 85 mm variation in y 33. should be less than 10%of the tolerance for the relevant dimension. ¨Since y 33 tolerance is +/-0. 5 mm, the error introduced by KC-Plate should be less than +/-50 mm. ¨In order to have less than +/-50 mm measurement error due to KC-Plate, KC-Pin location error should be within +/-29 mm. ¨The y-axis gap model (refer page 35 in vol. 1) may have to deal with +/-0. 3 mm tolerance, and this would require less than +/-30 mm of error induced by KC-Plate. ¨For less than +/-30 mm error in y 33 measurement, KC-Pin location error has to be within +/-17 mm. ¨Likewise as the wafer planes are required within +/ -0. 5 mm, the height error of KC- Plate should be less than +/-50 mm. SEMI Global PIC Maintenance TF, PI&C Committee April 8, 2010
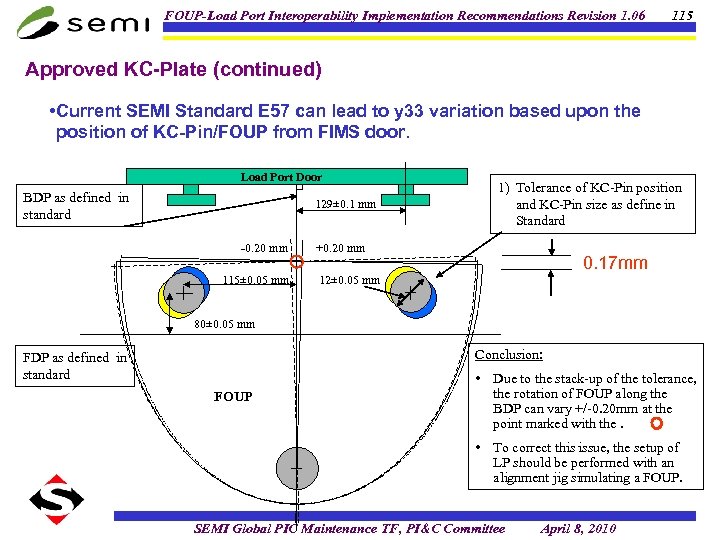
FOUP-Load Port Interoperability Implementation Recommendations Revision 1. 06 115 Approved KC-Plate (continued) • Current SEMI Standard E 57 can lead to y 33 variation based upon the position of KC-Pin/FOUP from FIMS door. Load Port Door BDP as defined in standard 129± 0. 1 mm -0. 20 mm 115± 0. 05 mm 1) Tolerance of KC-Pin position and KC-Pin size as define in Standard +0. 20 mm 0. 17 mm 12± 0. 05 mm 80± 0. 05 mm Conclusion: FDP as defined in standard FOUP • Due to the stack-up of the tolerance, the rotation of FOUP along the BDP can vary +/-0. 20 mm at the point marked with the. • To correct this issue, the setup of LP should be performed with an alignment jig simulating a FOUP. SEMI Global PIC Maintenance TF, PI&C Committee April 8, 2010
FOUP-Load Port Interoperability Implementation Recommendations Revision 1. 06 116 Wafer Plane by Using a Perfect Flat Wafer • Objective: ¨This method is an example which utilizes CMM. If ¨To provide evaluation method for wafer planes to determine SEMI Standard compliance. • Related Standards: other equipment (digital method or optical method) is to be used, a correlation with the CMM should be performed. • Background: ¨E 47. 1, E 1. 9 ¨First, the wafer plane should be confirmed with a • Requirement: ¨Measurement of compliance • z 8(FOUP), z 12, & z 10 by using perfect flat wafer • Procedure: ¨Use a test substrate without sag (e. g. , ceramics, glass, etc. ) • Flatness : No more than 10 mm • Thickness : Less than 4 mm ¨Set FOUP onto KC-Plate Jig. A Coordinate Measurement Machine (CMM) will be required ¨Calculate flatness from measurement at more than 3 points on the lower surface of the test substrate since the lower surface is cited in standard. • When it is impossible to measure the lower surface of a dummy wafer, it is possible to measure the upper surface of the dummy wafer. perfectly flat wafer. If the carrier fails this test, it may fail with prime wafers. ¨Normal Si wafers are not suitable to do this measurement. • Approach: • Note: ¨Test substrates can not be handled with wafer handling mechanism for normal Si wafers. The test substrates are to be placed within r 2 so as to eliminate the test substrate edge from overriding the side wall. ¨Alumina ceramic wafers must be thicker than 2. 7 mm to reduce sag less than 10 mm. ¨Jig which is designed to be conformant with SEMI E 57 but with narrower tolerances. ¨Approved KC-Plate is a jig designed to be conformant with SEMI E 57 but narrow tolerances (refer to pages 25 -26). SEMI Global PIC Maintenance TF, PI&C Committee April 8, 2010
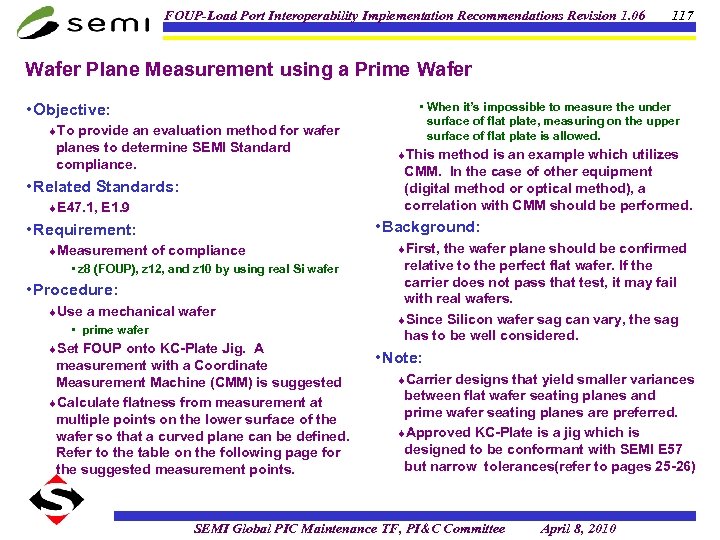
FOUP-Load Port Interoperability Implementation Recommendations Revision 1. 06 117 Wafer Plane Measurement using a Prime Wafer • Objective: ¨To provide an evaluation method for wafer planes to determine SEMI Standard compliance. • Related Standards: ¨E 47. 1, E 1. 9 • When it’s impossible to measure the under surface of flat plate, measuring on the upper surface of flat plate is allowed. ¨This method is an example which utilizes CMM. In the case of other equipment (digital method or optical method), a correlation with CMM should be performed. • Background: • Requirement: ¨Measurement of compliance • z 8 (FOUP), z 12, and z 10 by using real Si wafer • Procedure: ¨Use a mechanical wafer • prime wafer ¨Set FOUP onto KC-Plate Jig. A measurement with a Coordinate Measurement Machine (CMM) is suggested ¨Calculate flatness from measurement at multiple points on the lower surface of the wafer so that a curved plane can be defined. Refer to the table on the following page for the suggested measurement points. ¨First, the wafer plane should be confirmed relative to the perfect flat wafer. If the carrier does not pass that test, it may fail with real wafers. ¨Since Silicon wafer sag can vary, the sag has to be well considered. • Note: ¨Carrier designs that yield smaller variances between flat wafer seating planes and prime wafer seating planes are preferred. ¨Approved KC-Plate is a jig which is designed to be conformant with SEMI E 57 but narrow tolerances(refer to pages 25 -26) SEMI Global PIC Maintenance TF, PI&C Committee April 8, 2010
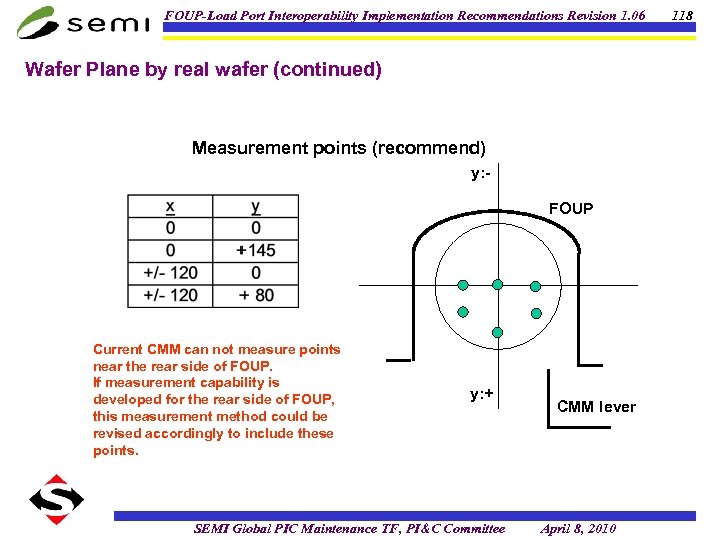
FOUP-Load Port Interoperability Implementation Recommendations Revision 1. 06 Wafer Plane by real wafer (continued) Measurement points (recommend) y: FOUP Current CMM can not measure points near the rear side of FOUP. If measurement capability is developed for the rear side of FOUP, this measurement method could be revised accordingly to include these points. y: + SEMI Global PIC Maintenance TF, PI&C Committee CMM lever April 8, 2010 118
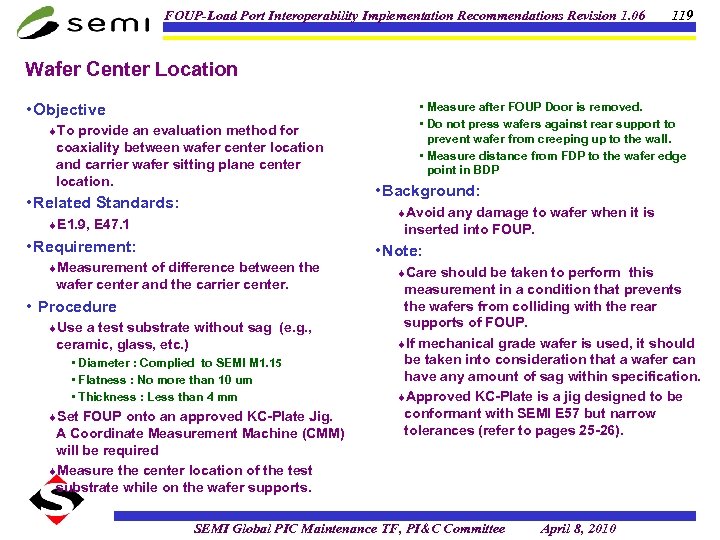
FOUP-Load Port Interoperability Implementation Recommendations Revision 1. 06 119 Wafer Center Location • Objective ¨To provide an evaluation method for coaxiality between wafer center location and carrier wafer sitting plane center location. • Related Standards: • Measure after FOUP Door is removed. • Do not press wafers against rear support to prevent wafer from creeping up to the wall. • Measure distance from FDP to the wafer edge point in BDP • Background: ¨Avoid any damage to wafer when it is ¨E 1. 9, E 47. 1 inserted into FOUP. • Requirement: ¨Measurement of difference between the wafer center and the carrier center. • Procedure ¨Use a test substrate without sag (e. g. , ceramic, glass, etc. ) • Diameter : Complied to SEMI M 1. 15 • Flatness : No more than 10 um • Thickness : Less than 4 mm ¨Set FOUP onto an approved KC-Plate Jig. A Coordinate Measurement Machine (CMM) will be required ¨Measure the center location of the test substrate while on the wafer supports. • Note: ¨Care should be taken to perform this measurement in a condition that prevents the wafers from colliding with the rear supports of FOUP. ¨If mechanical grade wafer is used, it should be taken into consideration that a wafer can have any amount of sag within specification. ¨Approved KC-Plate is a jig designed to be conformant with SEMI E 57 but narrow tolerances (refer to pages 25 -26). SEMI Global PIC Maintenance TF, PI&C Committee April 8, 2010
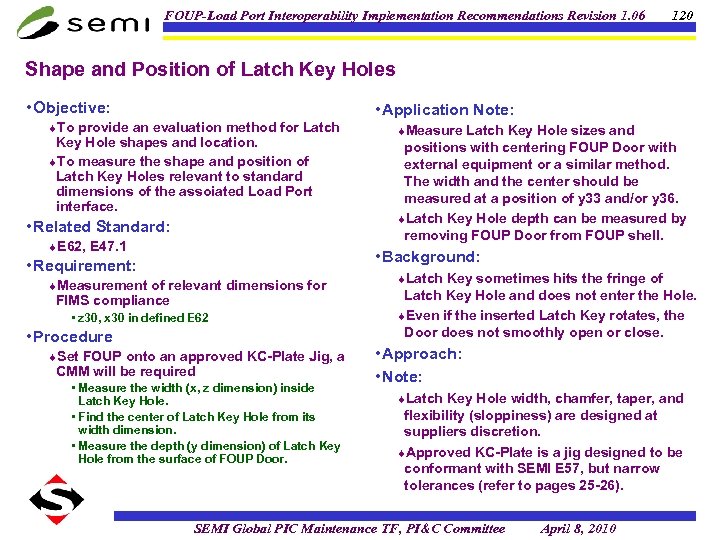
FOUP-Load Port Interoperability Implementation Recommendations Revision 1. 06 120 Shape and Position of Latch Key Holes • Objective: • Application Note: ¨To provide an evaluation method for Latch Key Hole shapes and location. ¨To measure the shape and position of Latch Key Holes relevant to standard dimensions of the assoiated Load Port interface. • Related Standard: ¨E 62, E 47. 1 ¨Measure Latch Key Hole sizes and positions with centering FOUP Door with external equipment or a similar method. The width and the center should be measured at a position of y 33 and/or y 36. ¨Latch Key Hole depth can be measured by removing FOUP Door from FOUP shell. • Background: • Requirement: ¨Measurement of relevant dimensions for FIMS compliance • z 30, x 30 in defined E 62 • Procedure ¨Set FOUP onto an approved KC-Plate Jig, a CMM will be required • Measure the width (x, z dimension) inside Latch Key Hole. • Find the center of Latch Key Hole from its width dimension. • Measure the depth (y dimension) of Latch Key Hole from the surface of FOUP Door. ¨Latch Key sometimes hits the fringe of Latch Key Hole and does not enter the Hole. ¨Even if the inserted Latch Key rotates, the Door does not smoothly open or close. • Approach: • Note: ¨Latch Key Hole width, chamfer, taper, and flexibility (sloppiness) are designed at suppliers discretion. ¨Approved KC-Plate is a jig designed to be conformant with SEMI E 57, but narrow tolerances (refer to pages 25 -26). SEMI Global PIC Maintenance TF, PI&C Committee April 8, 2010
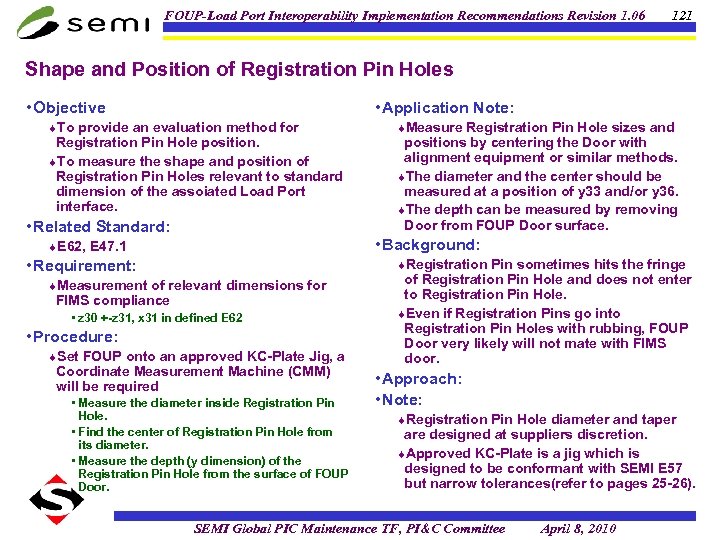
FOUP-Load Port Interoperability Implementation Recommendations Revision 1. 06 121 Shape and Position of Registration Pin Holes • Objective • Application Note: ¨To provide an evaluation method for Registration Pin Hole position. ¨To measure the shape and position of Registration Pin Holes relevant to standard dimension of the assoiated Load Port interface. • Related Standard: ¨Measure Registration Pin Hole sizes and positions by centering the Door with alignment equipment or similar methods. ¨The diameter and the center should be measured at a position of y 33 and/or y 36. ¨The depth can be measured by removing Door from FOUP Door surface. • Background: ¨E 62, E 47. 1 • Requirement: ¨Registration Pin sometimes hits the fringe ¨Measurement of relevant dimensions for FIMS compliance • z 30 +-z 31, x 31 in defined E 62 • Procedure: ¨Set FOUP onto an approved KC-Plate Jig, a Coordinate Measurement Machine (CMM) will be required • Measure the diameter inside Registration Pin Hole. • Find the center of Registration Pin Hole from its diameter. • Measure the depth (y dimension) of the Registration Pin Hole from the surface of FOUP Door. of Registration Pin Hole and does not enter to Registration Pin Hole. ¨Even if Registration Pins go into Registration Pin Holes with rubbing, FOUP Door very likely will not mate with FIMS door. • Approach: • Note: ¨Registration Pin Hole diameter and taper are designed at suppliers discretion. ¨Approved KC-Plate is a jig which is designed to be conformant with SEMI E 57 but narrow tolerances(refer to pages 25 -26). SEMI Global PIC Maintenance TF, PI&C Committee April 8, 2010
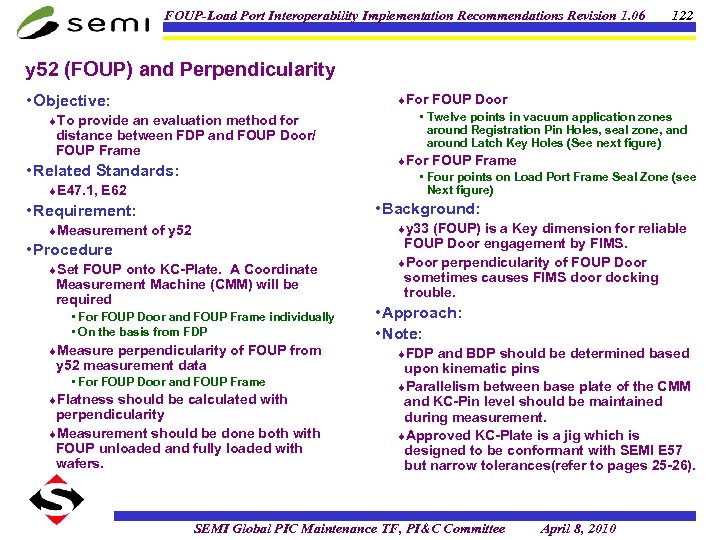
FOUP-Load Port Interoperability Implementation Recommendations Revision 1. 06 122 y 52 (FOUP) and Perpendicularity • Objective: ¨To provide an evaluation method for distance between FDP and FOUP Door/ FOUP Frame • Related Standards: ¨E 47. 1, E 62 ¨For FOUP Door • Twelve points in vacuum application zones around Registration Pin Holes, seal zone, and around Latch Key Holes (See next figure) ¨For FOUP Frame • Four points on Load Port Frame Seal Zone (see Next figure) • Background: • Requirement: ¨y 33 (FOUP) is a Key dimension for reliable ¨Measurement of y 52 • Procedure ¨Set FOUP onto KC-Plate. A Coordinate Measurement Machine (CMM) will be required • For FOUP Door and FOUP Frame individually • On the basis from FDP ¨Measure perpendicularity of FOUP from y 52 measurement data • For FOUP Door and FOUP Frame ¨Flatness should be calculated with perpendicularity ¨Measurement should be done both with FOUP unloaded and fully loaded with wafers. FOUP Door engagement by FIMS. ¨Poor perpendicularity of FOUP Door sometimes causes FIMS door docking trouble. • Approach: • Note: ¨FDP and BDP should be determined based upon kinematic pins ¨Parallelism between base plate of the CMM and KC-Pin level should be maintained during measurement. ¨Approved KC-Plate is a jig which is designed to be conformant with SEMI E 57 but narrow tolerances(refer to pages 25 -26). SEMI Global PIC Maintenance TF, PI&C Committee April 8, 2010
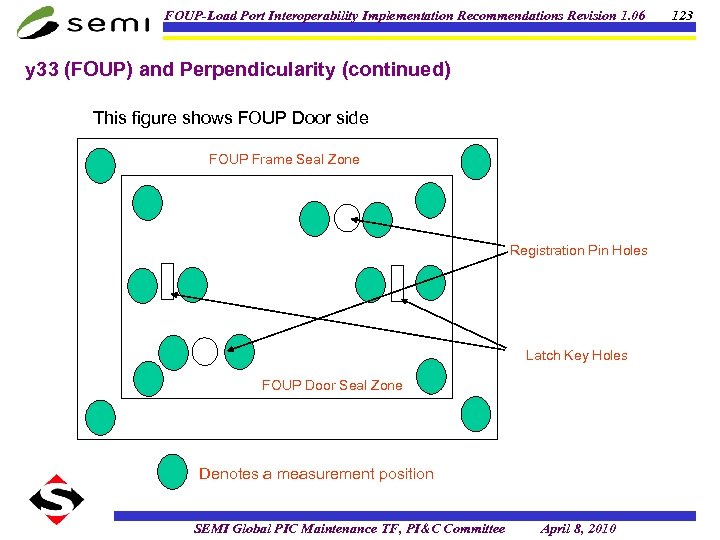
FOUP-Load Port Interoperability Implementation Recommendations Revision 1. 06 y 33 (FOUP) and Perpendicularity (continued) This figure shows FOUP Door side FOUP Frame Seal Zone Registration Pin Holes Latch Key Holes FOUP Door Seal Zone Denotes a measurement position SEMI Global PIC Maintenance TF, PI&C Committee April 8, 2010 123
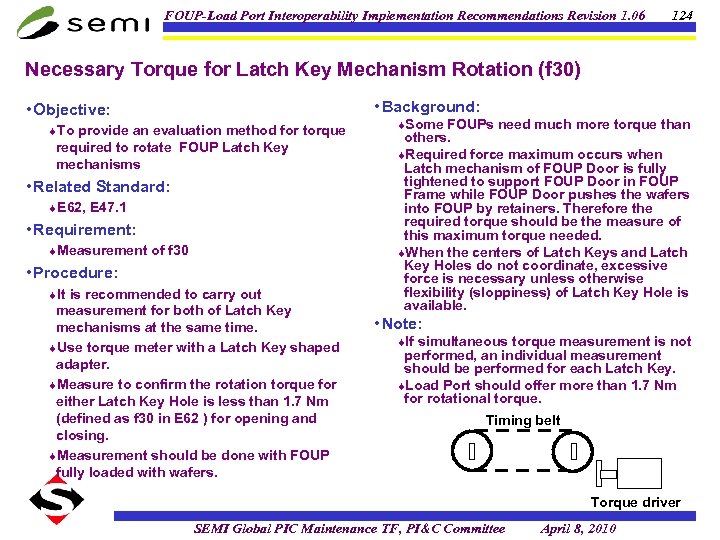
FOUP-Load Port Interoperability Implementation Recommendations Revision 1. 06 124 Necessary Torque for Latch Key Mechanism Rotation (f 30) • Background: • Objective: ¨To provide an evaluation method for torque required to rotate FOUP Latch Key mechanisms • Related Standard: ¨E 62, E 47. 1 • Requirement: ¨Measurement of f 30 • Procedure: ¨It is recommended to carry out measurement for both of Latch Key mechanisms at the same time. ¨Use torque meter with a Latch Key shaped adapter. ¨Measure to confirm the rotation torque for either Latch Key Hole is less than 1. 7 Nm (defined as f 30 in E 62 ) for opening and closing. ¨Measurement should be done with FOUP fully loaded with wafers. ¨Some FOUPs need much more torque than others. ¨Required force maximum occurs when Latch mechanism of FOUP Door is fully tightened to support FOUP Door in FOUP Frame while FOUP Door pushes the wafers into FOUP by retainers. Therefore the required torque should be the measure of this maximum torque needed. ¨When the centers of Latch Keys and Latch Key Holes do not coordinate, excessive force is necessary unless otherwise flexibility (sloppiness) of Latch Key Hole is available. • Note: ¨If simultaneous torque measurement is not performed, an individual measurement should be performed for each Latch Key. ¨Load Port should offer more than 1. 7 Nm for rotational torque. Timing belt Torque driver SEMI Global PIC Maintenance TF, PI&C Committee April 8, 2010
FOUP-Load Port Interoperability Implementation Recommendations Revision 1. 06 Revision History (1. 05 to 1. 06) • No Change in Measurement method SEMI Global PIC Maintenance TF, PI&C Committee April 8, 2010 125
00355901f009eb8af16dce2cea3aad06.ppt