Lecture 4_Dimension representation.pptx
- Количество слайдов: 42
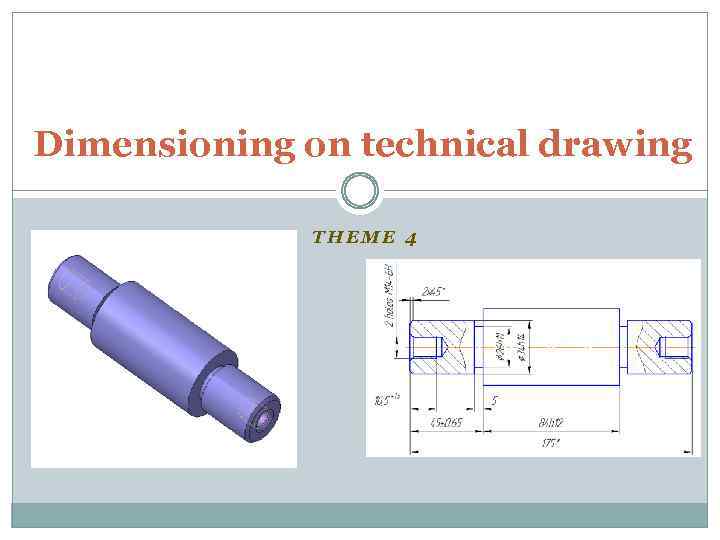 Dimensioning on technical drawing THEME 4
 Introduction The general principles of dimensioning applicable in fields of mechanical, and civil engineering are established by Russian Standard 2. 307 -68 and ISO 128 Technical drawings – Indication of dimensions and tolerances The dimensions presented on the drawings are the basics for sizes and shape of the object definition. For assurance of the dimensions accuracy at the mechanical parts manufacturing the limit deviations of the dimensions and forms, and geometrical tolerancing are used.
 Dimension is a numerical value that expressed in appropriate units of measurement and indicated graphically on technical drawings with lines, symbols and notes. Note, that the amount of the dimensions on drawing must be minimized but enough for defining a part or an end product. Each drawing must use the same unit (millimetres) for all dimensions, and the unit symbols are not shown on drawings.
 Reference dimensions Dimensions that are not proceed at the drawings but which are necessary for facilitating of drawing understanding are termed as “reference dimensions”. Reference dimensions are designated by symbol “*” on drawings and the note “*Reference dimensions” is put as a separated issue in technical specification of the drawing. The dimension may be referenced in the following cases: 1) One of dimension of the completed dimension chain. The limit deviation of that dimension is not shown.
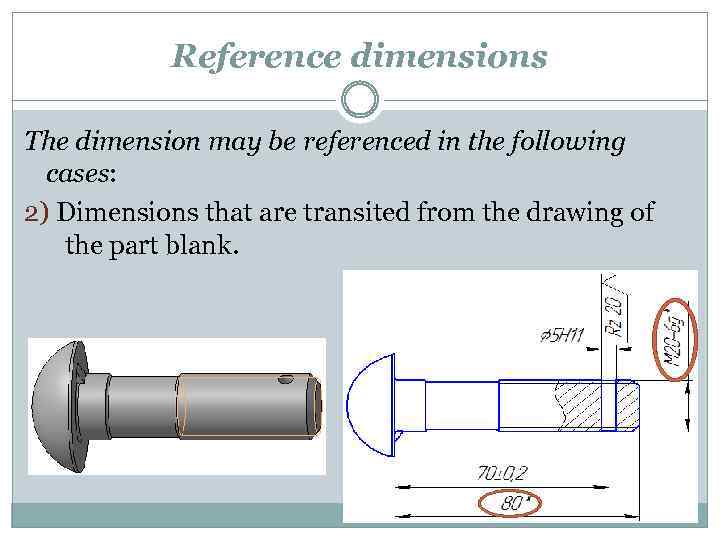 Reference dimensions The dimension may be referenced in the following cases: 2) Dimensions that are transited from the drawing of the part blank.
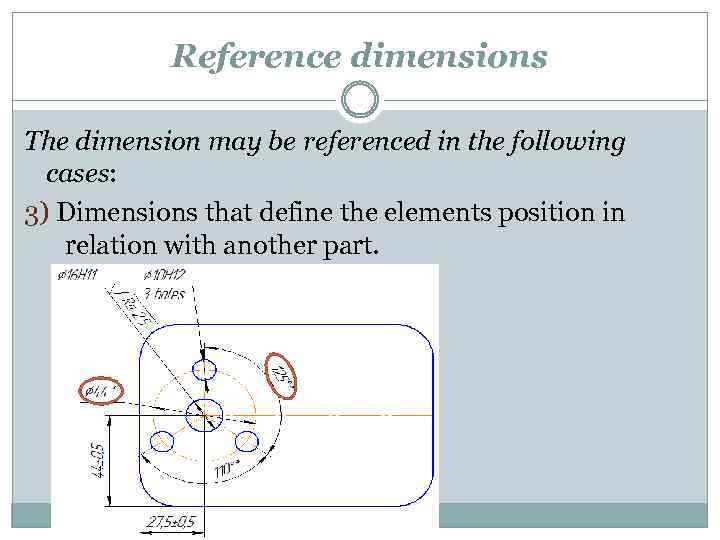 Reference dimensions The dimension may be referenced in the following cases: 3) Dimensions that define the elements position in relation with another part.
 Reference dimensions The dimension may be referenced in the following cases: 4) Dimensions on the assembly drawing that are defined the end positions of some parts or elements (piston stroke, etc. ). 5) Dimensions on the assembly drawing that are transited from the part drawings and are used as setting or connection dimensions. 6) Overall dimensions on assembly drawing that are transited from the part drawings or are obtained as a sum of some parts dimensions. 7) Dimensions of the parts that are produced from the profiles when they are determined by the designation of material in the title block of drawing.
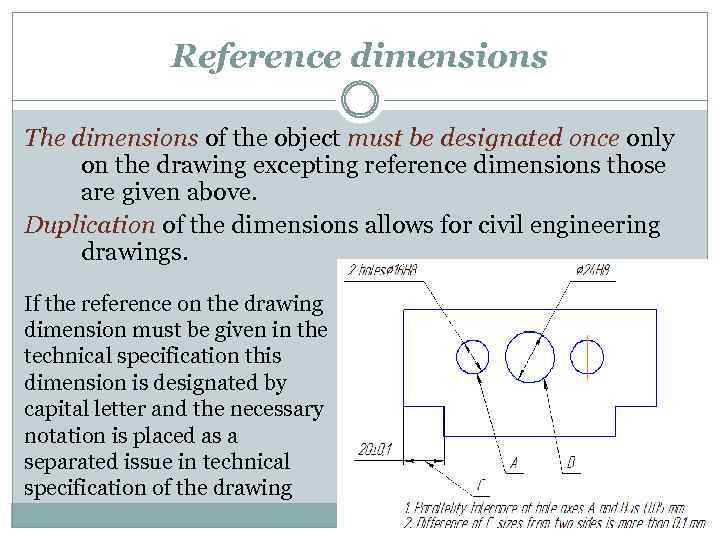 Reference dimensions The dimensions of the object must be designated once only on the drawing excepting reference dimensions those are given above. Duplication of the dimensions allows for civil engineering drawings. If the reference on the drawing dimension must be given in the technical specification this dimension is designated by capital letter and the necessary notation is placed as a separated issue in technical specification of the drawing
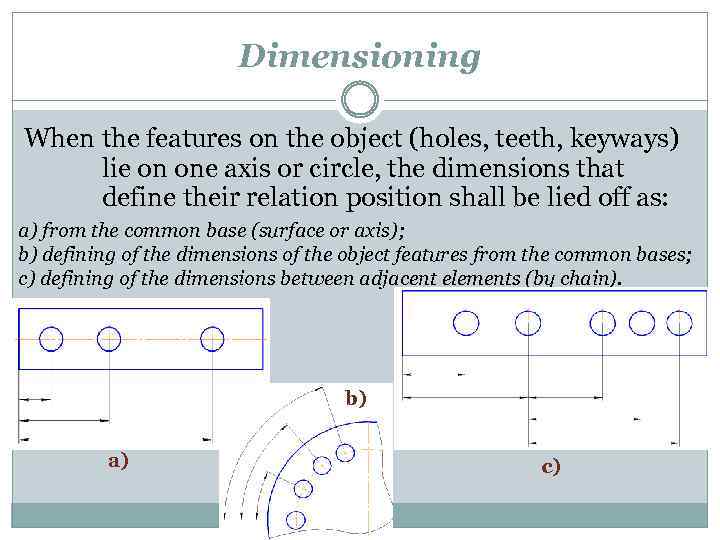 Dimensioning When the features on the object (holes, teeth, keyways) lie on one axis or circle, the dimensions that define their relation position shall be lied off as: a) from the common base (surface or axis); b) defining of the dimensions of the object features from the common bases; c) defining of the dimensions between adjacent elements (by chain). b) a) c)
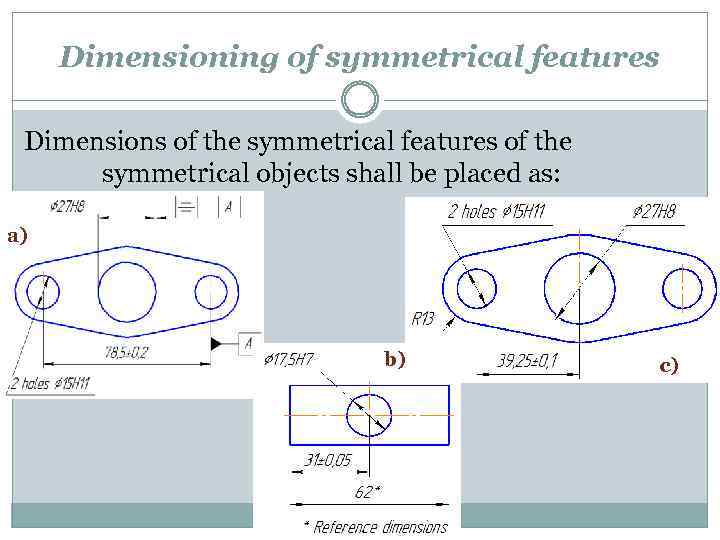 Dimensioning of symmetrical features Dimensions of the symmetrical features of the symmetrical objects shall be placed as: a) b) c)
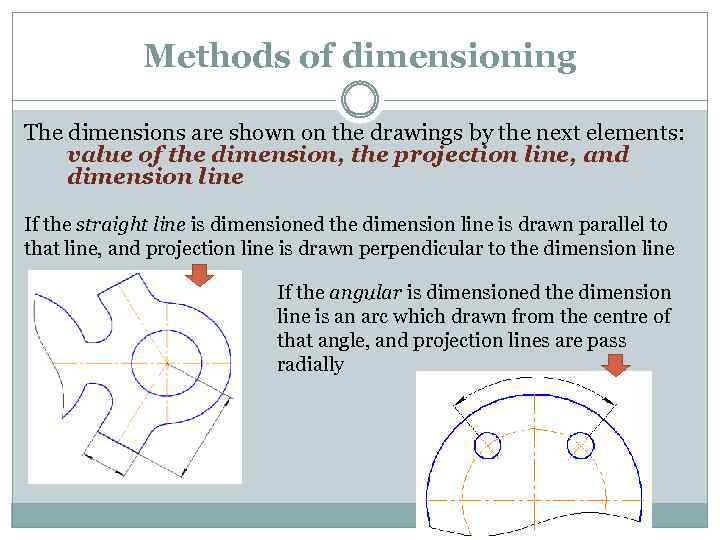 Methods of dimensioning The dimensions are shown on the drawings by the next elements: value of the dimension, the projection line, and dimension line If the straight line is dimensioned the dimension line is drawn parallel to that line, and projection line is drawn perpendicular to the dimension line If the angular is dimensioned the dimension line is an arc which drawn from the centre of that angle, and projection lines are pass radially
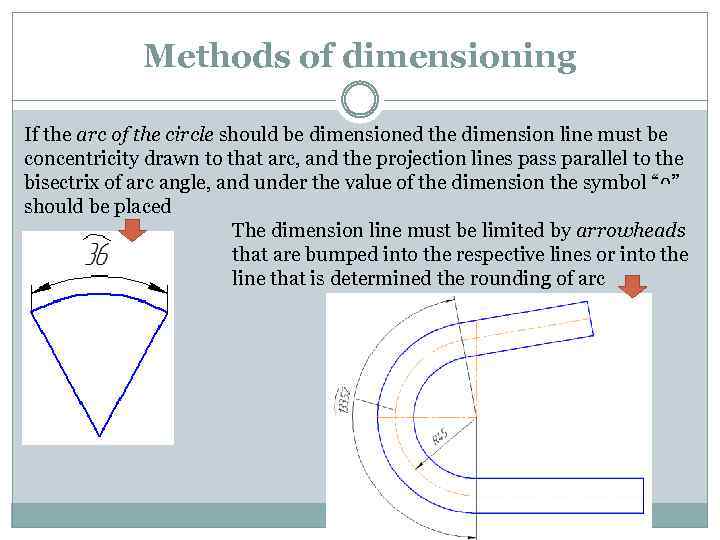 Methods of dimensioning If the arc of the circle should be dimensioned the dimension line must be concentricity drawn to that arc, and the projection lines pass parallel to the bisectrix of arc angle, and under the value of the dimension the symbol “ᴖ” should be placed The dimension line must be limited by arrowheads that are bumped into the respective lines or into the line that is determined the rounding of arc
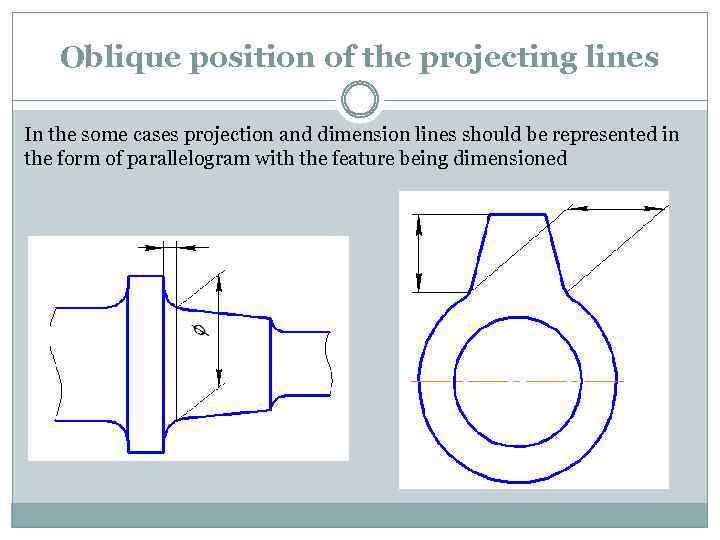 Oblique position of the projecting lines In the some cases projection and dimension lines should be represented in the form of parallelogram with the feature being dimensioned
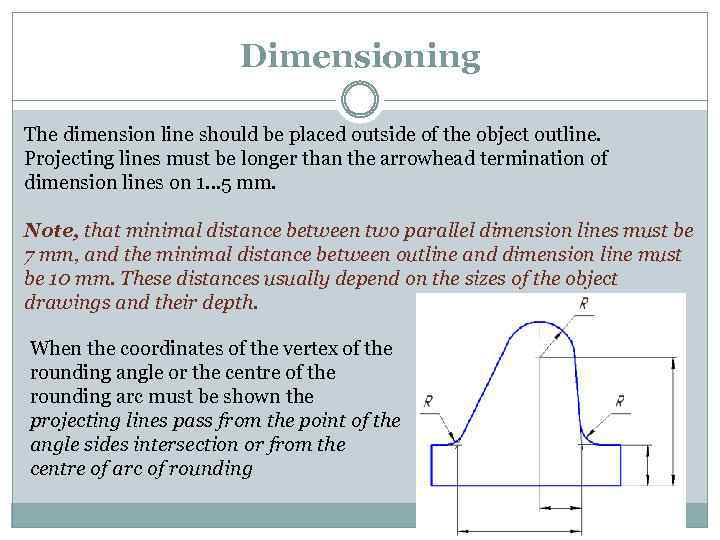 Dimensioning The dimension line should be placed outside of the object outline. Projecting lines must be longer than the arrowhead termination of dimension lines on 1… 5 mm. Note, that minimal distance between two parallel dimension lines must be 7 mm, and the minimal distance between outline and dimension line must be 10 mm. These distances usually depend on the sizes of the object drawings and their depth. When the coordinates of the vertex of the rounding angle or the centre of the rounding arc must be shown the projecting lines pass from the point of the angle sides intersection or from the centre of arc of rounding
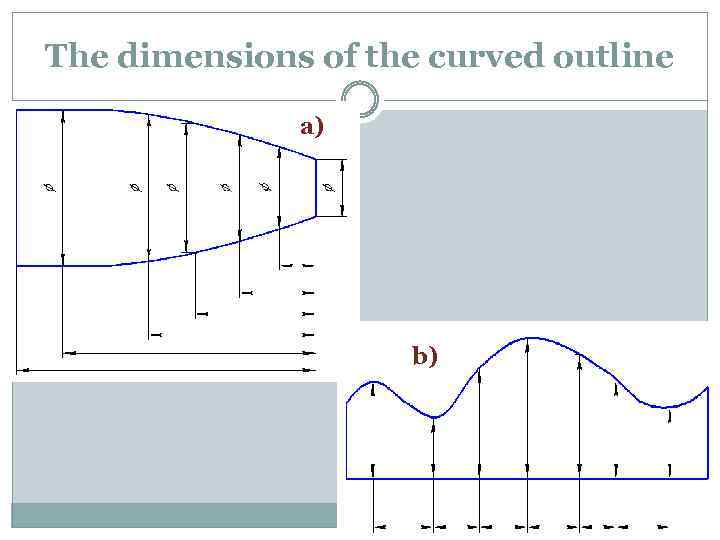 The dimensions of the curved outline a) b)
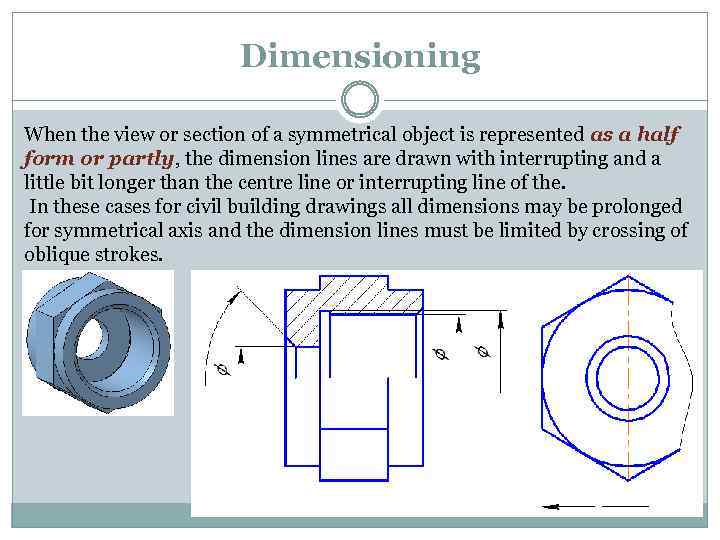 Dimensioning When the view or section of a symmetrical object is represented as a half form or partly, the dimension lines are drawn with interrupting and a little bit longer than the centre line or interrupting line of the. In these cases for civil building drawings all dimensions may be prolonged for symmetrical axis and the dimension lines must be limited by crossing of oblique strokes.
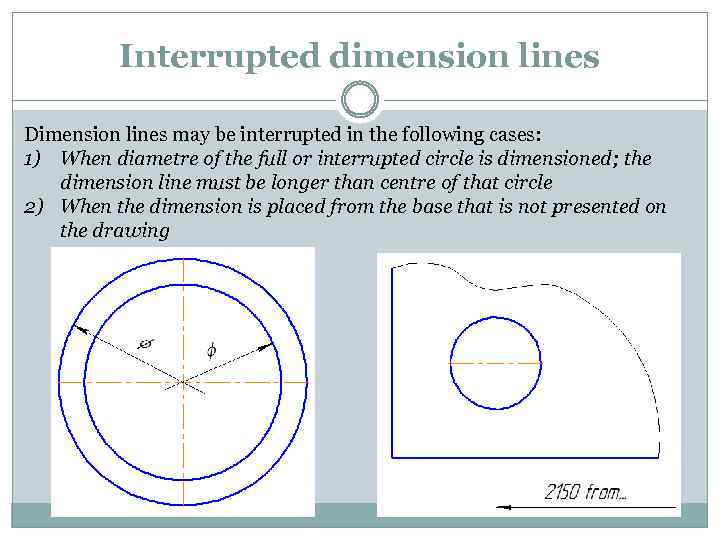 Interrupted dimension lines Dimension lines may be interrupted in the following cases: 1) When diametre of the full or interrupted circle is dimensioned; the dimension line must be longer than centre of that circle 2) When the dimension is placed from the base that is not presented on the drawing
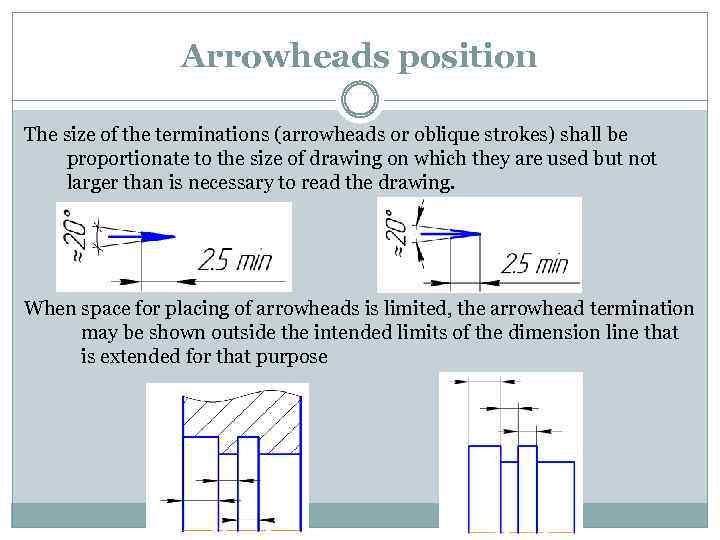 Arrowheads position The size of the terminations (arrowheads or oblique strokes) shall be proportionate to the size of drawing on which they are used but not larger than is necessary to read the drawing. When space for placing of arrowheads is limited, the arrowhead termination may be shown outside the intended limits of the dimension line that is extended for that purpose
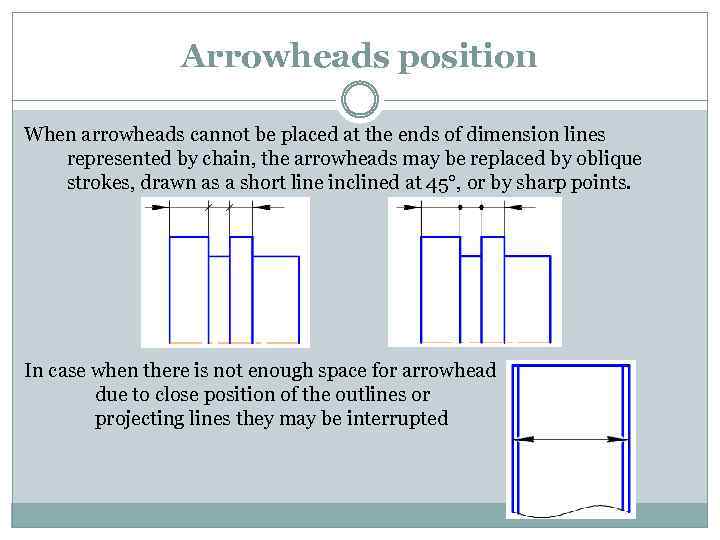 Arrowheads position When arrowheads cannot be placed at the ends of dimension lines represented by chain, the arrowheads may be replaced by oblique strokes, drawn as a short line inclined at 45°, or by sharp points. In case when there is not enough space for arrowhead due to close position of the outlines or projecting lines they may be interrupted
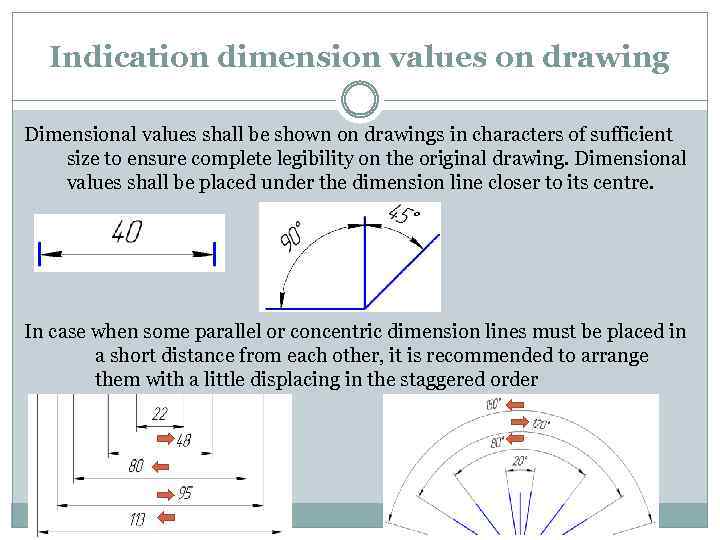 Indication dimension values on drawing Dimensional values shall be shown on drawings in characters of sufficient size to ensure complete legibility on the original drawing. Dimensional values shall be placed under the dimension line closer to its centre. In case when some parallel or concentric dimension lines must be placed in a short distance from each other, it is recommended to arrange them with a little displacing in the staggered order
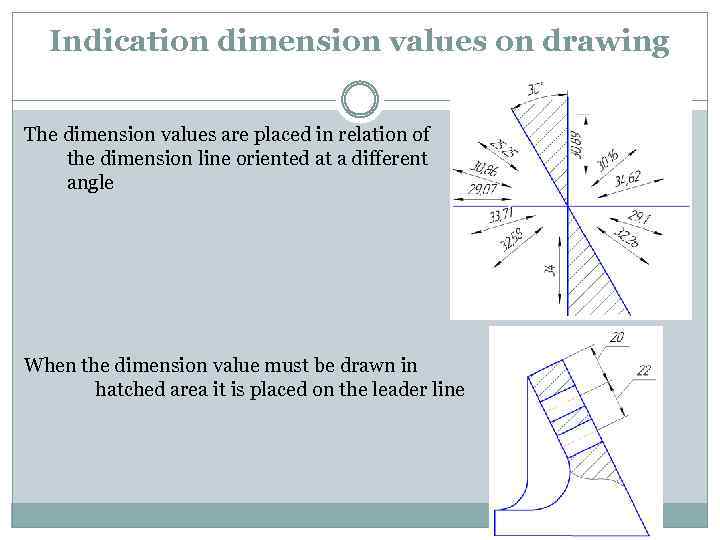 Indication dimension values on drawing The dimension values are placed in relation of the dimension line oriented at a different angle When the dimension value must be drawn in hatched area it is placed on the leader line
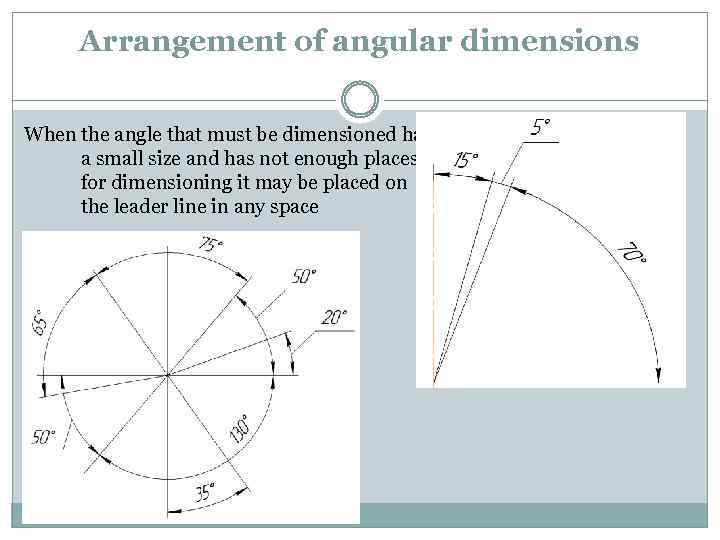 Arrangement of angular dimensions When the angle that must be dimensioned has a small size and has not enough places for dimensioning it may be placed on the leader line in any space
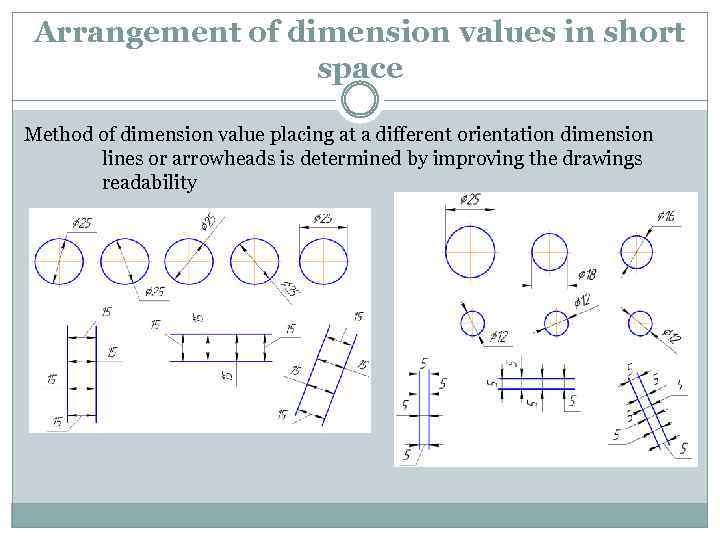 Arrangement of dimension values in short space Method of dimension value placing at a different orientation dimension lines or arrowheads is determined by improving the drawings readability
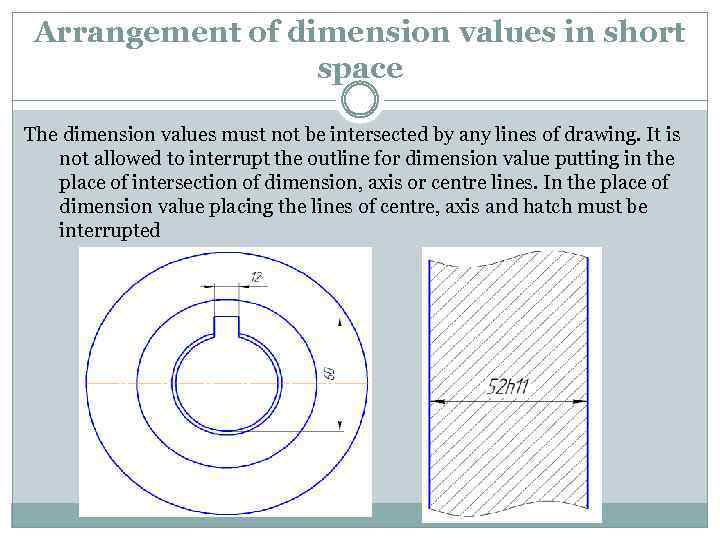 Arrangement of dimension values in short space The dimension values must not be intersected by any lines of drawing. It is not allowed to interrupt the outline for dimension value putting in the place of intersection of dimension, axis or centre lines. In the place of dimension value placing the lines of centre, axis and hatch must be interrupted
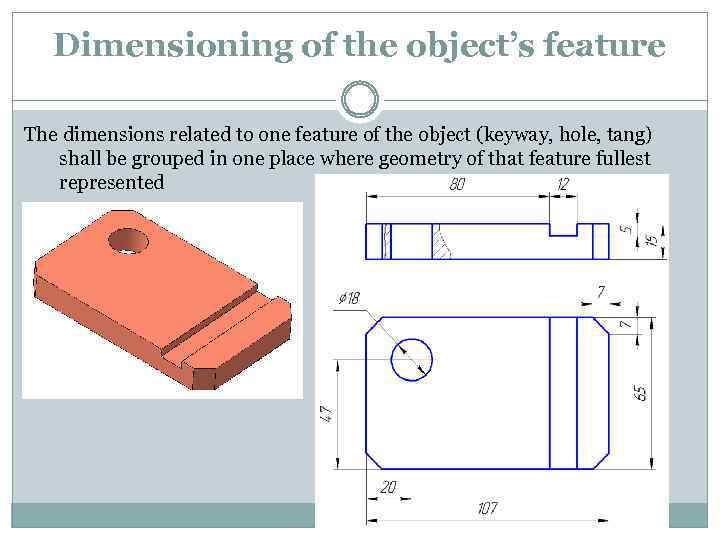 Dimensioning of the object’s feature The dimensions related to one feature of the object (keyway, hole, tang) shall be grouped in one place where geometry of that feature fullest represented
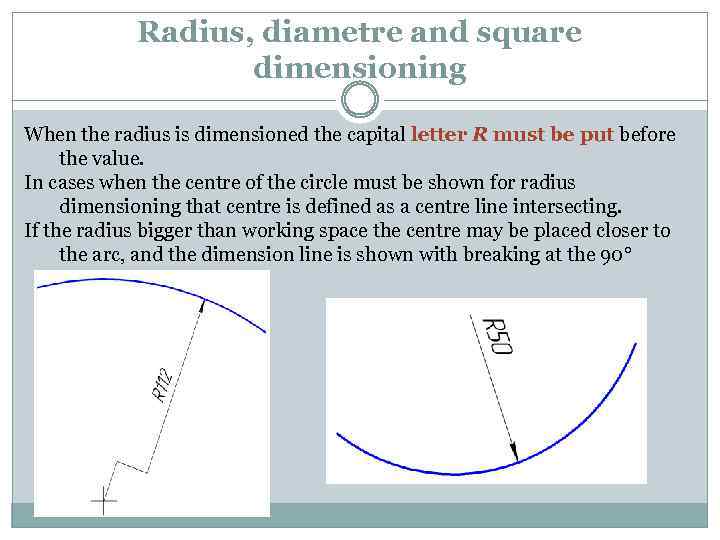 Radius, diametre and square dimensioning When the radius is dimensioned the capital letter R must be put before the value. In cases when the centre of the circle must be shown for radius dimensioning that centre is defined as a centre line intersecting. If the radius bigger than working space the centre may be placed closer to the arc, and the dimension line is shown with breaking at the 90°
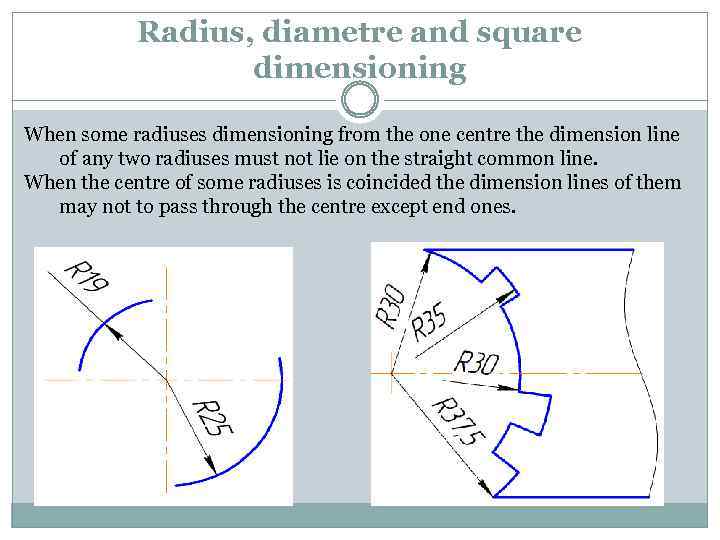 Radius, diametre and square dimensioning When some radiuses dimensioning from the one centre the dimension line of any two radiuses must not lie on the straight common line. When the centre of some radiuses is coincided the dimension lines of them may not to pass through the centre except end ones.
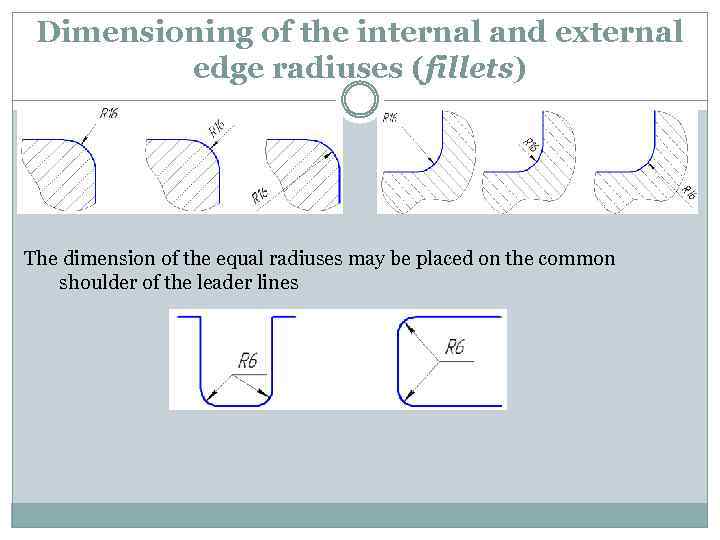 Dimensioning of the internal and external edge radiuses (fillets) The dimension of the equal radiuses may be placed on the common shoulder of the leader lines
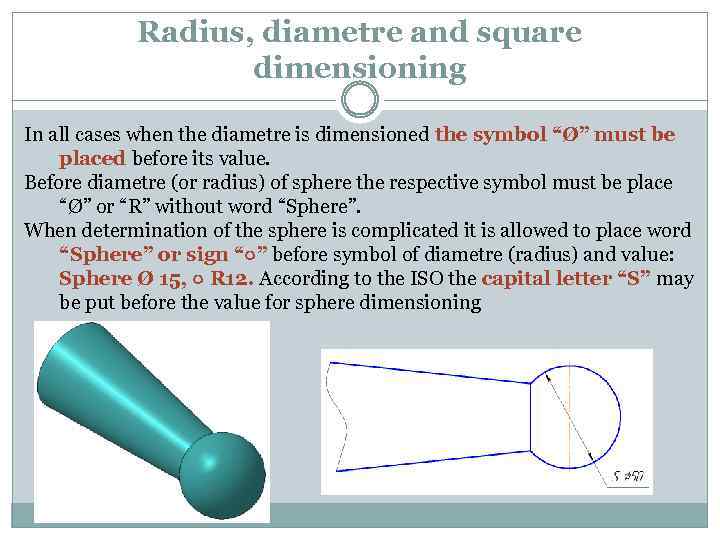 Radius, diametre and square dimensioning In all cases when the diametre is dimensioned the symbol “Ø” must be placed before its value. Before diametre (or radius) of sphere the respective symbol must be place “Ø” or “R” without word “Sphere”. When determination of the sphere is complicated it is allowed to place word “Sphere” or sign “○” before symbol of diametre (radius) and value: Sphere Ø 15, ○ R 12. According to the ISO the capital letter “S” may be put before the value for sphere dimensioning
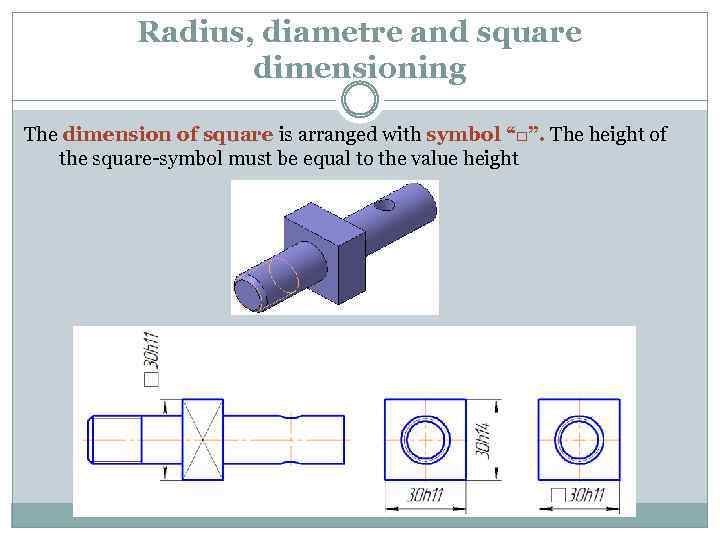 Radius, diametre and square dimensioning The dimension of square is arranged with symbol “□”. The height of the square-symbol must be equal to the value height
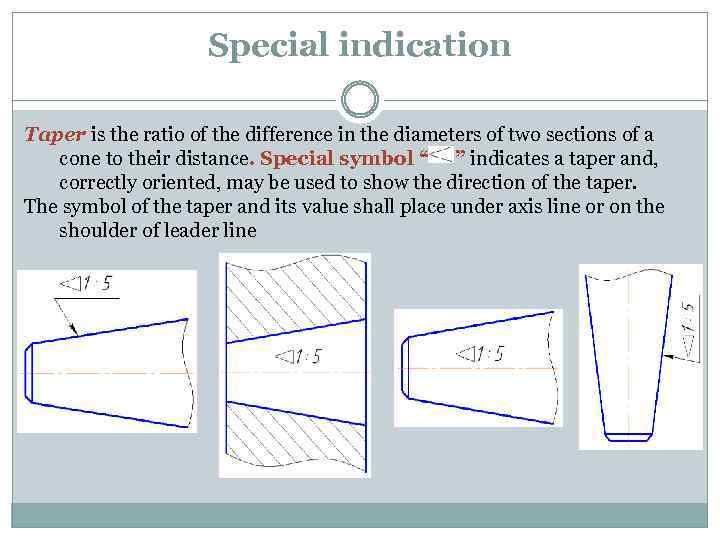 Special indication Taper is the ratio of the difference in the diameters of two sections of a cone to their distance. Special symbol “ ” indicates a taper and, correctly oriented, may be used to show the direction of the taper. The symbol of the taper and its value shall place under axis line or on the shoulder of leader line
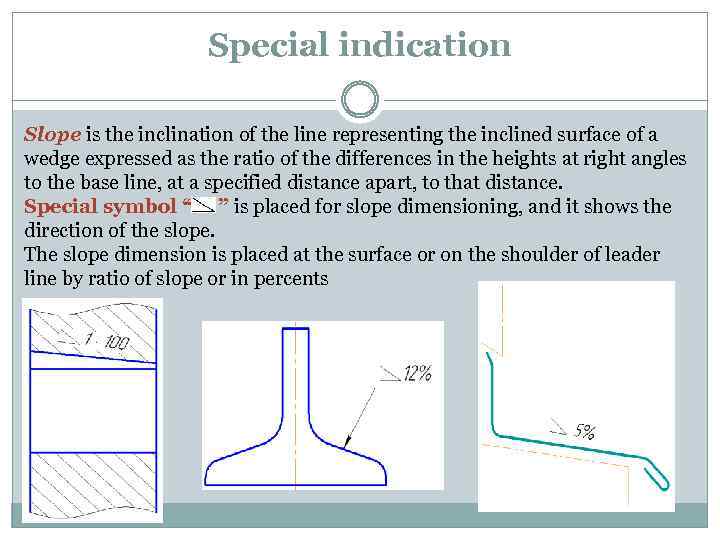 Special indication Slope is the inclination of the line representing the inclined surface of a wedge expressed as the ratio of the differences in the heights at right angles to the base line, at a specified distance apart, to that distance. Special symbol “ ” is placed for slope dimensioning, and it shows the direction of the slope. The slope dimension is placed at the surface or on the shoulder of leader line by ratio of slope or in percents
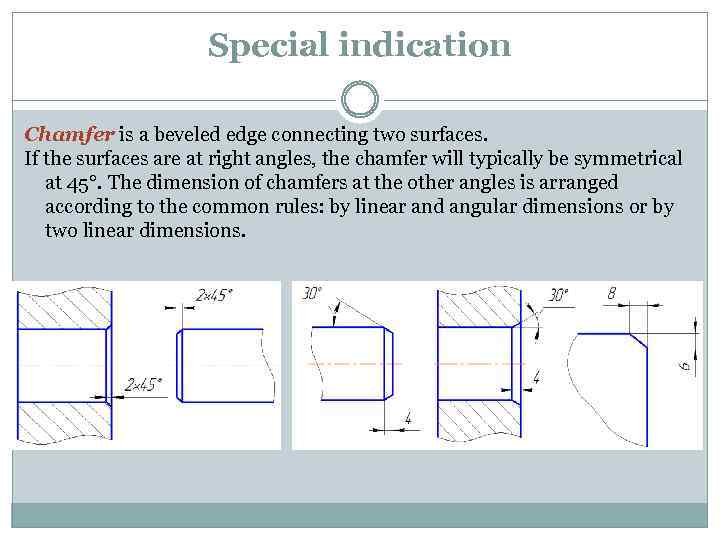 Special indication Chamfer is a beveled edge connecting two surfaces. If the surfaces are at right angles, the chamfer will typically be symmetrical at 45°. The dimension of chamfers at the other angles is arranged according to the common rules: by linear and angular dimensions or by two linear dimensions.
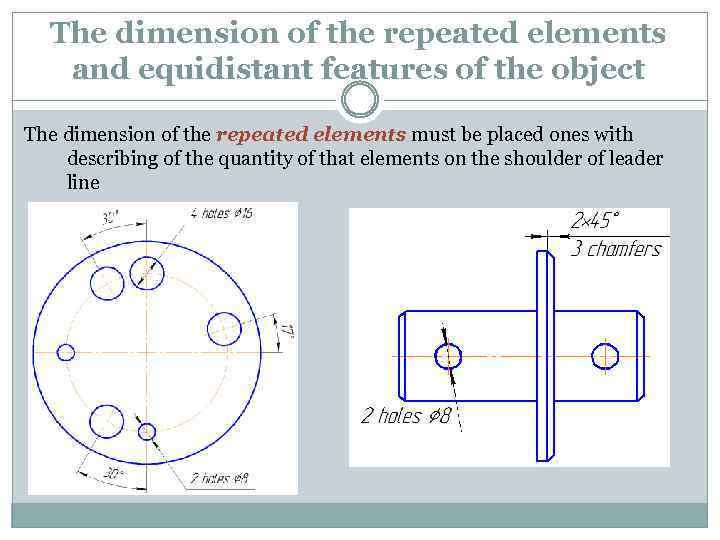 The dimension of the repeated elements and equidistant features of the object The dimension of the repeated elements must be placed ones with describing of the quantity of that elements on the shoulder of leader line
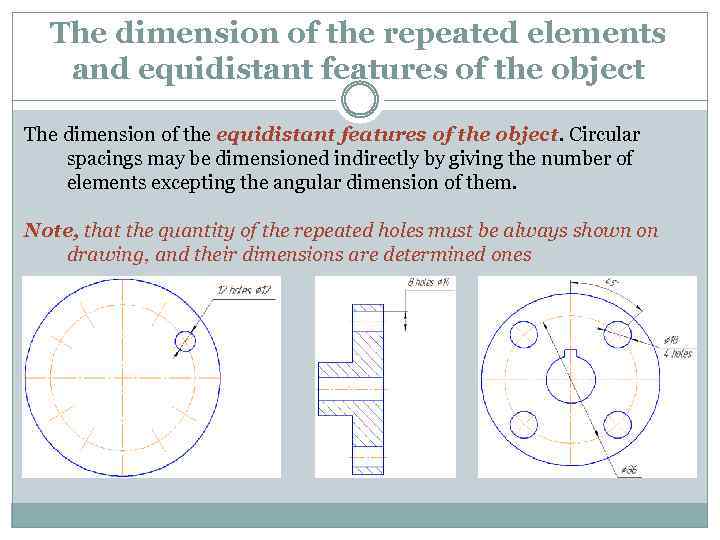 The dimension of the repeated elements and equidistant features of the object The dimension of the equidistant features of the object. Circular spacings may be dimensioned indirectly by giving the number of elements excepting the angular dimension of them. Note, that the quantity of the repeated holes must be always shown on drawing, and their dimensions are determined ones
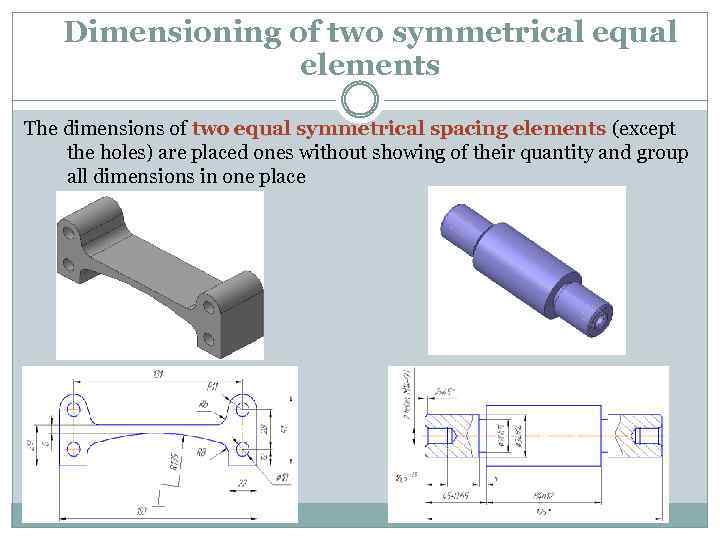 Dimensioning of two symmetrical equal elements The dimensions of two equal symmetrical spacing elements (except the holes) are placed ones without showing of their quantity and group all dimensions in one place
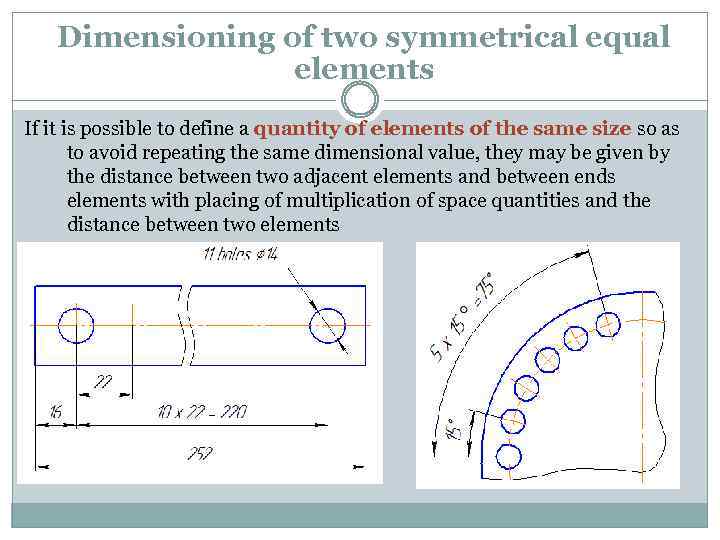 Dimensioning of two symmetrical equal elements If it is possible to define a quantity of elements of the same size so as to avoid repeating the same dimensional value, they may be given by the distance between two adjacent elements and between ends elements with placing of multiplication of space quantities and the distance between two elements
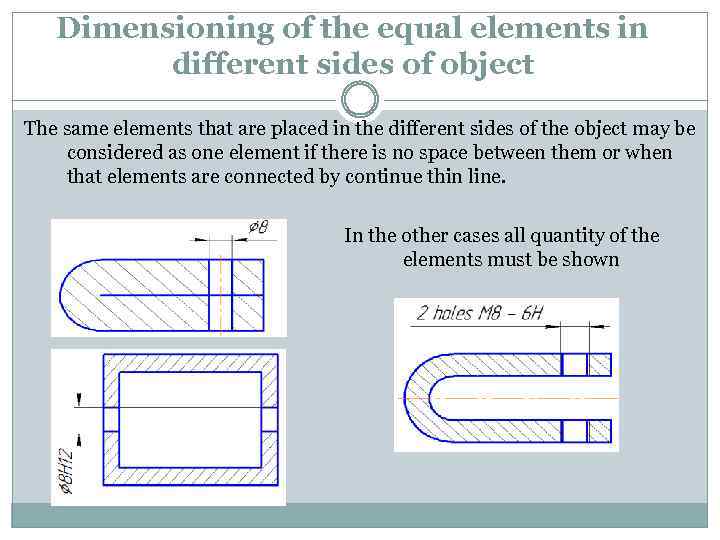 Dimensioning of the equal elements in different sides of object The same elements that are placed in the different sides of the object may be considered as one element if there is no space between them or when that elements are connected by continue thin line. In the other cases all quantity of the elements must be shown
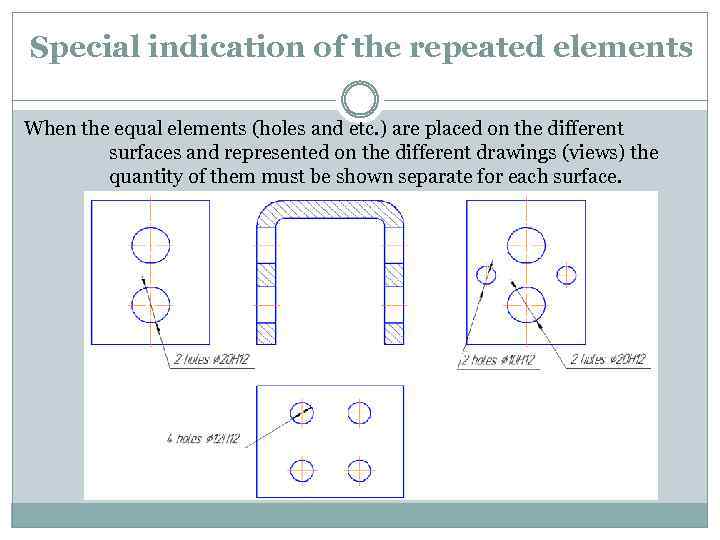 Special indication of the repeated elements When the equal elements (holes and etc. ) are placed on the different surfaces and represented on the different drawings (views) the quantity of them must be shown separate for each surface.
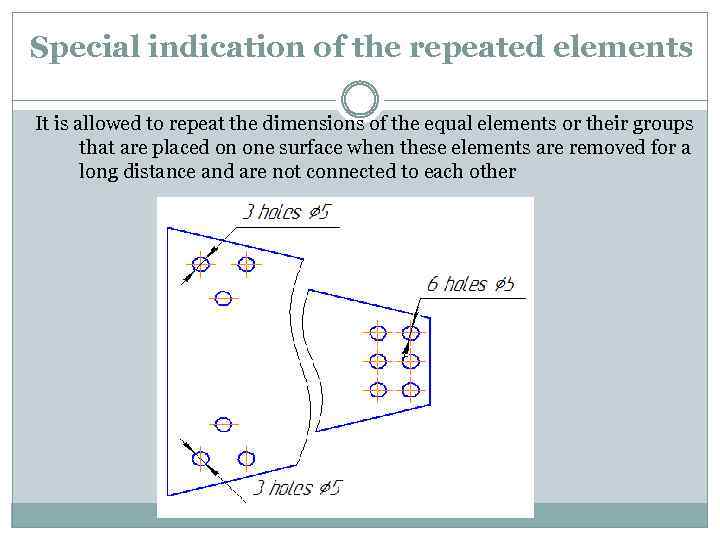 Special indication of the repeated elements It is allowed to repeat the dimensions of the equal elements or their groups that are placed on one surface when these elements are removed for a long distance and are not connected to each other
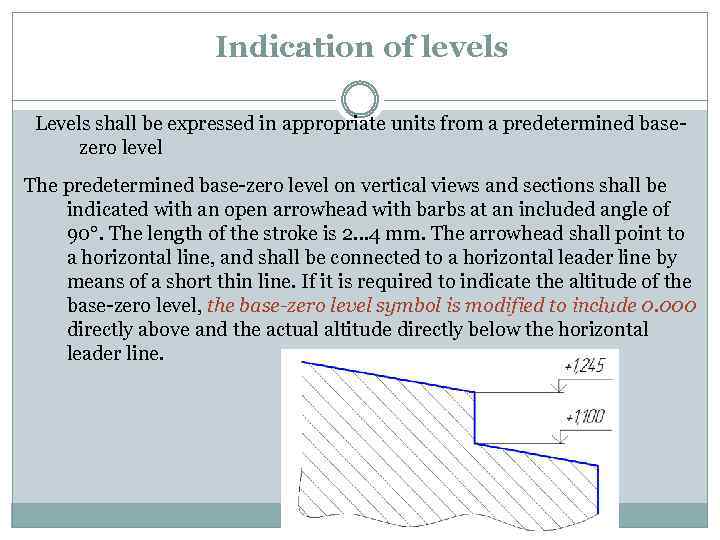 Indication of levels Levels shall be expressed in appropriate units from a predetermined basezero level The predetermined base-zero level on vertical views and sections shall be indicated with an open arrowhead with barbs at an included angle of 90°. The length of the stroke is 2… 4 mm. The arrowhead shall point to a horizontal line, and shall be connected to a horizontal leader line by means of a short thin line. If it is required to indicate the altitude of the base-zero level, the base-zero level symbol is modified to include 0. 000 directly above and the actual altitude directly below the horizontal leader line.
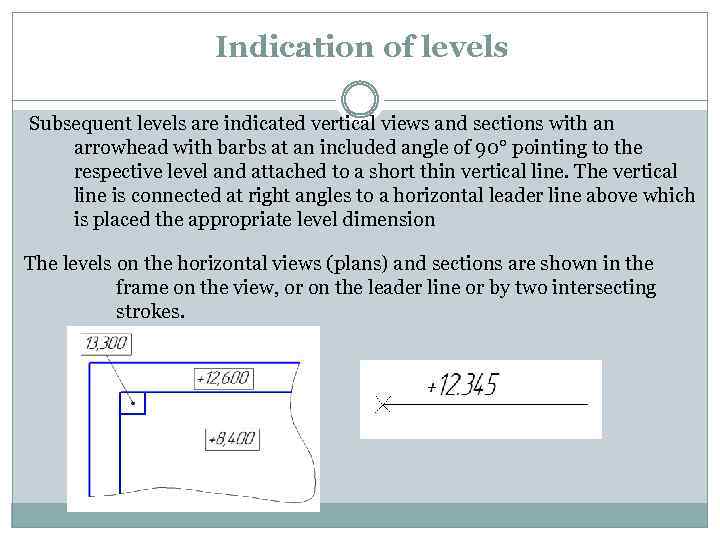 Indication of levels Subsequent levels are indicated vertical views and sections with an arrowhead with barbs at an included angle of 90° pointing to the respective level and attached to a short thin vertical line. The vertical line is connected at right angles to a horizontal leader line above which is placed the appropriate level dimension The levels on the horizontal views (plans) and sections are shown in the frame on the view, or on the leader line or by two intersecting strokes.


