8538bf62859b1ac42eb251266f8575e6.ppt
- Количество слайдов: 66
BHEL Tiruchirappalli Quality Powering the Growth
VISION 2012 Quality • The Quality function will be done by the respective task performers • Defect prevention will be given top priority • Supported with Integrated systems and functions towards total compliance to specifications. • The final task performer will certify the outgoing product for its quality • Quality Surveillance and audits will be the source for improvement actions Gearing up for
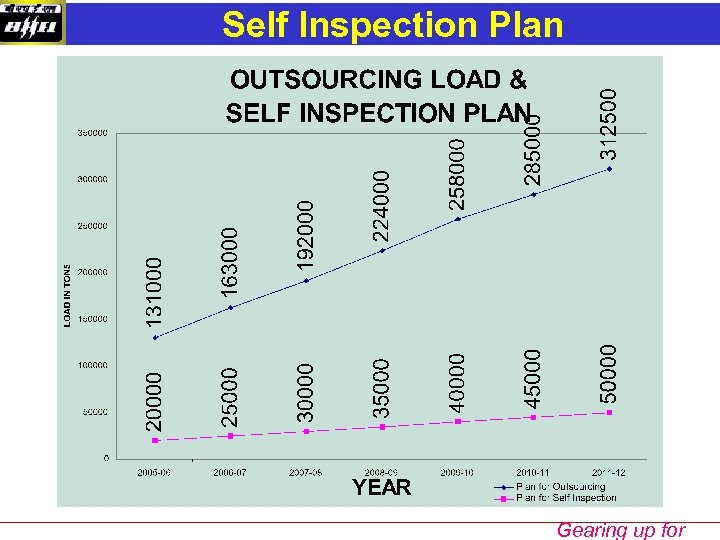
Quality: Vision 2012: Basis Presentation Focus • Larger association with suppliers and service providers considering: – – Physical Growth rate of about 10% CAGR in Shops 17% CAGR in Outsourcing/Away Centre fabrication 30% in Shops, 70% in Outsourcing Increased Outsourcing from 1, 20, 000 MT to 3, 20, 000 MT • Reduced in-house human resource/ talent, with no significant inductions • A company-wide quality culture • Increased Automation, e-enabling Gearing up for
Quality: Vision 2012 Presentation Focus Defect Prevention culture to avert errors and defects (instead of finding out defectives and correcting the same) The task performers own and control the process and monitor the performance (without the need for separate QC Personnel at Shop floor/ Vendor Works for verification and compliance) The goal is to reach Zero Defects Gearing up for
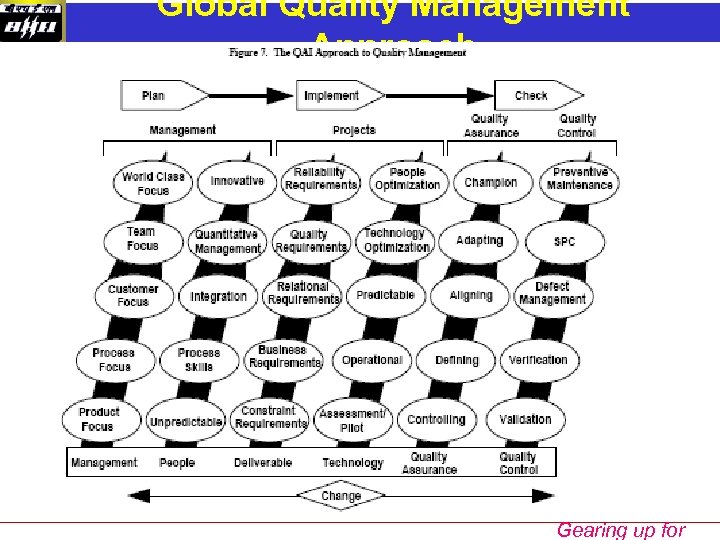
Global Quality Management Approach Gearing up for
Quality: Vision 2012: Strategies Presentation Focus 1. Focus on Quality Planning rather than Inspection 2. Minimisation of human dependence with appropriate automation 3. Increased Outsourcing of non-core activities 4. More stress on Self Inspection 5. Adequate and Reliable Supplier-base with Strong Partnership 6. Quality Image Enhancement 7. Sustenance of Knowledge Base 8. Highly Motivated self-driven Team Gearing up for
1. Focus on Quality Planning … 1 • Effective Process Management * • Dedicated Group to analyse data regularly, Root Cause analysis and Mistake Proofing * • Establishment and Monitoring of Process Capability for all CTQ Work Centres • Minimisation of Liaison Work through online systems and outsourcing • Strong internal audits and surveillance in all functions • Continuous Revisit and Standardisation of Procedures and Plans * Gearing up for
1. Focus on Quality Planning … 2 • Simplifying Quality Function through Modularisation of Products • Enhancing Customer Confidence for Reduction of Hold Points (CHPs) • Augmentation and right mix of Quality Equipments, with high utilisation • Comprehensive documentation to task performers on time • Monitor and control Cost of Quality * Gearing up for
2. Minimising Human Dependence • Automation in Inspection – * – Automated measurements by probes in CNC System – Laser-based linear measurements – Portable Co-ordinate Measuring Machine (CMM) based measurements for fabricated components – Robots, AI based Decision Making Equipments – Automated Equipments in Testing and NDE • Intelligent Process Monitoring and Control of major welding, forming and other processes • Electronic Data Exchange of Quality Work Instructions and Reports – IT Plan * • Voice enabled data acquisition systems • Increased Speed of Response * Gearing up for
3. Increased Outsourcing The potential additional areas of outsourcing of the Quality Activities: • Material Quality Assessment on receipt • Documentation work at Shop & Data Folder / IBR certificate preparation • Fixed Tenure Recruitment of certified NDE and other Quality Engineers/ Supervisors for 3 shift working • Calibration and more Routine Testing Activities Gearing up for
4. Stress on Self Inspection / Certification • Certification of Personnel for Specific Assignments based on competencies • Majority of the vendors aligned with ISO 9001 systems, with dedicated BHEL audit teams conducting planned surveillance audits • Robust system for monitoring effectiveness of self inspection through interlinking of product performance, continuous rating, feedback, retraining etc * Gearing up for
5. Reliable Supplier-base …. 1 • Partnering with Suppliers to develop them for manufacturing pressure parts and precision products, through a dedicated group – to assist in establishment of quality systems (FOT, WPS , Welder qualification, Speciality Tooling and Gauges, Measurement techniques etc. ) with reduced cycle time & enhanced quality • Wider Self Product Certification for specific jobs • Electronic Data Interchange with Suppliers; including online TC Verification and product acceptance Gearing up for
5. Reliable Supplier-base …. 2 • Grooming up a team of "mobile" quality inspector turned educators for meeting extensive away centre/site fabrication quality requirements • Extensive sharing of improved "processes" developed by BHEL with the vendors Gearing up for
6. Image Enhancement • Creation of a Centre of Excellence for Materials Evaluation • Training and Support in Quality Management (ISO 9001, TQM etc) • Increased participation by executives as NABL Assessors for other Testing / Calibration Labs, CII Assessors for CII Award, Q & HSE Audits etc • Become a Well known Valve/ Boiler Maker Gearing up for
7. Sustenance of Knowledge-base • Creating a robust online knowledge bank by capturing the tacit experiences of Quality Personnel * – On Site Failures, Modifications, Improvement Studies, Site Visit Tour Reports, Quality Improvement Studies, implemented suggestions etc • Development of On-line Query System for clarifications in Quality Field, Online data bank to enable task performer to take corrective action in case of deviations • Support to WRI to continuously assess the impact of new materials/ new processes and their application issues Gearing up for
8. Motivated Team • Training and Skill Upgradation of personnel, based on identified competency needs • Plant wide SQC Knowledge and an SQC culture • Training in areas like SQC, Six Sigma, FMEA and other Quality tools to all personnel * • Competency mapping and capability building of personnel to enable scientific problem analysis and solving • System for tracking Quality Performance of Task Performers and the linked training • Increased team work through Quality Circles * and small group working Gearing up for
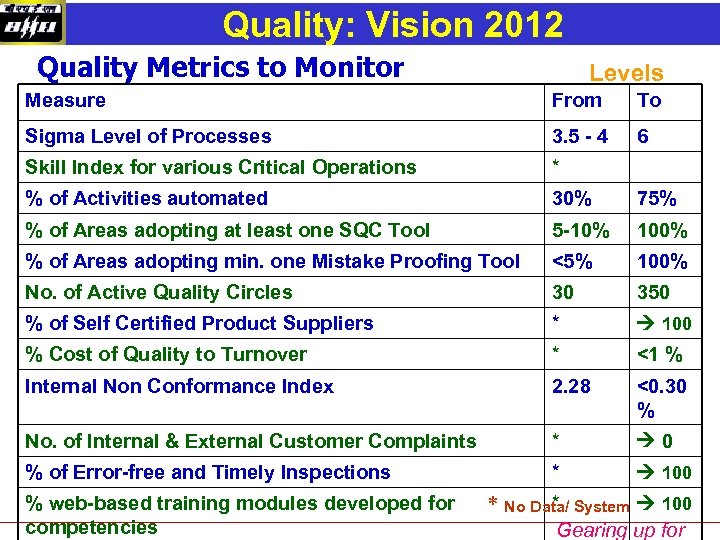
Quality: Vision 2012 Presentation Focus Quality Metrics to Monitor Levels Measure From To Sigma Level of Processes 3. 5 - 4 6 Skill Index for various Critical Operations * % of Activities automated 30% 75% % of Areas adopting at least one SQC Tool 5 -10% 100% % of Areas adopting min. one Mistake Proofing Tool <5% 100% No. of Active Quality Circles 30 350 % of Self Certified Product Suppliers * 100 % Cost of Quality to Turnover * <1 % Internal Non Conformance Index 2. 28 <0. 30 % No. of Internal & External Customer Complaints * 0 % of Error-free and Timely Inspections * 100 % web-based training modules developed for competencies * * No Data/ System 100 Gearing up for
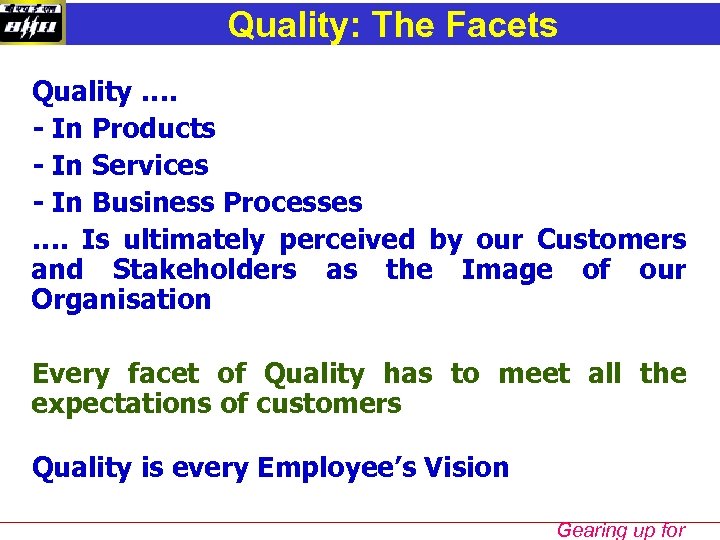
Presentation. Facets Quality: The Focus Quality …. - In Products - In Services - In Business Processes …. Is ultimately perceived by our Customers and Stakeholders as the Image of our Organisation Every facet of Quality has to meet all the expectations of customers Quality is every Employee’s Vision Gearing up for

Thank
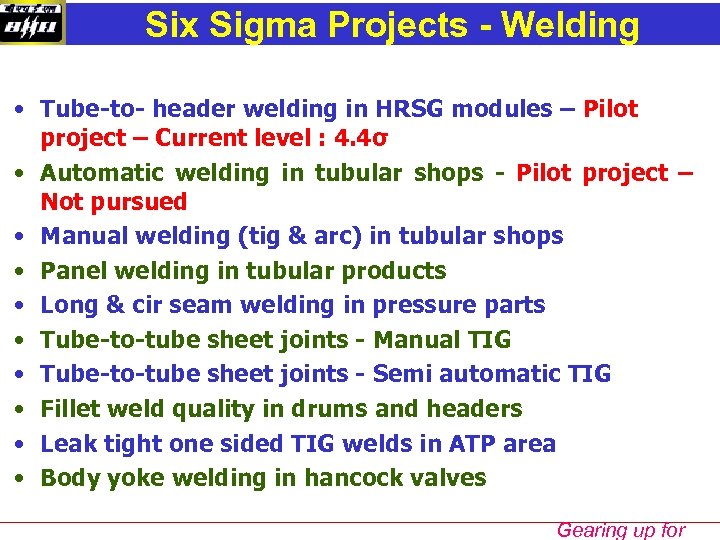
Six Sigma Projects - Welding • Tube-to- header welding in HRSG modules – Pilot project – Current level : 4. 4σ • Automatic welding in tubular shops - Pilot project – Not pursued • Manual welding (tig & arc) in tubular shops • Panel welding in tubular products • Long & cir seam welding in pressure parts • Tube-to-tube sheet joints - Manual TIG • Tube-to-tube sheet joints - Semi automatic TIG • Fillet weld quality in drums and headers • Leak tight one sided TIG welds in ATP area • Body yoke welding in hancock valves Gearing up for
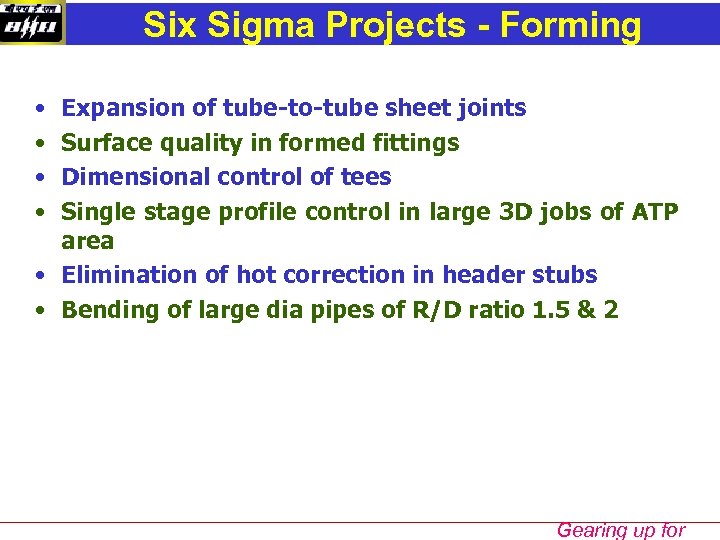
Six Sigma Projects - Forming • • Expansion of tube-to-tube sheet joints Surface quality in formed fittings Dimensional control of tees Single stage profile control in large 3 D jobs of ATP area • Elimination of hot correction in header stubs • Bending of large dia pipes of R/D ratio 1. 5 & 2 Gearing up for
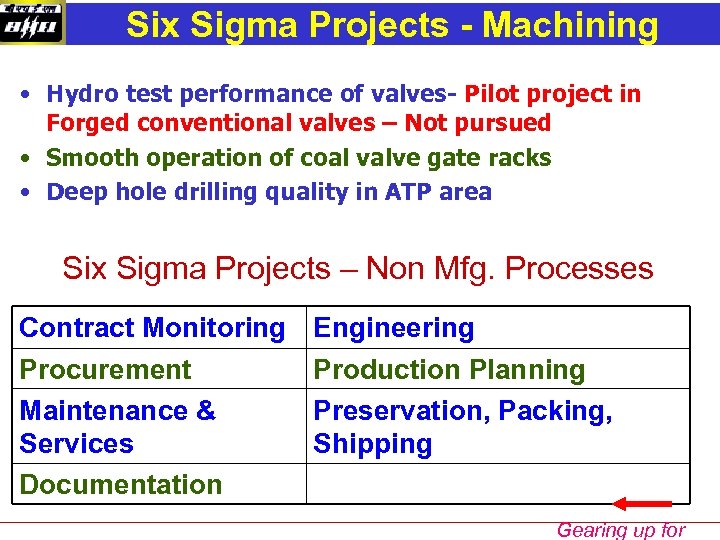
Six Sigma Projects - Machining • Hydro test performance of valves- Pilot project in Forged conventional valves – Not pursued • Smooth operation of coal valve gate racks • Deep hole drilling quality in ATP area Six Sigma Projects – Non Mfg. Processes Contract Monitoring Procurement Maintenance & Services Documentation Engineering Production Planning Preservation, Packing, Shipping Gearing up for
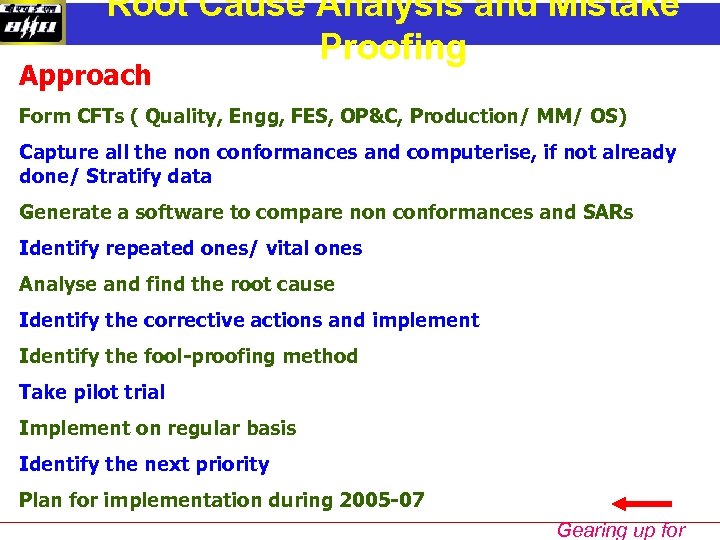
Root Cause Analysis and Mistake Proofing Approach Form CFTs ( Quality, Engg, FES, OP&C, Production/ MM/ OS) Capture all the non conformances and computerise, if not already done/ Stratify data Generate a software to compare non conformances and SARs Identify repeated ones/ vital ones Analyse and find the root cause Identify the corrective actions and implement Identify the fool-proofing method Take pilot trial Implement on regular basis Identify the next priority Plan for implementation during 2005 -07 Gearing up for
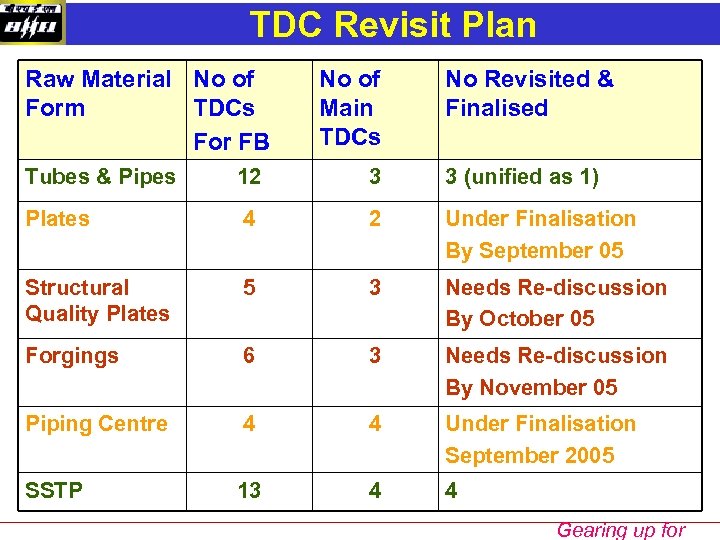
TDC Revisit Plan Raw Material No of Form TDCs For FB No of Main TDCs No Revisited & Finalised Tubes & Pipes 12 3 3 (unified as 1) Plates 4 2 Under Finalisation By September 05 Structural Quality Plates 5 3 Needs Re-discussion By October 05 Forgings 6 3 Needs Re-discussion By November 05 Piping Centre 4 4 Under Finalisation September 2005 SSTP 13 4 4 Gearing up for
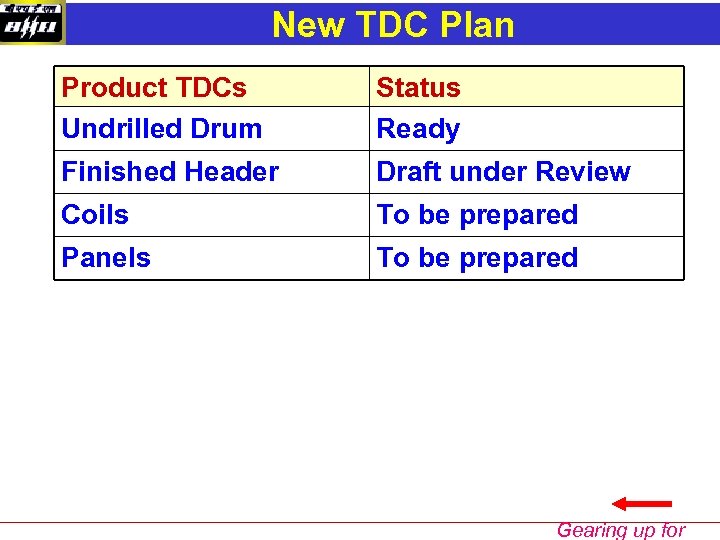
New TDC Plan Product TDCs Undrilled Drum Status Ready Finished Header Draft under Review Coils To be prepared Panels To be prepared Gearing up for
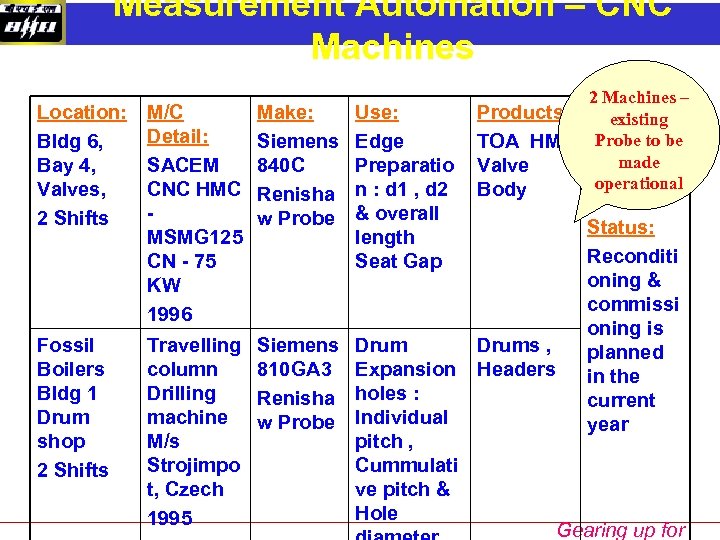
Measurement Automation – CNC Machines Location: Bldg 6, Bay 4, Valves, 2 Shifts M/C Detail: SACEM CNC HMC MSMG 125 CN - 75 KW 1996 Make: Siemens 840 C Renisha w Probe Use: Edge Preparatio n : d 1 , d 2 & overall length Seat Gap Products: TOA HM Valve Body Fossil Boilers Bldg 1 Drum shop 2 Shifts Travelling column Drilling machine M/s Strojimpo t, Czech 1995 Siemens 810 GA 3 Renisha w Probe Drums , Expansion Headers holes : Individual pitch , Cummulati ve pitch & Hole 2 Machines – existing Probe to be made operational Status: Reconditi oning & commissi oning is planned in the current year Gearing up for
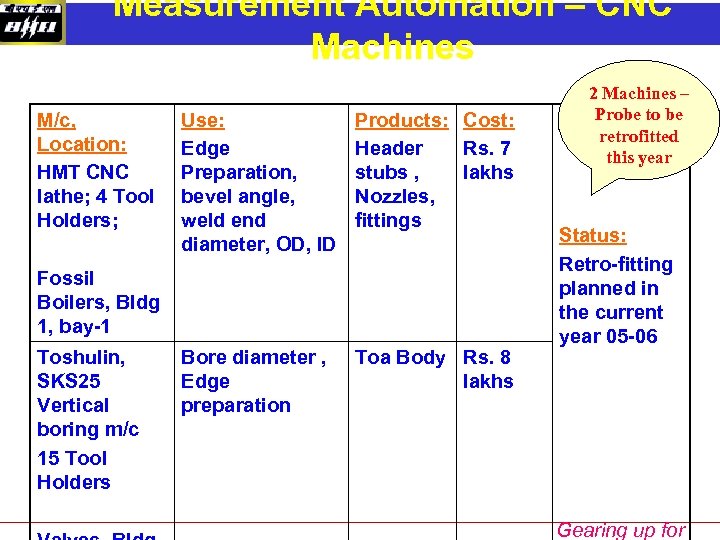
Measurement Automation – CNC Machines M/c, Location: HMT CNC lathe; 4 Tool Holders; Use: Edge Preparation, bevel angle, weld end diameter, OD, ID Products: Cost: Header Rs. 7 stubs , lakhs Nozzles, fittings Bore diameter , Edge preparation Toa Body Rs. 8 lakhs Fossil Boilers, Bldg 1, bay-1 Toshulin, SKS 25 Vertical boring m/c 15 Tool Holders 2 Machines – Probe to be retrofitted this year Status: Retro-fitting planned in the current year 05 -06 Gearing up for
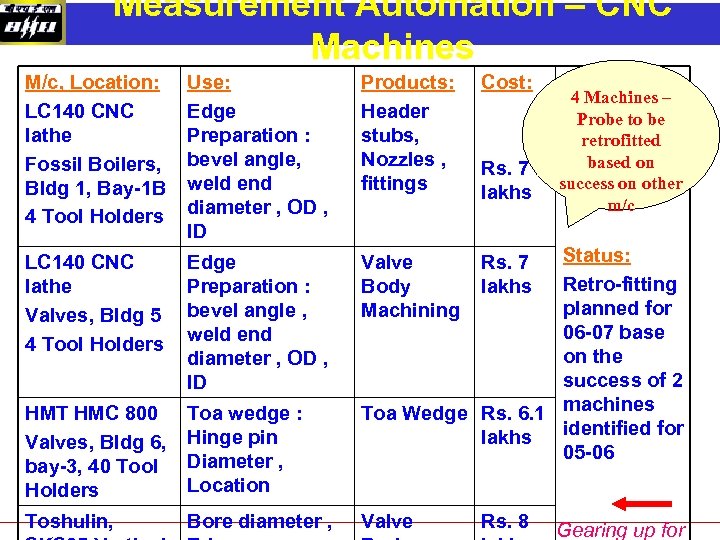
Measurement Automation – CNC Machines M/c, Location: LC 140 CNC lathe Fossil Boilers, Bldg 1, Bay-1 B 4 Tool Holders Use: Edge Preparation : bevel angle, weld end diameter , OD , ID Products: Header stubs, Nozzles , fittings Cost: LC 140 CNC lathe Valves, Bldg 5 4 Tool Holders Edge Preparation : bevel angle , weld end diameter , OD , ID Valve Body Machining Rs. 7 lakhs HMT HMC 800 Valves, Bldg 6, bay-3, 40 Tool Holders Toa wedge : Hinge pin Diameter , Location Toshulin, Bore diameter , Valve Rs. 8 Rs. 7 lakhs 4 Machines – Probe to be retrofitted based on success on other m/c Status: Retro-fitting planned for 06 -07 base on the success of 2 Toa Wedge Rs. 6. 1 machines identified for lakhs 05 -06 Gearing up for
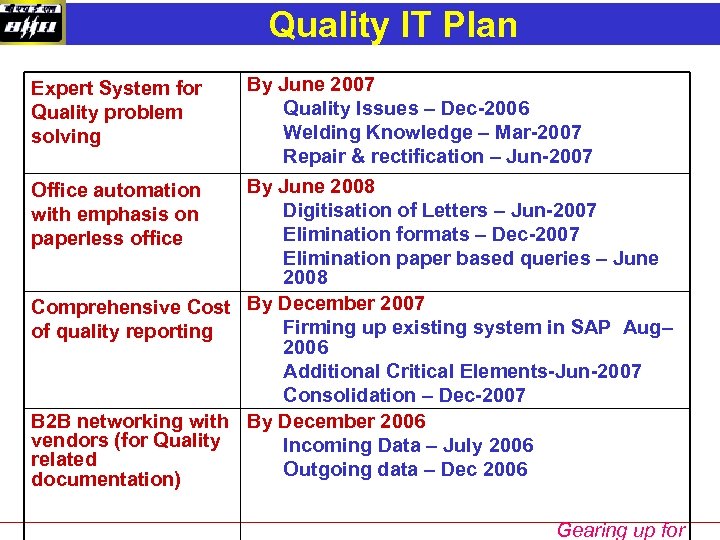
Quality IT Plan By June 2007 Quality Issues – Dec-2006 Welding Knowledge – Mar-2007 Repair & rectification – Jun-2007 By June 2008 Office automation Digitisation of Letters – Jun-2007 with emphasis on Elimination formats – Dec-2007 paperless office Elimination paper based queries – June 2008 Comprehensive Cost By December 2007 Firming up existing system in SAP Aug– of quality reporting 2006 Additional Critical Elements-Jun-2007 Consolidation – Dec-2007 B 2 B networking with By December 2006 vendors (for Quality Incoming Data – July 2006 related Outgoing data – Dec 2006 documentation) Expert System for Quality problem solving Gearing up for
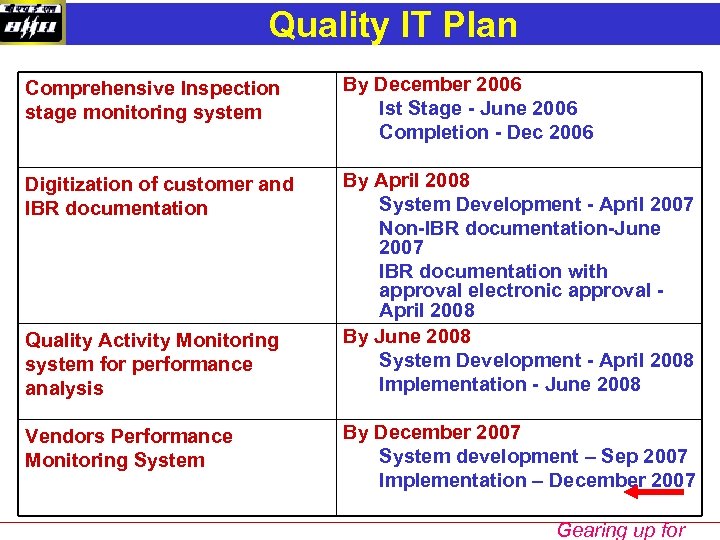
Quality IT Plan Comprehensive Inspection stage monitoring system By December 2006 Ist Stage - June 2006 Completion - Dec 2006 Digitization of customer and IBR documentation By April 2008 System Development - April 2007 Non-IBR documentation-June 2007 IBR documentation with approval electronic approval April 2008 By June 2008 System Development - April 2008 Implementation - June 2008 Quality Activity Monitoring system for performance analysis Vendors Performance Monitoring System By December 2007 System development – Sep 2007 Implementation – December 2007 Gearing up for
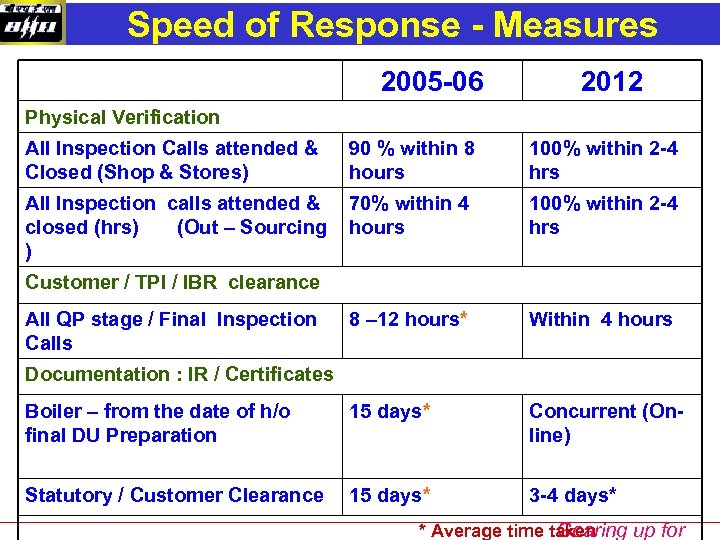
Speed of Response - Measures 2005 -06 2012 Physical Verification All Inspection Calls attended & Closed (Shop & Stores) 90 % within 8 hours 100% within 2 -4 hrs All Inspection calls attended & closed (hrs) (Out – Sourcing ) 70% within 4 hours 100% within 2 -4 hrs 8 – 12 hours* Within 4 hours Boiler – from the date of h/o final DU Preparation 15 days* Concurrent (Online) Statutory / Customer Clearance 15 days* 3 -4 days* Customer / TPI / IBR clearance All QP stage / Final Inspection Calls Documentation : IR / Certificates * Average time taken Gearing up for
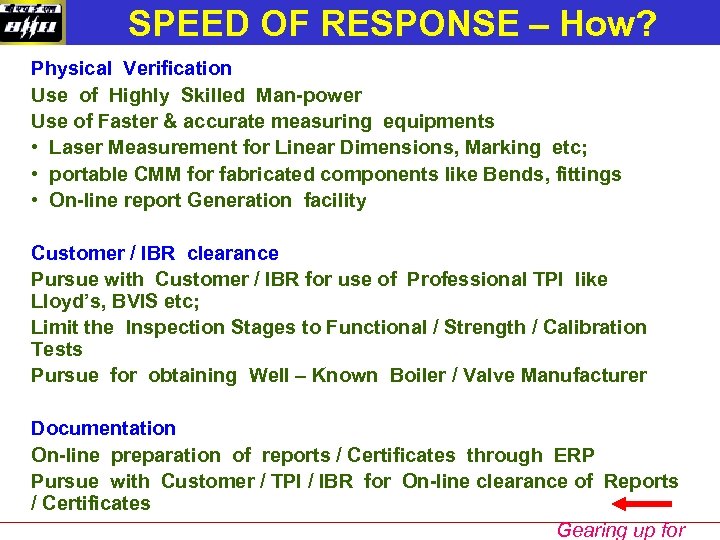
SPEED OF RESPONSE – How? Physical Verification Use of Highly Skilled Man-power Use of Faster & accurate measuring equipments • Laser Measurement for Linear Dimensions, Marking etc; • portable CMM for fabricated components like Bends, fittings • On-line report Generation facility Customer / IBR clearance Pursue with Customer / IBR for use of Professional TPI like Lloyd’s, BVIS etc; Limit the Inspection Stages to Functional / Strength / Calibration Tests Pursue for obtaining Well – Known Boiler / Valve Manufacturer Documentation On-line preparation of reports / Certificates through ERP Pursue with Customer / TPI / IBR for On-line clearance of Reports / Certificates Gearing up for
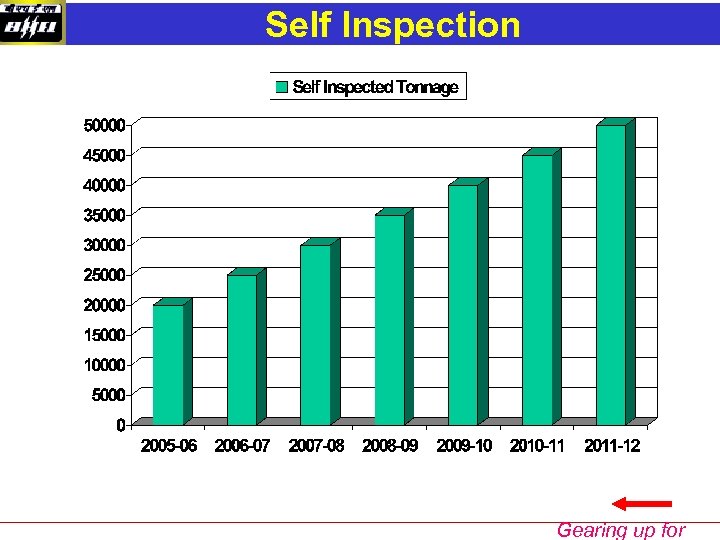
Self Inspection Gearing up for
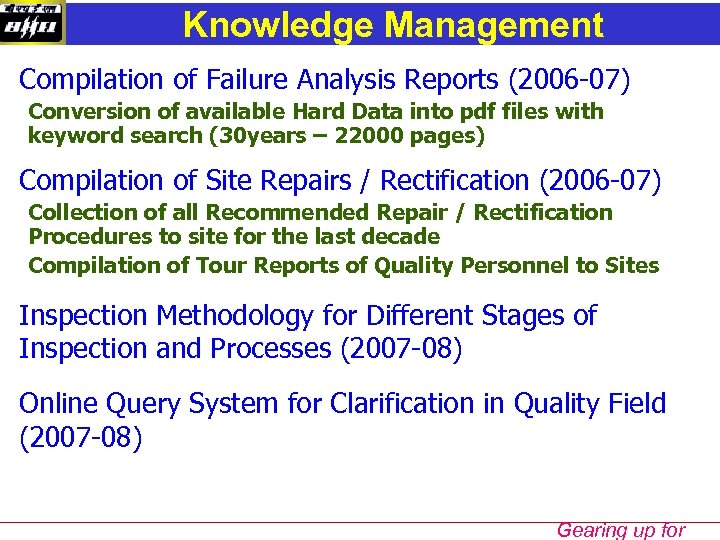
Knowledge Management Compilation of Failure Analysis Reports (2006 -07) Conversion of available Hard Data into pdf files with keyword search (30 years – 22000 pages) Compilation of Site Repairs / Rectification (2006 -07) Collection of all Recommended Repair / Rectification Procedures to site for the last decade Compilation of Tour Reports of Quality Personnel to Sites Inspection Methodology for Different Stages of Inspection and Processes (2007 -08) Online Query System for Clarification in Quality Field (2007 -08) Gearing up for
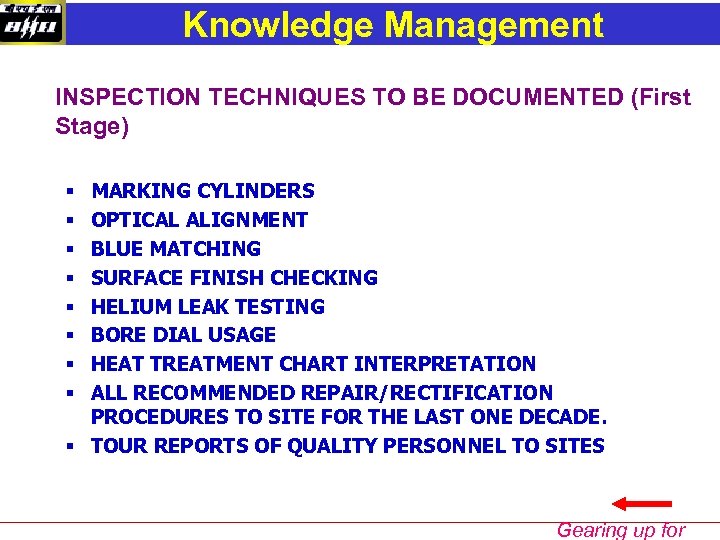
Knowledge Management INSPECTION TECHNIQUES TO BE DOCUMENTED (First Stage) MARKING CYLINDERS OPTICAL ALIGNMENT BLUE MATCHING SURFACE FINISH CHECKING HELIUM LEAK TESTING BORE DIAL USAGE HEAT TREATMENT CHART INTERPRETATION ALL RECOMMENDED REPAIR/RECTIFICATION PROCEDURES TO SITE FOR THE LAST ONE DECADE. § TOUR REPORTS OF QUALITY PERSONNEL TO SITES § § § § Gearing up for
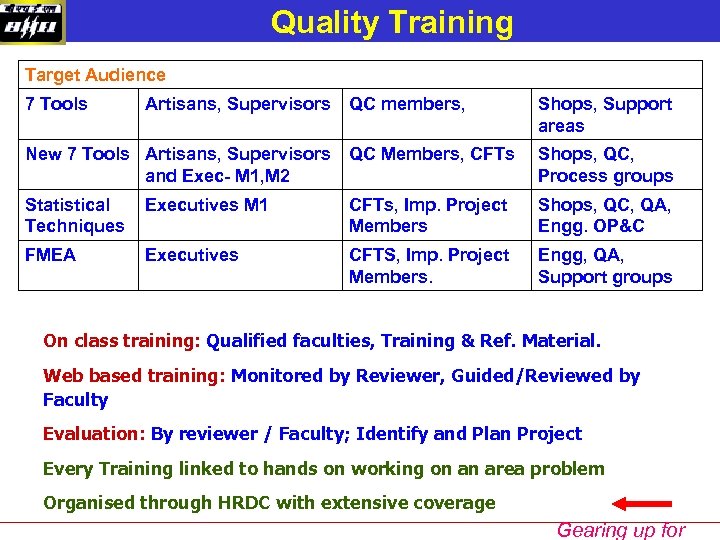
Quality Training Target Audience 7 Tools Artisans, Supervisors QC members, Shops, Support areas New 7 Tools Artisans, Supervisors and Exec- M 1, M 2 QC Members, CFTs Shops, QC, Process groups Statistical Techniques Executives M 1 CFTs, Imp. Project Members Shops, QC, QA, Engg. OP&C FMEA Executives CFTS, Imp. Project Members. Engg, QA, Support groups On class training: Qualified faculties, Training & Ref. Material. Web based training: Monitored by Reviewer, Guided/Reviewed by Faculty Evaluation: By reviewer / Faculty; Identify and Plan Project Every Training linked to hands on working on an area problem Organised through HRDC with extensive coverage Gearing up for
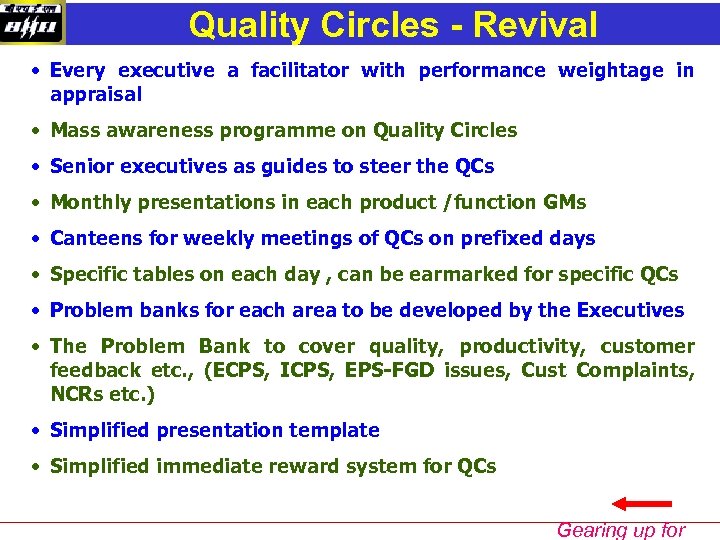
Quality Circles - Revival • Every executive a facilitator with performance weightage in appraisal • Mass awareness programme on Quality Circles • Senior executives as guides to steer the QCs • Monthly presentations in each product /function GMs • Canteens for weekly meetings of QCs on prefixed days • Specific tables on each day , can be earmarked for specific QCs • Problem banks for each area to be developed by the Executives • The Problem Bank to cover quality, productivity, customer feedback etc. , (ECPS, ICPS, EPS-FGD issues, Cust Complaints, NCRs etc. ) • Simplified presentation template • Simplified immediate reward system for QCs Gearing up for
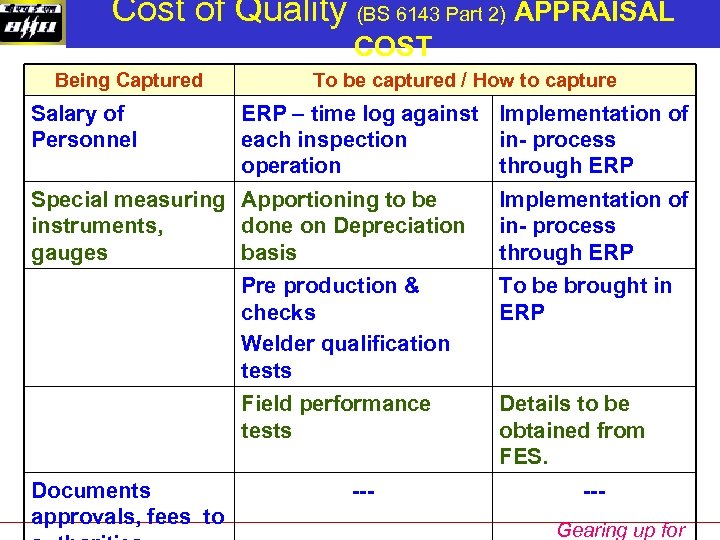
Cost of Quality (BS 6143 Part 2) APPRAISAL COST Being Captured Salary of Personnel To be captured / How to capture ERP – time log against Implementation of each inspection in- process operation through ERP Special measuring Apportioning to be instruments, done on Depreciation gauges basis Implementation of in- process through ERP Pre production & checks Welder qualification tests Field performance tests Documents approvals, fees to To be brought in ERP Details to be obtained from FES. --- --Gearing up for
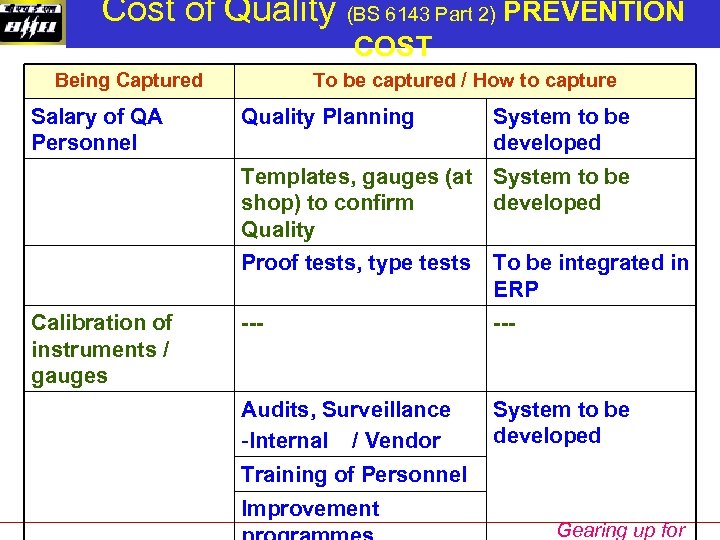
Cost of Quality (BS 6143 Part 2) PREVENTION COST Being Captured Salary of QA Personnel To be captured / How to capture Quality Planning System to be developed Templates, gauges (at System to be shop) to confirm developed Quality Proof tests, type tests Calibration of instruments / gauges To be integrated in ERP --- Audits, Surveillance -Internal / Vendor System to be developed Training of Personnel Improvement Gearing up for
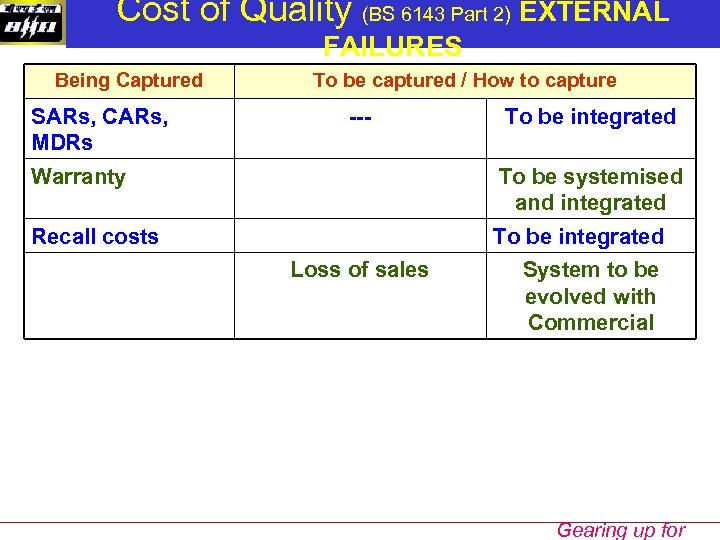
Cost of Quality (BS 6143 Part 2) EXTERNAL FAILURES Being Captured SARs, CARs, MDRs To be captured / How to capture --- To be integrated Warranty To be systemised and integrated Recall costs To be integrated Loss of sales System to be evolved with Commercial Gearing up for
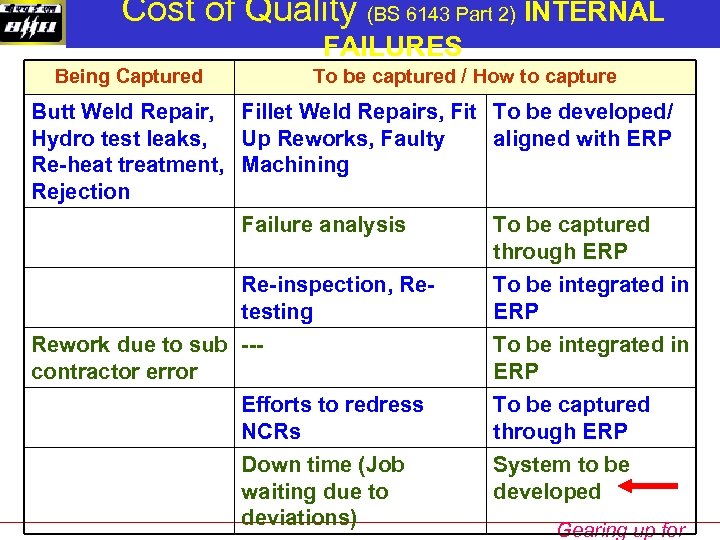
Cost of Quality (BS 6143 Part 2) INTERNAL FAILURES Being Captured To be captured / How to capture Butt Weld Repair, Fillet Weld Repairs, Fit To be developed/ Hydro test leaks, Up Reworks, Faulty aligned with ERP Re-heat treatment, Machining Rejection Failure analysis To be captured through ERP Re-inspection, Retesting To be integrated in ERP Rework due to sub --contractor error To be integrated in ERP Efforts to redress NCRs To be captured through ERP Down time (Job waiting due to deviations) System to be developed Gearing up for
VISION 2012 Quality Additional Back Up Slides Gearing up for
Six Sigma Programme • Six Sigma Level – 3. 4 defects per million • Most of our manufacturing processes are at levels between 3σ and 4σ • Corporate target – 4. 5σ level by 2007 in critical processes • Suggested list of processes (not exhaustive) for implementing Six Sigma programme follows • Examples of opportunities / sigma level calculation presented Gearing up for
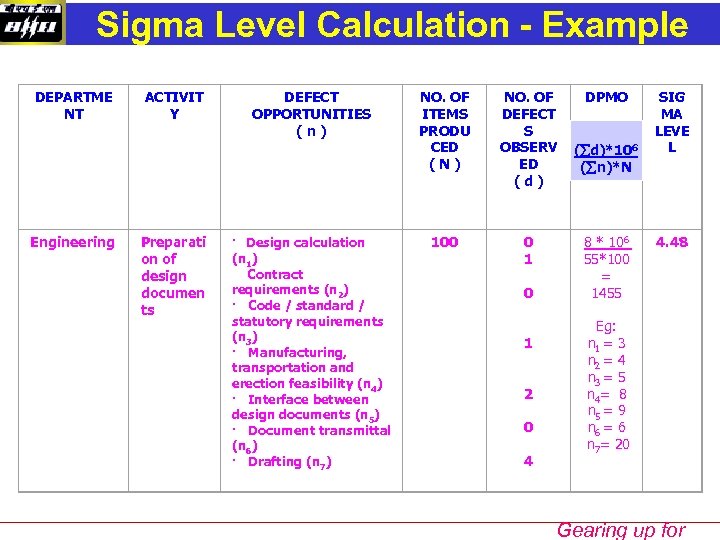
Sigma Level Calculation - Example DEPARTME NT Engineering ACTIVIT Y Preparati on of design documen ts DEFECT OPPORTUNITIES ( n ) · Design calculation (n 1) Contract requirements (n 2) · Code / standard / statutory requirements (n 3) · Manufacturing, transportation and erection feasibility (n 4) · Interface between design documents (n 5) · Document transmittal (n 6) · Drafting (n 7) NO. OF ITEMS PRODU CED ( N ) NO. OF DEFECT S OBSERV ED ( d ) 100 0 1 0 1 2 0 4 DPMO ( d)*106 ( n)*N 8 * 106 55*100 = 1455 SIG MA LEVE L 4. 48 Eg: n 1 = 3 n 2 = 4 n 3 = 5 n 4= 8 n 5 = 9 n 6 = 6 n 7= 20 Gearing up for
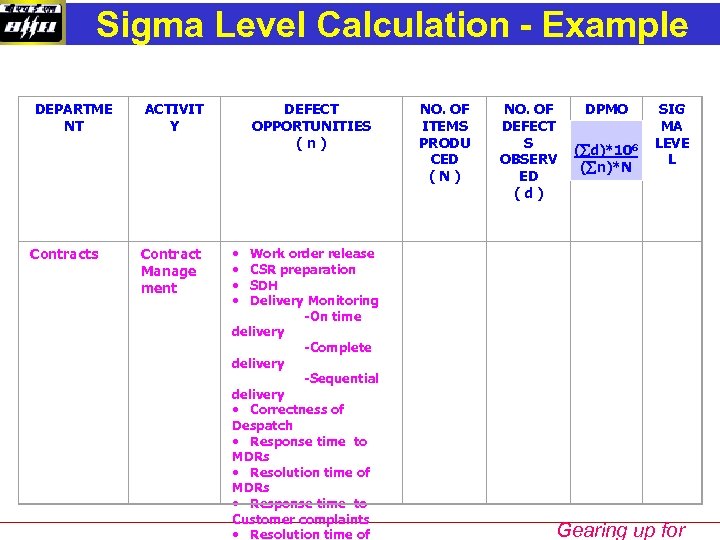
Sigma Level Calculation - Example DEPARTME NT Contracts ACTIVIT Y Contract Manage ment DEFECT OPPORTUNITIES ( n ) NO. OF ITEMS PRODU CED ( N ) NO. OF DEFECT S OBSERV ED ( d ) DPMO ( d)*106 ( n)*N SIG MA LEVE L • • Work order release CSR preparation SDH Delivery Monitoring -On time delivery -Complete delivery -Sequential delivery • Correctness of Despatch • Response time to MDRs • Resolution time of MDRs • Response time to Customer complaints • Resolution time of Gearing up for
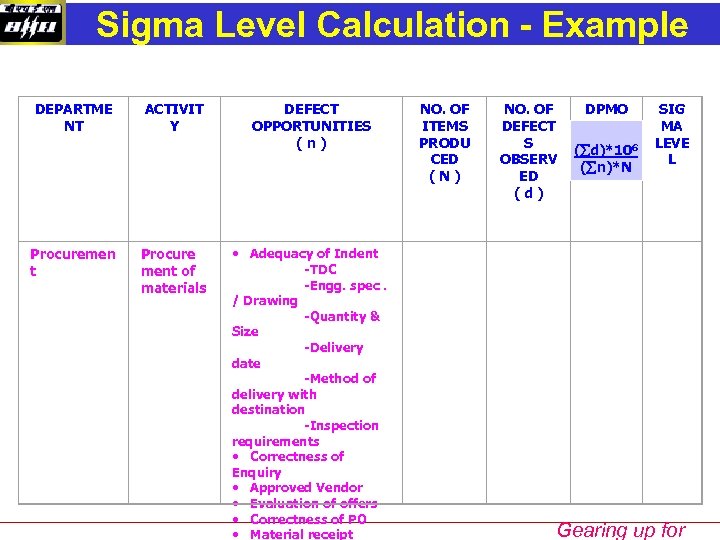
Sigma Level Calculation - Example DEPARTME NT Procuremen t ACTIVIT Y Procure ment of materials DEFECT OPPORTUNITIES ( n ) • Adequacy of Indent -TDC -Engg. spec. / Drawing -Quantity & Size -Delivery date -Method of delivery with destination -Inspection requirements • Correctness of Enquiry • Approved Vendor • Evaluation of offers • Correctness of PO • Material receipt NO. OF ITEMS PRODU CED ( N ) NO. OF DEFECT S OBSERV ED ( d ) DPMO ( d)*106 ( n)*N SIG MA LEVE L Gearing up for
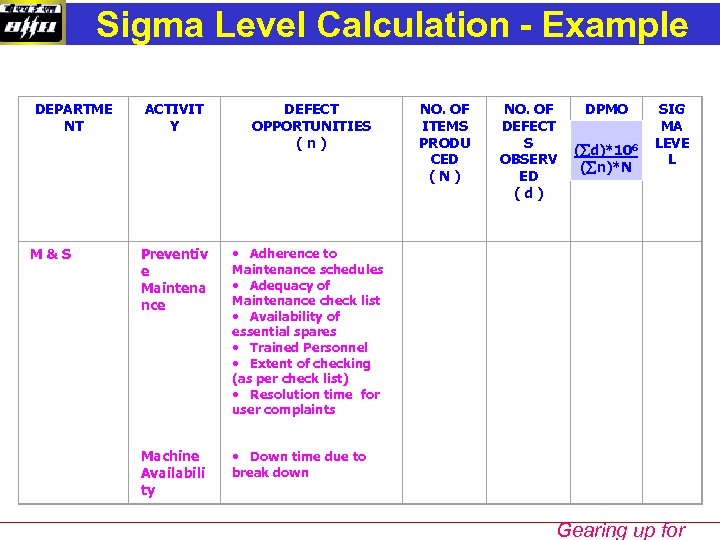
Sigma Level Calculation - Example DEPARTME NT M & S ACTIVIT Y DEFECT OPPORTUNITIES ( n ) Preventiv e Maintena nce NO. OF DEFECT S OBSERV ED ( d ) DPMO ( d)*106 ( n)*N SIG MA LEVE L • Adherence to Maintenance schedules • Adequacy of Maintenance check list • Availability of essential spares • Trained Personnel • Extent of checking (as per check list) • Resolution time for user complaints Machine Availabili ty NO. OF ITEMS PRODU CED ( N ) • Down time due to break down Gearing up for
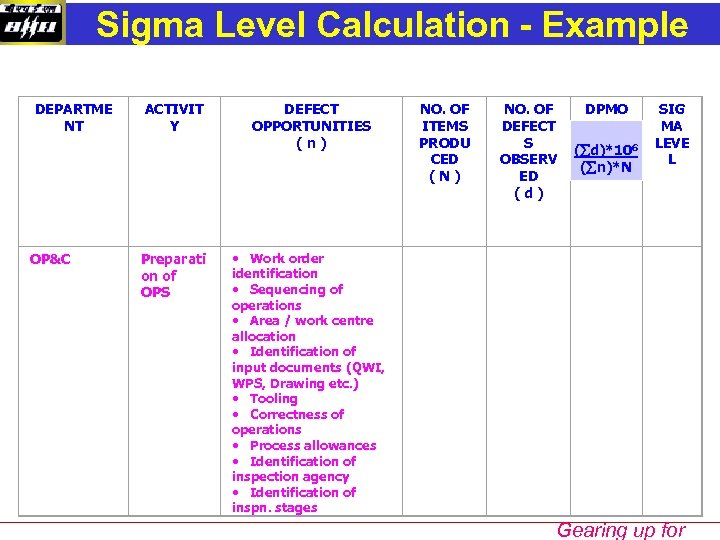
Sigma Level Calculation - Example DEPARTME NT OP&C ACTIVIT Y Preparati on of OPS DEFECT OPPORTUNITIES ( n ) NO. OF ITEMS PRODU CED ( N ) NO. OF DEFECT S OBSERV ED ( d ) DPMO ( d)*106 ( n)*N SIG MA LEVE L • Work order identification • Sequencing of operations • Area / work centre allocation • Identification of input documents (QWI, WPS, Drawing etc. ) • Tooling • Correctness of operations • Process allowances • Identification of inspection agency • Identification of inspn. stages Gearing up for
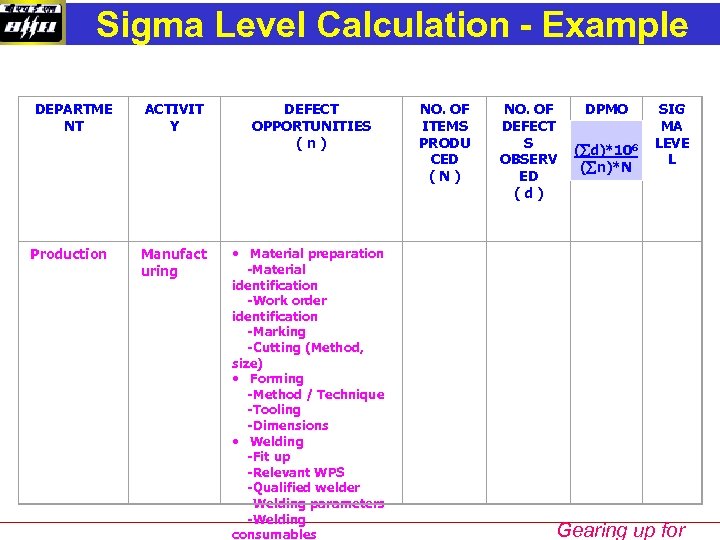
Sigma Level Calculation - Example DEPARTME NT Production ACTIVIT Y Manufact uring DEFECT OPPORTUNITIES ( n ) • Material preparation -Material identification -Work order identification -Marking -Cutting (Method, size) • Forming -Method / Technique -Tooling -Dimensions • Welding -Fit up -Relevant WPS -Qualified welder -Welding parameters -Welding consumables NO. OF ITEMS PRODU CED ( N ) NO. OF DEFECT S OBSERV ED ( d ) DPMO ( d)*106 ( n)*N SIG MA LEVE L Gearing up for
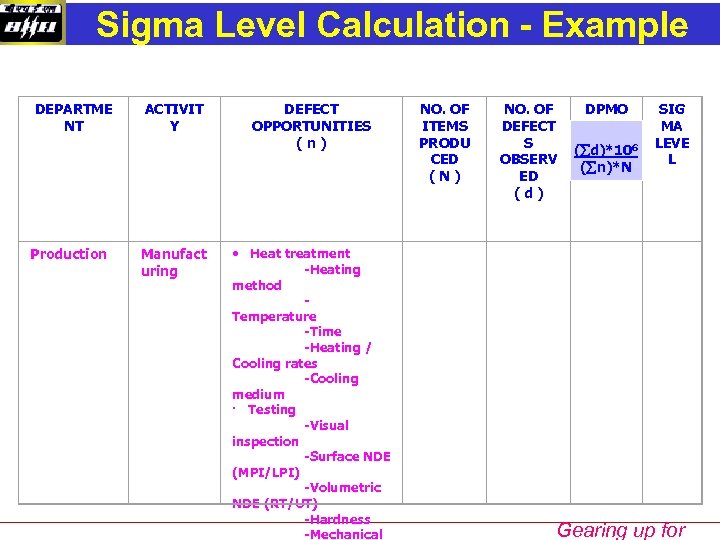
Sigma Level Calculation - Example DEPARTME NT Production ACTIVIT Y Manufact uring DEFECT OPPORTUNITIES ( n ) • Heat treatment -Heating method Temperature -Time -Heating / Cooling rates -Cooling medium · Testing -Visual inspection -Surface NDE (MPI/LPI) -Volumetric NDE (RT/UT) -Hardness -Mechanical NO. OF ITEMS PRODU CED ( N ) NO. OF DEFECT S OBSERV ED ( d ) DPMO ( d)*106 ( n)*N SIG MA LEVE L Gearing up for
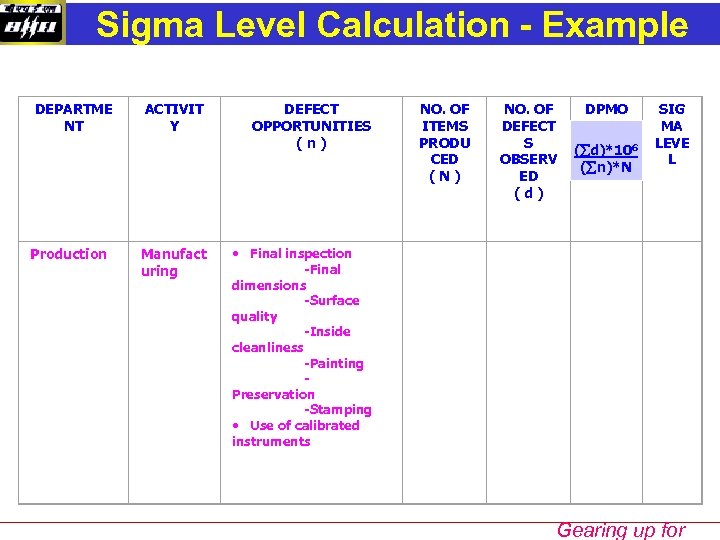
Sigma Level Calculation - Example DEPARTME NT Production ACTIVIT Y Manufact uring DEFECT OPPORTUNITIES ( n ) NO. OF ITEMS PRODU CED ( N ) NO. OF DEFECT S OBSERV ED ( d ) DPMO ( d)*106 ( n)*N SIG MA LEVE L • Final inspection -Final dimensions -Surface quality -Inside cleanliness -Painting Preservation -Stamping • Use of calibrated instruments Gearing up for
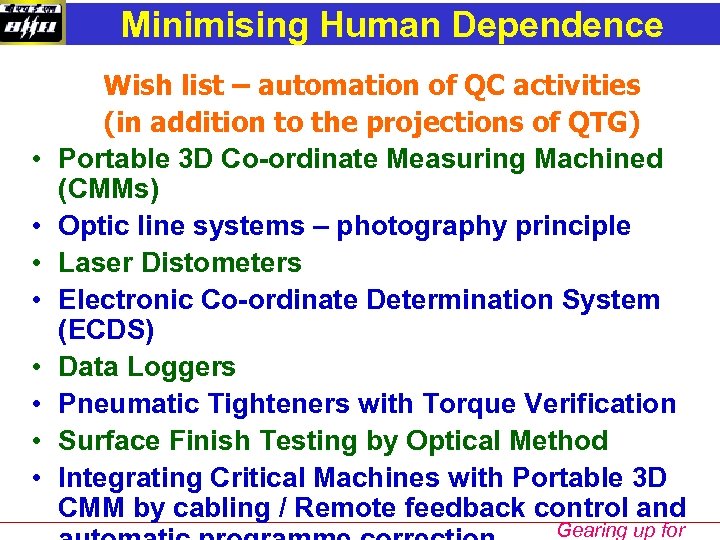
Minimising Human Dependence • • Wish list – automation of QC activities (in addition to the projections of QTG) Portable 3 D Co-ordinate Measuring Machined (CMMs) Optic line systems – photography principle Laser Distometers Electronic Co-ordinate Determination System (ECDS) Data Loggers Pneumatic Tighteners with Torque Verification Surface Finish Testing by Optical Method Integrating Critical Machines with Portable 3 D CMM by cabling / Remote feedback control and Gearing up for
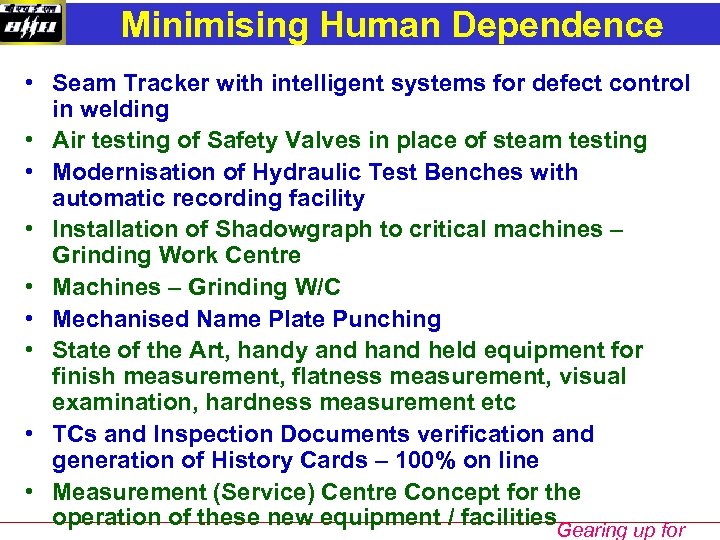
Minimising Human Dependence • Seam Tracker with intelligent systems for defect control in welding • Air testing of Safety Valves in place of steam testing • Modernisation of Hydraulic Test Benches with automatic recording facility • Installation of Shadowgraph to critical machines – Grinding Work Centre • Machines – Grinding W/C • Mechanised Name Plate Punching • State of the Art, handy and held equipment for finish measurement, flatness measurement, visual examination, hardness measurement etc • TCs and Inspection Documents verification and generation of History Cards – 100% on line • Measurement (Service) Centre Concept for the operation of these new equipment / facilities. Gearing up for
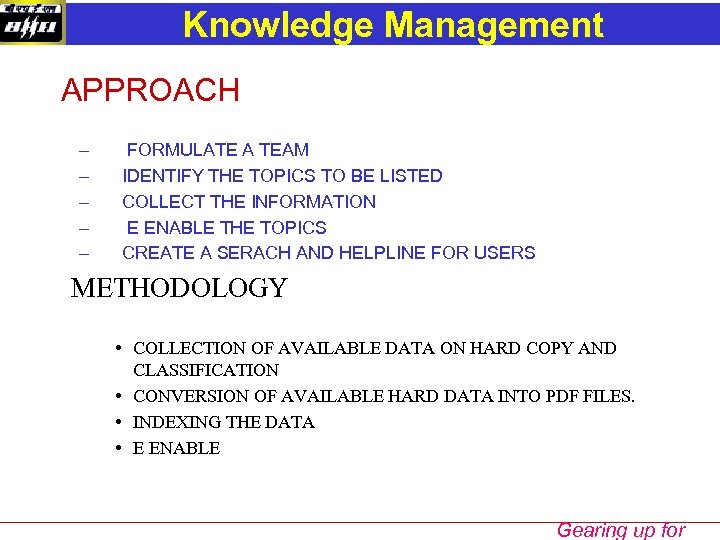
Knowledge Management APPROACH – – – FORMULATE A TEAM IDENTIFY THE TOPICS TO BE LISTED COLLECT THE INFORMATION E ENABLE THE TOPICS CREATE A SERACH AND HELPLINE FOR USERS METHODOLOGY • COLLECTION OF AVAILABLE DATA ON HARD COPY AND CLASSIFICATION • CONVERSION OF AVAILABLE HARD DATA INTO PDF FILES. • INDEXING THE DATA • E ENABLE Gearing up for
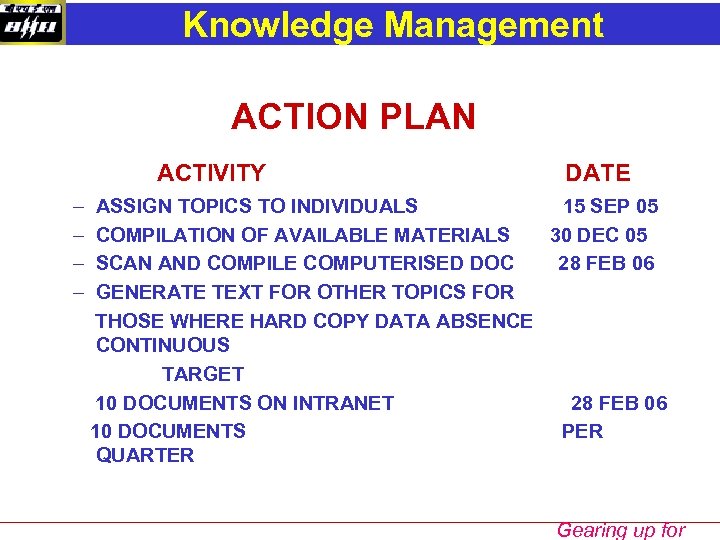
Knowledge Management ACTION PLAN ACTIVITY – – DATE ASSIGN TOPICS TO INDIVIDUALS 15 SEP 05 COMPILATION OF AVAILABLE MATERIALS 30 DEC 05 SCAN AND COMPILE COMPUTERISED DOC 28 FEB 06 GENERATE TEXT FOR OTHER TOPICS FOR THOSE WHERE HARD COPY DATA ABSENCE CONTINUOUS TARGET 10 DOCUMENTS ON INTRANET 28 FEB 06 10 DOCUMENTS PER QUARTER Gearing up for
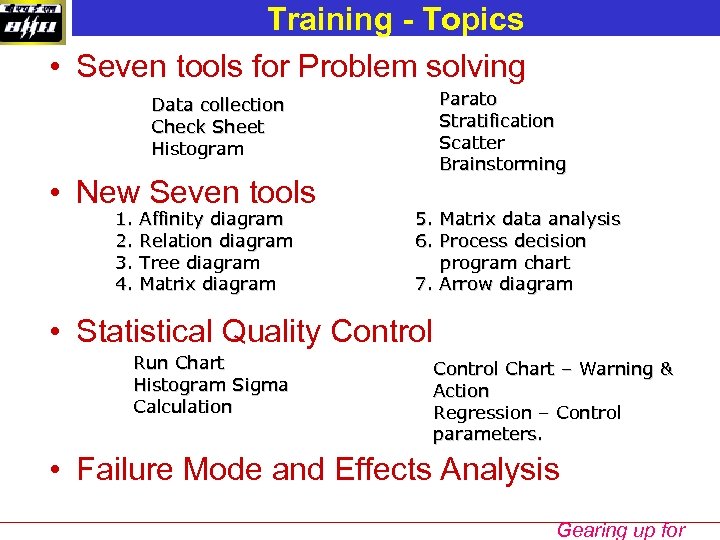
Training - Topics • Seven tools for Problem solving Parato Stratification Scatter Brainstorming Data collection Check Sheet Histogram • New Seven tools 1. 2. 3. 4. Affinity diagram Relation diagram Tree diagram Matrix diagram 5. Matrix data analysis 6. Process decision program chart 7. Arrow diagram • Statistical Quality Control Run Chart Histogram Sigma Calculation Control Chart – Warning & Action Regression – Control parameters. • Failure Mode and Effects Analysis Gearing up for
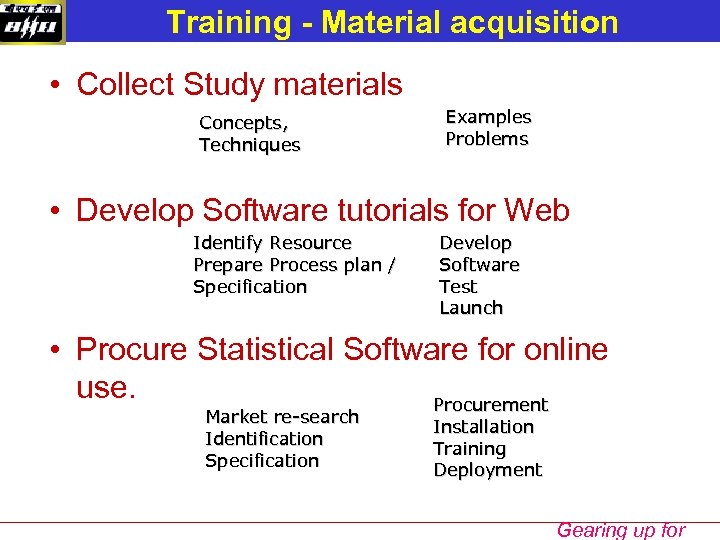
Training - Material acquisition • Collect Study materials Concepts, Techniques Examples Problems • Develop Software tutorials for Web Identify Resource Prepare Process plan / Specification Develop Software Test Launch • Procure Statistical Software for online use. Procurement Market re-search Identification Specification Installation Training Deployment Gearing up for
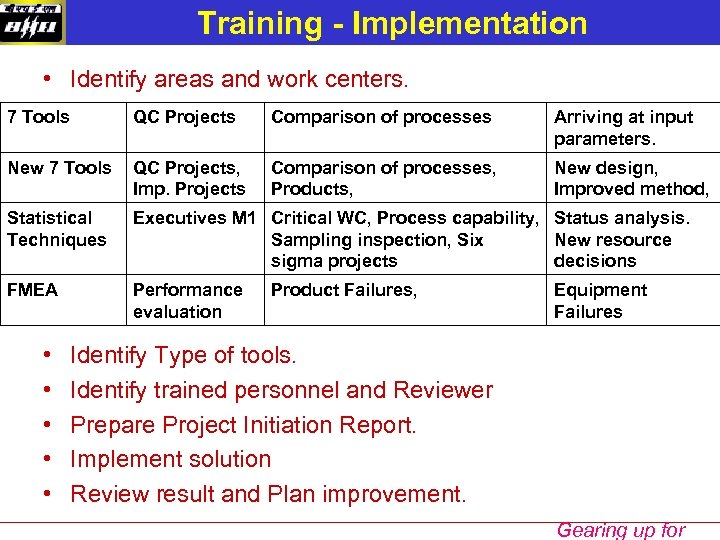
Training - Implementation • Identify areas and work centers. 7 Tools QC Projects Comparison of processes Arriving at input parameters. New 7 Tools QC Projects, Imp. Projects Comparison of processes, Products, New design, Improved method, Statistical Techniques Executives M 1 Critical WC, Process capability, Status analysis. Sampling inspection, Six New resource sigma projects decisions FMEA Performance evaluation • • • Product Failures, Equipment Failures Identify Type of tools. Identify trained personnel and Reviewer Prepare Project Initiation Report. Implement solution Review result and Plan improvement. Gearing up for
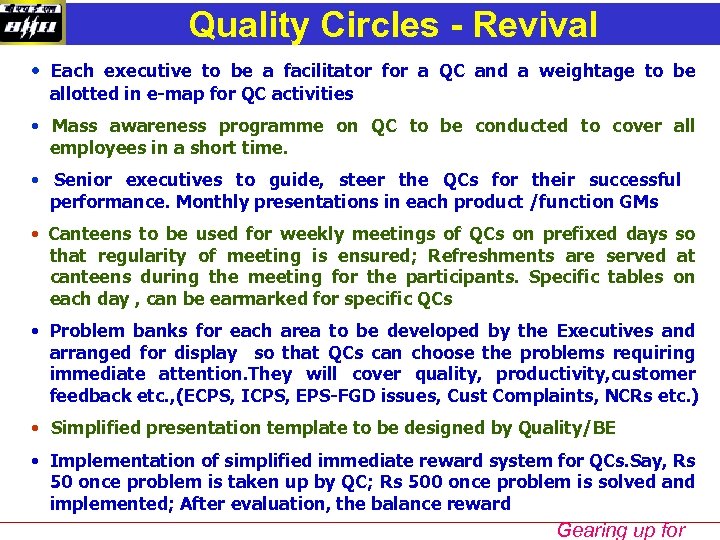
Quality Circles - Revival • Each executive to be a facilitator for a QC and a weightage to be allotted in e-map for QC activities • Mass awareness programme on QC to be conducted to cover all employees in a short time. • Senior executives to guide, steer the QCs for their successful performance. Monthly presentations in each product /function GMs • Canteens to be used for weekly meetings of QCs on prefixed days so that regularity of meeting is ensured; Refreshments are served at canteens during the meeting for the participants. Specific tables on each day , can be earmarked for specific QCs • Problem banks for each area to be developed by the Executives and arranged for display so that QCs can choose the problems requiring immediate attention. They will cover quality, productivity, customer feedback etc. , (ECPS, ICPS, EPS-FGD issues, Cust Complaints, NCRs etc. ) • Simplified presentation template to be designed by Quality/BE • Implementation of simplified immediate reward system for QCs. Say, Rs 50 once problem is taken up by QC; Rs 500 once problem is solved and implemented; After evaluation, the balance reward Gearing up for
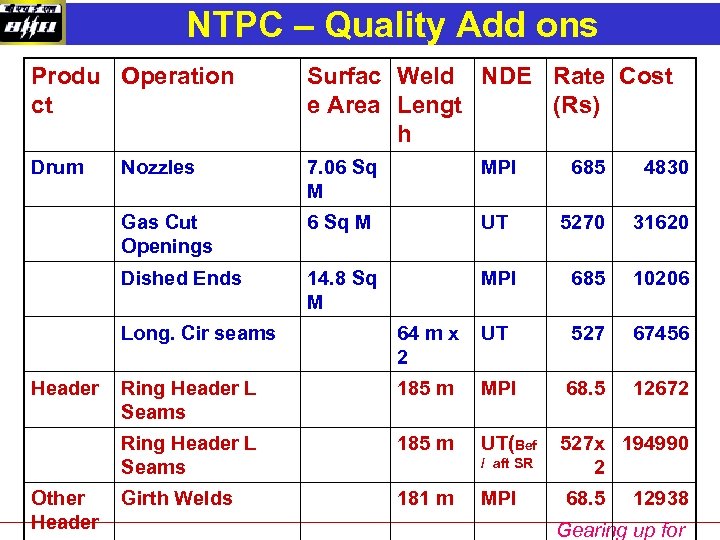
NTPC – Quality Add ons Produ Operation ct Surfac Weld NDE Rate Cost e Area Lengt (Rs) h Drum Nozzles 7. 06 Sq M MPI 685 4830 Gas Cut Openings 6 Sq M UT 5270 31620 Dished Ends 14. 8 Sq M MPI 685 10206 Long. Cir seams Other Header UT 527 67456 Ring Header L Seams 185 m MPI 68. 5 12672 Ring Header L Seams Header 64 m x 2 185 m UT(Bef 527 x 194990 2 Girth Welds 181 m / aft SR MPI 68. 5 12938 Gearing up for
Self Inspection Plan Gearing up for
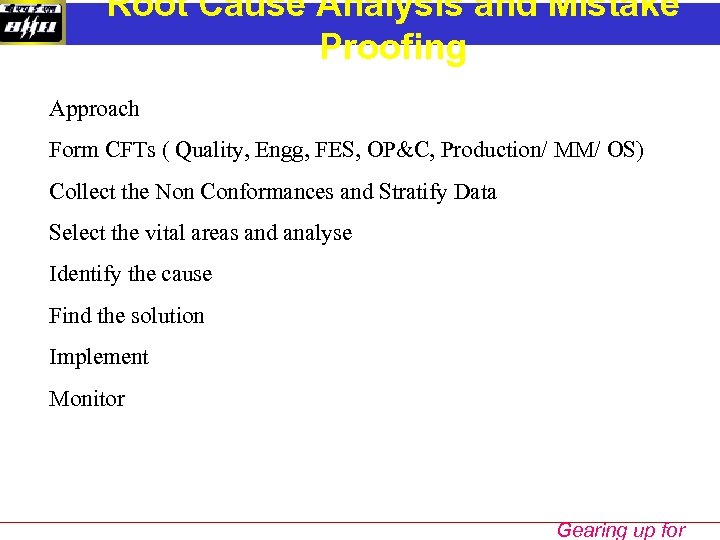
Root Cause Analysis and Mistake Proofing Approach Form CFTs ( Quality, Engg, FES, OP&C, Production/ MM/ OS) Collect the Non Conformances and Stratify Data Select the vital areas and analyse Identify the cause Find the solution Implement Monitor Gearing up for
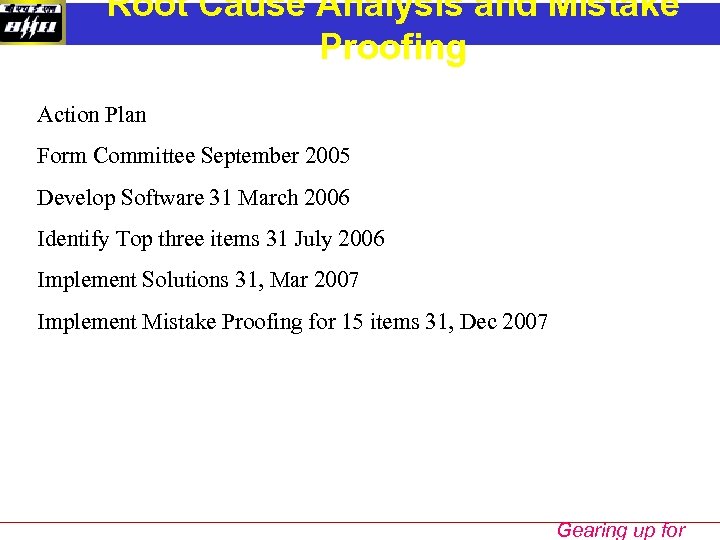
Root Cause Analysis and Mistake Proofing Action Plan Form Committee September 2005 Develop Software 31 March 2006 Identify Top three items 31 July 2006 Implement Solutions 31, Mar 2007 Implement Mistake Proofing for 15 items 31, Dec 2007 Gearing up for
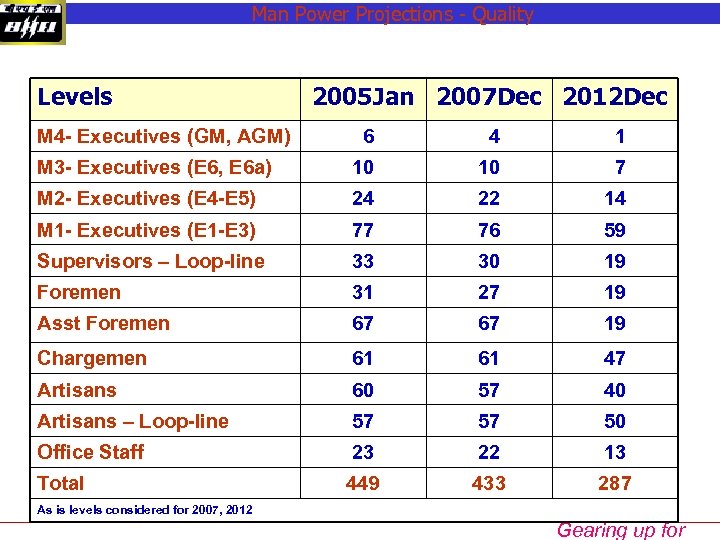
Man Power Projections - Quality Levels M 4 - Executives (GM, AGM) 2005 Jan 2007 Dec 2012 Dec 6 4 1 M 3 - Executives (E 6, E 6 a) 10 10 7 M 2 - Executives (E 4 -E 5) 24 22 14 M 1 - Executives (E 1 -E 3) 77 76 59 Supervisors – Loop-line 33 30 19 Foremen 31 27 19 Asst Foremen 67 67 19 Chargemen 61 61 47 Artisans 60 57 40 Artisans – Loop-line 57 57 50 Office Staff 23 22 13 Total 449 433 287 As is levels considered for 2007, 2012 Gearing up for
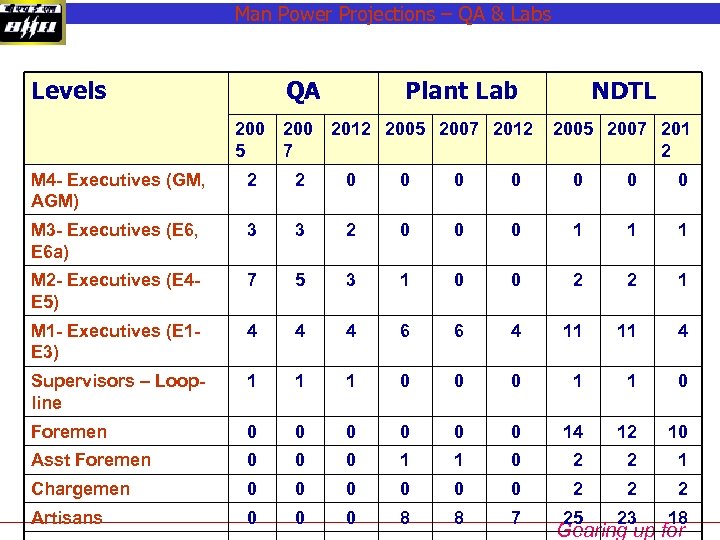
Man Power Projections – QA & Labs Levels QA Plant Lab 200 2012 2005 2007 2012 5 7 NDTL 2005 2007 201 2 M 4 - Executives (GM, AGM) 2 2 0 0 0 0 M 3 - Executives (E 6, E 6 a) 3 3 2 0 0 0 1 1 1 M 2 - Executives (E 4 E 5) 7 5 3 1 0 0 2 2 1 M 1 - Executives (E 1 E 3) 4 4 4 6 6 4 11 11 4 Supervisors – Loopline 1 1 1 0 0 0 1 1 0 Foremen 0 0 0 14 12 10 Asst Foremen 0 0 0 1 1 0 2 2 1 Chargemen 0 0 0 2 2 2 Artisans 0 0 0 8 8 7 25 23 18 Gearing up for
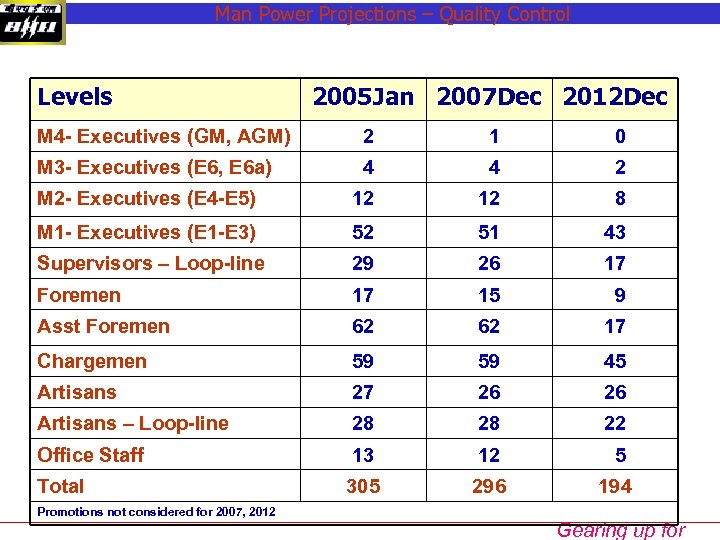
Man Power Projections – Quality Control Levels 2005 Jan 2007 Dec 2012 Dec M 4 - Executives (GM, AGM) 2 1 0 M 3 - Executives (E 6, E 6 a) 4 4 2 M 2 - Executives (E 4 -E 5) 12 12 8 M 1 - Executives (E 1 -E 3) 52 51 43 Supervisors – Loop-line 29 26 17 Foremen 17 15 9 Asst Foremen 62 62 17 Chargemen 59 59 45 Artisans 27 26 26 Artisans – Loop-line 28 28 22 Office Staff 13 12 5 Total 305 296 194 Promotions not considered for 2007, 2012 Gearing up for
8538bf62859b1ac42eb251266f8575e6.ppt