2.1.1.7_AXLES AND SHAFTS.ppt
- Количество слайдов: 36
 AXLES AND SHAFTS
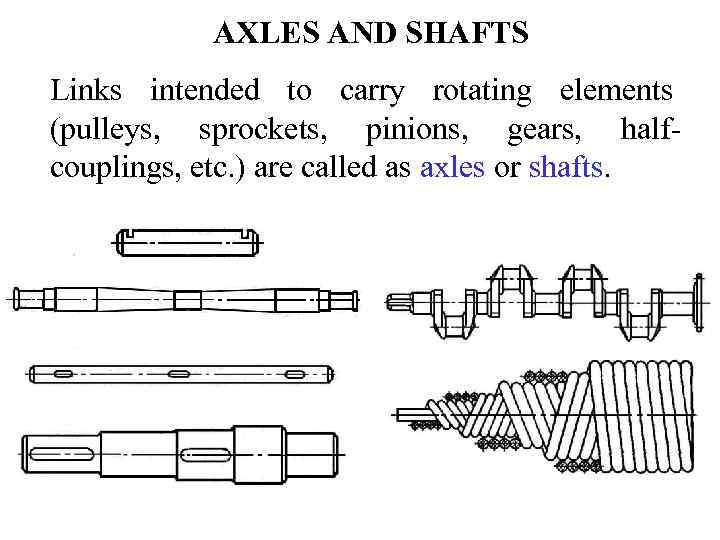 AXLES AND SHAFTS Links intended to carry rotating elements (pulleys, sprockets, pinions, gears, halfcouplings, etc. ) are called as axles or shafts.
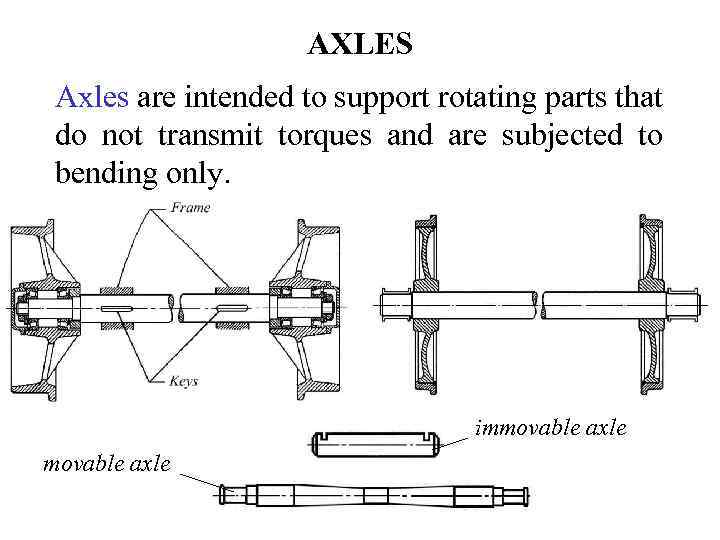 AXLES Axles are intended to support rotating parts that do not transmit torques and are subjected to bending only. immovable axle
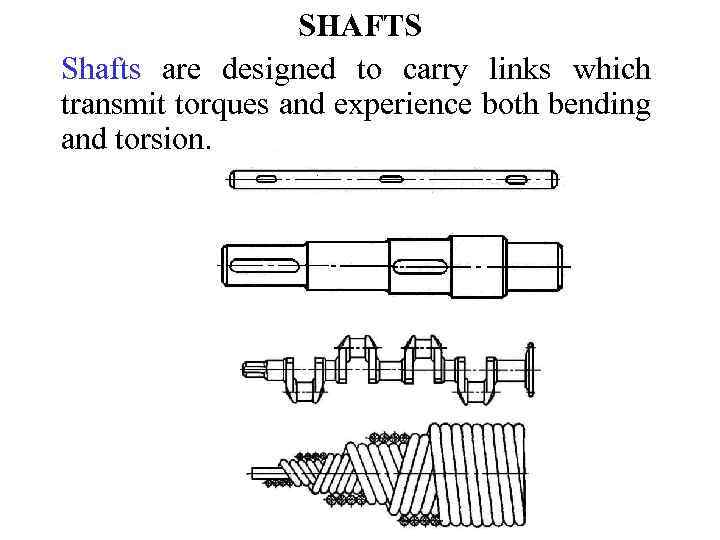 SHAFTS Shafts are designed to carry links which transmit torques and experience both bending and torsion.
 CLASSIFICATION OF SHAFTS 1. According to purpose • Shafts of various drives (gear drives, belt drives, chain drives and so on); • Main shafts of mechanisms and machines whose function is to carry not only drive elements but other elements that do not transmit torques such as rotors, fly-wheels, turbine disks, etc.
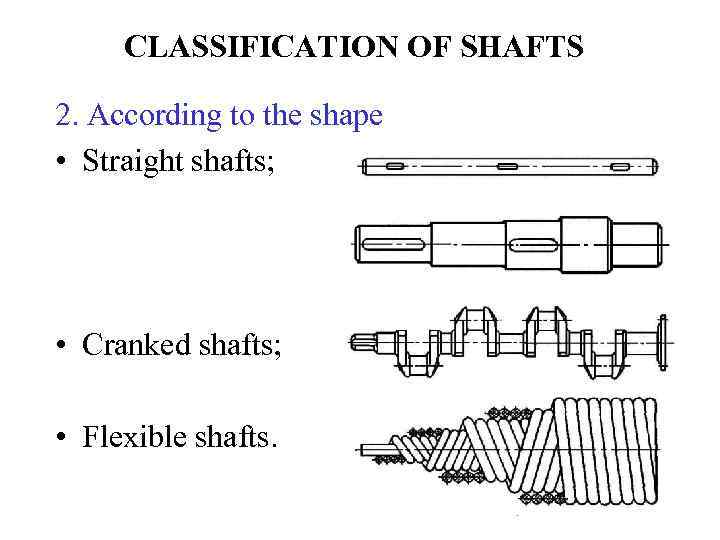 CLASSIFICATION OF SHAFTS 2. According to the shape • Straight shafts; • Cranked shafts; • Flexible shafts.
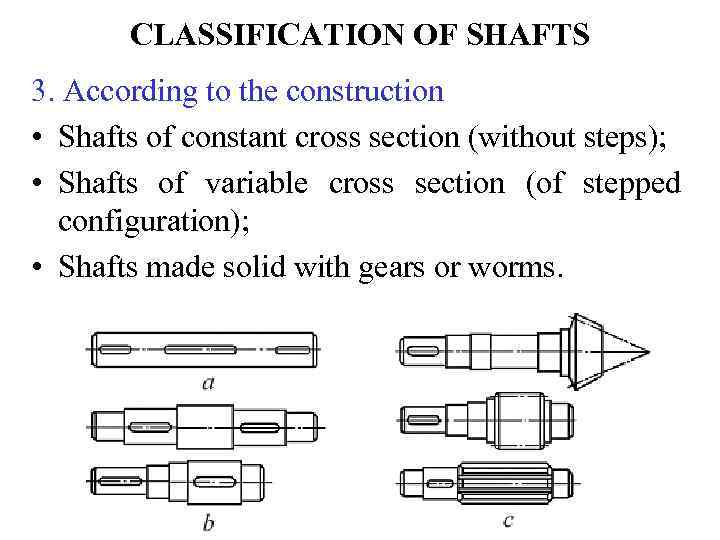 CLASSIFICATION OF SHAFTS 3. According to the construction • Shafts of constant cross section (without steps); • Shafts of variable cross section (of stepped configuration); • Shafts made solid with gears or worms.
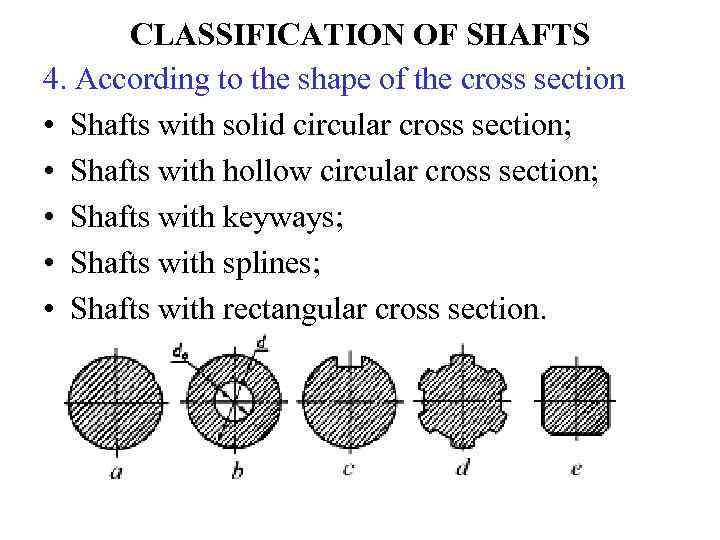 CLASSIFICATION OF SHAFTS 4. According to the shape of the cross section • Shafts with solid circular cross section; • Shafts with hollow circular cross section; • Shafts with keyways; • Shafts with splines; • Shafts with rectangular cross section.
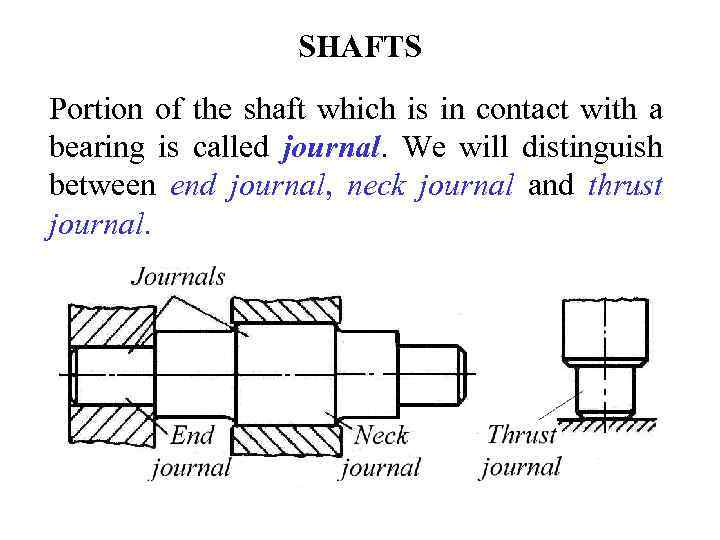 SHAFTS Portion of the shaft which is in contact with a bearing is called journal. We will distinguish between end journal, neck journal and thrust journal.
 CALCULATION OF SHAFTS Shafts may be calculated for: • Strength; • Rigidity; • Oscillations.
 CALCULATION OF SHAFTS FOR STRENGTH Calculation of shafts for strength is divided into 3 stages: 1. Determination of the minimum diameter of the shaft; 2. Designing the shaft construction; 3. Strength analysis of the shaft.
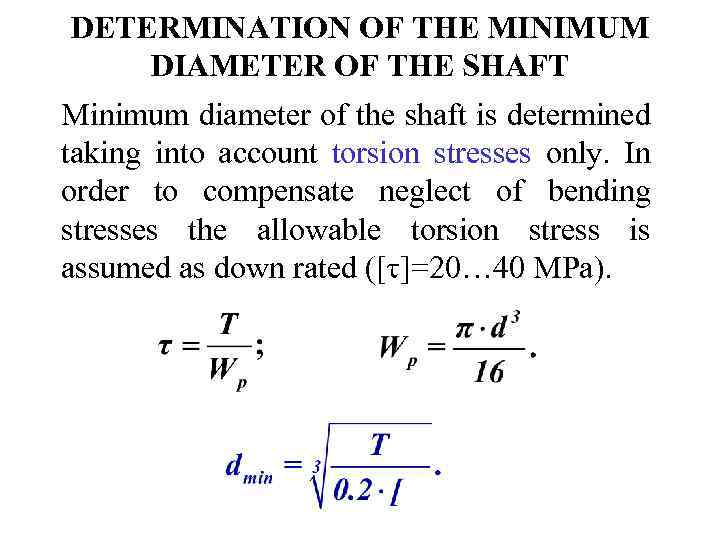 DETERMINATION OF THE MINIMUM DIAMETER OF THE SHAFT Minimum diameter of the shaft is determined taking into account torsion stresses only. In order to compensate neglect of bending stresses the allowable torsion stress is assumed as down rated ([t]=20… 40 MPa).
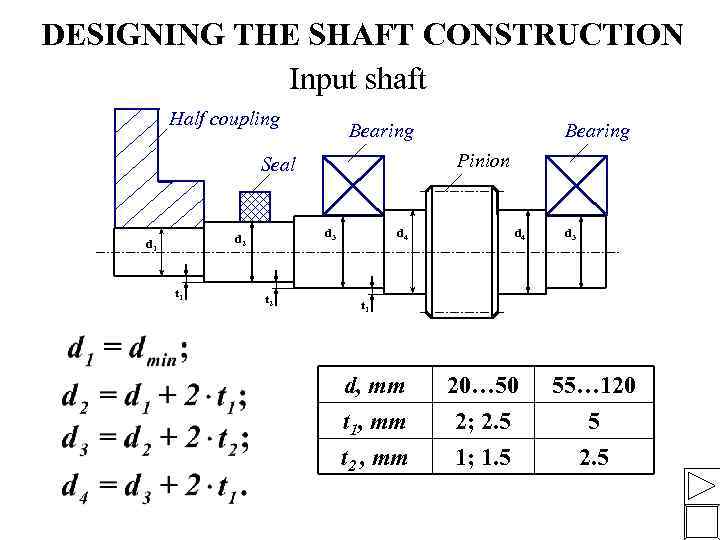 DESIGNING THE SHAFT CONSTRUCTION Input shaft Half coupling Bearing Pinion Seal t 1 d 4 d 3 d 2 d 1 t 2 Bearing d 4 d 3 t 1 d, mm t 1, mm t 2 , mm 20… 50 2; 2. 5 1; 1. 5 55… 120 5 2. 5
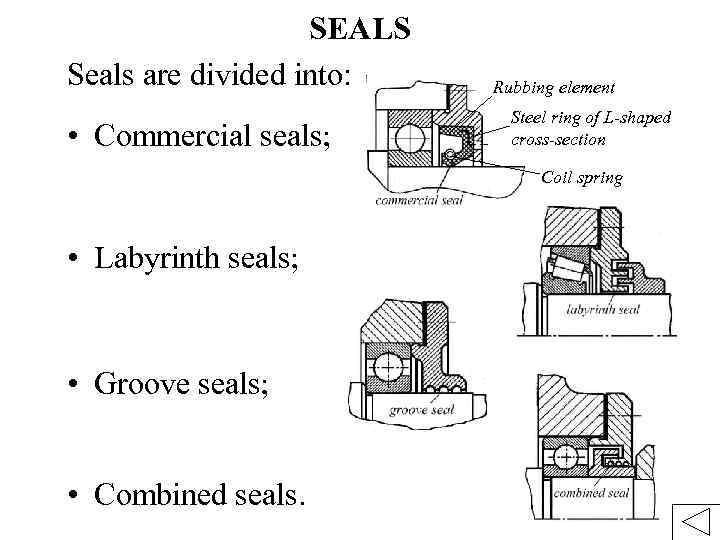 SEALS Seals are divided into: • Commercial seals; Rubbing element Steel ring of L-shaped cross-section Coil spring • Labyrinth seals; • Groove seals; • Combined seals.
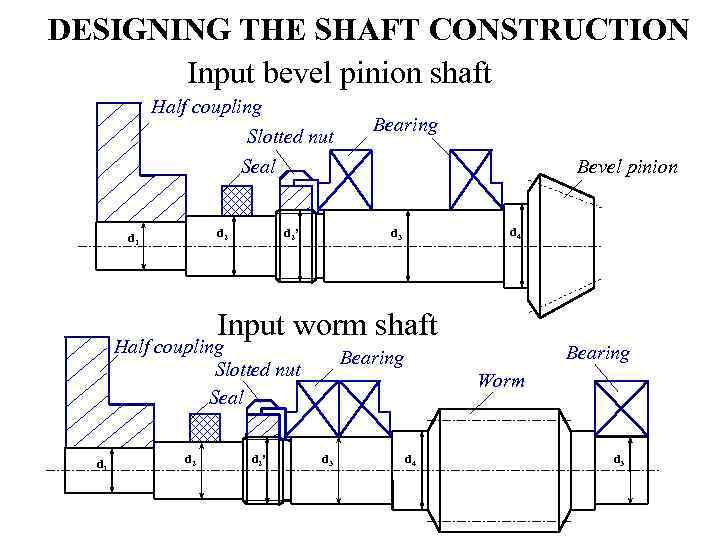 DESIGNING THE SHAFT CONSTRUCTION Input bevel pinion shaft Half coupling Slotted nut Bearing Seal d 2’ d 2 d 1 Bevel pinion d 4 d 3 Input worm shaft Half coupling Slotted nut Seal d 1 d 2’ Bearing Worm d 3 d 4 d 3
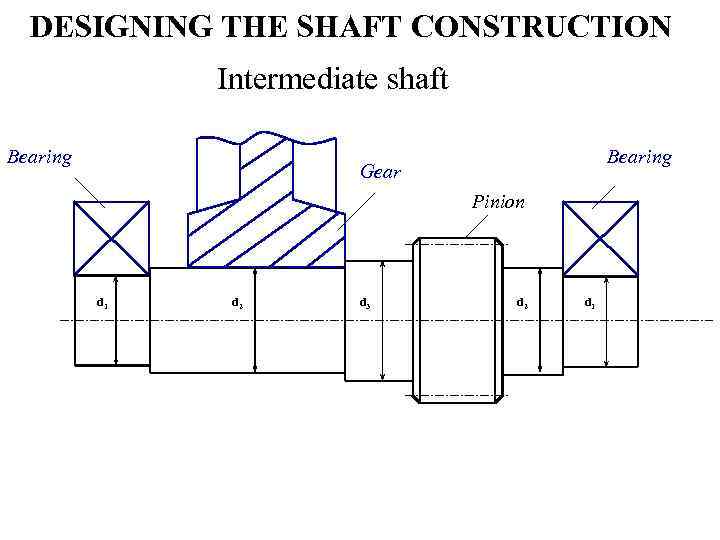 DESIGNING THE SHAFT CONSTRUCTION Intermediate shaft Bearing Gear Pinion d 1 d 2 d 3 d 2 d 1
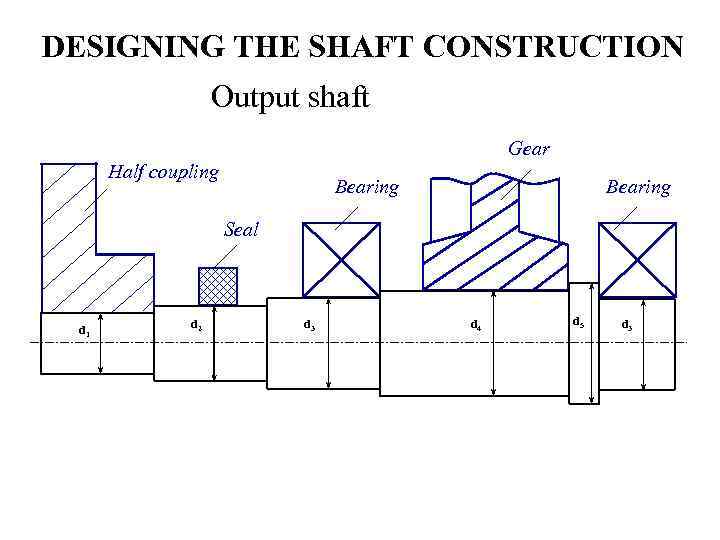 DESIGNING THE SHAFT CONSTRUCTION Output shaft Gear Half coupling Bearing Seal d 1 d 2 d 3 d 4 d 5 d 3
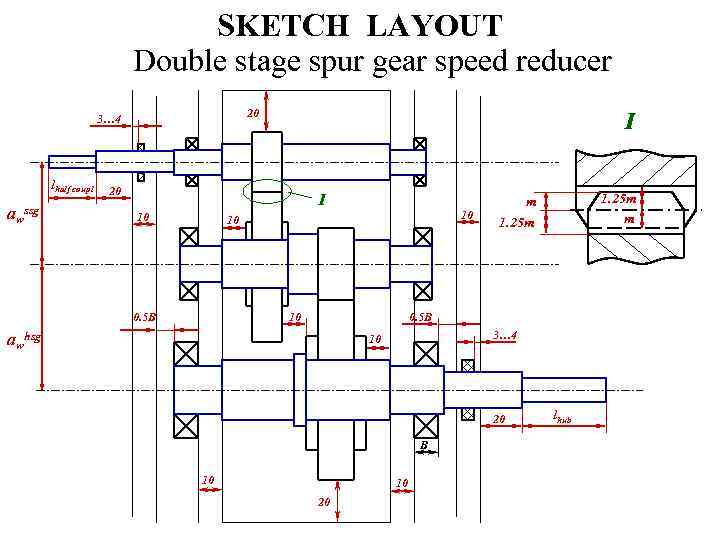 SKETCH LAYOUT Double stage spur gear speed reducer 20 3… 4 lhalf coupl awssg I 20 I 10 10 10 0. 5 B 10 1. 25 m m m 1. 25 m 0. 5 B awhsg 3… 4 10 20 B 10 10 20 lhub
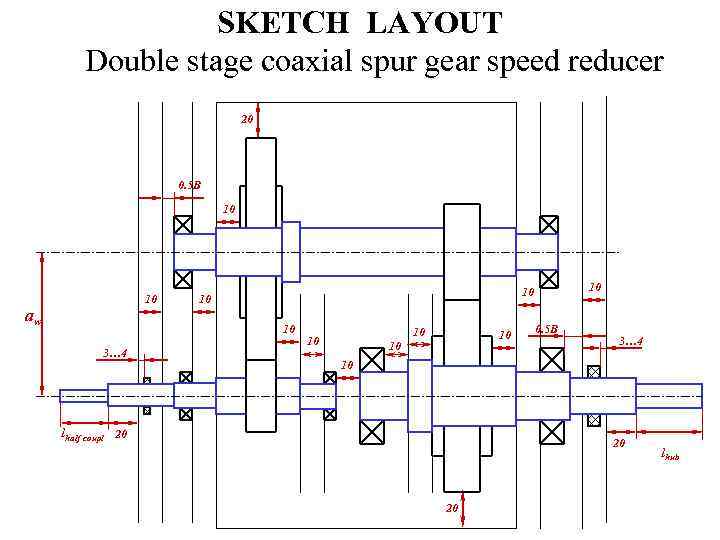 SKETCH LAYOUT Double stage coaxial spur gear speed reducer 20 0. 5 B 10 10 aw 10 3… 4 10 10 0. 5 B 3… 4 10 lhalf coupl 20 20 20 lhub
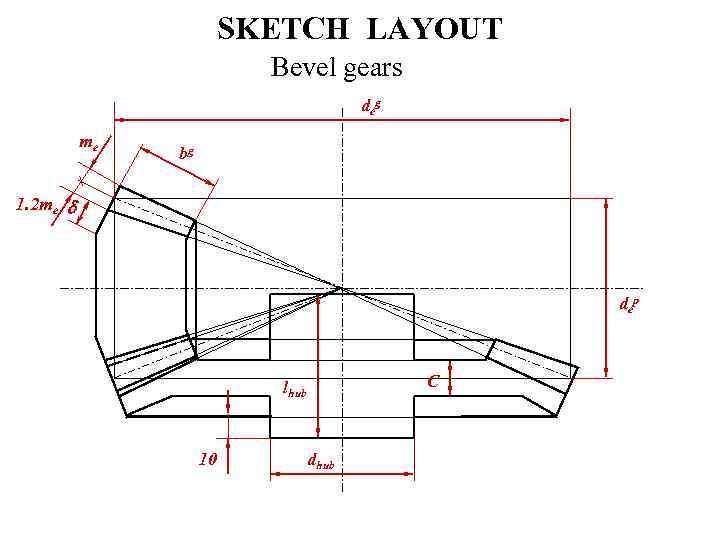 SKETCH LAYOUT Bevel gears deg me bg 1. 2 me d dep lhub 10 dhub C
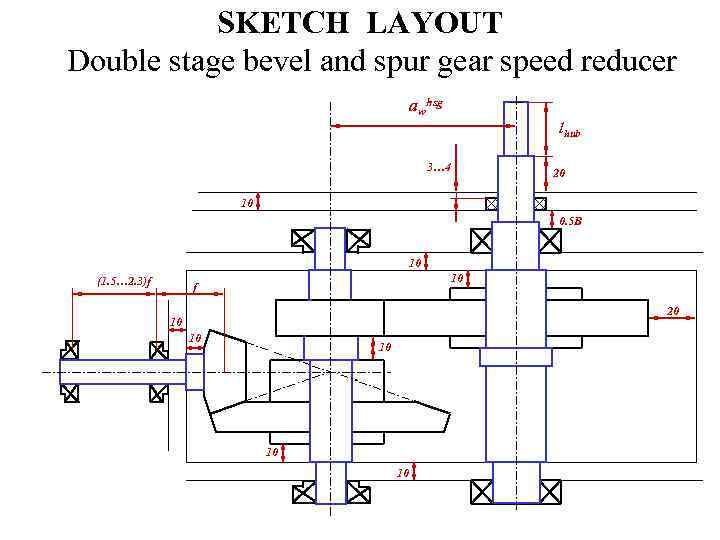 SKETCH LAYOUT Double stage bevel and spur gear speed reducer awhsg lhub 3… 4 20 10 0. 5 B 10 (1. 5… 2. 3)f 10 f 20 10 10 10
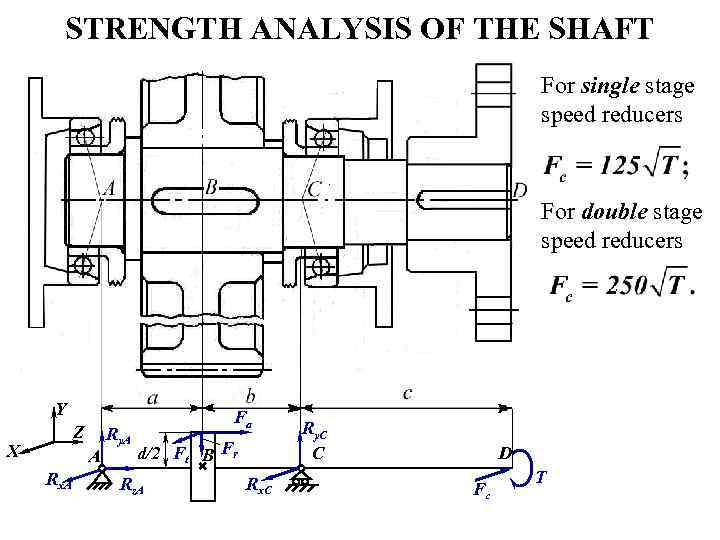 STRENGTH ANALYSIS OF THE SHAFT For single stage speed reducers For double stage speed reducers Y Z X A Rx. A Ry. A Fa d/2 Ft B Fr Rz. A Rx. C Ry. C C D Fc T
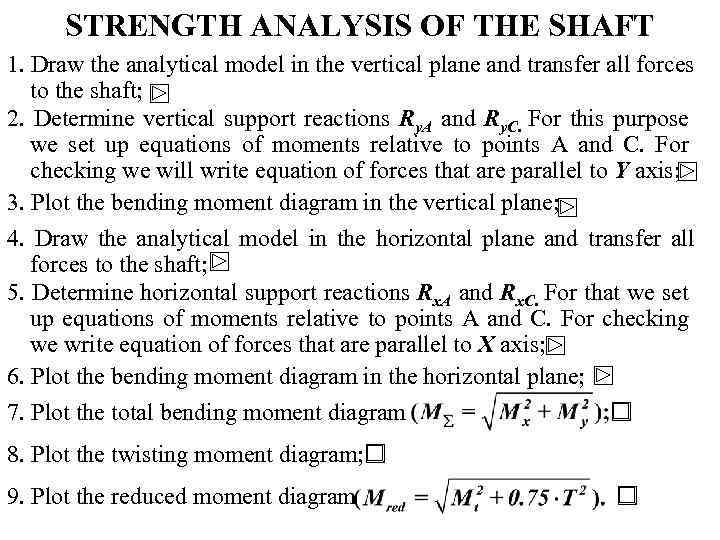 STRENGTH ANALYSIS OF THE SHAFT 1. Draw the analytical model in the vertical plane and transfer all forces to the shaft; 2. Determine vertical support reactions Ry. A and Ry. C. For this purpose we set up equations of moments relative to points A and C. For checking we will write equation of forces that are parallel to Y axis; 3. Plot the bending moment diagram in the vertical plane; 4. Draw the analytical model in the horizontal plane and transfer all forces to the shaft; 5. Determine horizontal support reactions Rx. A and Rx. C. For that we set up equations of moments relative to points A and C. For checking we write equation of forces that are parallel to X axis; 6. Plot the bending moment diagram in the horizontal plane; 7. Plot the total bending moment diagram 8. Plot the twisting moment diagram; 9. Plot the reduced moment diagram
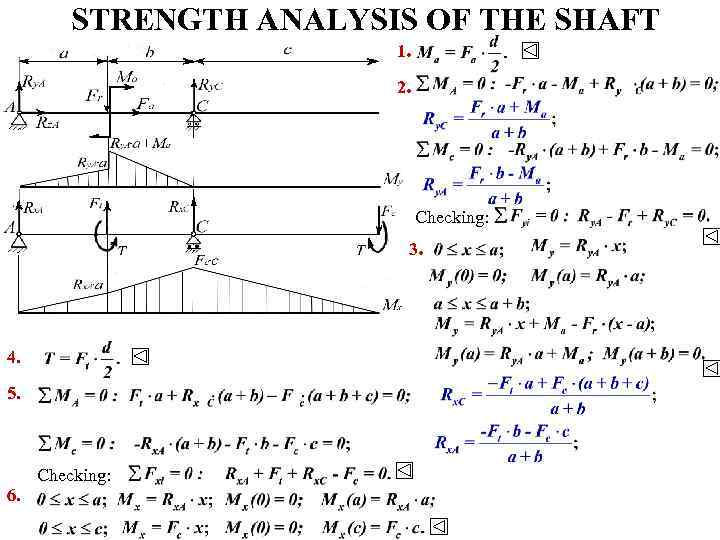 STRENGTH ANALYSIS OF THE SHAFT 1. 2. Checking: 3. 4. 5. 6. Checking:
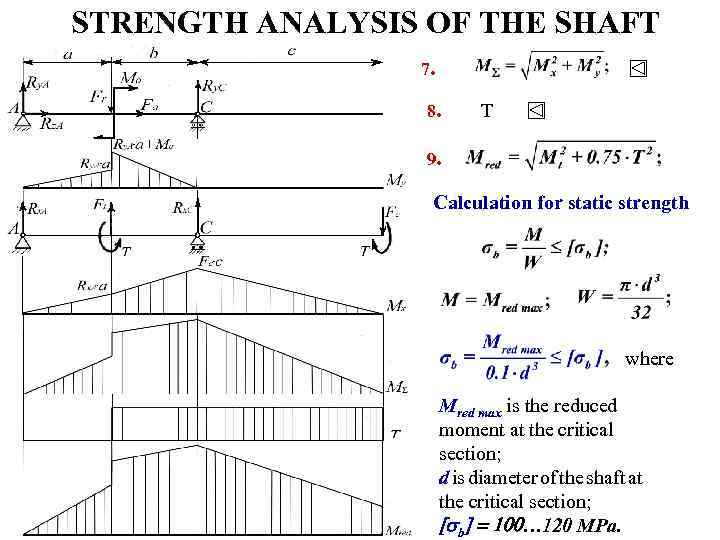 STRENGTH ANALYSIS OF THE SHAFT 7. 8. T 9. Calculation for static strength where Mred max is the reduced moment at the critical section; d is diameter of the shaft at the critical section; [sb] = 100… 120 MPa.
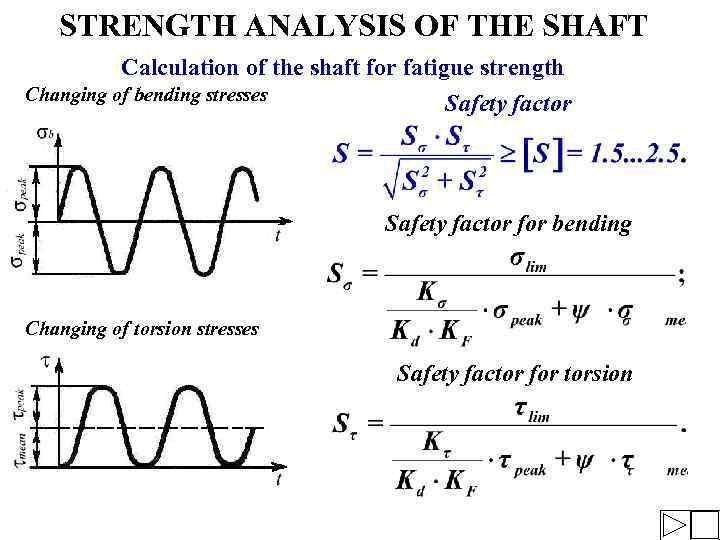 STRENGTH ANALYSIS OF THE SHAFT Calculation of the shaft for fatigue strength Changing of bending stresses Safety factor for bending Changing of torsion stresses Safety factor for torsion
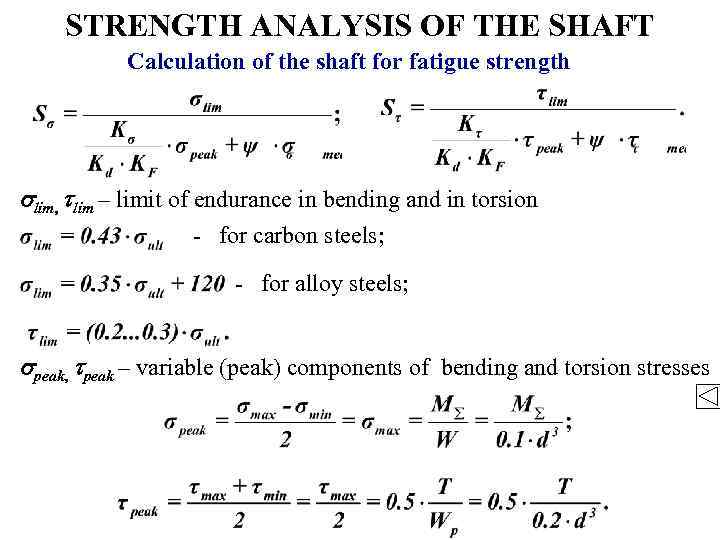 STRENGTH ANALYSIS OF THE SHAFT Calculation of the shaft for fatigue strength slim, tlim – limit of endurance in bending and in torsion - for carbon steels; - for alloy steels; speak, tpeak – variable (peak) components of bending and torsion stresses
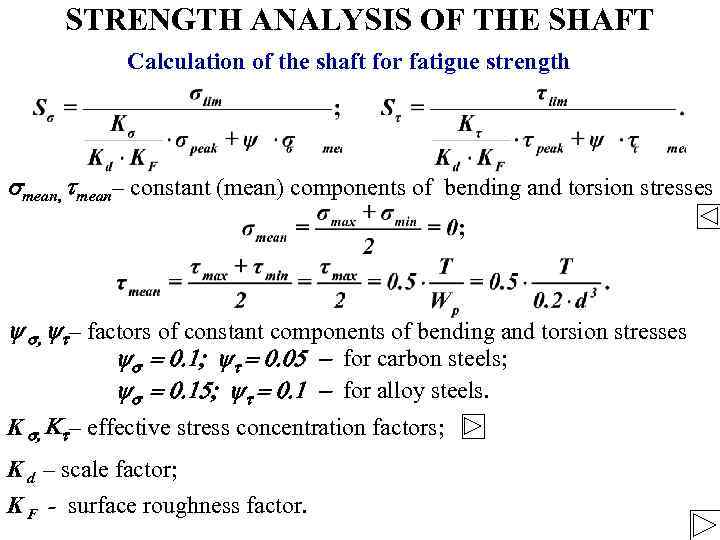 STRENGTH ANALYSIS OF THE SHAFT Calculation of the shaft for fatigue strength smean, tmean– constant (mean) components of bending and torsion stresses y s, yt– factors of constant components of bending and torsion stresses ys = 0. 1; yt = 0. 05 - for carbon steels; ys = 0. 15; yt = 0. 1 - for alloy steels. K s, Kt– effective stress concentration factors; K d – scale factor; K F - surface roughness factor.
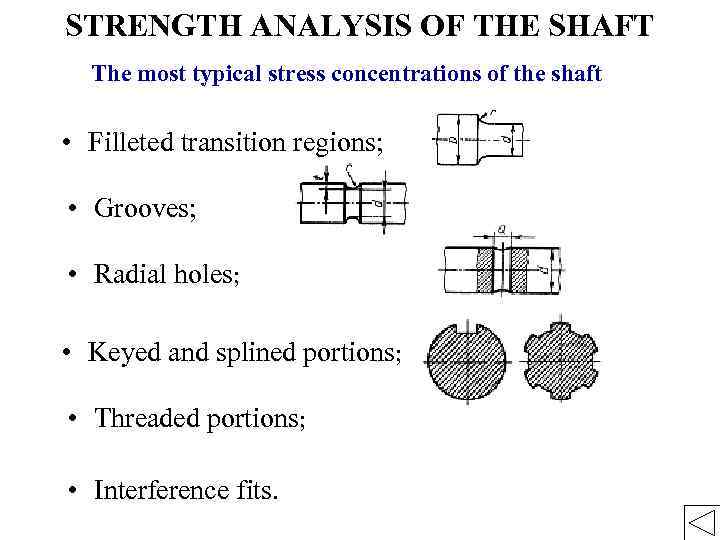 STRENGTH ANALYSIS OF THE SHAFT The most typical stress concentrations of the shaft • Filleted transition regions; • Grooves; • Radial holes; • Keyed and splined portions; • Threaded portions; • Interference fits.
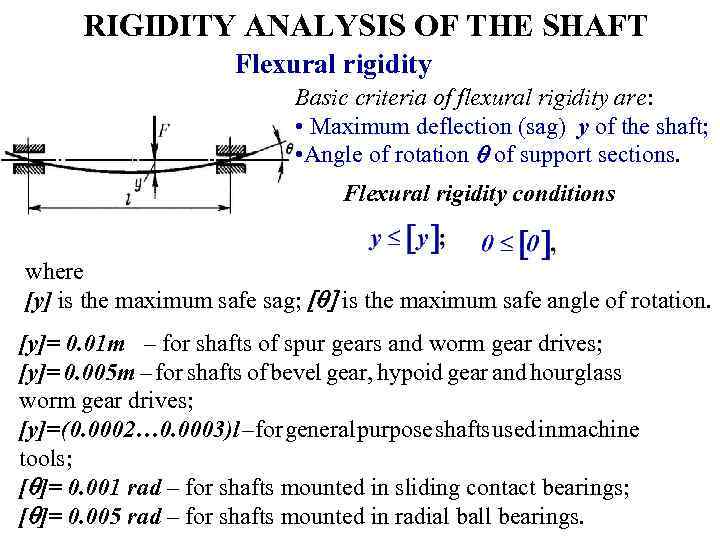 RIGIDITY ANALYSIS OF THE SHAFT Flexural rigidity Basic criteria of flexural rigidity are: • Maximum deflection (sag) y of the shaft; • Angle of rotation q of support sections. Flexural rigidity conditions where [y] is the maximum safe sag; [q] is the maximum safe angle of rotation. [y]= 0. 01 m – for shafts of spur gears and worm gear drives; [y]= 0. 005 m – for shafts of bevel gear, hypoid gear and hourglass worm gear drives; [y]= (0. 0002… 0. 0003)l – for general purpose shafts used in machine tools; [q]= 0. 001 rad – for shafts mounted in sliding contact bearings; [q]= 0. 005 rad – for shafts mounted in radial ball bearings.
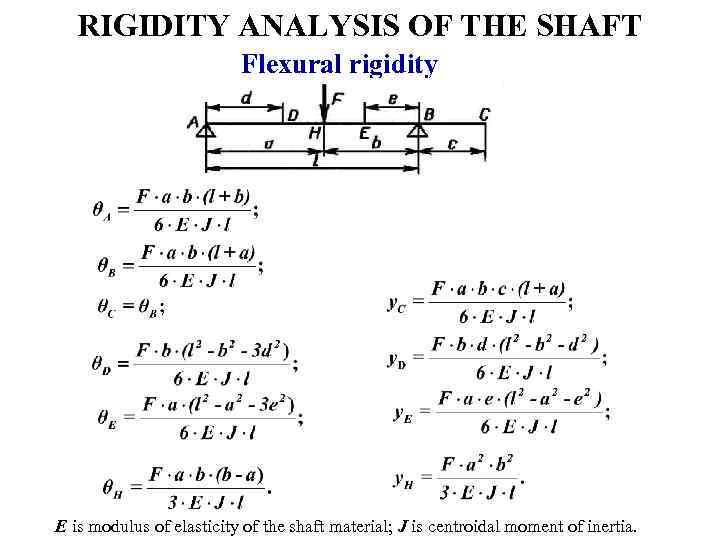 RIGIDITY ANALYSIS OF THE SHAFT Flexural rigidity E is modulus of elasticity of the shaft material; J is centroidal moment of inertia.
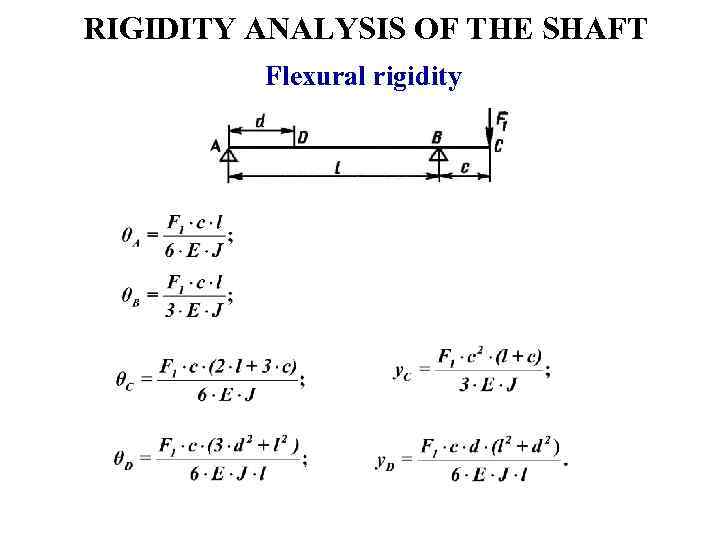 RIGIDITY ANALYSIS OF THE SHAFT Flexural rigidity
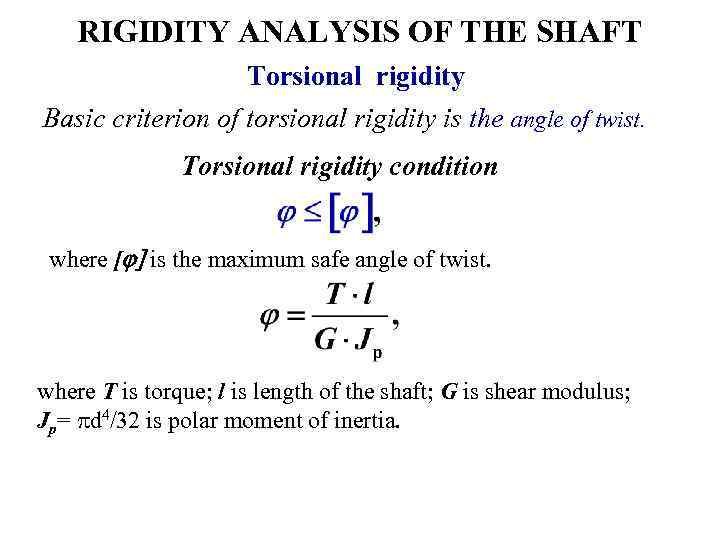 RIGIDITY ANALYSIS OF THE SHAFT Torsional rigidity Basic criterion of torsional rigidity is the angle of twist. Torsional rigidity condition where [j] is the maximum safe angle of twist. where T is torque; l is length of the shaft; G is shear modulus; Jp= pd 4/32 is polar moment of inertia.
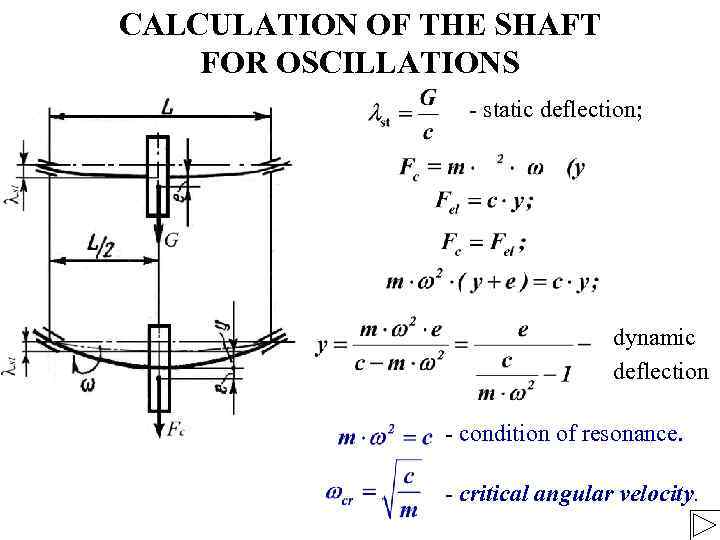 CALCULATION OF THE SHAFT FOR OSCILLATIONS - static deflection; dynamic deflection - condition of resonance. - critical angular velocity.
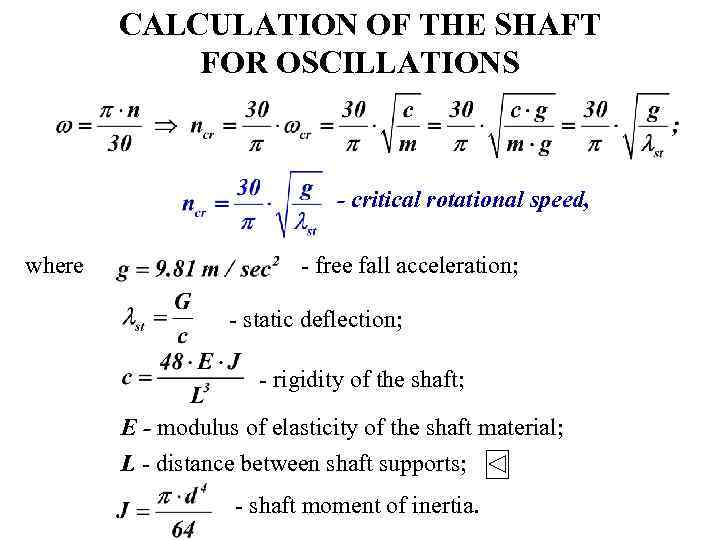 CALCULATION OF THE SHAFT FOR OSCILLATIONS - critical rotational speed, where - free fall acceleration; - static deflection; - rigidity of the shaft; E - modulus of elasticity of the shaft material; L - distance between shaft supports; - shaft moment of inertia.
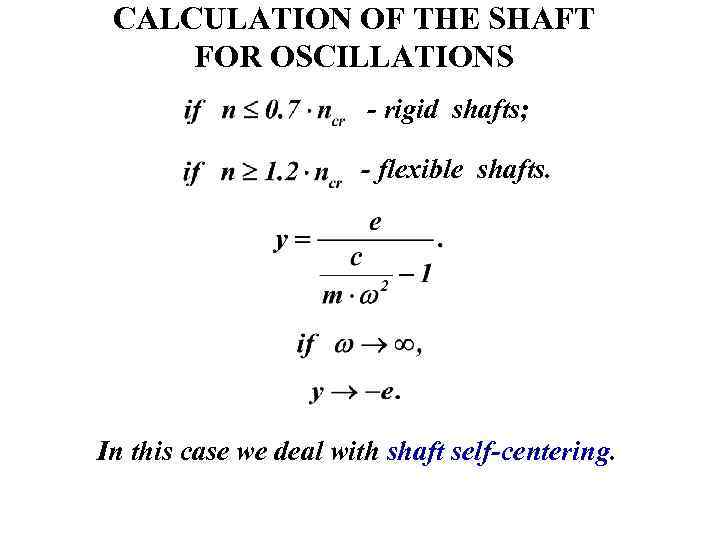 CALCULATION OF THE SHAFT FOR OSCILLATIONS - rigid shafts; - flexible shafts. In this case we deal with shaft self-centering.


