8cd389477d340877c4cbc5f427f4729d.ppt
- Количество слайдов: 21
 Automatic classification of weld cracks using artificial intelligence and statistical methods Ryszard SIKORA, Piotr BANIUKIEWICZ, Marcin CARYK Szczecin University of Technology Department of Electrical and Computer Engineering ul. Sikorskiego 37, 70 -313 Szczecin POLAND
 OUTLINE § Digital radiography system § Automatic Defect Recognition algorithm § Introduction, § ADDIP, § Data base preparation, § Statistical analysis § Artificial neural network classifier § Conclusions Szczecin, June 2008 2
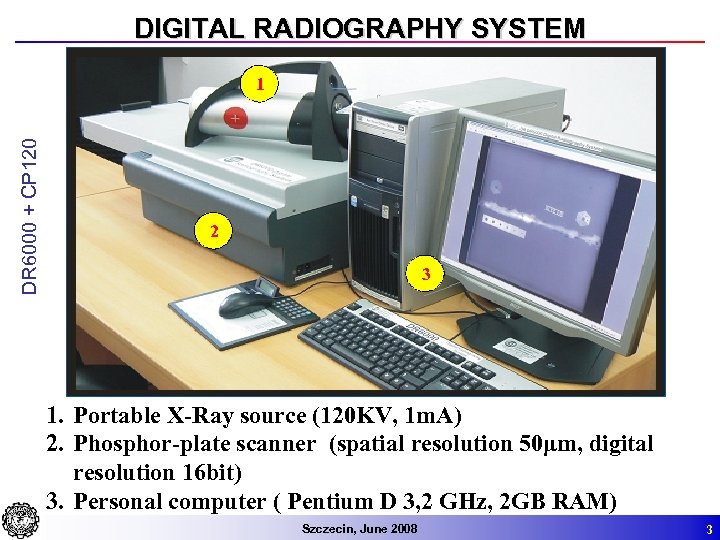 DIGITAL RADIOGRAPHY SYSTEM DR 6000 + CP 120 1 2 3 1. Portable X-Ray source (120 KV, 1 m. A) 2. Phosphor-plate scanner (spatial resolution 50μm, digital resolution 16 bit) 3. Personal computer ( Pentium D 3, 2 GHz, 2 GB RAM) Szczecin, June 2008 3
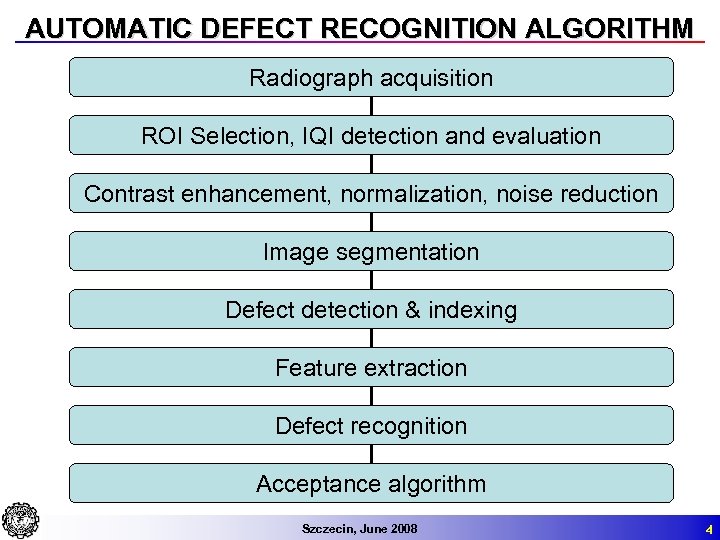 AUTOMATIC DEFECT RECOGNITION ALGORITHM Radiograph acquisition ROI Selection, IQI detection and evaluation Contrast enhancement, normalization, noise reduction Image segmentation Defect detection & indexing Feature extraction Defect recognition Acceptance algorithm Szczecin, June 2008 4
 INTRODUCTION § The defects data base was prepared using ADDIP (developed by PS), § The classification is done in accordance with respective welding norm EN ISO 6520 -1 § The statistical method PCA is applied in order to find redundant features, § The artificial neural network was used as a defect group classifier, § The real digital radiographs of welded parts of a ship were analyzed Szczecin, June 2008 5
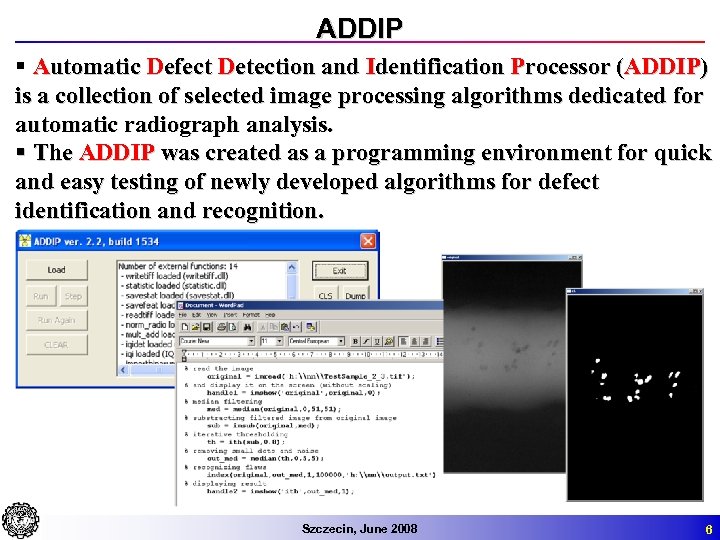 ADDIP § Automatic Defect Detection and Identification Processor (ADDIP) is a collection of selected image processing algorithms dedicated for automatic radiograph analysis. § The ADDIP was created as a programming environment for quick and easy testing of newly developed algorithms for defect identification and recognition. Szczecin, June 2008 6
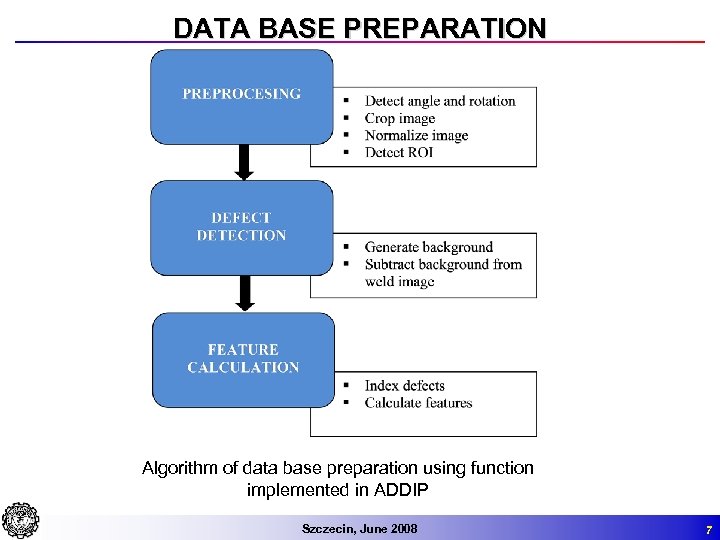 DATA BASE PREPARATION Algorithm of data base preparation using function implemented in ADDIP Szczecin, June 2008 7
 DATA BASE PREPARATION Acquired radiograph image with defects Image after rotation, crop and normalization operations Szczecin, June 2008 8
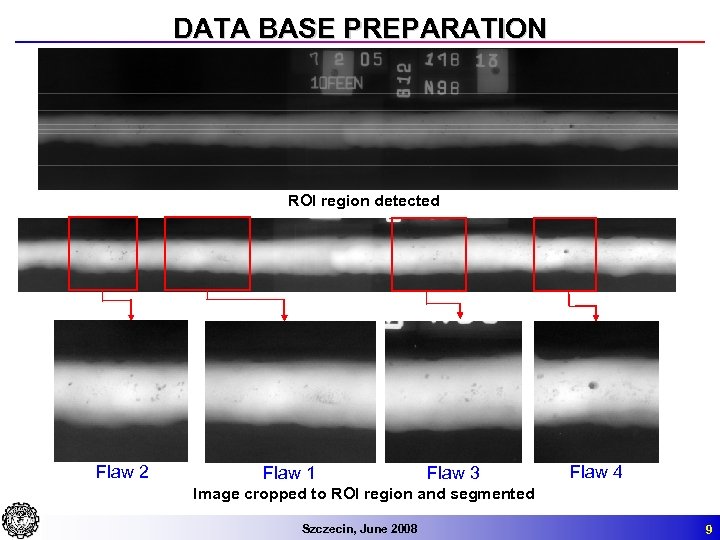 DATA BASE PREPARATION ROI region detected Flaw 2 Flaw 1 Flaw 3 Flaw 4 Image cropped to ROI region and segmented Szczecin, June 2008 9
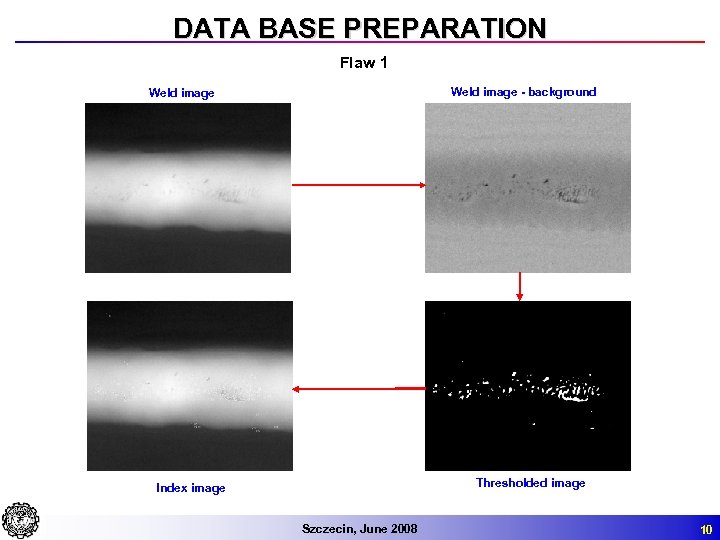 DATA BASE PREPARATION Flaw 1 Weld image - background Weld image Thresholded image Index image Szczecin, June 2008 10
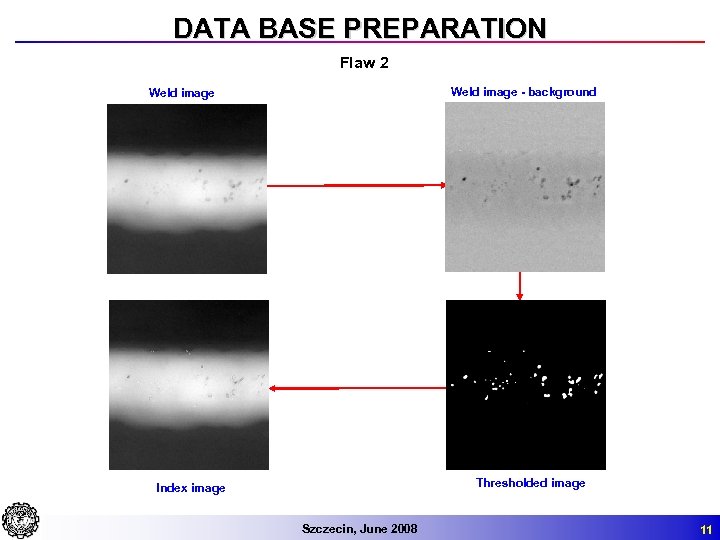 DATA BASE PREPARATION Flaw 2 Weld image - background Weld image Thresholded image Index image Szczecin, June 2008 11
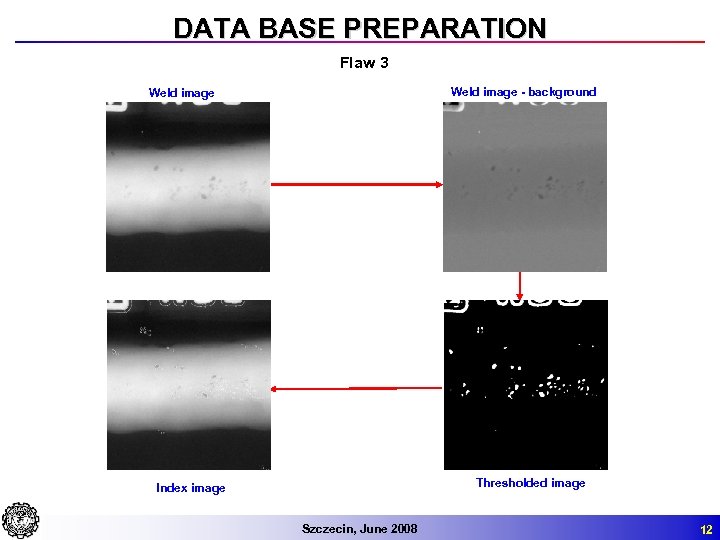 DATA BASE PREPARATION Flaw 3 Weld image - background Weld image Thresholded image Index image Szczecin, June 2008 12
 DATA BASE PREPARATION Flaw 4 Weld image - background Weld image Thresholded image Index image Szczecin, June 2008 13
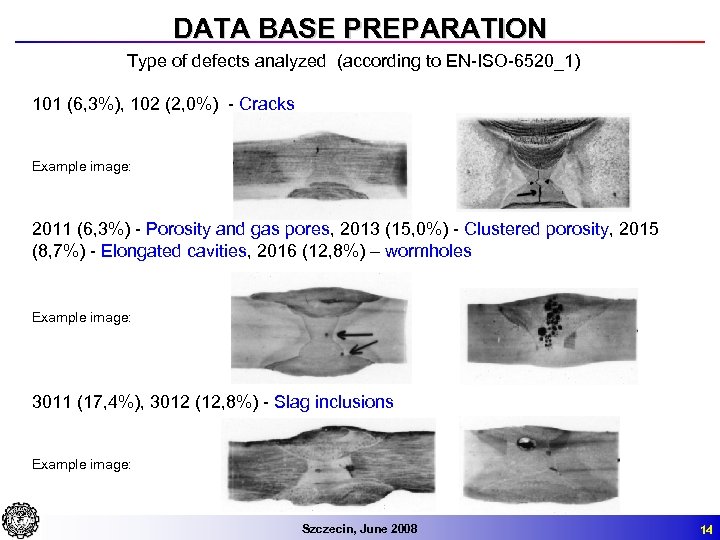 DATA BASE PREPARATION Type of defects analyzed (according to EN-ISO-6520_1) 101 (6, 3%), 102 (2, 0%) - Cracks Example image: 2011 (6, 3%) - Porosity and gas pores, 2013 (15, 0%) - Clustered porosity, 2015 (8, 7%) - Elongated cavities, 2016 (12, 8%) – wormholes Example image: 3011 (17, 4%), 3012 (12, 8%) - Slag inclusions Example image: Szczecin, June 2008 14
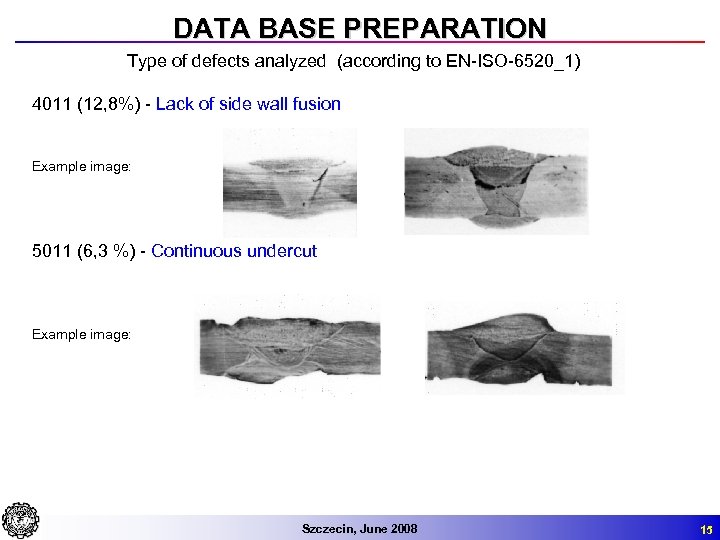 DATA BASE PREPARATION Type of defects analyzed (according to EN-ISO-6520_1) 4011 (12, 8%) - Lack of side wall fusion Example image: 5011 (6, 3 %) - Continuous undercut Example image: Szczecin, June 2008 15
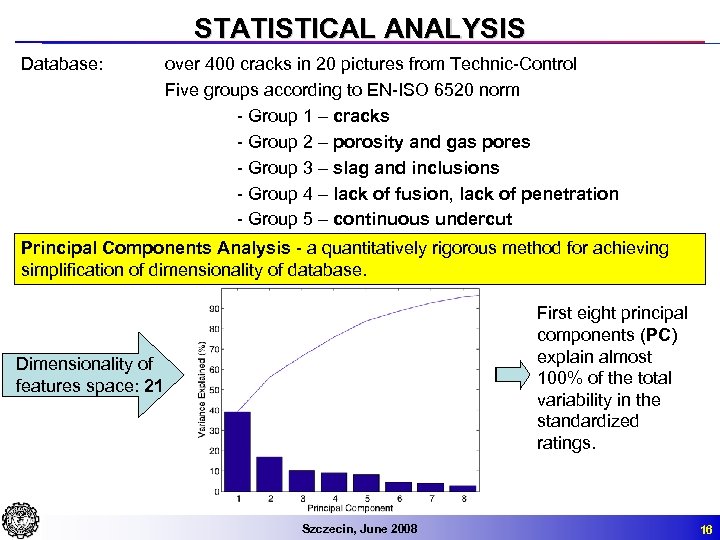 STATISTICAL ANALYSIS Database: over 400 cracks in 20 pictures from Technic-Control Five groups according to EN-ISO 6520 norm - Group 1 – cracks - Group 2 – porosity and gas pores - Group 3 – slag and inclusions - Group 4 – lack of fusion, lack of penetration - Group 5 – continuous undercut Principal Components Analysis - a quantitatively rigorous method for achieving simplification of dimensionality of database. Cumulative sum Dimensionality of features space: 21 Szczecin, June 2008 First eight principal components (PC) explain almost 100% of the total variability in the standardized ratings. 16
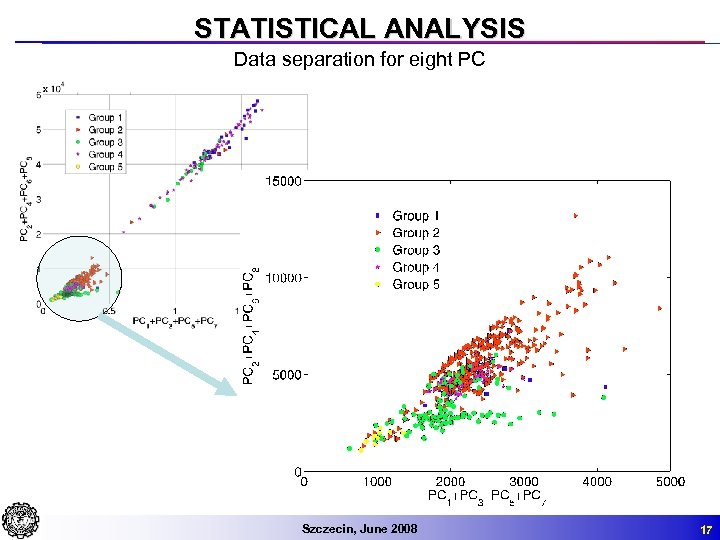 STATISTICAL ANALYSIS Data separation for eight PC Szczecin, June 2008 17
 STATISTICAL ANALYSIS Factor analysis – finding redundant features 1 – Area 2 – Perimeter 3 – Center of gravity (x) 4 – Center of gravity (y) 5 – Center of gravity according to brightness (x) 6 – Center of gravity according to brightness (y) 7 – Longer diagonal of ellipse 8 – Second diagonal of ellipse 9 – Perpendicular diagonal to longer diagonal 10 – Angle 11 – Compactness 12 – Anisometry 13 – Elongation 14 – Lengthening 15 – Rectangularity 16 – Mean Brightness 17 – Max Dev of Brightness 18 – Ratio 19 – Heywood 20 – Surroundings 21 – Surroundings (mean brightness) Visualization of the principal component coefficients for each feature • Features 4 and 6 are linearly depended • Features 3 and 5 are linearly depended • Features 2 and 7 are linearly depended • Features 16, 20 and 21 are linearly depended Szczecin, June 2008 18
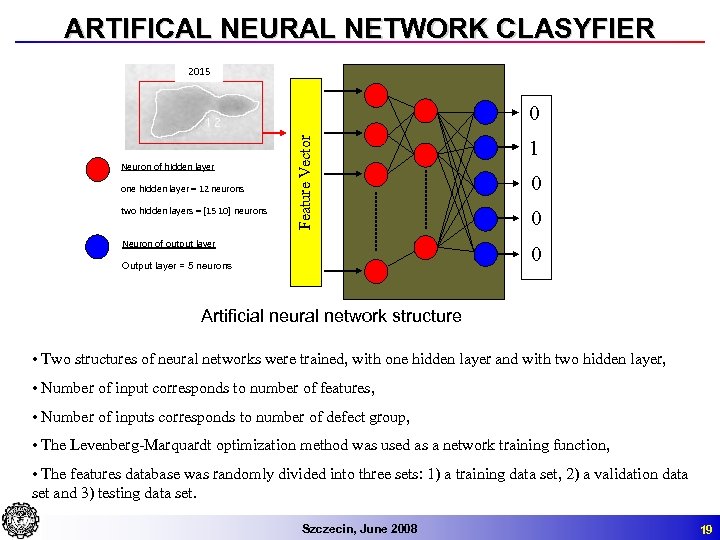 ARTIFICAL NEURAL NETWORK CLASYFIER 2015 Neuron of hidden layer one hidden layer = 12 neurons two hidden layers = [15 10] neurons Feature Vector 0 Neuron of output layer 1 0 0 0 Output layer = 5 neurons Artificial neural network structure • Two structures of neural networks were trained, with one hidden layer and with two hidden layer, • Number of input corresponds to number of features, • Number of inputs corresponds to number of defect group, • The Levenberg-Marquardt optimization method was used as a network training function, • The features database was randomly divided into three sets: 1) a training data set, 2) a validation data set and 3) testing data set. Szczecin, June 2008 19
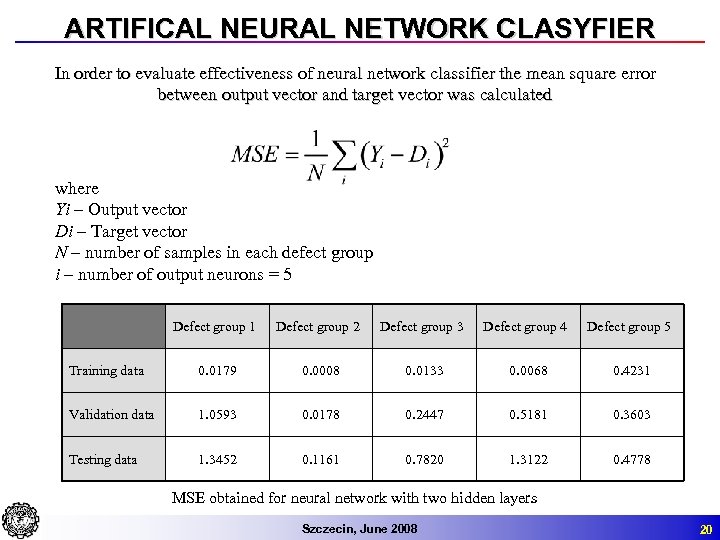 ARTIFICAL NEURAL NETWORK CLASYFIER In order to evaluate effectiveness of neural network classifier the mean square error between output vector and target vector was calculated where Yi – Output vector Di – Target vector N – number of samples in each defect group i – number of output neurons = 5 Defect group 1 Defect group 2 Defect group 3 Defect group 4 Defect group 5 Training data 0. 0179 0. 0008 0. 0133 0. 0068 0. 4231 Validation data 1. 0593 0. 0178 0. 2447 0. 5181 0. 3603 Testing data 1. 3452 0. 1161 0. 7820 1. 3122 0. 4778 MSE obtained for neural network with two hidden layers Szczecin, June 2008 20
 CONCLUSIONS • Cracks (group 1) are most separated defects group so easiest to detect, • The most difficult to distinguish is defect group 4, which can be confused with first, second and third defect group, • Small error obtained for training data and validation data confirms that the structure of applied NN has been chosen correctly, • The best results of NN have been achieved for second, third and fifth group of defects, which are porosity and gas pores, slag and inclusions, undercuts respectively, • Having suitable big training set, it is possible to build semi-automatic system distinguishing among main groups of imperfections Szczecin, June 2008 21


