87d9070c31ee324df363d015c3cc0c43.ppt
- Количество слайдов: 9
 Asymmetric Layouts 2007 • Maximum Hook & Arc – Good for most House Shots • Mid-Lane Hook & Back-End – A favorite for fresh PBA and Sport Conditions • Length & Back-End – A favorite for broken down PBA and Sport Conditions • Length – Good for most broken down House Shots • Full Roller Options
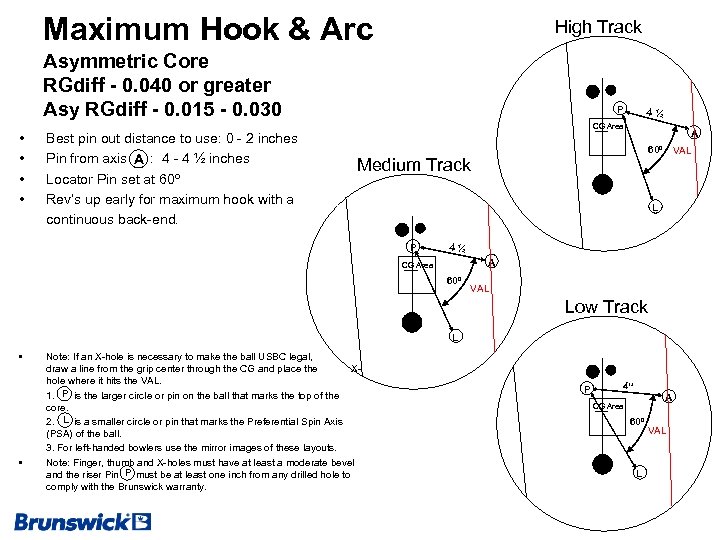 Maximum Hook & Arc High Track Asymmetric Core RGdiff - 0. 040 or greater Asy RGdiff - 0. 015 - 0. 030 • • Best pin out distance to use: 0 - 2 inches Pin from axis A : 4 - 4 ½ inches Locator Pin set at 60º Rev’s up early for maximum hook with a continuous back-end. P 4½ CG Area A 60º VAL Medium Track L P 4½ A CG Area 60º VAL Low Track L • • Note: If an X-hole is necessary to make the ball USBC legal, draw a line from the grip center through the CG and place the Xhole where it hits the VAL. 1. P is the larger circle or pin on the ball that marks the top of the core. 2. L is a smaller circle or pin that marks the Preferential Spin Axis (PSA) of the ball. 3. For left-handed bowlers use the mirror images of these layouts. Note: Finger, thumb and X-holes must have at least a moderate bevel and the riser Pin P must be at least one inch from any drilled hole to comply with the Brunswick warranty. P 4” A CG Area 60º L VAL
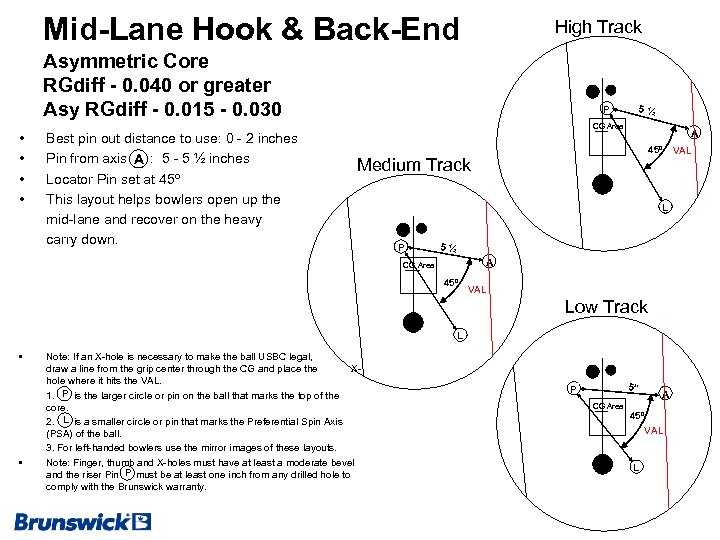 Mid-Lane Hook & Back-End High Track Asymmetric Core RGdiff - 0. 040 or greater Asy RGdiff - 0. 015 - 0. 030 • • Best pin out distance to use: 0 - 2 inches Pin from axis A : 5 - 5 ½ inches Locator Pin set at 45º This layout helps bowlers open up the mid-lane and recover on the heavy carry down. 5½ P CG Area A 45º Medium Track L P 5½ A CG Area 45º VAL Low Track L • • Note: If an X-hole is necessary to make the ball USBC legal, draw a line from the grip center through the CG and place the Xhole where it hits the VAL. 1. P is the larger circle or pin on the ball that marks the top of the core. 2. L is a smaller circle or pin that marks the Preferential Spin Axis (PSA) of the ball. 3. For left-handed bowlers use the mirror images of these layouts. Note: Finger, thumb and X-holes must have at least a moderate bevel and the riser Pin P must be at least one inch from any drilled hole to comply with the Brunswick warranty. 5” P CG Area A 45º VAL L VAL
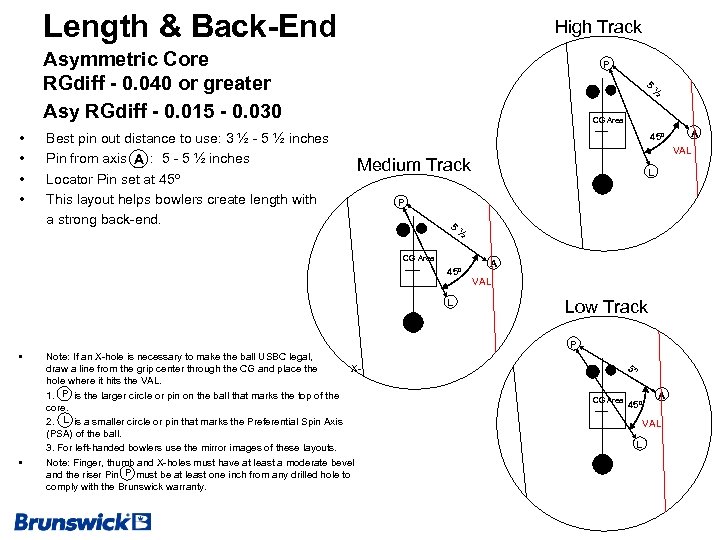 Length & Back-End High Track Asymmetric Core RGdiff - 0. 040 or greater Asy RGdiff - 0. 015 - 0. 030 • • Best pin out distance to use: 3 ½ - 5 ½ inches Pin from axis A : 5 - 5 ½ inches Locator Pin set at 45º This layout helps bowlers create length with a strong back-end. P 5 ½ CG Area 45º VAL Medium Track L P 5 ½ CG Area 45º L A VAL Low Track P • • Note: If an X-hole is necessary to make the ball USBC legal, draw a line from the grip center through the CG and place the Xhole where it hits the VAL. 1. P is the larger circle or pin on the ball that marks the top of the core. 2. L is a smaller circle or pin that marks the Preferential Spin Axis (PSA) of the ball. 3. For left-handed bowlers use the mirror images of these layouts. Note: Finger, thumb and X-holes must have at least a moderate bevel and the riser Pin P must be at least one inch from any drilled hole to comply with the Brunswick warranty. A 5” CG Area 45º A VAL L
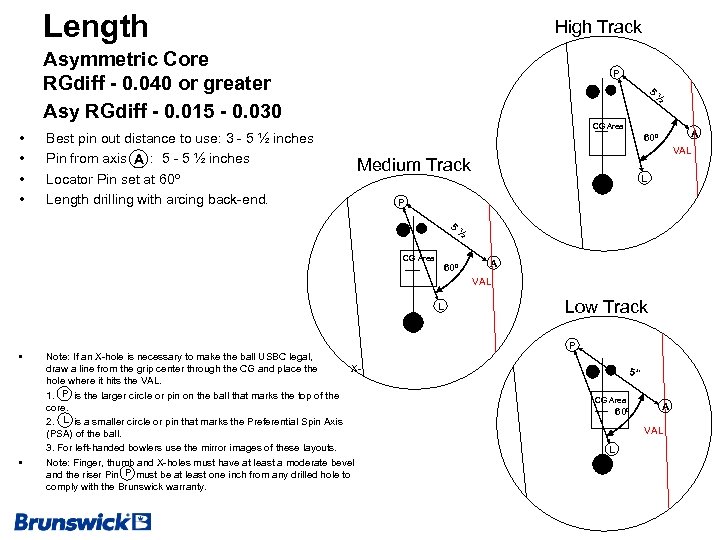 Length High Track Asymmetric Core RGdiff - 0. 040 or greater Asy RGdiff - 0. 015 - 0. 030 • • Best pin out distance to use: 3 - 5 ½ inches Pin from axis A : 5 - 5 ½ inches Locator Pin set at 60º Length drilling with arcing back-end. P 5 ½ CG Area A 60º VAL Medium Track L P 5 CG Area ½ 60º A VAL L • • Note: If an X-hole is necessary to make the ball USBC legal, draw a line from the grip center through the CG and place the Xhole where it hits the VAL. 1. P is the larger circle or pin on the ball that marks the top of the core. 2. L is a smaller circle or pin that marks the Preferential Spin Axis (PSA) of the ball. 3. For left-handed bowlers use the mirror images of these layouts. Note: Finger, thumb and X-holes must have at least a moderate bevel and the riser Pin P must be at least one inch from any drilled hole to comply with the Brunswick warranty. Low Track P 5” CG Area 60º A VAL L
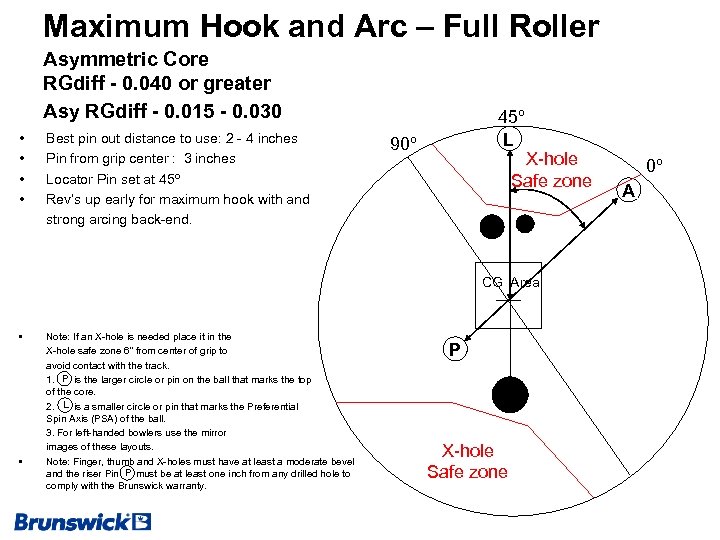 Maximum Hook and Arc – Full Roller Asymmetric Core RGdiff - 0. 040 or greater Asy RGdiff - 0. 015 - 0. 030 • • Best pin out distance to use: 2 - 4 inches Pin from grip center : 3 inches Locator Pin set at 45º Rev’s up early for maximum hook with and strong arcing back-end. 45º L 90º X-hole Safe zone CG Area • • Note: If an X-hole is needed place it in the X-hole safe zone 6” from center of grip to avoid contact with the track. 1. P is the larger circle or pin on the ball that marks the top of the core. 2. L is a smaller circle or pin that marks the Preferential Spin Axis (PSA) of the ball. 3. For left-handed bowlers use the mirror images of these layouts. Note: Finger, thumb and X-holes must have at least a moderate bevel and the riser Pin P must be at least one inch from any drilled hole to comply with the Brunswick warranty. P X-hole Safe zone 0º A
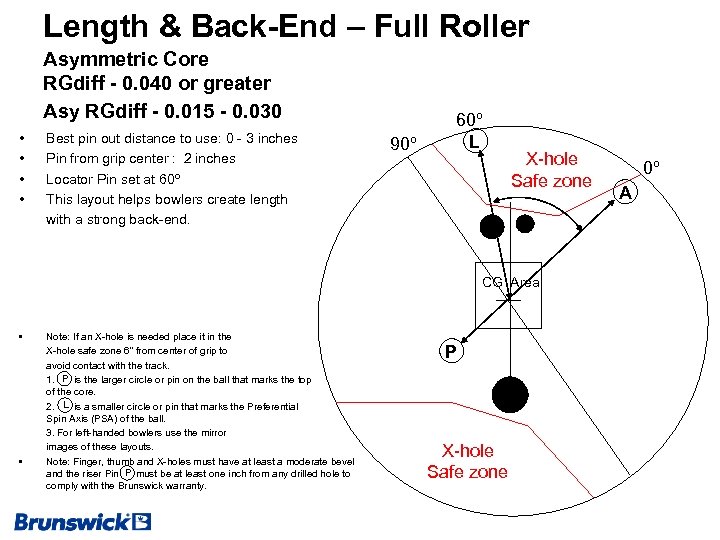 Length & Back-End – Full Roller Asymmetric Core RGdiff - 0. 040 or greater Asy RGdiff - 0. 015 - 0. 030 • • Best pin out distance to use: 0 - 3 inches Pin from grip center : 2 inches Locator Pin set at 60º This layout helps bowlers create length with a strong back-end. 90º 60º L X-hole Safe zone CG Area • • Note: If an X-hole is needed place it in the X-hole safe zone 6” from center of grip to avoid contact with the track. 1. P is the larger circle or pin on the ball that marks the top of the core. 2. L is a smaller circle or pin that marks the Preferential Spin Axis (PSA) of the ball. 3. For left-handed bowlers use the mirror images of these layouts. Note: Finger, thumb and X-holes must have at least a moderate bevel and the riser Pin P must be at least one inch from any drilled hole to comply with the Brunswick warranty. P X-hole Safe zone 0º A
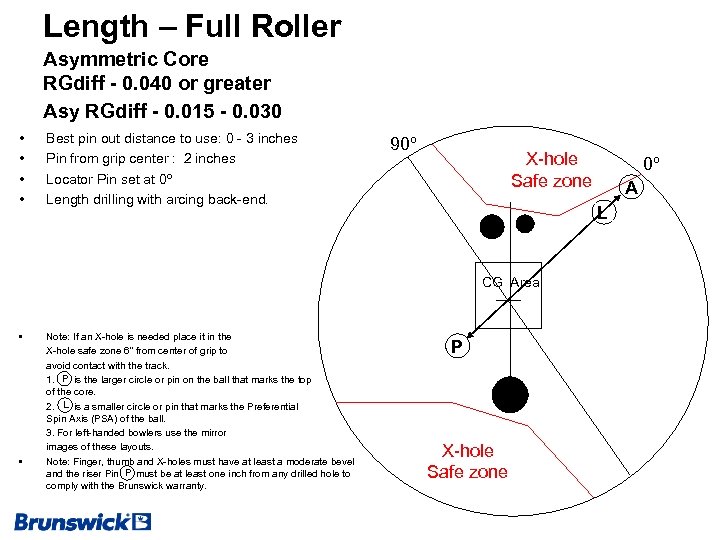 Length – Full Roller Asymmetric Core RGdiff - 0. 040 or greater Asy RGdiff - 0. 015 - 0. 030 • • Best pin out distance to use: 0 - 3 inches Pin from grip center : 2 inches Locator Pin set at 0º Length drilling with arcing back-end. 90º X-hole Safe zone • Note: If an X-hole is needed place it in the X-hole safe zone 6” from center of grip to avoid contact with the track. 1. P is the larger circle or pin on the ball that marks the top of the core. 2. L is a smaller circle or pin that marks the Preferential Spin Axis (PSA) of the ball. 3. For left-handed bowlers use the mirror images of these layouts. Note: Finger, thumb and X-holes must have at least a moderate bevel and the riser Pin P must be at least one inch from any drilled hole to comply with the Brunswick warranty. A L CG Area • 0º P X-hole Safe zone
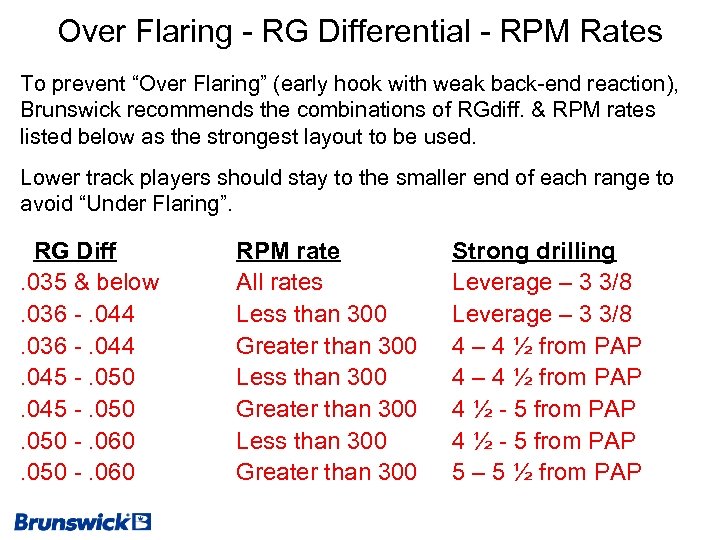 Over Flaring - RG Differential - RPM Rates To prevent “Over Flaring” (early hook with weak back-end reaction), Brunswick recommends the combinations of RGdiff. & RPM rates listed below as the strongest layout to be used. Lower track players should stay to the smaller end of each range to avoid “Under Flaring”. RG Diff. 035 & below. 036 -. 044. 045 -. 050 -. 060 RPM rate All rates Less than 300 Greater than 300 Strong drilling Leverage – 3 3/8 4 – 4 ½ from PAP 4 ½ - 5 from PAP 5 – 5 ½ from PAP


