0b44914820d50e49c4bdb931776d8677.ppt
- Количество слайдов: 24
 ASIPP Application of Infrared Thermography in NDT of Plasma-Facing Components for Tokamaks Pan QI, Qiang LI, Guang-Nan LUO Institute of Plasma Physics Chinese Academy of Sciences P. O. Box 1126, Hefei, 230031 China 17 th World Congress of Non-Destructive Testing Exhibition Center, Shanghai, China, October 25 – 28, 2008
 ASIPP Outline • Background • Infrared thermography applied in PFCs testing • R & D at ASIPP for NDT of PFCs • Summary and future work
 ASIPP Outline • Background • Infrared thermography applied in PFCs testing • R & D at ASIPP for NDT of PFCs • Summary and future work
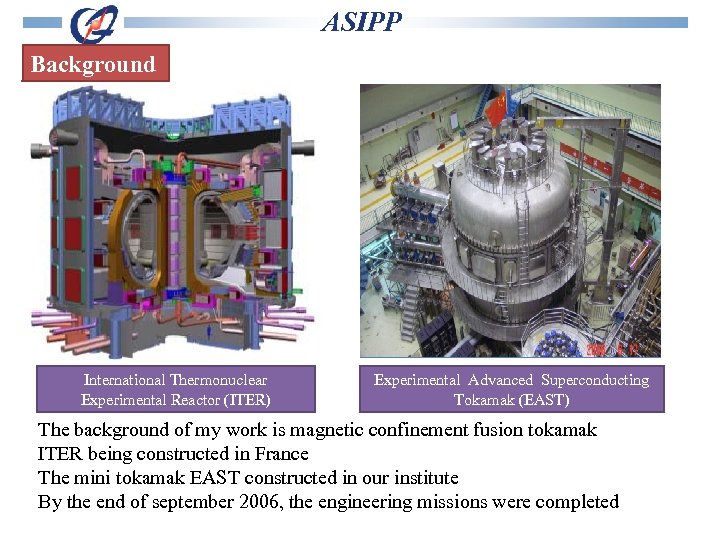 ASIPP Background International Thermonuclear Experimental Reactor (ITER) Experimental Advanced Superconducting Tokamak (EAST) The background of my work is magnetic confinement fusion tokamak ITER being constructed in France The mini tokamak EAST constructed in our institute By the end of september 2006, the engineering missions were completed
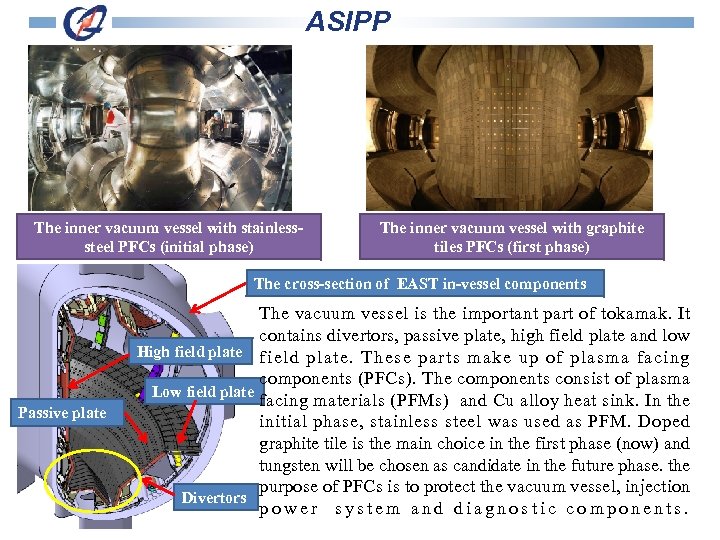 ASIPP The inner vacuum vessel with stainlesssteel PFCs (initial phase) The inner vacuum vessel with graphite tiles PFCs (first phase) The cross-section of EAST in-vessel components Passive plate The vacuum vessel is the important part of tokamak. It contains divertors, passive plate, high field plate and low High field plate. These parts make up of plasma facing components (PFCs). The components consist of plasma Low field plate facing materials (PFMs) and Cu alloy heat sink. In the initial phase, stainless steel was used as PFM. Doped graphite tile is the main choice in the first phase (now) and tungsten will be chosen as candidate in the future phase. the purpose of PFCs is to protect the vacuum vessel, injection Divertors power system and diagnostic components.
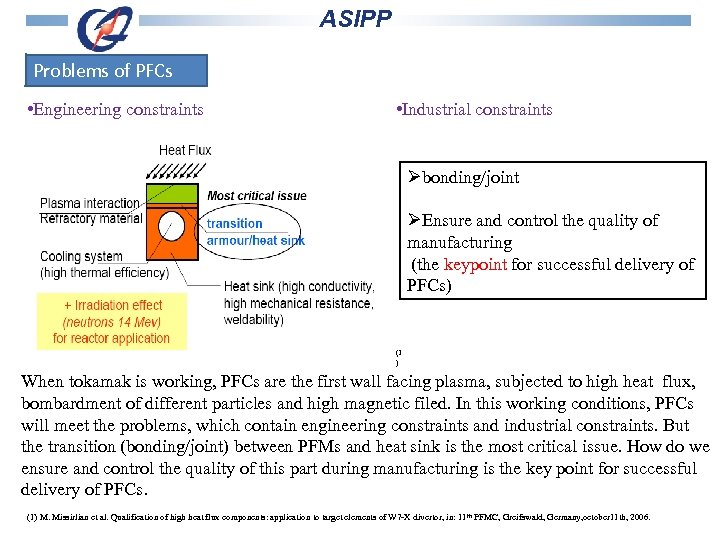 ASIPP Problems of PFCs • Engineering constraints • Industrial constraints Øbonding/joint ØEnsure and control the quality of manufacturing (the keypoint for successful delivery of PFCs) (1 ) When tokamak is working, PFCs are the first wall facing plasma, subjected to high heat flux, bombardment of different particles and high magnetic filed. In this working conditions, PFCs will meet the problems, which contain engineering constraints and industrial constraints. But the transition (bonding/joint) between PFMs and heat sink is the most critical issue. How do we ensure and control the quality of this part during manufacturing is the key point for successful delivery of PFCs. (1) M. Missirlian et al. Qualification of high heat flux components: application to target elements of W 7 -X divertor, in: 11 th PFMC, Greifswald, Germany, october 11 th, 2006.
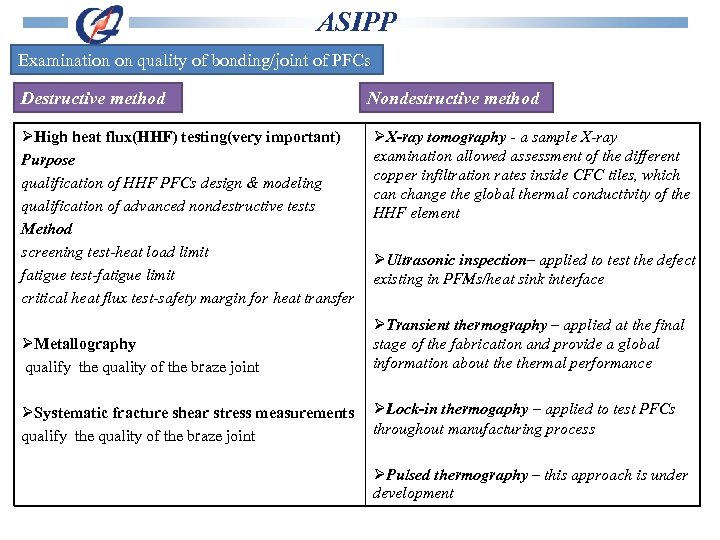 ASIPP Examination on quality of bonding/joint of PFCs Destructive method ØHigh heat flux(HHF) testing(very important) Purpose qualification of HHF PFCs design & modeling qualification of advanced nondestructive tests Method screening test-heat load limit fatigue test-fatigue limit critical heat flux test-safety margin for heat transfer ØMetallography qualify the quality of the braze joint Nondestructive method ØX-ray tomography - a sample X-ray examination allowed assessment of the different copper infiltration rates inside CFC tiles, which can change the global thermal conductivity of the HHF element ØUltrasonic inspection– applied to test the defect existing in PFMs/heat sink interface ØTransient thermography – applied at the final stage of the fabrication and provide a global information about thermal performance ØSystematic fracture shear stress measurements ØLock-in thermogaphy – applied to test PFCs throughout manufacturing process qualify the quality of the braze joint ØPulsed thermography – this approach is under development
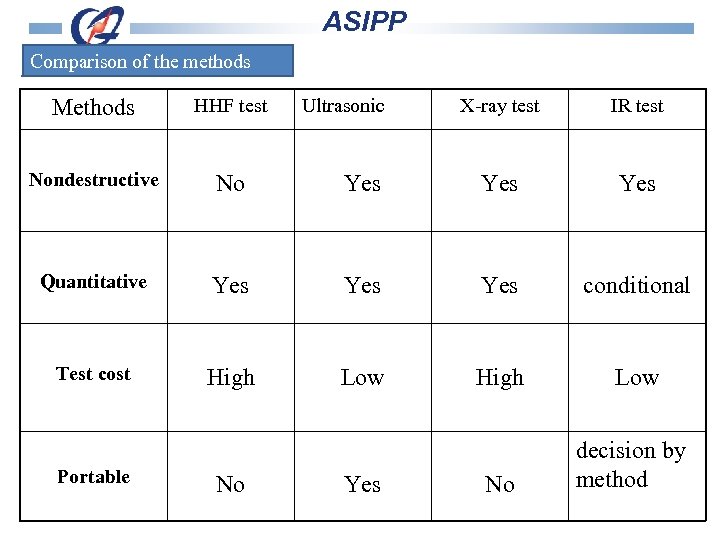 ASIPP Comparison of the methods Methods HHF test Nondestructive No Quantitative Test cost Portable X-ray test IR test Yes Yes Yes conditional High Low No decision by method No Ultrasonic Yes
 ASIPP Outline • Background • Infrared thermography applied in PFCs testing • R & D at ASIPP for NDT of PFCs • Summary and future work
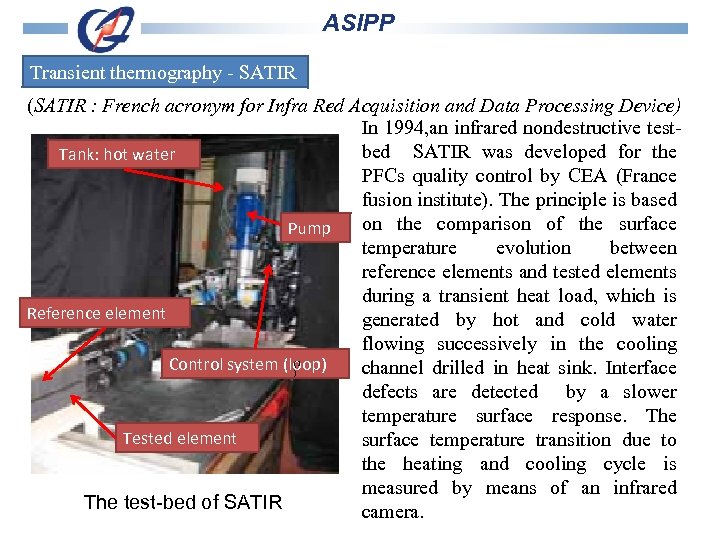 ASIPP Transient thermography - SATIR (SATIR : French acronym for Infra Red Acquisition and Data Processing Device) In 1994, an infrared nondestructive testbed SATIR was developed for the Tank: hot water PFCs quality control by CEA (France fusion institute). The principle is based on the comparison of the surface Pump temperature evolution between reference elements and tested elements during a transient heat load, which is Reference element generated by hot and cold water flowing successively in the cooling Control system (loop) channel drilled in heat sink. Interface defects are detected by a slower temperature surface response. The Tested element surface temperature transition due to the heating and cooling cycle is measured by means of an infrared The test-bed of SATIR camera. (1 )
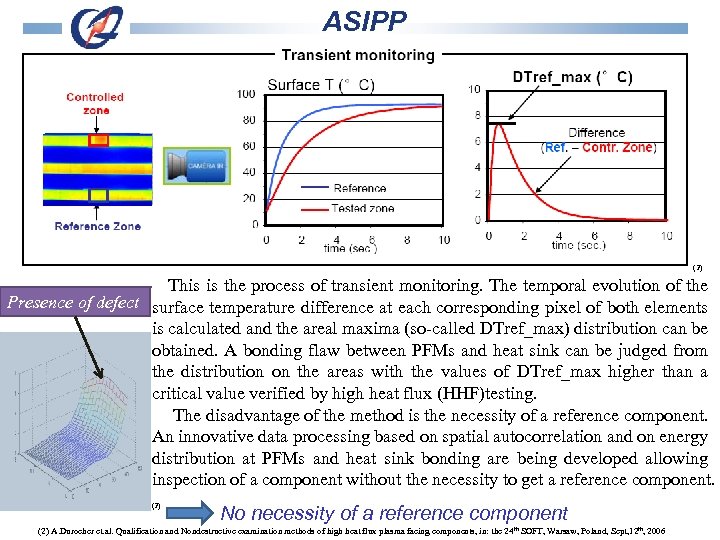 ASIPP (2) This is the process of transient monitoring. The temporal evolution of the Presence of defect surface temperature difference at each corresponding pixel of both elements is calculated and the areal maxima (so-called DTref_max) distribution can be obtained. A bonding flaw between PFMs and heat sink can be judged from the distribution on the areas with the values of DTref_max higher than a critical value verified by high heat flux (HHF)testing. The disadvantage of the method is the necessity of a reference component. An innovative data processing based on spatial autocorrelation and on energy distribution at PFMs and heat sink bonding are being developed allowing inspection of a component without the necessity to get a reference component. (2) No necessity of a reference component (2) A. Durocher et. al. Qualification and Nondestructive examination methods of high heat flux plasma facing components, in: the 24 th SOFT, Warsaw, Poland, Sept, 12 th, 2006
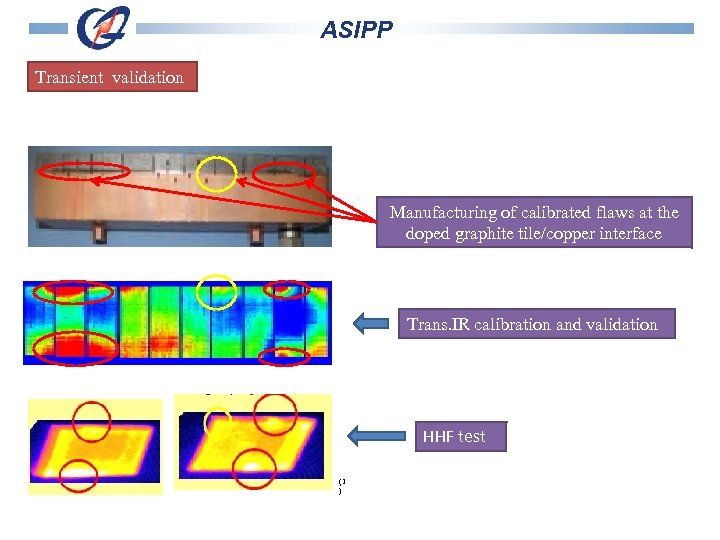 ASIPP Transient validation Manufacturing of calibrated flaws at the doped graphite tile/copper interface Trans. IR calibration and validation HHF test (1 )
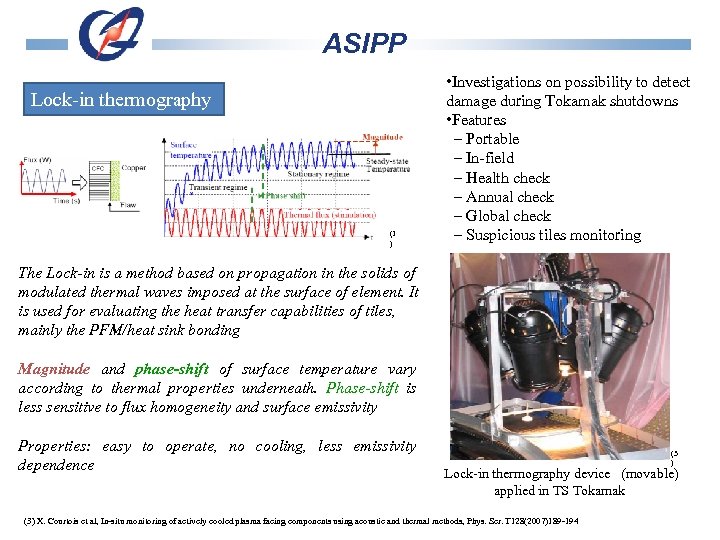 ASIPP Lock-in thermography (1 ) • Investigations on possibility to detect damage during Tokamak shutdowns • Features – Portable – In-field – Health check – Annual check – Global check – Suspicious tiles monitoring The Lock-in is a method based on propagation in the solids of modulated thermal waves imposed at the surface of element. It is used for evaluating the heat transfer capabilities of tiles, mainly the PFM/heat sink bonding Magnitude and phase-shift of surface temperature vary according to thermal properties underneath. Phase-shift is less sensitive to flux homogeneity and surface emissivity Properties: easy to operate, no cooling, less emissivity dependence (3 ) Lock-in thermography device (movable) applied in TS Tokamak (3) X. Courtois et al, In-situ monitoring of actively cooled plasma facing components using acoustic and thermal methods, Phys. Scr. T 128(2007)189 -194
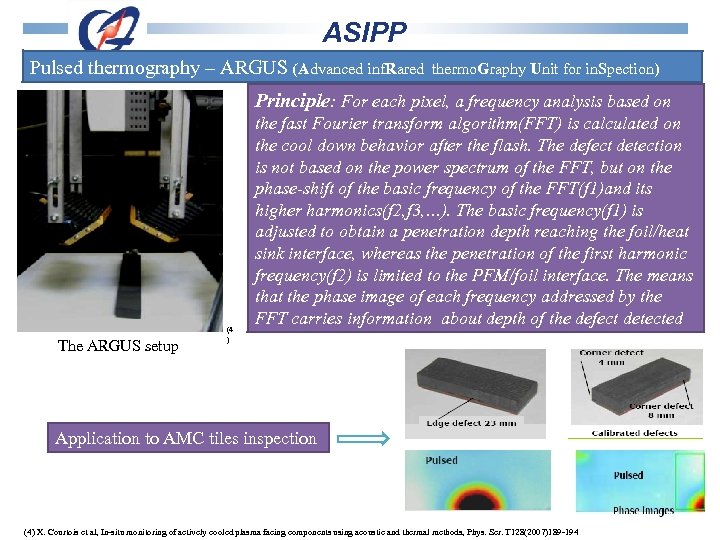 ASIPP Pulsed thermography – ARGUS (Advanced inf. Rared thermo. Graphy Unit for in. Spection) Principle: For each pixel, a frequency analysis based on The ARGUS setup (4 ) the fast Fourier transform algorithm(FFT) is calculated on the cool down behavior after the flash. The defect detection is not based on the power spectrum of the FFT, but on the phase-shift of the basic frequency of the FFT(f 1)and its higher harmonics(f 2, f 3, …). The basic frequency(f 1) is adjusted to obtain a penetration depth reaching the foil/heat sink interface, whereas the penetration of the first harmonic frequency(f 2) is limited to the PFM/foil interface. The means that the phase image of each frequency addressed by the FFT carries information about depth of the defect detected Application to AMC tiles inspection (4) X. Courtois et al, In-situ monitoring of actively cooled plasma facing components using acoustic and thermal methods, Phys. Scr. T 128(2007)189 -194
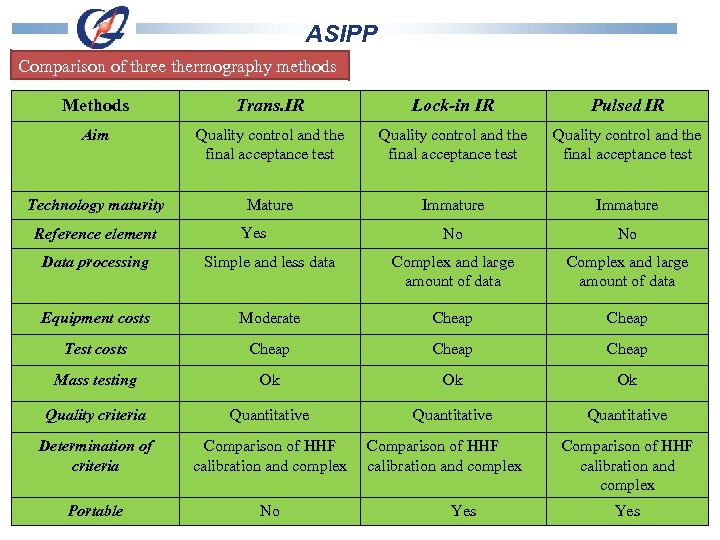 ASIPP Comparison of three thermography methods Methods Trans. IR Lock-in IR Pulsed IR Aim Quality control and the final acceptance test Technology maturity Mature Immature No No Reference element Yes Data processing Simple and less data Complex and large amount of data Equipment costs Moderate Cheap Test costs Cheap Mass testing Ok Ok Ok Quality criteria Quantitative Determination of criteria Comparison of HHF calibration and complex Portable No Comparison of HHF calibration and complex Yes
 ASIPP Outline • Background • Infrared thermography applied in PFCs testing • R & D at ASIPP for NDT of PFCs • Summary and future work
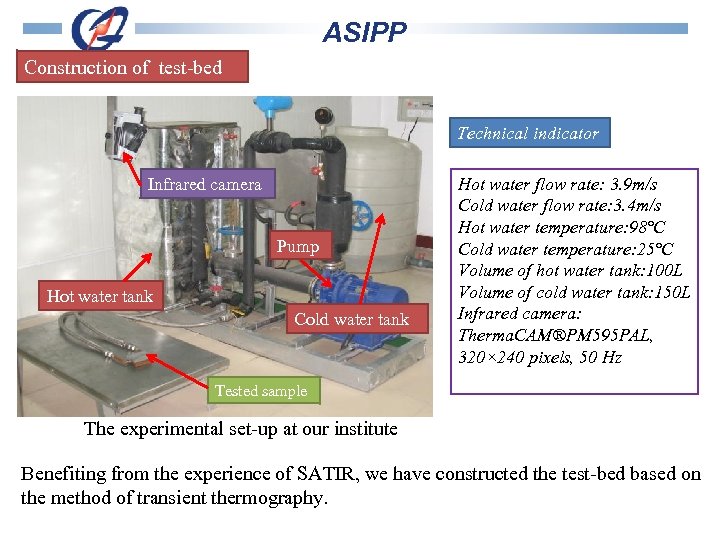 ASIPP Construction of test-bed Technical indicator Infrared camera Pump Hot water tank Cold water tank Hot water flow rate: 3. 9 m/s Cold water flow rate: 3. 4 m/s Hot water temperature: 98℃ Cold water temperature: 25℃ Volume of hot water tank: 100 L Volume of cold water tank: 150 L Infrared camera: Therma. CAM®PM 595 PAL, 320× 240 pixels, 50 Hz Tested sample The experimental set-up at our institute Benefiting from the experience of SATIR, we have constructed the test-bed based on the method of transient thermography.
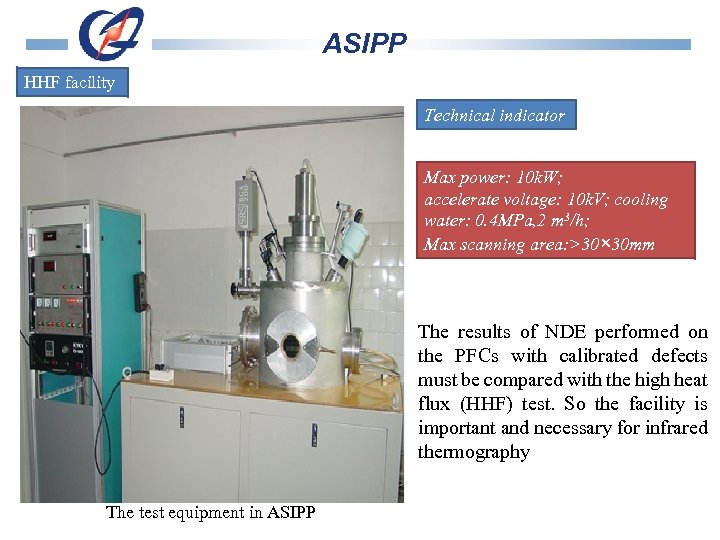 ASIPP HHF facility Technical indicator Max power: 10 k. W; accelerate voltage: 10 k. V; cooling water: 0. 4 MPa, 2 m 3/h; Max scanning area: >30× 30 mm The results of NDE performed on the PFCs with calibrated defects must be compared with the high heat flux (HHF) test. So the facility is important and necessary for infrared thermography The test equipment in ASIPP
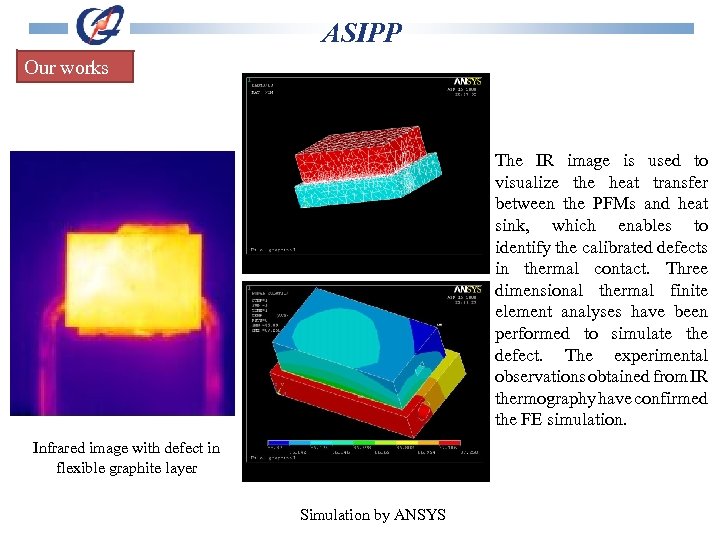 ASIPP Our works The IR image is used to visualize the heat transfer between the PFMs and heat sink, which enables to identify the calibrated defects in thermal contact. Three dimensional thermal finite element analyses have been performed to simulate the defect. The experimental observations obtained from IR thermography have confirmed the FE simulation. Infrared image with defect in flexible graphite layer Simulation by ANSYS
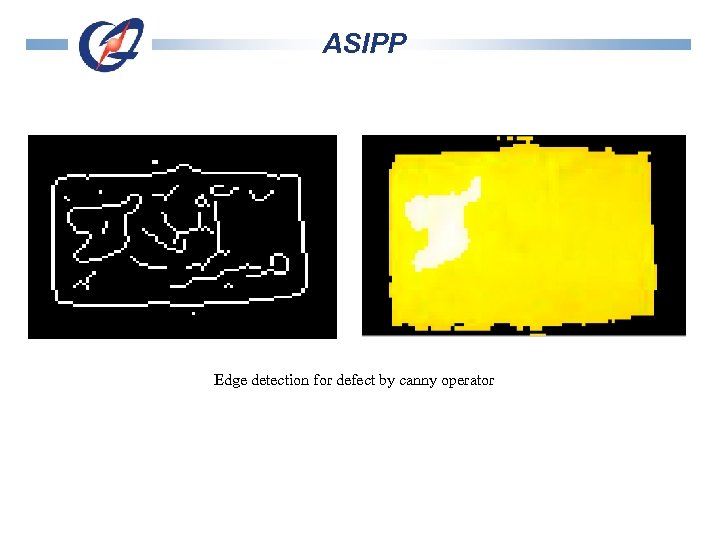 ASIPP Edge detection for defect by canny operator
 ASIPP Outline • Background • Infrared thermography applied in PFCs testing • R & D at ASIPP for NDT of PFCs • Summary and future work
 ASIPP Summary ØPlasma-facing component is one of the most important in-vessel components in a tokamak. High reliability and stability are necessary for high performance plasma operations. ØGood bonding/joint quality between the plasma-facing material and the heat sink is a keypoint to realize the high reliability and stability, which requires reliable examinations during manufacturing and at final batch reception. ØInfrared thermography has proved to be a reliable and effective method in the examination and been chosen as a candidate method in the manufacturing of the ITER PFCs. ØR & D work is underway to establish reliable NDTs in future manufacturing of the nextstep EAST PFCs, mainly including IR thermography and ultrasonic inspections.
 ASIPP Future work ØContinuous efforts in developing IR transient thermography NDT, i. e. , completion and improvement of the system, esp. calibration with comparison to HHF testing ØMore NDT methods, e. g. , ultrasonic inspection, will be examined for their use in the manufacturing of the future EAST PFCs ØThe acceptance criteria for the NDTs must be determined via dedicated and reliable testings, usually destructive ones ØPortable Lock-in or Pulsed IR thermography test-bed will be useful for in-field examination, may be used as an effective tool for routine health check and service life prediction of the PFCs
 ASIPP
ASIPP


