a8ecc985d8b90ffdaaf931f6aa92e2df.ppt
- Количество слайдов: 53
 2. 008 Design & Manufacturing II Spring 2004 Process Planning CAD/CAM Ref 1: CAD/CAM/CAE systems, by K. W. Lee, Addison-Wesley, 1999 Ref. 2: Computer Aided Manufacturing, 2 nd ed. by T. C. Chang, R. A. Wysk, and H-P Wang, Prentice Hall 1998 Ref. 3: Manufacturing: Design, Production, Automation and Integration, by B. Benhabib, Marcel Dekker, New York, 2003 1
 - Lab starts today. - Monday 2/16, President’s day, a Holiday - Tuesday 2/17, Monday’s lecture & lab group A - HW#1 due 2/11 (W) 2
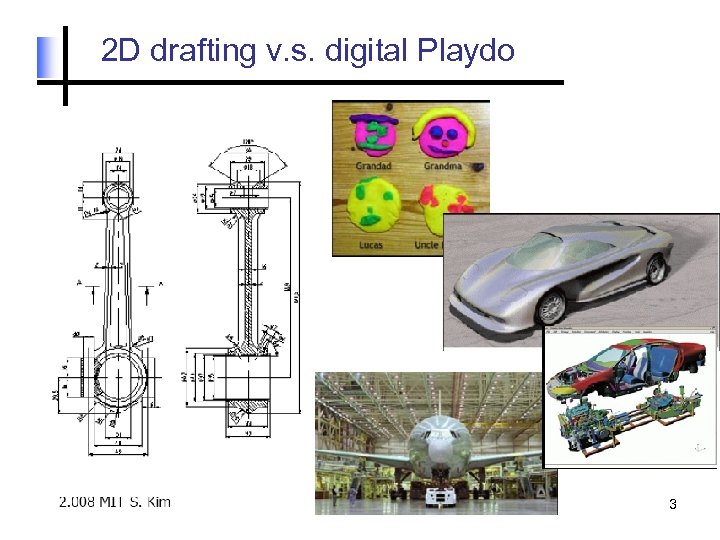 2 D drafting v. s. digital Playdo 3
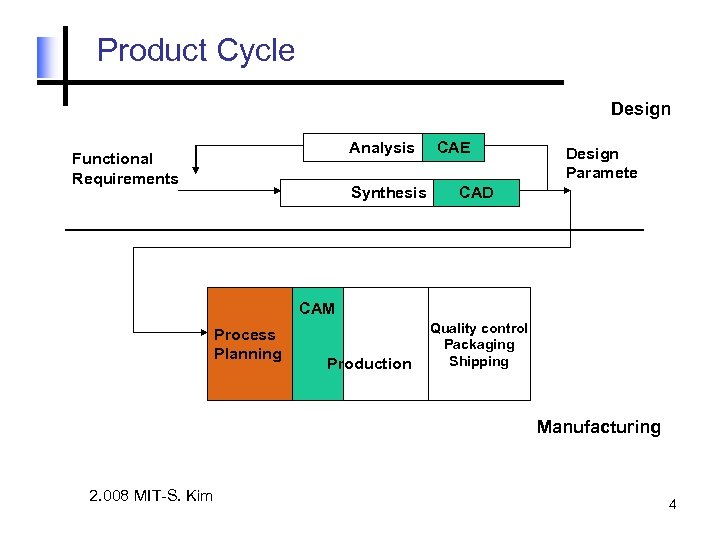 Product Cycle Design Analysis Functional Requirements Synthesis CAE Design Paramete CAD CAM Process Planning Production Quality control Packaging Shipping Manufacturing 2. 008 MIT-S. Kim 4
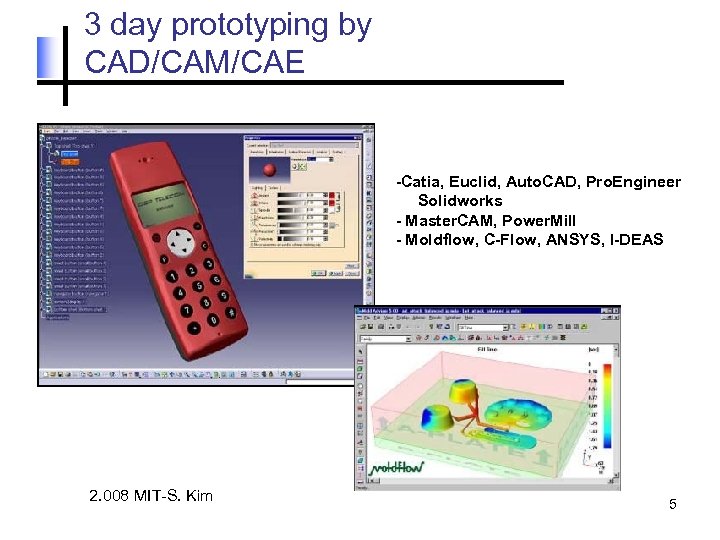 3 day prototyping by CAD/CAM/CAE -Catia, Euclid, Auto. CAD, Pro. Engineer Solidworks - Master. CAM, Power. Mill - Moldflow, C-Flow, ANSYS, I-DEAS 2. 008 MIT-S. Kim 5
 Geometric Modeling – Historical Development • 1960 -1962: The first Graphical User Interface (GUI), Sketchpad, developed at MIT. • 1964 -1965: DAC-1 by GM and CADAM by Lockheed. • 1970 -1980: Various systems that ran on proprietary hardware – only a handful survived beyond the 1990 s. • 1990 -2000: Pro/Engineer, Solid Works and I-DEAS run on PC platforms. 2. 008 MIT-S. Kim 6
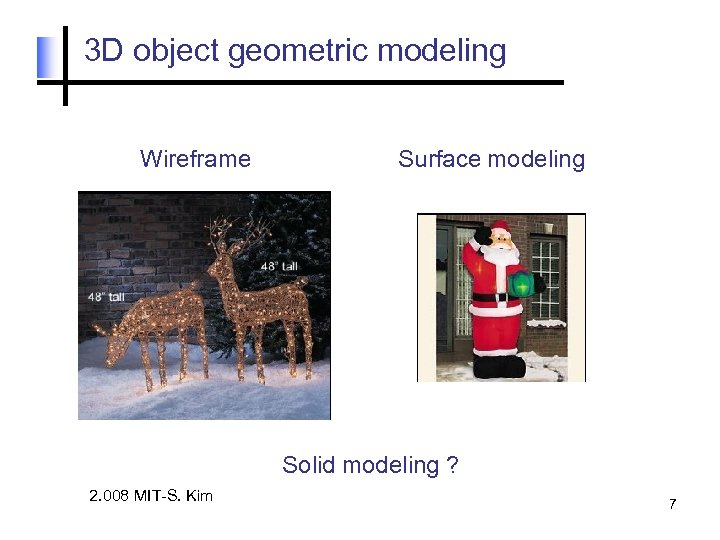 3 D object geometric modeling Wireframe Surface modeling Solid modeling ? 2. 008 MIT-S. Kim 7
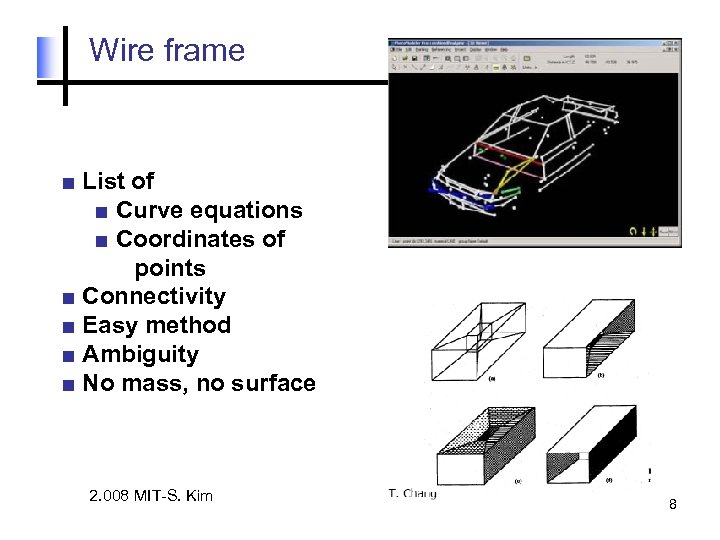 Wire frame ■ List of ■ Curve equations ■ Coordinates of points ■ Connectivity ■ Easy method ■ Ambiguity ■ No mass, no surface 2. 008 MIT-S. Kim 8
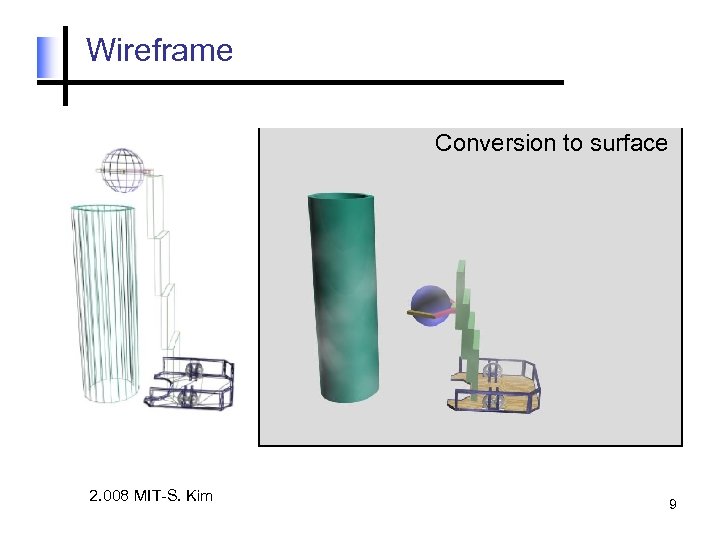 Wireframe Conversion to surface 2. 008 MIT-S. Kim 9
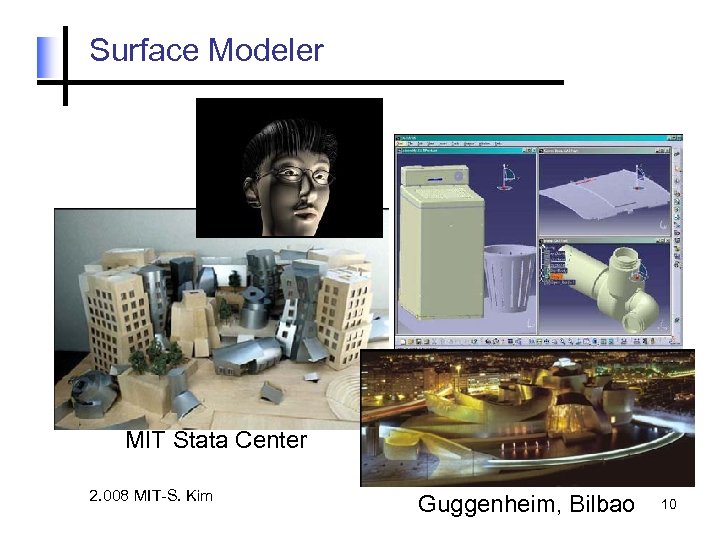 Surface Modeler MIT Stata Center 2. 008 MIT-S. Kim Guggenheim, Bilbao 10
 Surface Modeler ■ Wireframe data + ■ Surfaces ■ Connectivity, Adjacency ■ Interpolation of points, curve nets ■ Translation or sweeping of curves ■ Fits to complex free formed surfaces ■ Visual, aesthetic design ■ NC code generation 2. 008 MIT-S. Kim 11
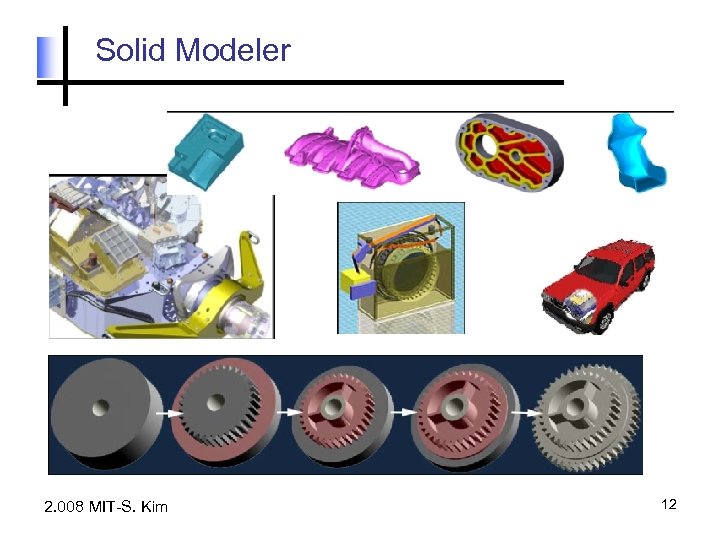 Solid Modeler 2. 008 MIT-S. Kim 12
 Solid modeler ■ Has a closed volume. ■ Knows “in” or “out” ■ Has a mass and inertia. ■ Huge input data, maths. ■ User friendliness is a must. ■ Primitives ■ +/- by Boolean operations ■ Sweeping, rounding, lifting ■ Hybrid (solid + Surface, CSG + BREP, Parametric + explicit) 2. 008 MIT-S. Kim 13
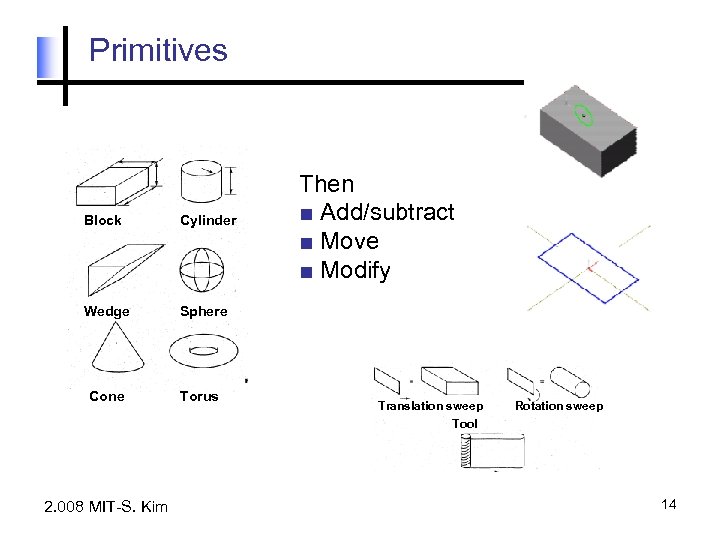 Primitives Block Cylinder Wedge Then ■ Add/subtract ■ Move ■ Modify Sphere Cone 2. 008 MIT-S. Kim Torus Translation sweep Tool Rotation sweep 14
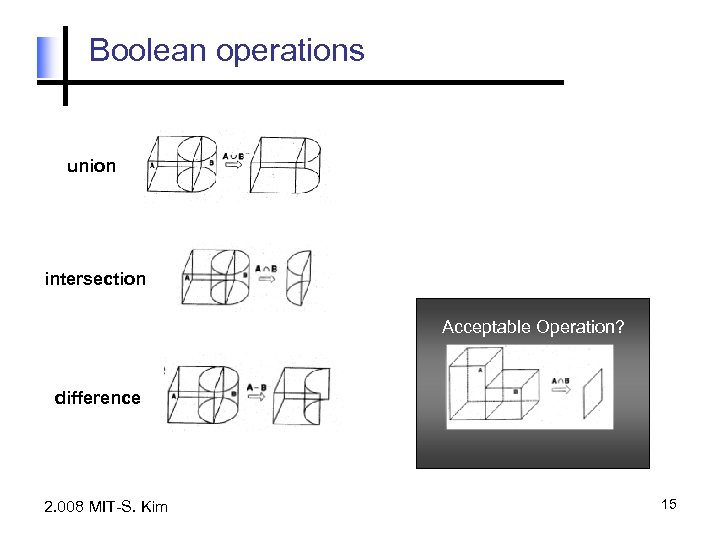 Boolean operations union intersection Acceptable Operation? difference 2. 008 MIT-S. Kim 15
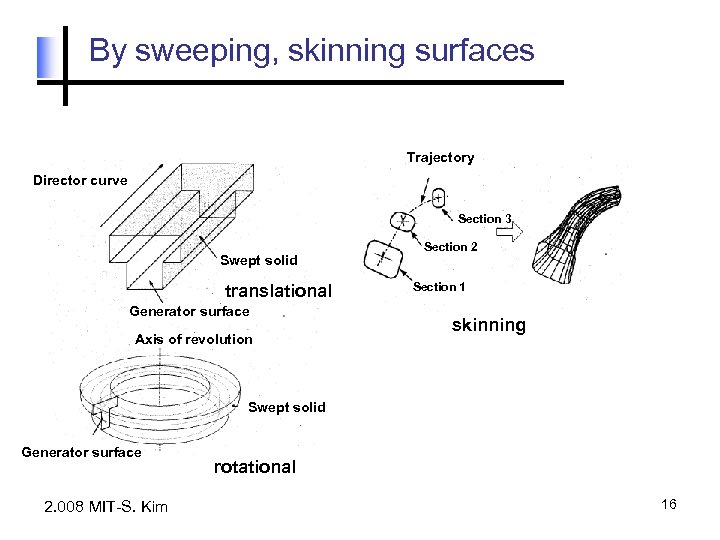 By sweeping, skinning surfaces Trajectory Director curve Section 3 Swept solid translational Generator surface Axis of revolution Section 2 Section 1 skinning Swept solid Generator surface 2. 008 MIT-S. Kim rotational 16
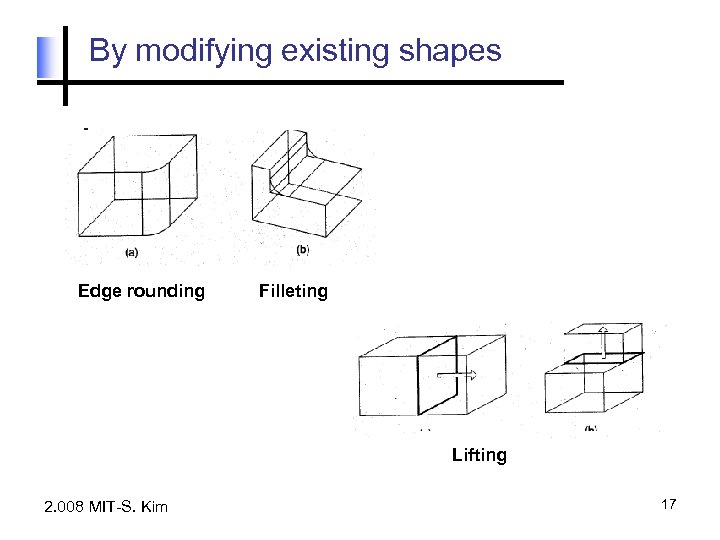 By modifying existing shapes Edge rounding Filleting Lifting 2. 008 MIT-S. Kim 17
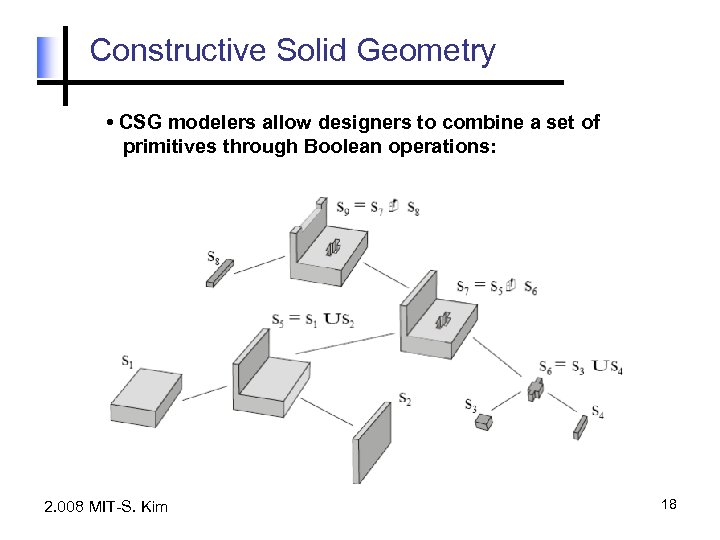 Constructive Solid Geometry • CSG modelers allow designers to combine a set of primitives through Boolean operations: 2. 008 MIT-S. Kim 18
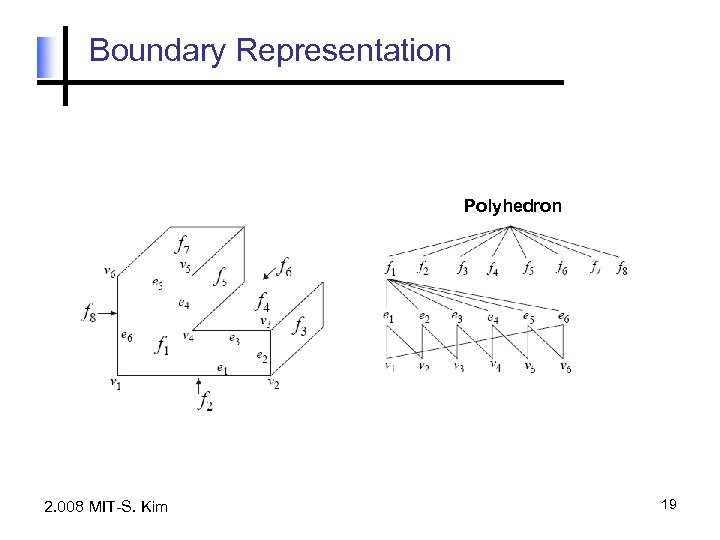 Boundary Representation Polyhedron 2. 008 MIT-S. Kim 19
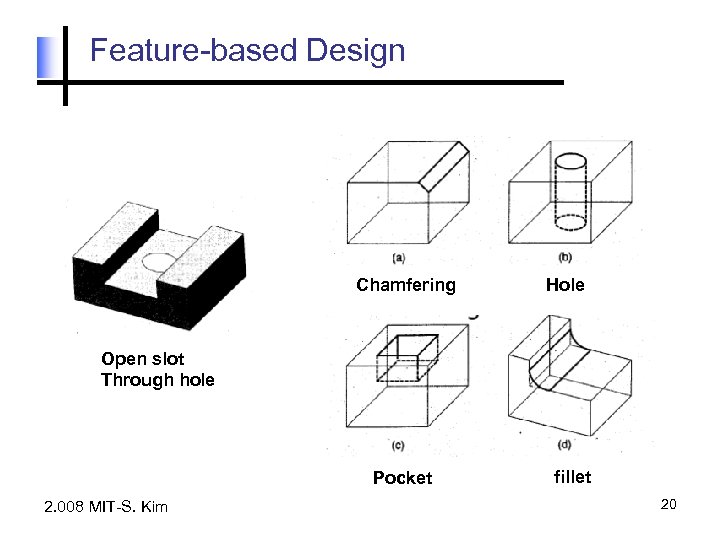 Feature-based Design Chamfering Hole Open slot Through hole Pocket 2. 008 MIT-S. Kim fillet 20
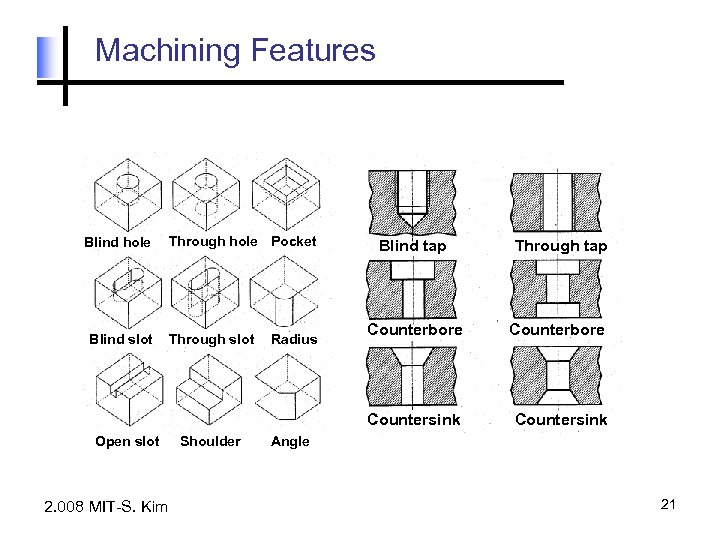 Machining Features Blind hole Through hole Pocket Open slot 2. 008 MIT-S. Kim Through slot Shoulder Radius Through tap Counterbore Countersink Blind slot Blind tap Countersink Angle 21
 Parametric modeling ■ Feature-based ■ Dimension data ■ Geometric constraints ■ Assembly modeling ■ No standard of data exchange ■ IGES (Initial Graphic Exchnage Standards) 2. 008 MIT-S. Kim 22
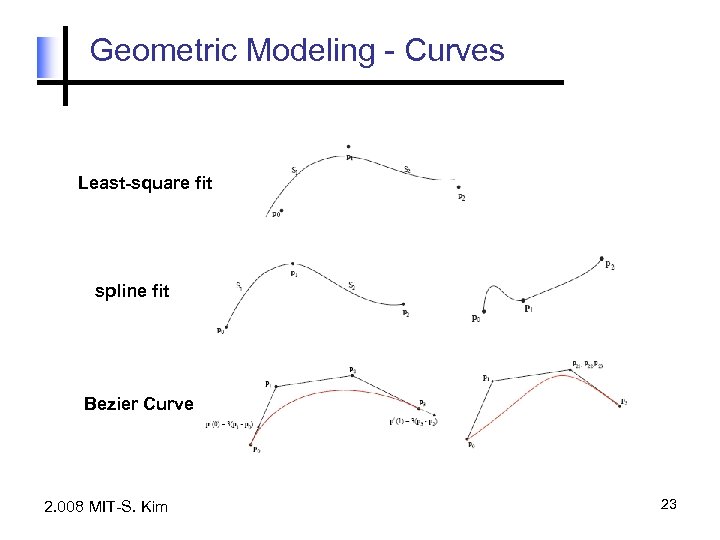 Geometric Modeling - Curves Least-square fit spline fit Bezier Curve 2. 008 MIT-S. Kim 23
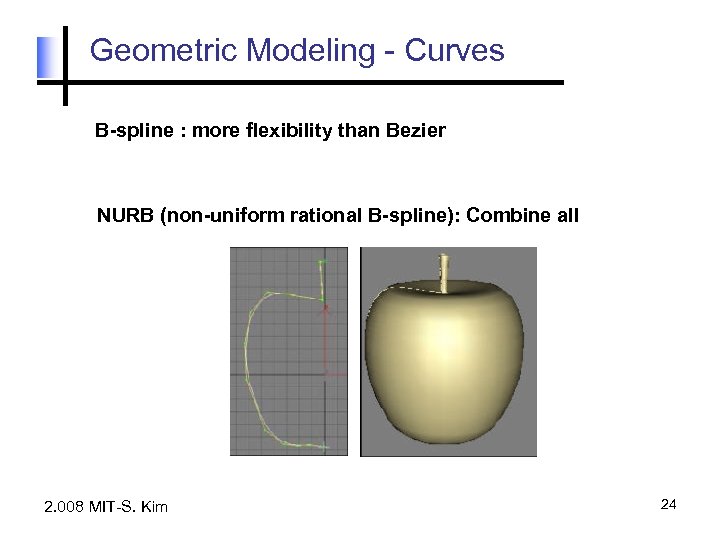 Geometric Modeling - Curves B-spline : more flexibility than Bezier NURB (non-uniform rational B-spline): Combine all 2. 008 MIT-S. Kim 24
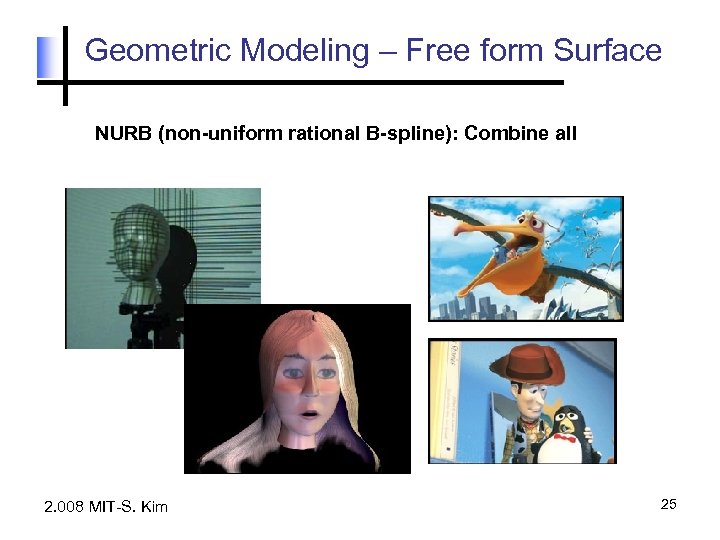 Geometric Modeling – Free form Surface NURB (non-uniform rational B-spline): Combine all 2. 008 MIT-S. Kim 25
 Process Planning (CAPP) ■ “Act of preparing detailed work instructions to machine or assemble a part or parts” –Chang, Wysk, Wang ■ Sequence of manufacturing processes and/or assembly operations ■ Operation sheet 2. 008 MIT-S. Kim 26
 Restaurant Owner ■ Have customers eat well ■ Customers serviced well ■ speed ■ customization ■ Affordable tab ■ $$$ - Profit What’s the difference between Mc. Donald v. s. Maison Robert? 2. 008 MIT-S. Kim 27
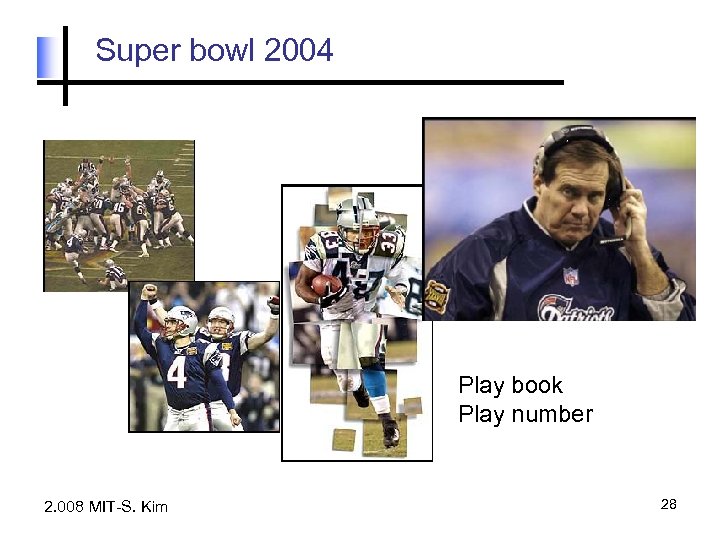 Super bowl 2004 Play book Play number 2. 008 MIT-S. Kim 28
 Image removed due to copyright considerations. 29
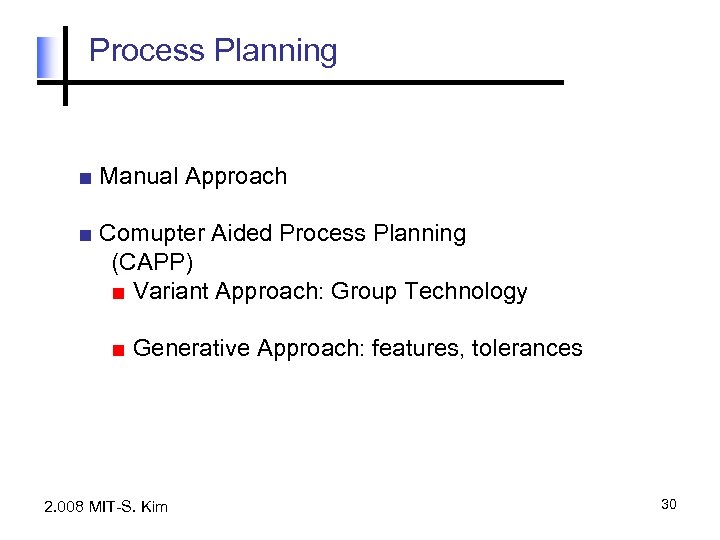 Process Planning ■ Manual Approach ■ Comupter Aided Process Planning (CAPP) ■ Variant Approach: Group Technology ■ Generative Approach: features, tolerances 2. 008 MIT-S. Kim 30
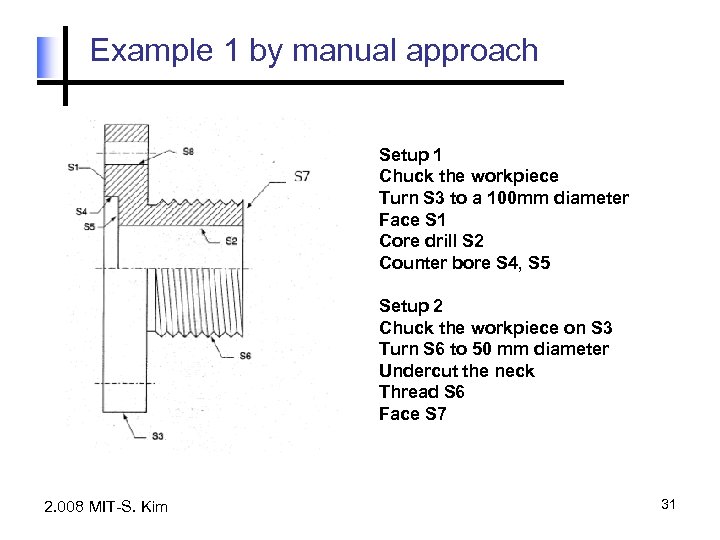 Example 1 by manual approach Setup 1 Chuck the workpiece Turn S 3 to a 100 mm diameter Face S 1 Core drill S 2 Counter bore S 4, S 5 Setup 2 Chuck the workpiece on S 3 Turn S 6 to 50 mm diameter Undercut the neck Thread S 6 Face S 7 2. 008 MIT-S. Kim 31
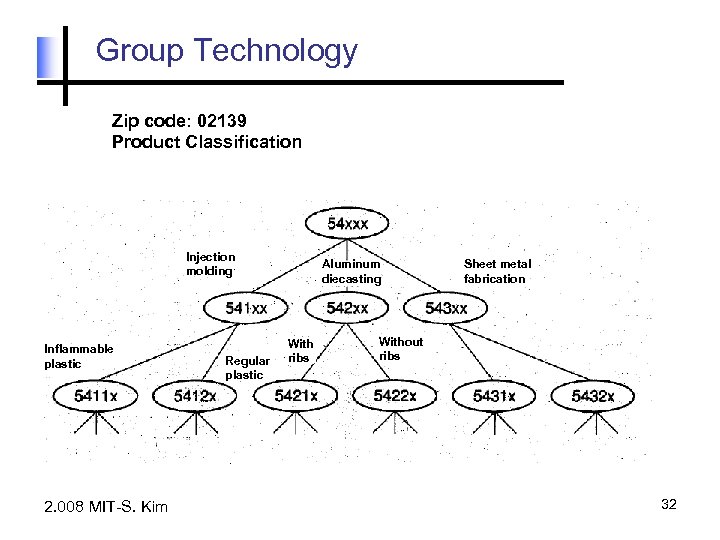 Group Technology Zip code: 02139 Product Classification Injection molding Inflammable plastic 2. 008 MIT-S. Kim Regular plastic Aluminum diecasting With ribs Sheet metal fabrication Without ribs 32
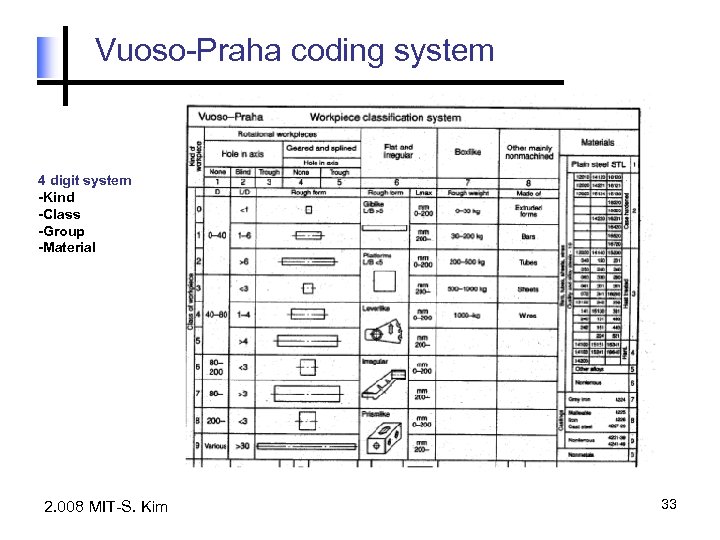 Vuoso-Praha coding system 4 digit system -Kind -Class -Group -Material 2. 008 MIT-S. Kim 33
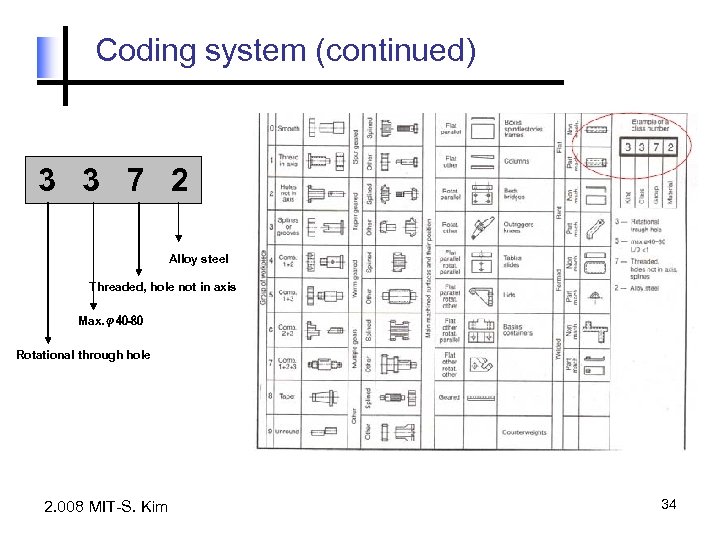 Coding system (continued) 3 3 7 2 Alloy steel Threaded, hole not in axis Max. φ40 -80 Rotational through hole 2. 008 MIT-S. Kim 34
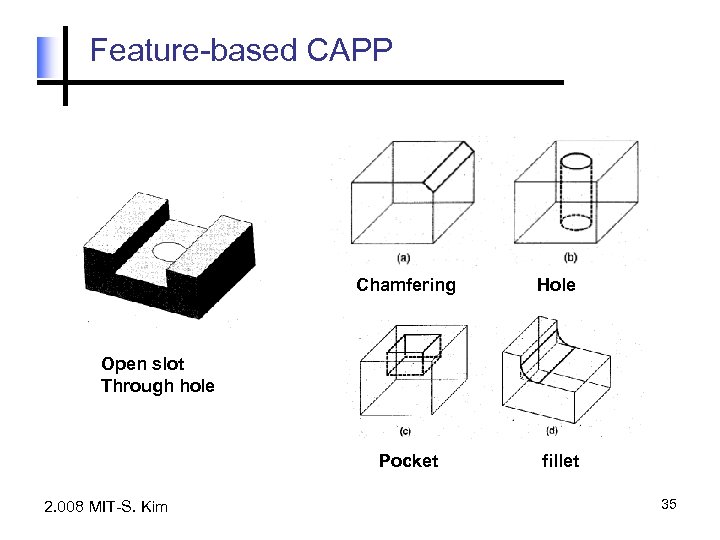 Feature-based CAPP Chamfering Hole Pocket fillet Open slot Through hole 2. 008 MIT-S. Kim 35
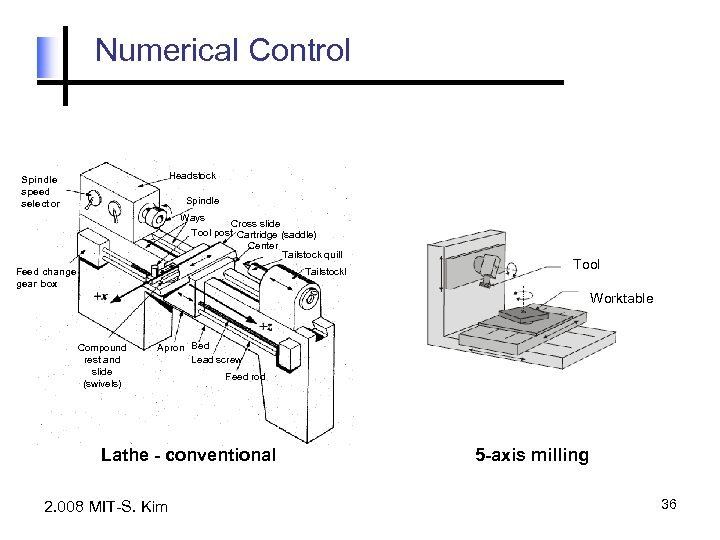 Numerical Control Headstock Spindle speed selector Spindle Ways Cross slide Tool post Cartridge (saddle) Center Tailstock quill Feed change gear box Tailstockl Tool Worktable Compound rest and slide (swivels) Apron Bed Lead screw Feed rod Lathe - conventional 2. 008 MIT-S. Kim 5 -axis milling 36
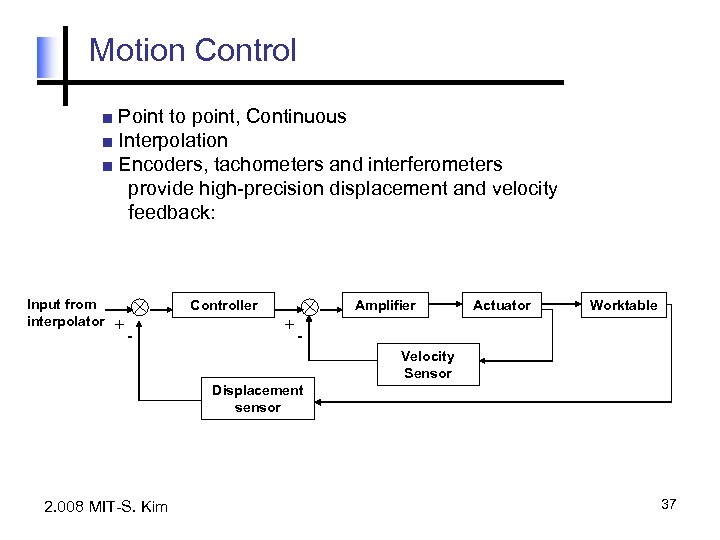 Motion Control ■ Point to point, Continuous ■ Interpolation ■ Encoders, tachometers and interferometers provide high-precision displacement and velocity feedback: Input from interpolator ⊕ + - ⊕ Controller + Amplifier Actuator Worktable Velocity Sensor Displacement sensor 2. 008 MIT-S. Kim 37
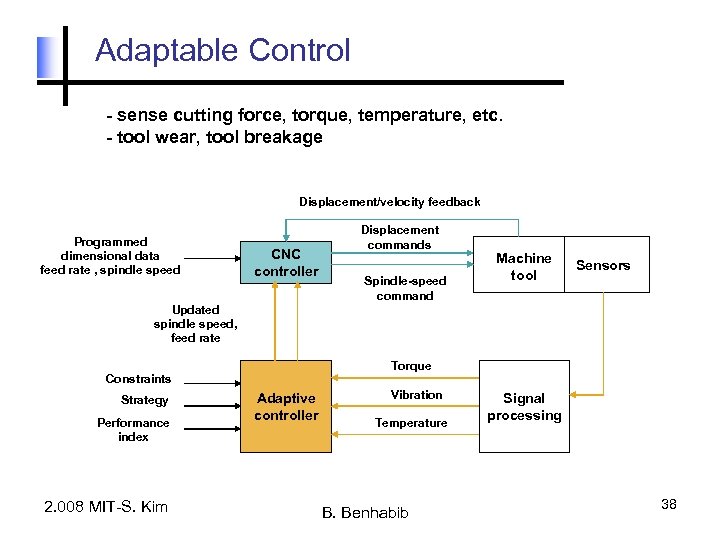 Adaptable Control - sense cutting force, torque, temperature, etc. - tool wear, tool breakage Displacement/velocity feedback Programmed dimensional data feed rate , spindle speed CNC controller Displacement commands Spindle-speed command Machine tool Sensors Updated spindle speed, feed rate Torque Constraints Strategy Performance index 2. 008 MIT-S. Kim Adaptive controller Vibration Temperature B. Benhabib Signal processing 38
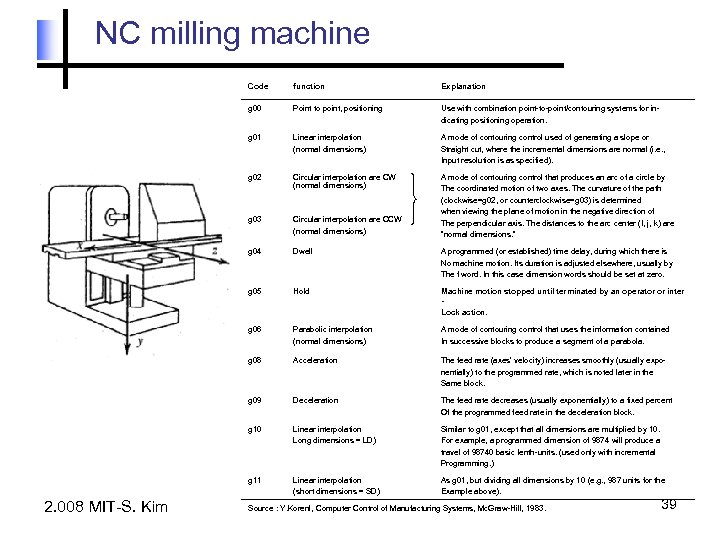 NC milling machine Code Explanation g 00 Point to point, positioning Use with combination point-to-point/contouring systems for indicating positioning operation. g 01 Linear interpolation (normal dimensions) A mode of contouring control used of generating a slope or Straight cut, where the incremental dimensions are normal (i. e. , Input resolution is as specified). g 02 Circular interpolation are CW (normal dimensions) g 03 Circular interpolation are CCW (normal dimensions) A mode of contouring control that produces an arc of a circle by The coordinated motion of two axes. The curvature of the path (clockwise=g 02, or counterclockwise=g 03) is determined when viewing the plane of motion in the negative direction of The perpendicular axis. The distances to the arc center (I, j, k) are “normal dimensions. ” g 04 Dwell A programmed (or established) time delay, during which there is No machine motion. Its duration is adjusted elsewhere, usually by The f word. In this case dimension words should be set at zero. g 05 Hold Machine motion stopped until terminated by an operator or inter Lock action. g 06 Parabolic interpolation (normal dimensions) A mode of contouring control that uses the information contained In successive blocks to produce a segment of a parabola. g 08 Acceleration The feed rate (axes’ velocity) increases smoothly (usually exponentially) to the programmed rate, which is noted later in the Same block. g 09 Deceleration The feed rate decreases (usually exponentially) to a fixed percent Of the programmed feed rate in the deceleration block. g 10 Linear interpolation Long dimensions = LD) Similar to g 01, except that all dimensions are multiplied by 10. For example, a programmed dimension of 9874 will produce a travel of 98740 basic lenth-units. (used only with incremental Programming. ) g 11 2. 008 MIT-S. Kim function Linear interpolation (short dimensions = SD) As g 01, but dividing all dimensions by 10 (e. g. , 987 units for the Example above). Source : Y. Korenl, Computer Control of Manufacturing Systems, Mc. Graw-Hill, 1983. 39
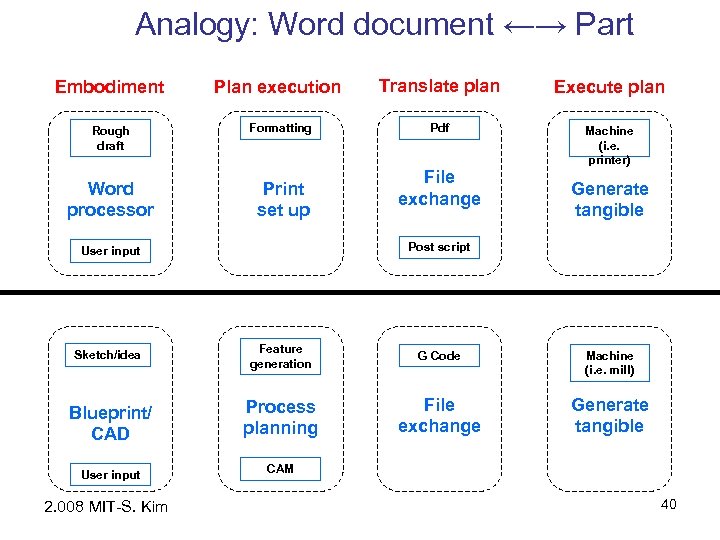 Analogy: Word document ←→ Part Embodiment Plan execution Translate plan Execute plan Rough draft Formatting Pdf Machine (i. e. printer) Word processor Print set up File exchange Generate tangible Post script User input Sketch/idea Feature generation G Code Machine (i. e. mill) Blueprint/ CAD Process planning File exchange Generate tangible User input CAM 2. 008 MIT-S. Kim 40
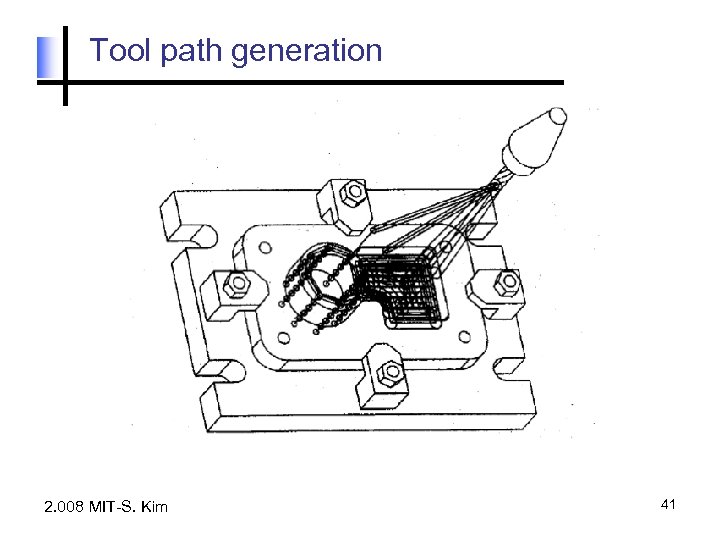 Tool path generation 2. 008 MIT-S. Kim 41
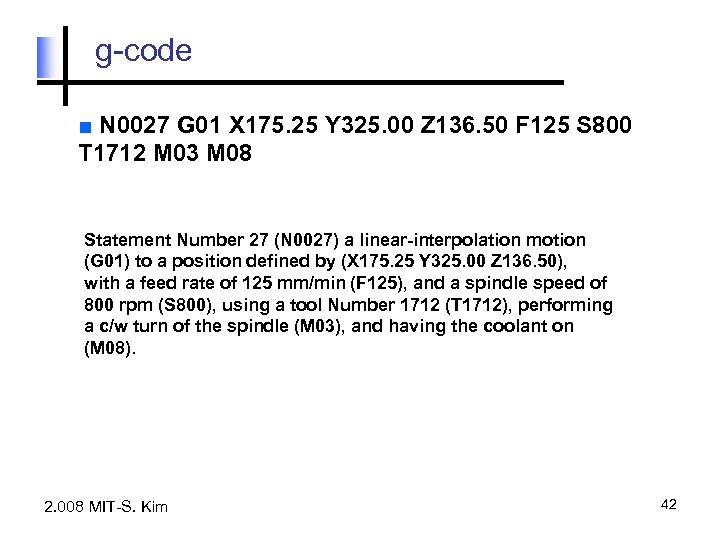 g-code ■ N 0027 G 01 X 175. 25 Y 325. 00 Z 136. 50 F 125 S 800 T 1712 M 03 M 08 Statement Number 27 (N 0027) a linear-interpolation motion (G 01) to a position defined by (X 175. 25 Y 325. 00 Z 136. 50), with a feed rate of 125 mm/min (F 125), and a spindle speed of 800 rpm (S 800), using a tool Number 1712 (T 1712), performing a c/w turn of the spindle (M 03), and having the coolant on (M 08). 2. 008 MIT-S. Kim 42
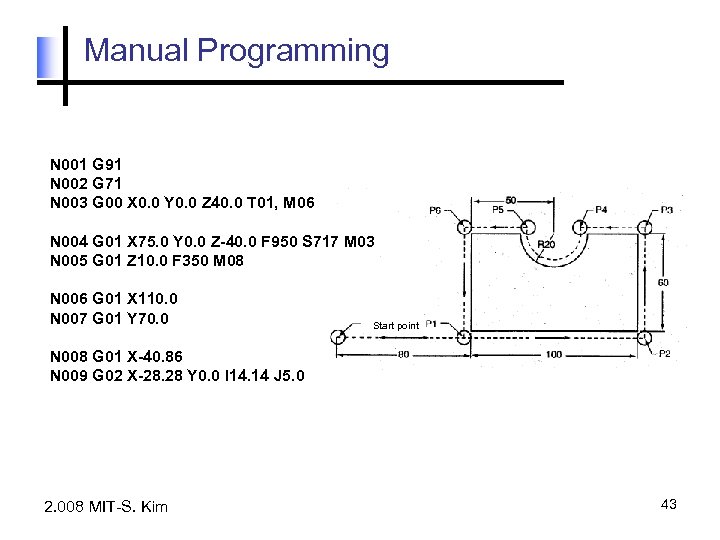 Manual Programming N 001 G 91 N 002 G 71 N 003 G 00 X 0. 0 Y 0. 0 Z 40. 0 T 01, M 06 N 004 G 01 X 75. 0 Y 0. 0 Z-40. 0 F 950 S 717 M 03 N 005 G 01 Z 10. 0 F 350 M 08 N 006 G 01 X 110. 0 N 007 G 01 Y 70. 0 Start point N 008 G 01 X-40. 86 N 009 G 02 X-28. 28 Y 0. 0 I 14. 14 J 5. 0 2. 008 MIT-S. Kim 43
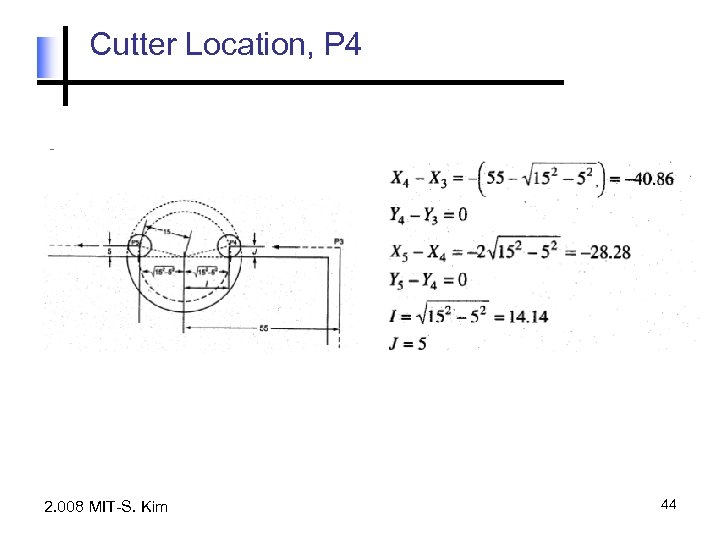 Cutter Location, P 4 2. 008 MIT-S. Kim 44
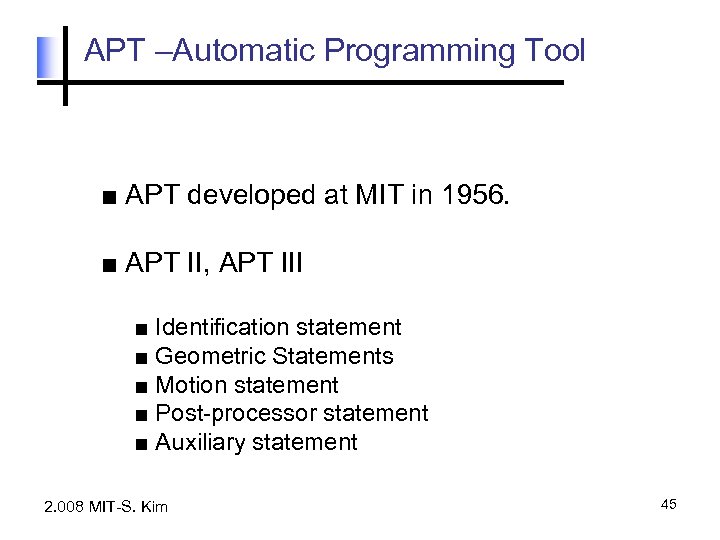 APT –Automatic Programming Tool ■ APT developed at MIT in 1956. ■ APT II, APT III ■ Identification statement ■ Geometric Statements ■ Motion statement ■ Post-processor statement ■ Auxiliary statement 2. 008 MIT-S. Kim 45
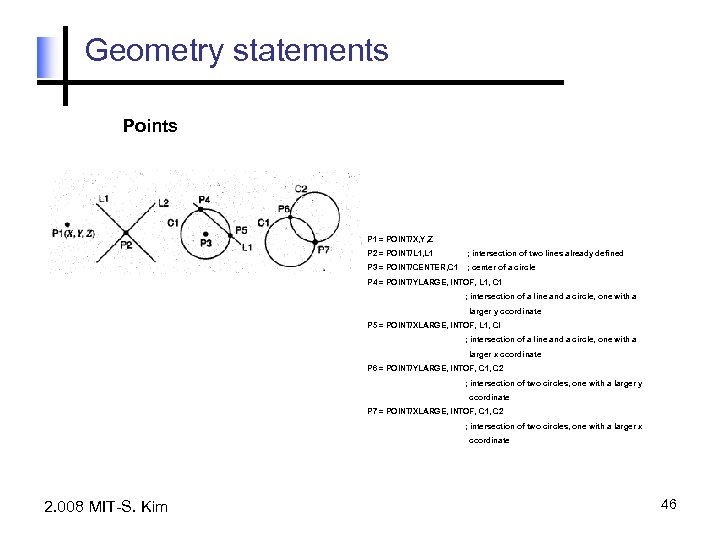 Geometry statements Points P 1 = POINT/X, Y, Z P 2 = POINT/L 1, L 1 ; intersection of two lines already defined P 3 = POINT/CENTER, C 1 ; center of a circle P 4 = POINT/YLARGE, INTOF, L 1, C 1 ; intersection of a line and a circle, one with a larger y coordinate P 5 = POINT/XLARGE, INTOF, L 1, CI ; intersection of a line and a circle, one with a larger x coordinate P 6 = POINT/YLARGE, INTOF, C 1, C 2 ; intersection of two circles, one with a larger y coordinate P 7 = POINT/XLARGE, INTOF, C 1, C 2 ; intersection of two circles, one with a larger x coordinate 2. 008 MIT-S. Kim 46
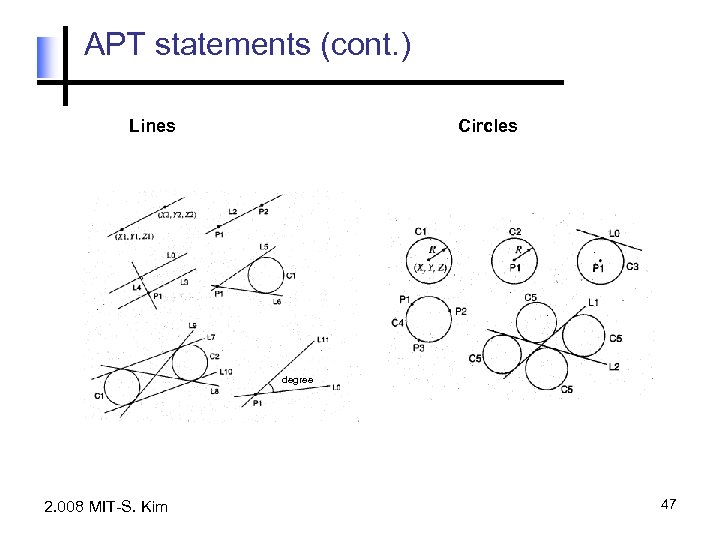 APT statements (cont. ) Lines Circles degree 2. 008 MIT-S. Kim 47
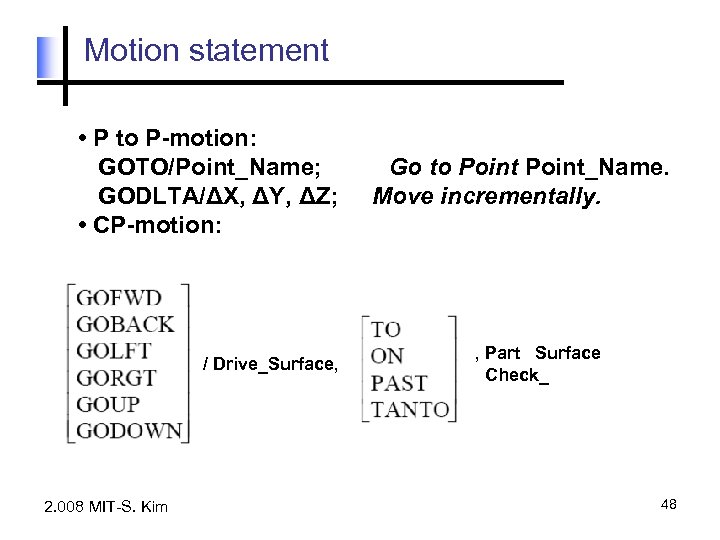 Motion statement • P to P-motion: GOTO/Point_Name; GODLTA/ΔX, ΔY, ΔZ; • CP-motion: / Drive_Surface, 2. 008 MIT-S. Kim Go to Point_Name. Move incrementally. , Part Surface Check_ 48
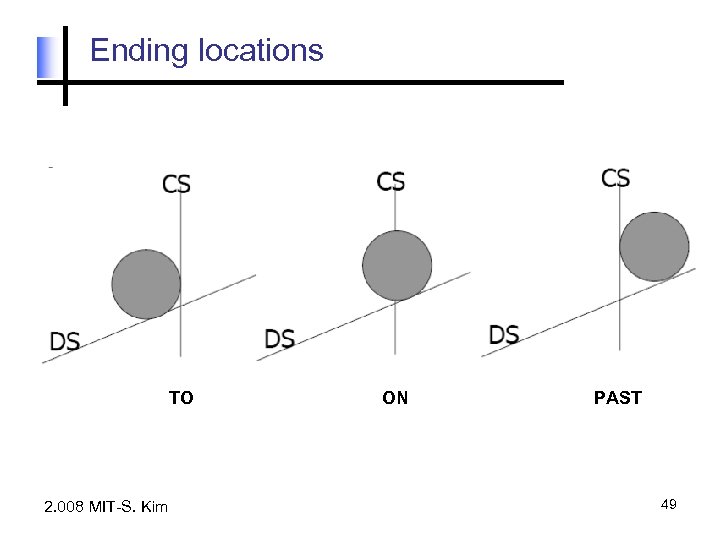 Ending locations TO 2. 008 MIT-S. Kim ON PAST 49
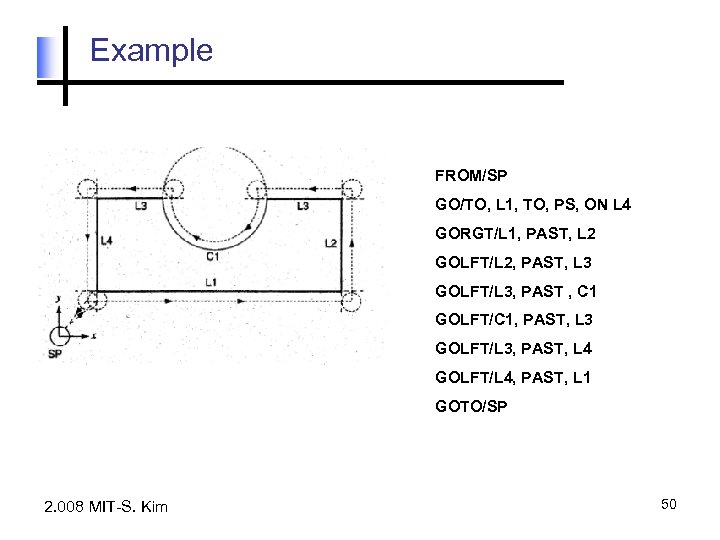 Example FROM/SP GO/TO, L 1, TO, PS, ON L 4 GORGT/L 1, PAST, L 2 GOLFT/L 2, PAST, L 3 GOLFT/L 3, PAST , C 1 GOLFT/C 1, PAST, L 3 GOLFT/L 3, PAST, L 4 GOLFT/L 4, PAST, L 1 GOTO/SP 2. 008 MIT-S. Kim 50
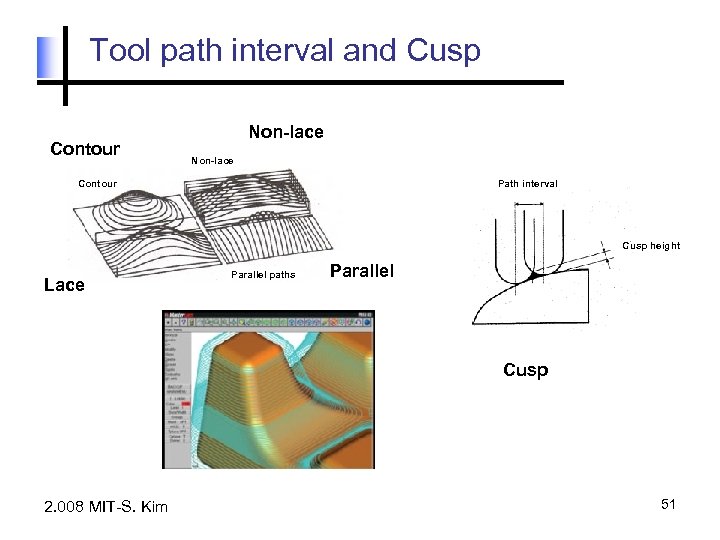 Tool path interval and Cusp Contour Non-lace Contour Path interval Cusp height Lace Parallel paths Parallel Cusp 2. 008 MIT-S. Kim 51
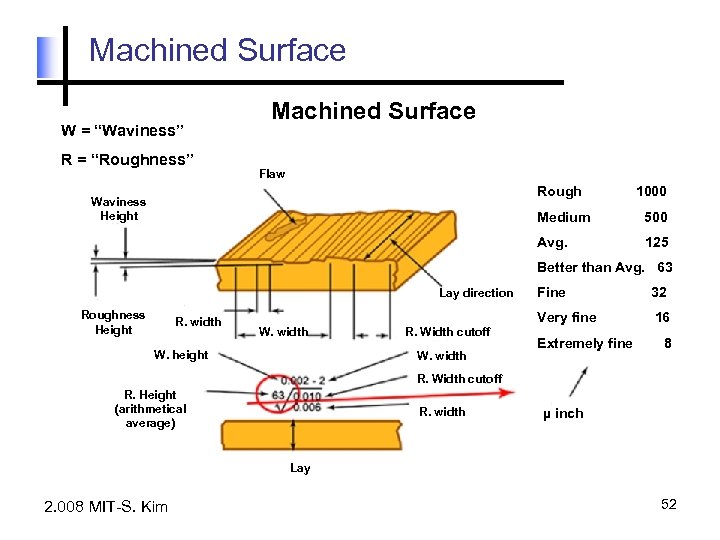 Machined Surface W = “Waviness” R = “Roughness” Machined Surface Flaw Rough Waviness Height 1000 Medium 500 Avg. 125 Better than Avg. 63 Lay direction Roughness Height R. width W. height R. Width cutoff W. width Fine 32 Very fine 16 Extremely fine 8 R. Width cutoff R. Height (arithmetical average) R. width µ inch Lay 2. 008 MIT-S. Kim 52
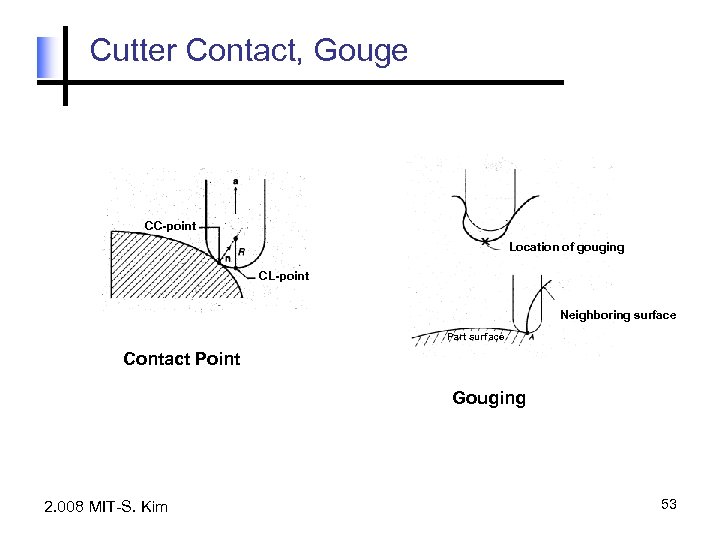 Cutter Contact, Gouge CC-point Location of gouging CL-point Neighboring surface Part surface Contact Point Gouging 2. 008 MIT-S. Kim 53


