Krautkramer NDT Ultrasonic Systems Introduction to Ultrasonic Testing


12606-introduction_of_ut_testing_.ppt
- Количество слайдов: 72
 Krautkramer NDT Ultrasonic Systems Introduction to Ultrasonic Testing SD 218 © Michael Berke Agfa NDT GmbH, Hürth, Germany 1994 - 2002
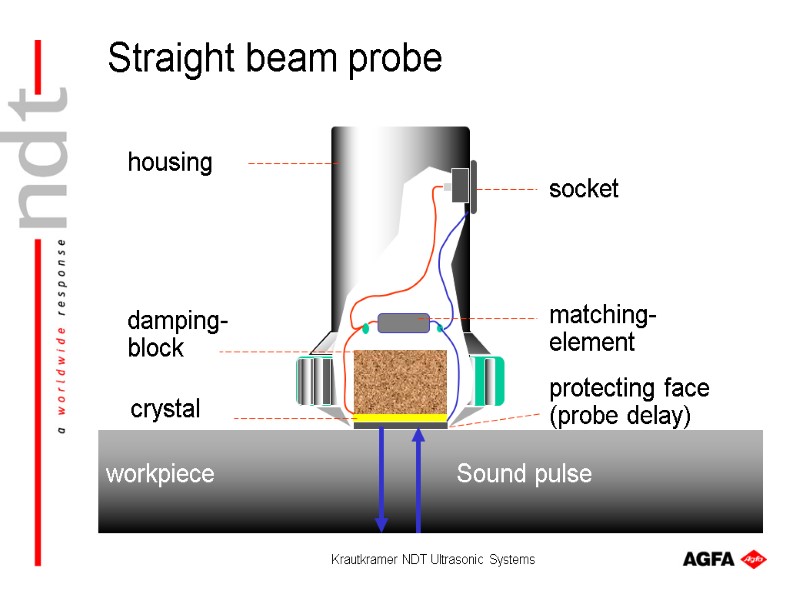
 Krautkramer NDT Ultrasonic Systems socket matching- element damping- block crystal protecting face (probe delay) housing workpiece Sound pulse Straight beam probe
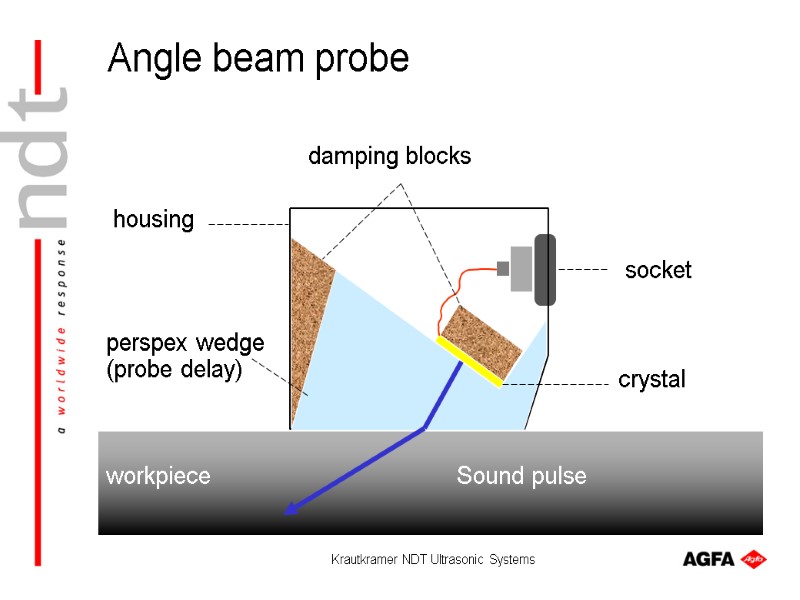
 Krautkramer NDT Ultrasonic Systems crystal perspex wedge (probe delay) damping blocks socket housing workpiece Sound pulse Angle beam probe
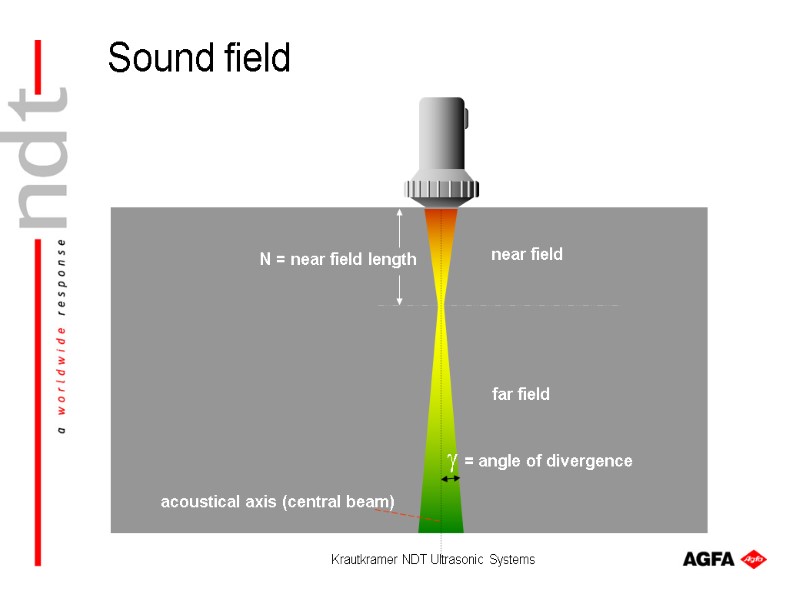
 Krautkramer NDT Ultrasonic Systems near field far field acoustical axis (central beam) N = near field length = angle of divergence 3 Sound field
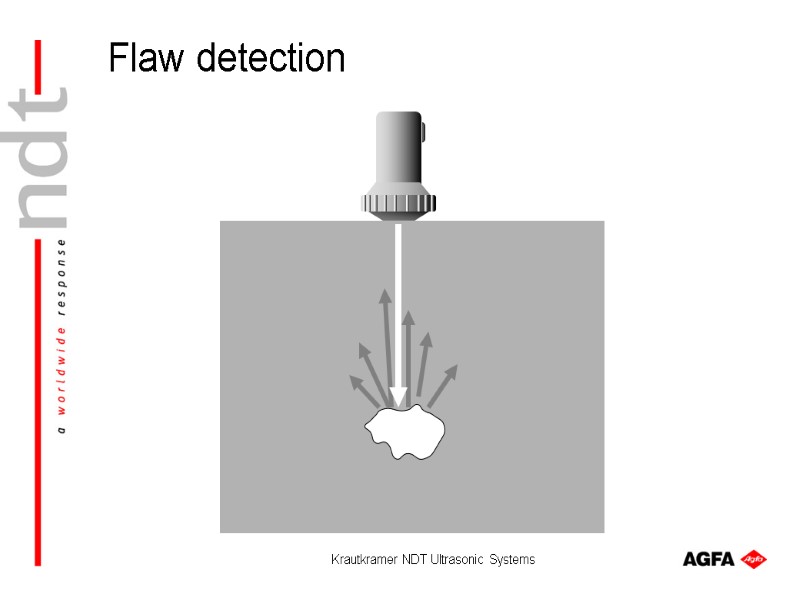
 Krautkramer NDT Ultrasonic Systems Flaw detection
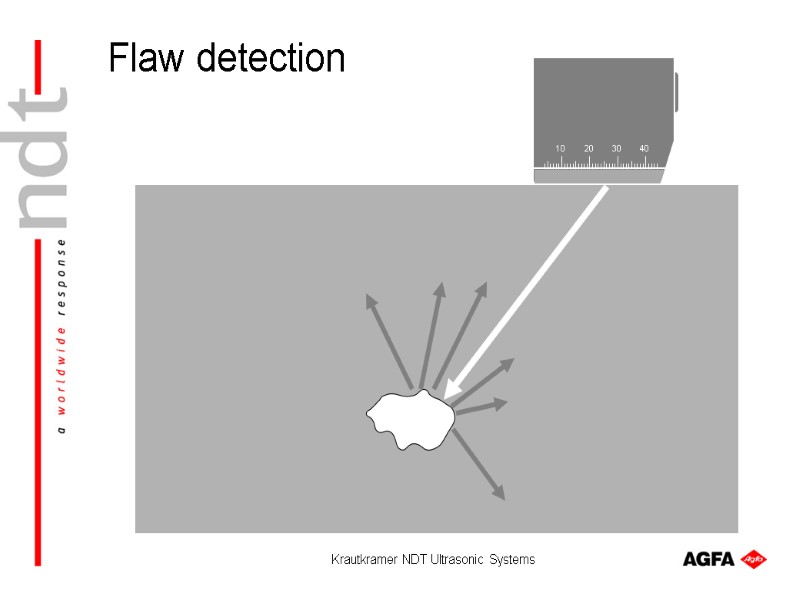
 Krautkramer NDT Ultrasonic Systems Flaw detection
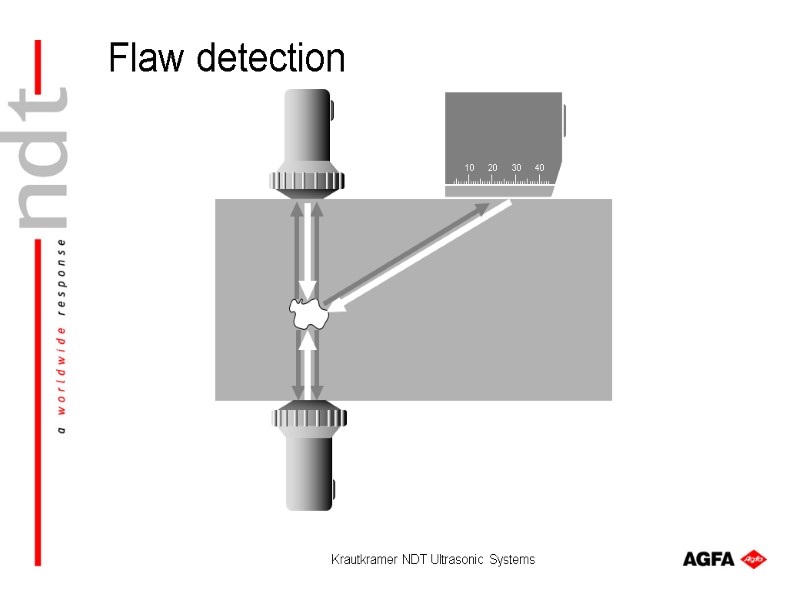
 Krautkramer NDT Ultrasonic Systems Flaw detection
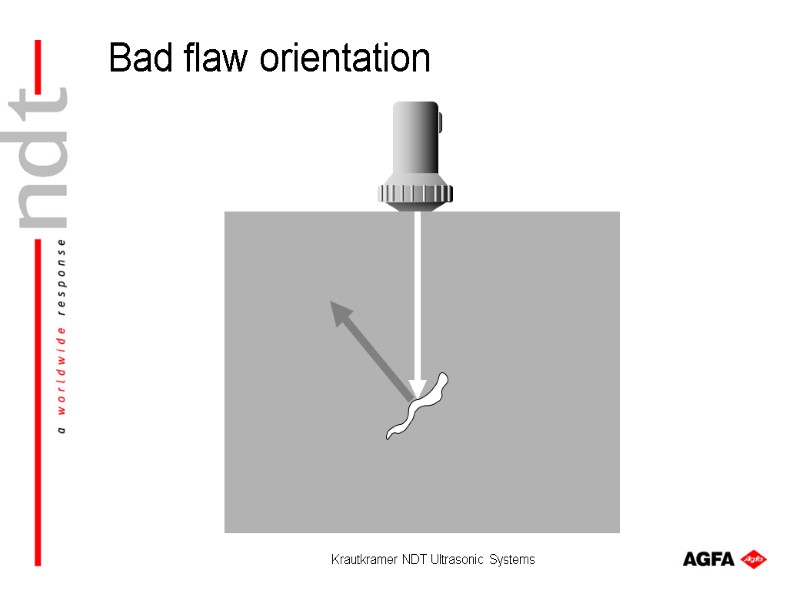
 Krautkramer NDT Ultrasonic Systems Bad flaw orientation
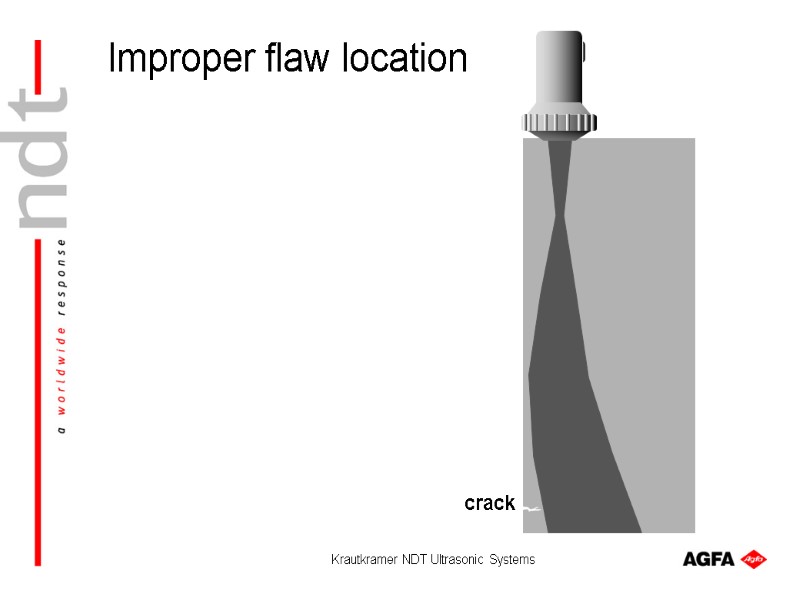
 Krautkramer NDT Ultrasonic Systems crack Improper flaw location
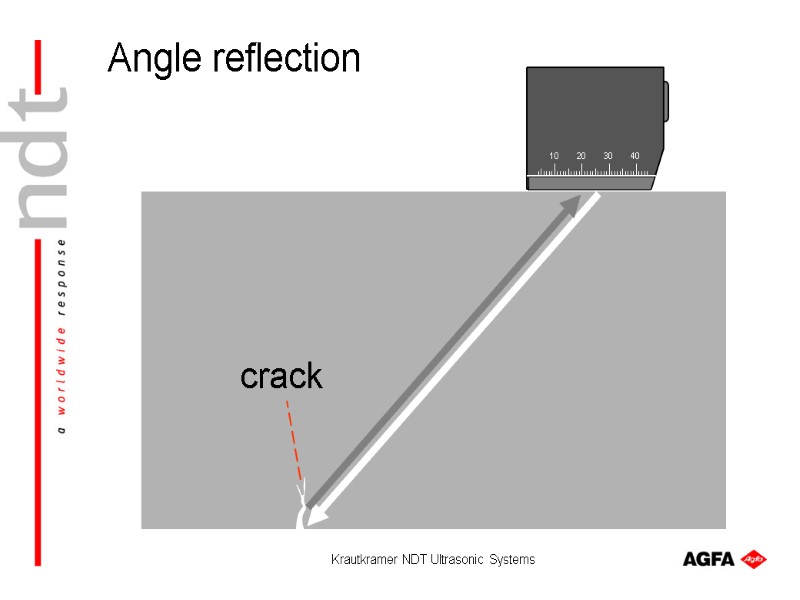
 Krautkramer NDT Ultrasonic Systems 10 20 30 40 crack Angle reflection
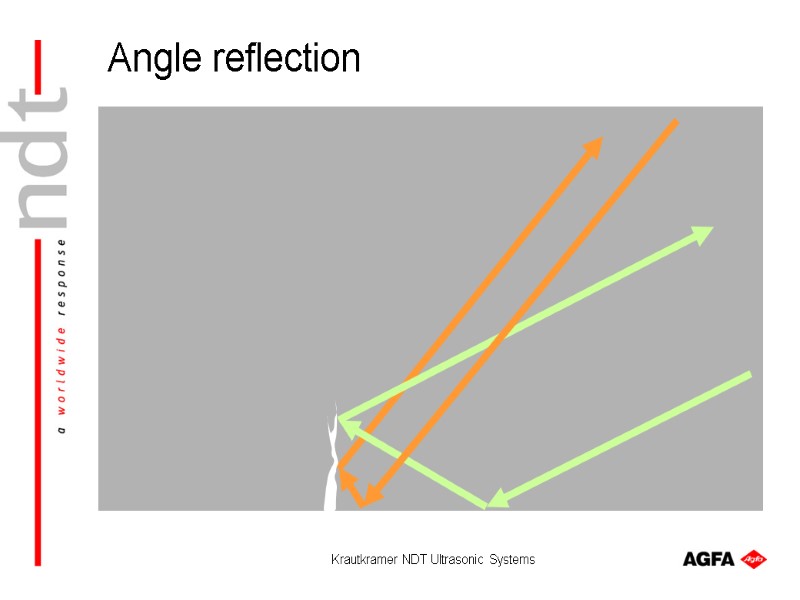
 Krautkramer NDT Ultrasonic Systems Angle reflection
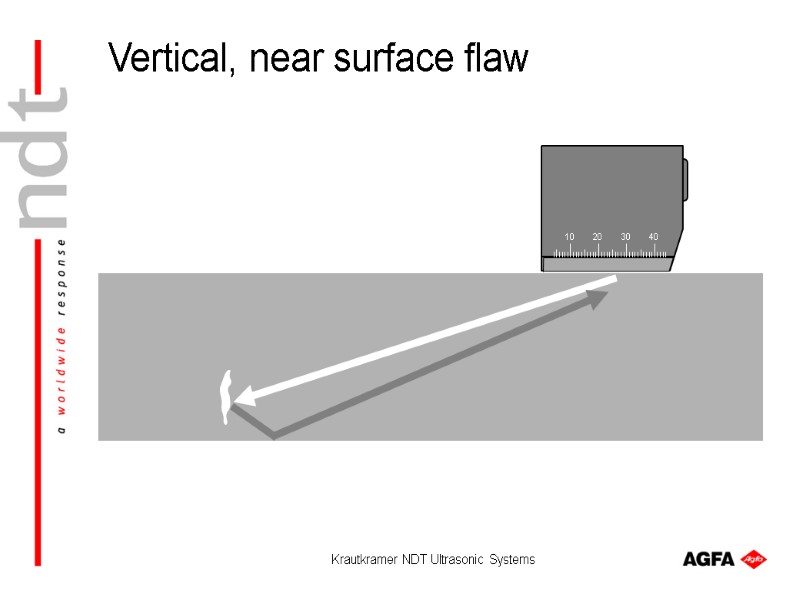
 Krautkramer NDT Ultrasonic Systems 10 20 30 40 Vertical, near surface flaw
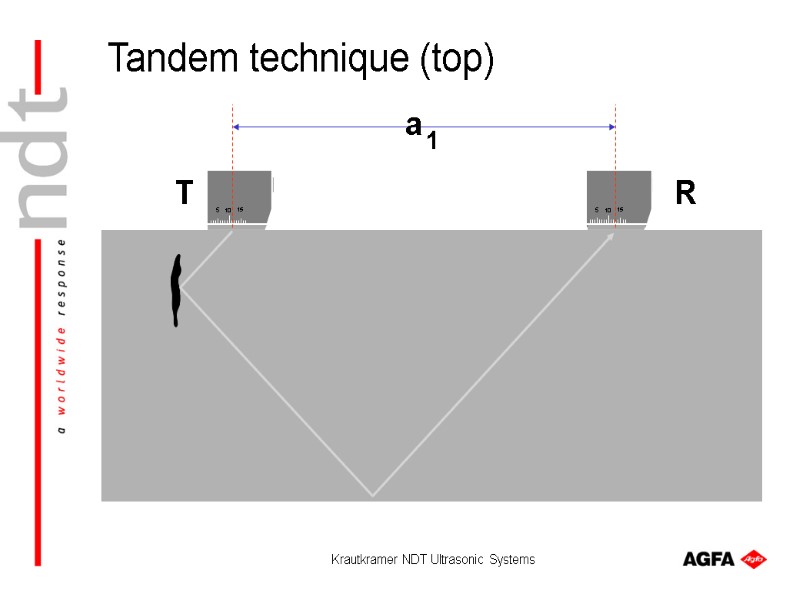
 Krautkramer NDT Ultrasonic Systems T R a 1 Tandem technique (top)
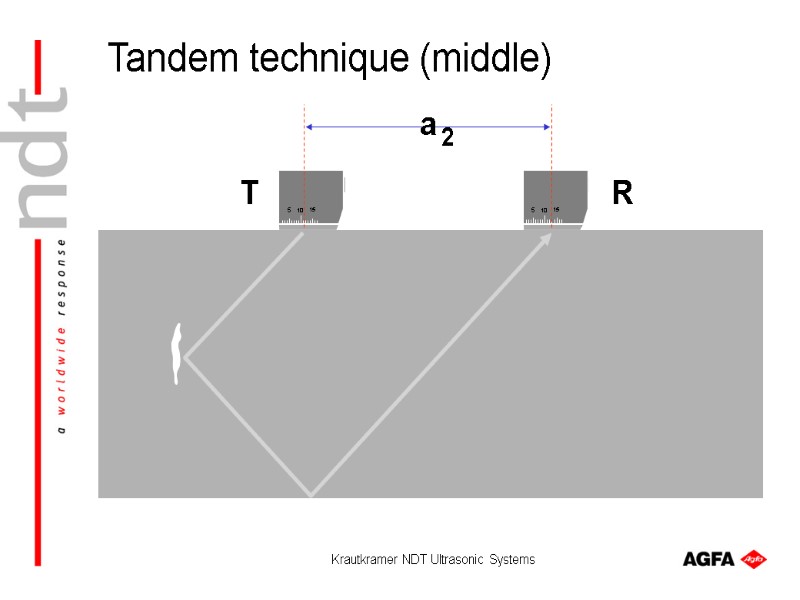
 Krautkramer NDT Ultrasonic Systems T R a 2 Tandem technique (middle)
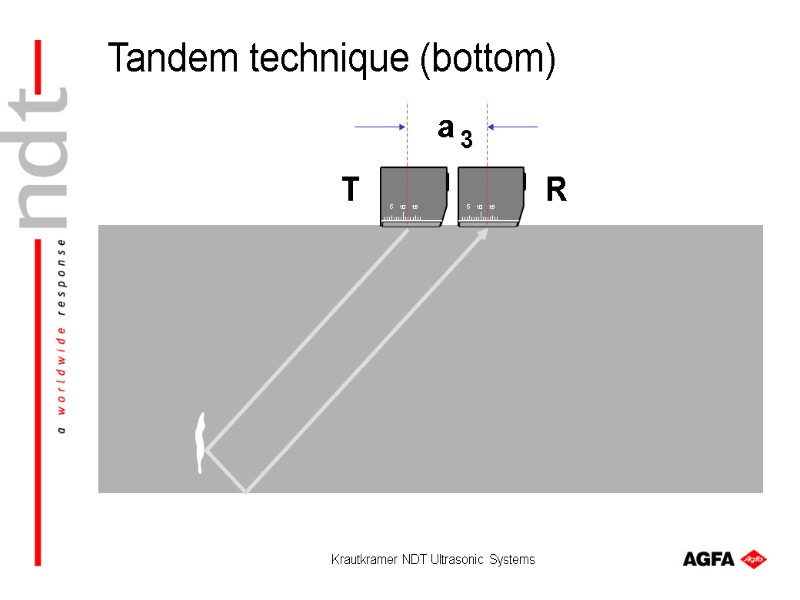
 Krautkramer NDT Ultrasonic Systems 10 15 5 10 15 5 T R a 3 Tandem technique (bottom)
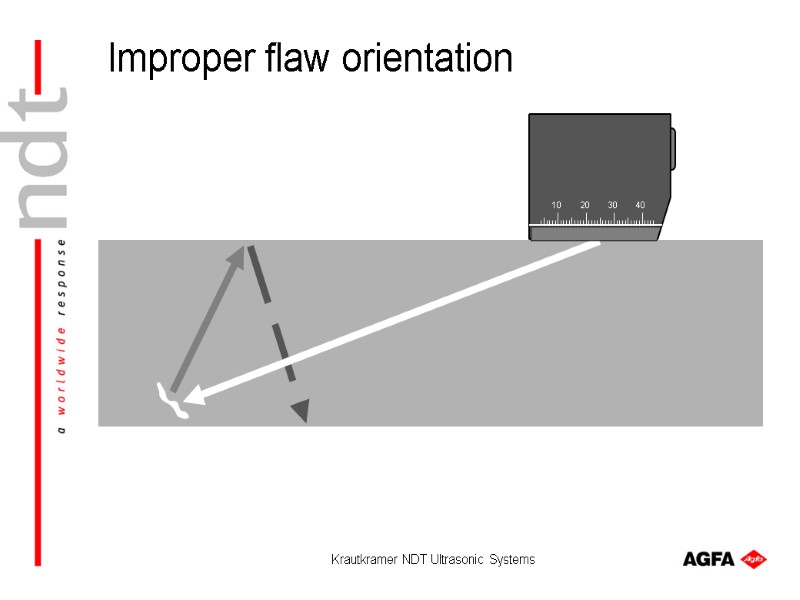
 Krautkramer NDT Ultrasonic Systems 10 20 30 40 Improper flaw orientation
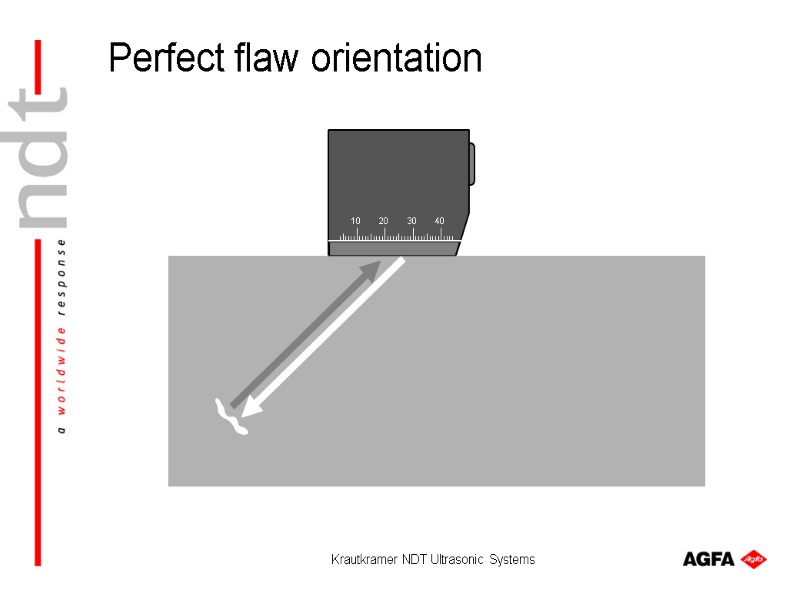
 Krautkramer NDT Ultrasonic Systems 10 20 30 40 Perfect flaw orientation
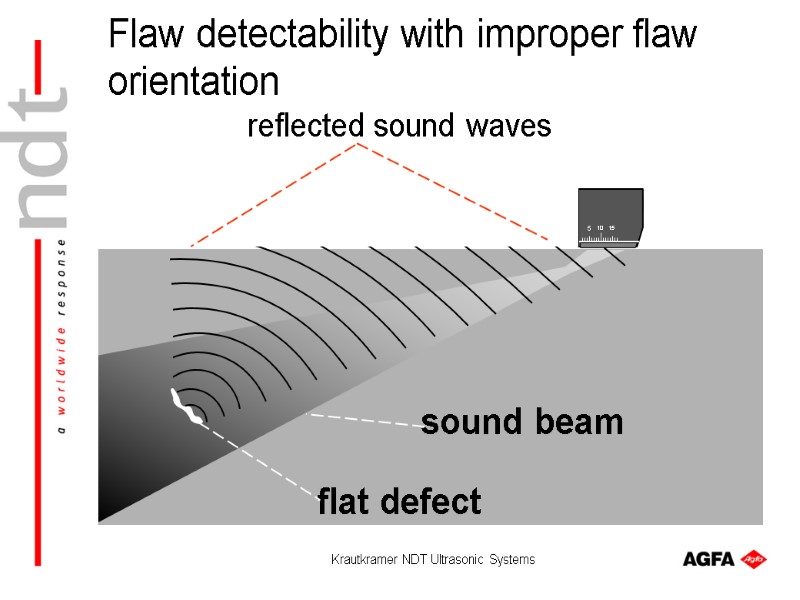
 Krautkramer NDT Ultrasonic Systems sound beam flat defect 15 10 5 reflected sound waves Flaw detectability with improper flaw orientation
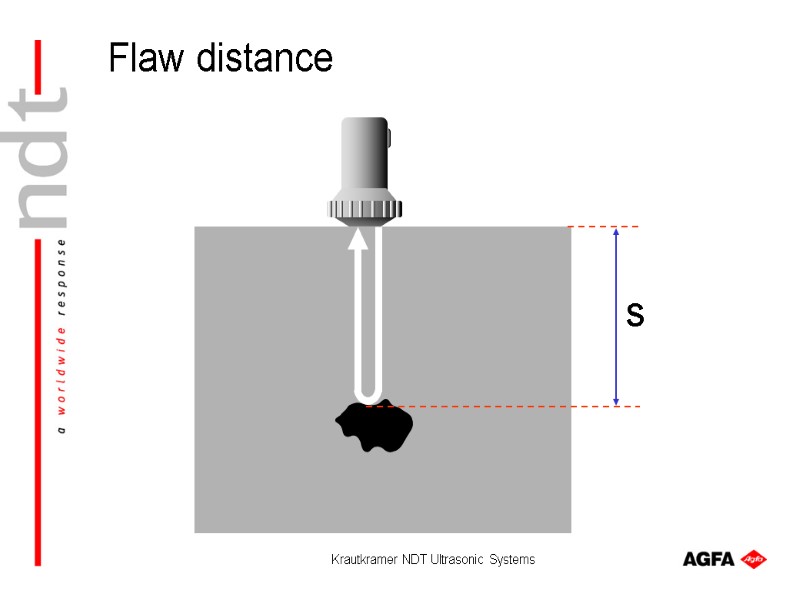
 Krautkramer NDT Ultrasonic Systems s Flaw distance
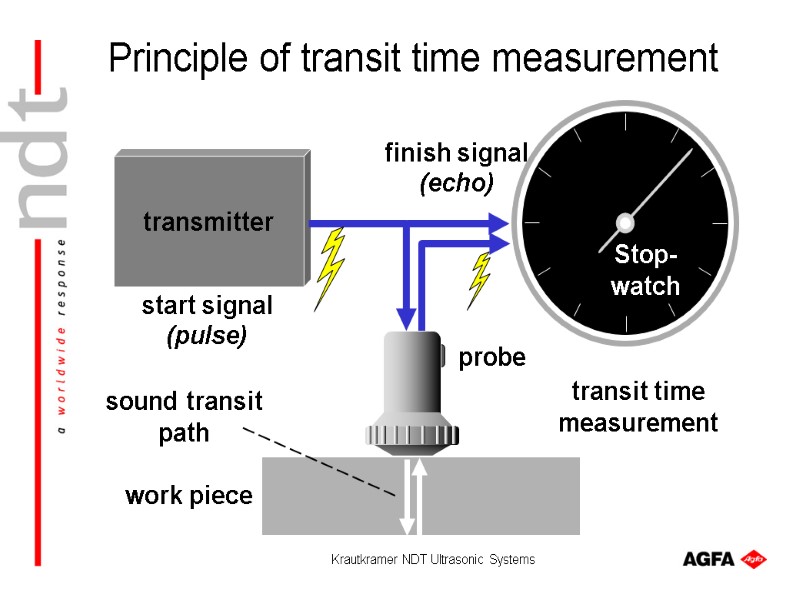
 Krautkramer NDT Ultrasonic Systems start signal (pulse) finish signal (echo) transmitter transit time measurement probe work piece sound transit path Stop- watch Principle of transit time measurement
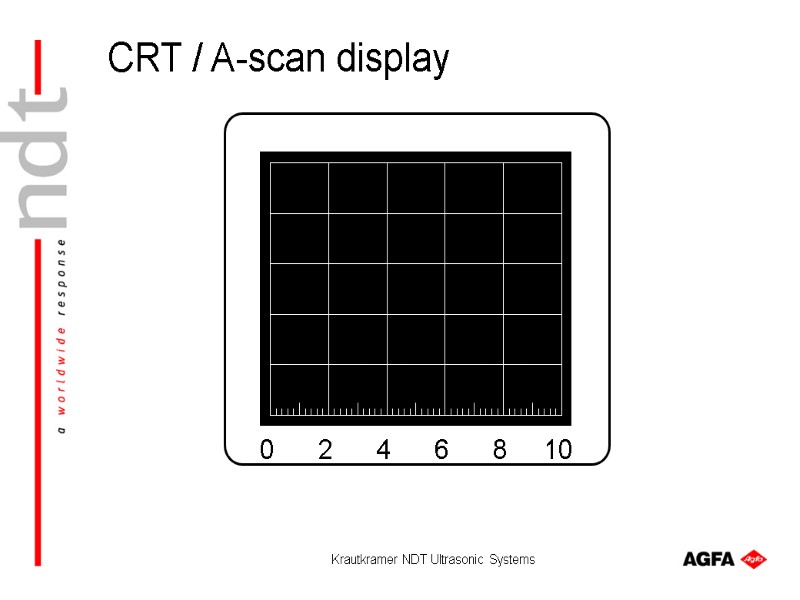
 Krautkramer NDT Ultrasonic Systems CRT / A-scan display
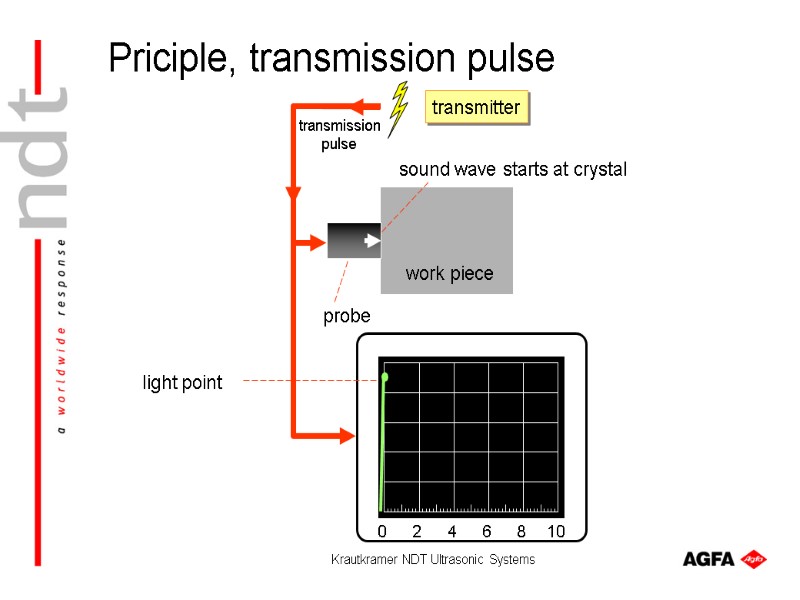
 Krautkramer NDT Ultrasonic Systems work piece probe sound wave starts at crystal light point transmitter transmission pulse Priciple, transmission pulse
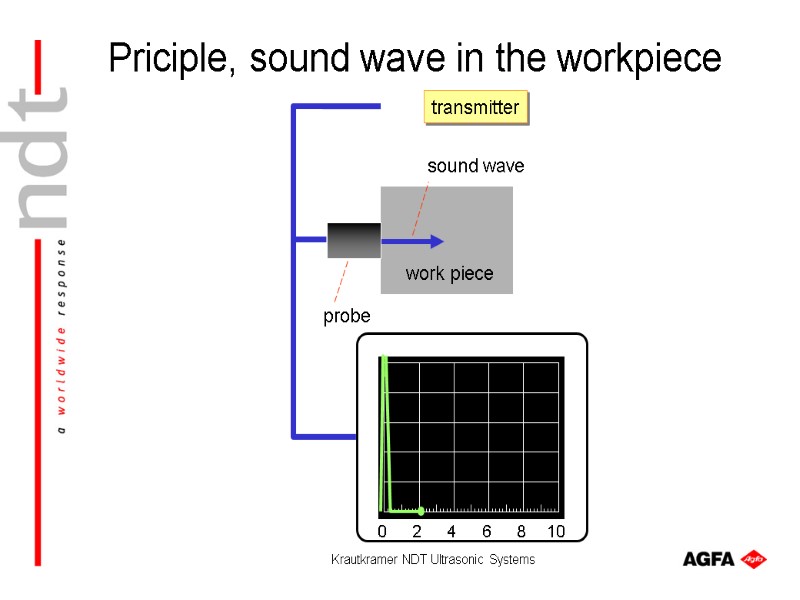
 Krautkramer NDT Ultrasonic Systems work piece probe sound wave transmitter Priciple, sound wave in the workpiece
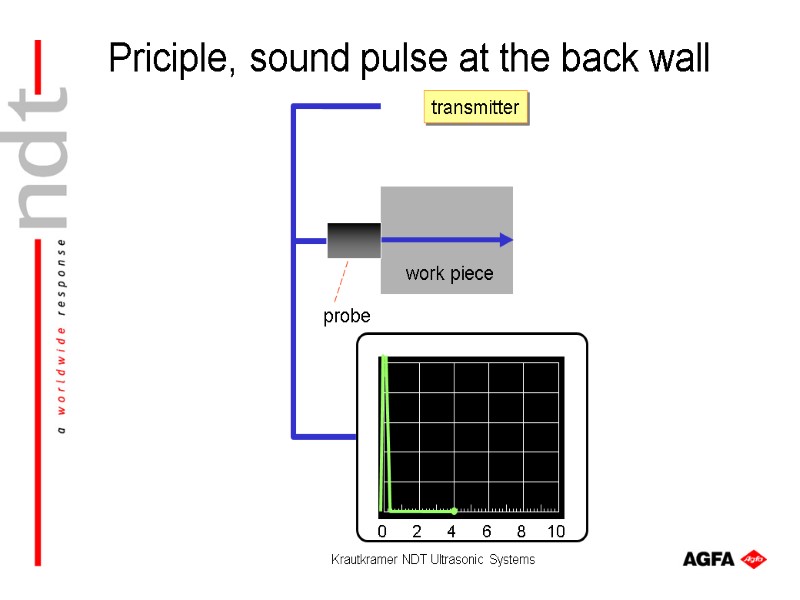
 Krautkramer NDT Ultrasonic Systems work piece probe transmitter Priciple, sound pulse at the back wall
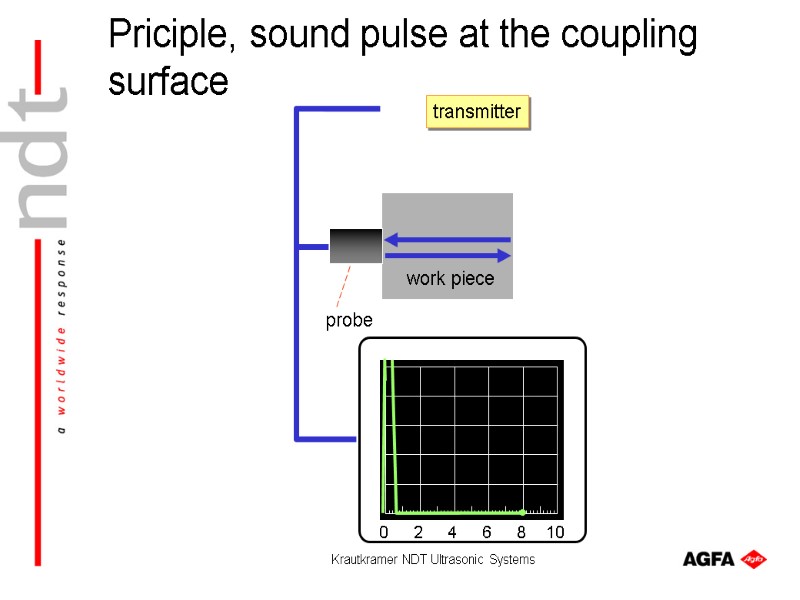
 Krautkramer NDT Ultrasonic Systems transmitter Priciple, sound pulse at the coupling surface
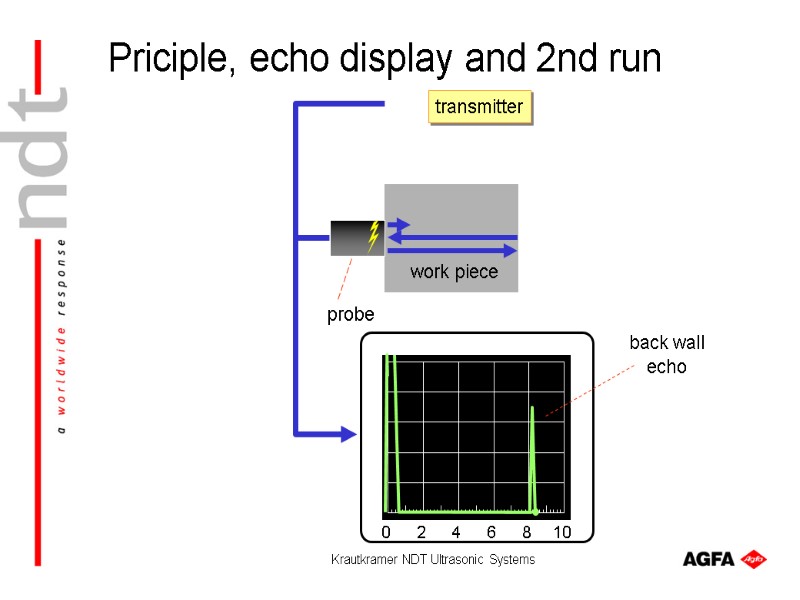
 Krautkramer NDT Ultrasonic Systems transmitter Priciple, echo display and 2nd run
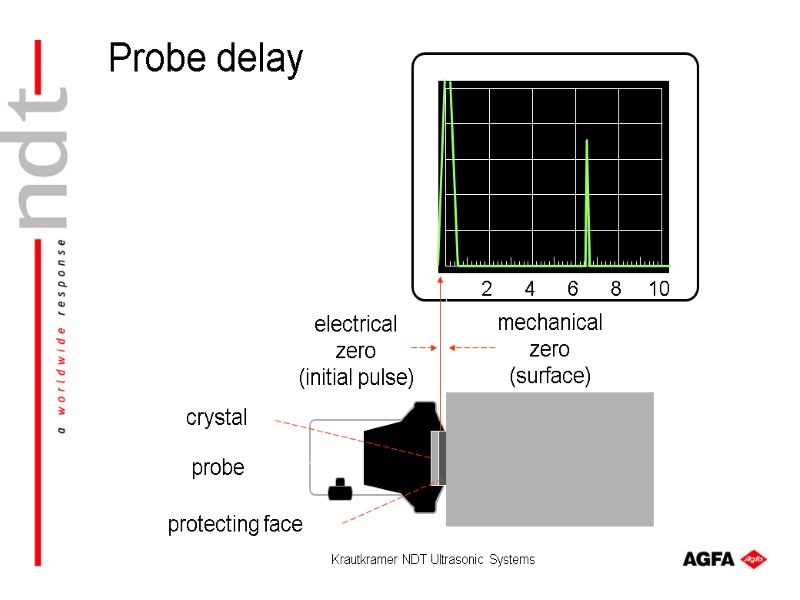
 Krautkramer NDT Ultrasonic Systems 2 4 6 8 10 protecting face crystal probe electrical zero (initial pulse) mechanical zero (surface) Probe delay
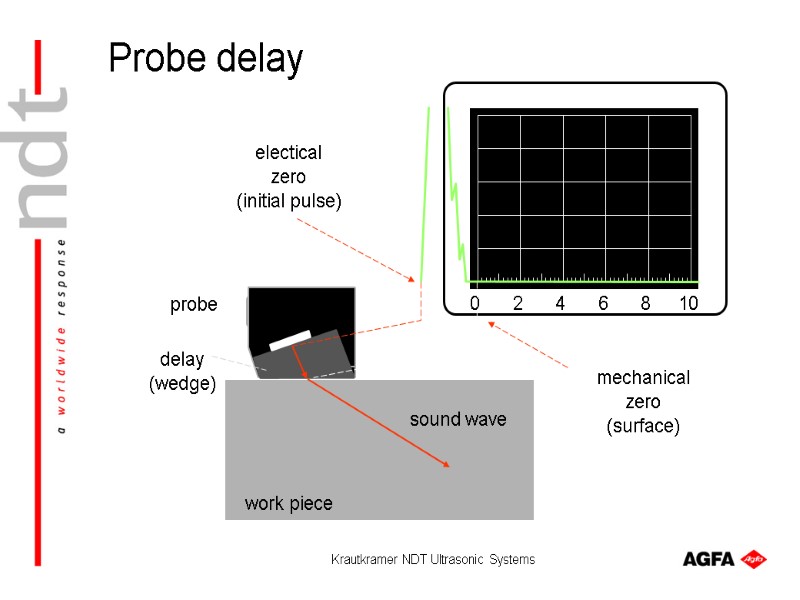
 Krautkramer NDT Ultrasonic Systems electical zero (initial pulse) mechanical zero (surface) sound wave work piece delay (wedge) probe Probe delay
 Krautkramer NDT Ultrasonic Systems Flaw location and echo display
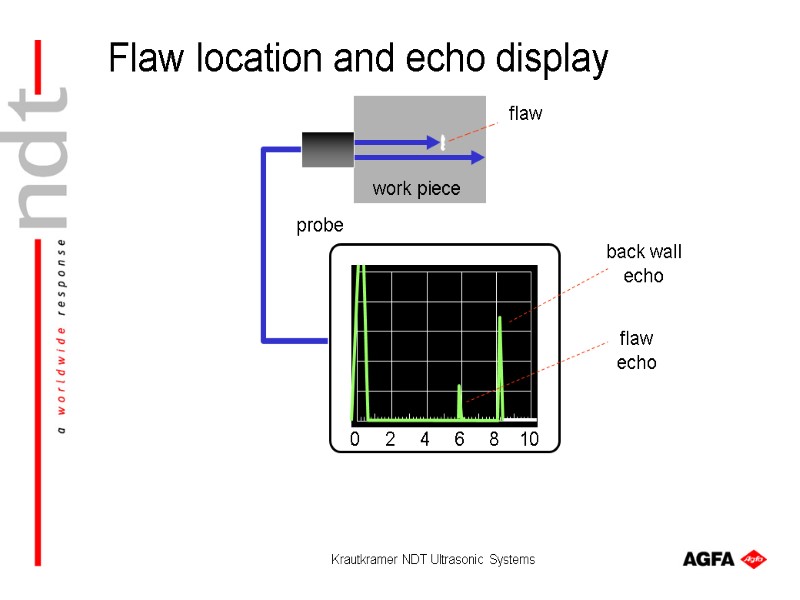
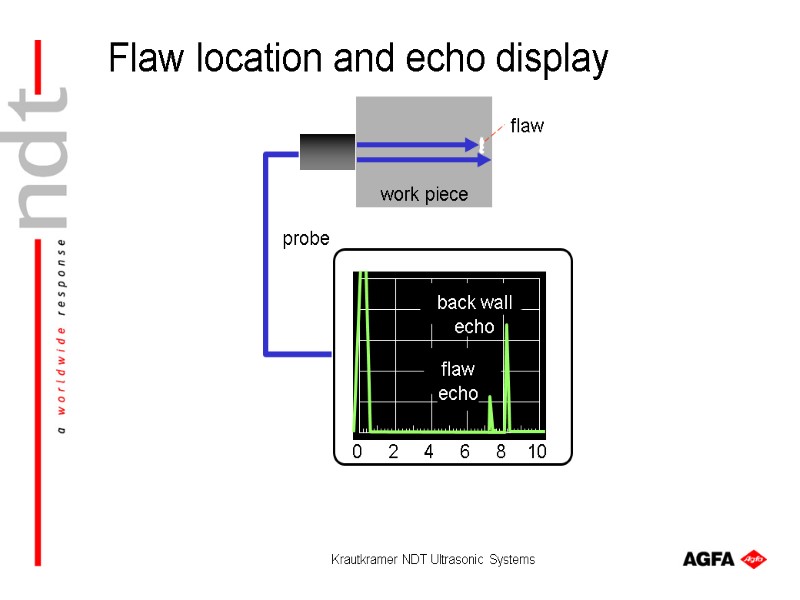
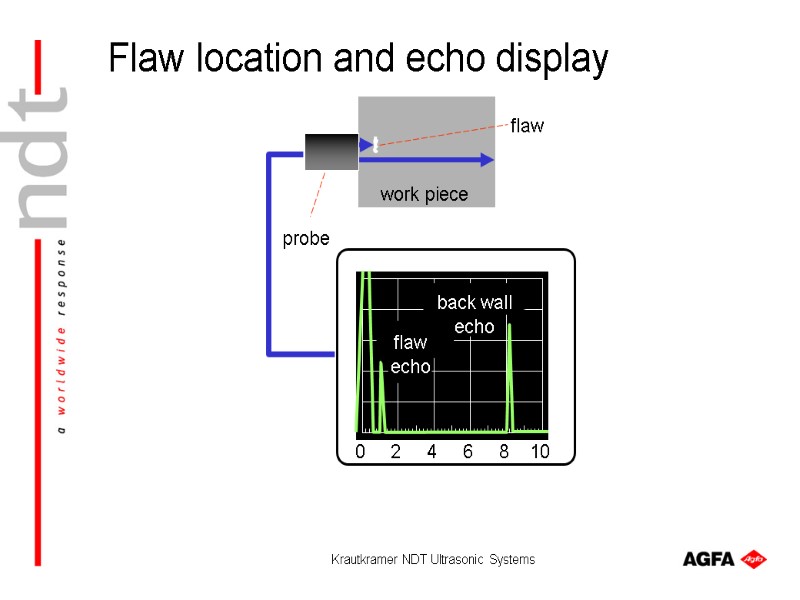
 Krautkramer NDT Ultrasonic Systems work piece probe back wall echo flaw flaw echo Flaw location and echo display
 Krautkramer NDT Ultrasonic Systems work piece probe back wall echo flaw flaw echo Flaw location and echo display
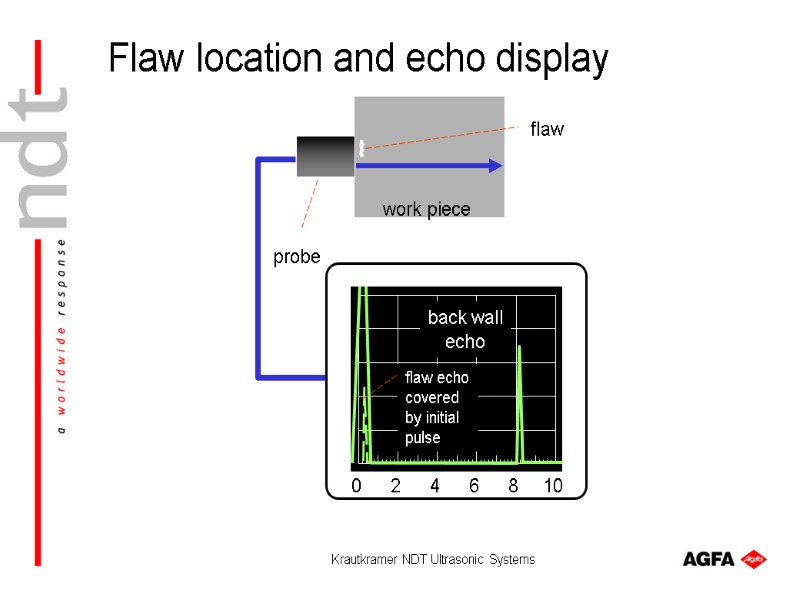
 Krautkramer NDT Ultrasonic Systems flaw echo covered by initial pulse work piece probe back wall echo flaw Flaw location and echo display
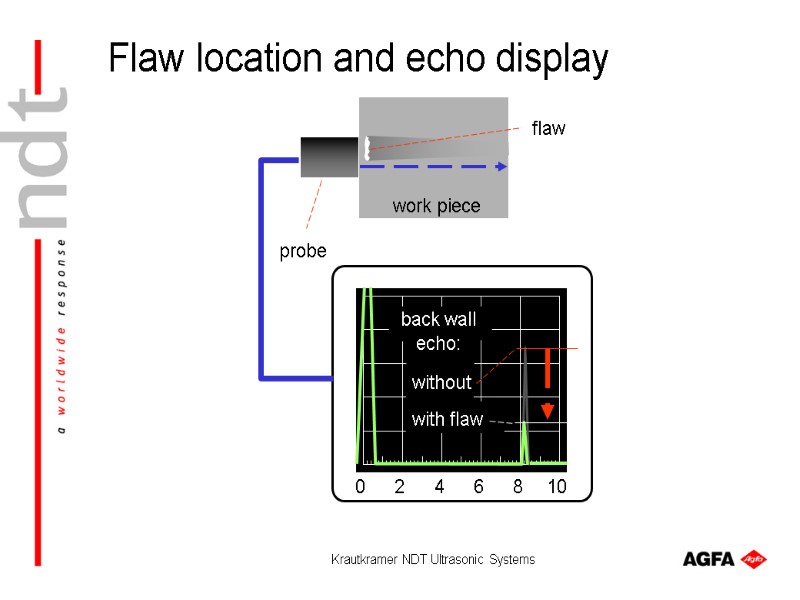
 Krautkramer NDT Ultrasonic Systems back wall echo: without with flaw work piece probe flaw Flaw location and echo display
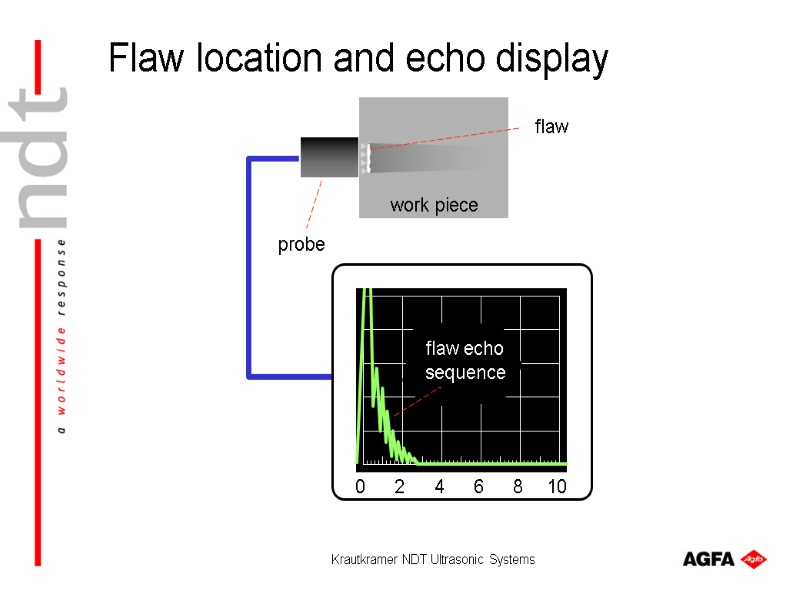
 Krautkramer NDT Ultrasonic Systems flaw echo sequence work piece probe flaw Flaw location and echo display
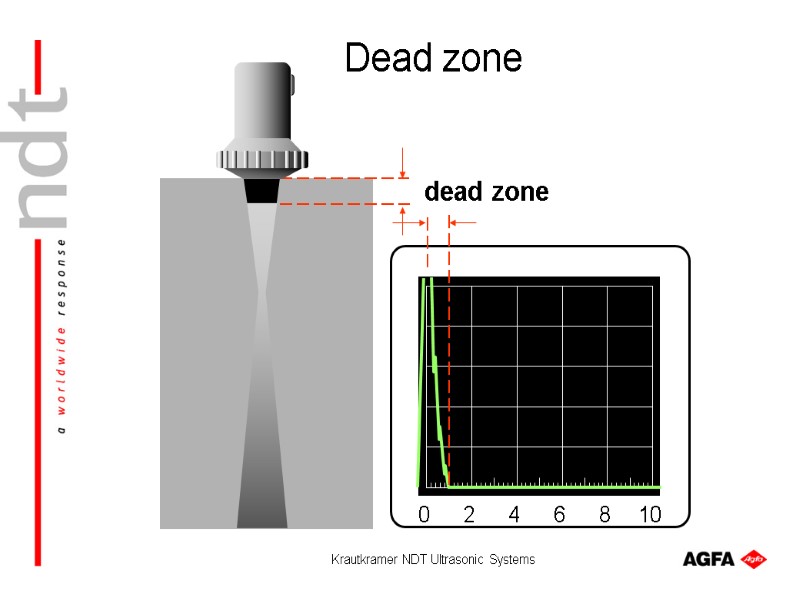
 Krautkramer NDT Ultrasonic Systems dead zone Dead zone
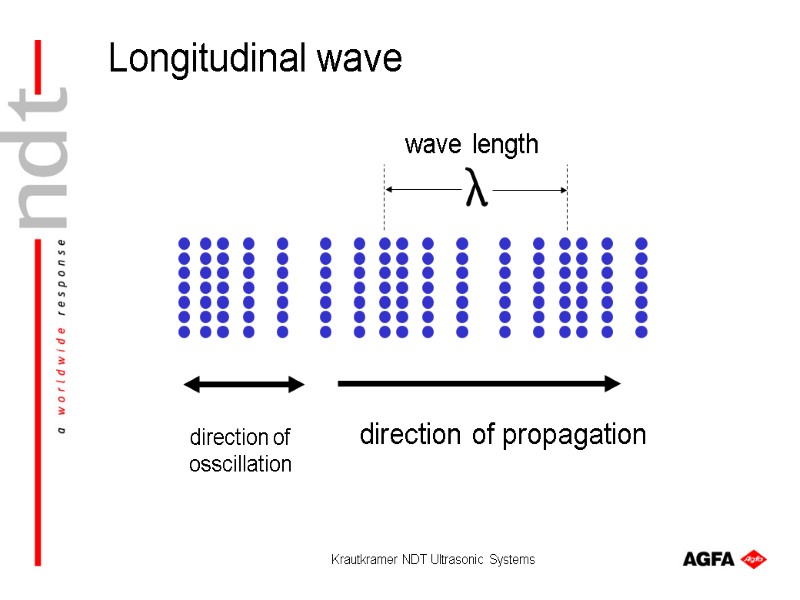
 Krautkramer NDT Ultrasonic Systems direction of osscillation direction of propagation wave length Longitudinal wave
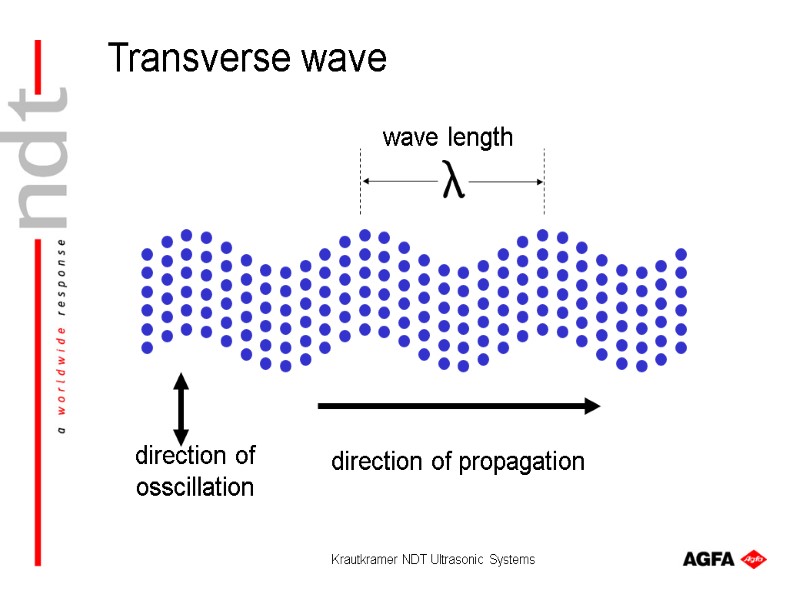
 Krautkramer NDT Ultrasonic Systems direction of osscillation direction of propagation wave length Transverse wave
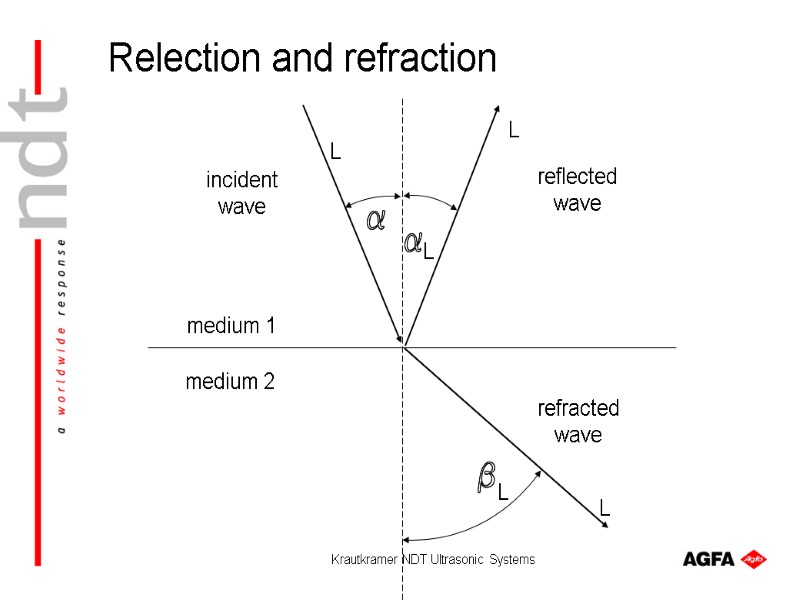
 Krautkramer NDT Ultrasonic Systems Relection and refraction
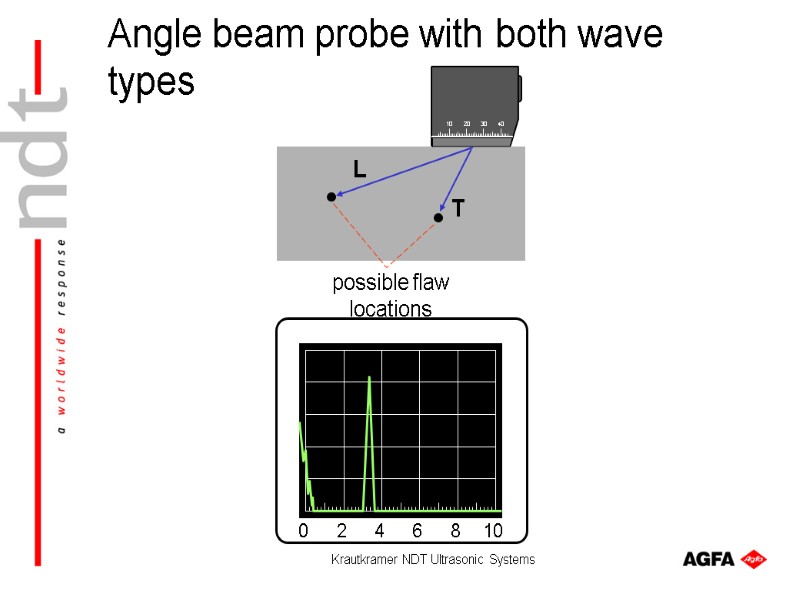
 Krautkramer NDT Ultrasonic Systems 10 20 30 40 L T possible flaw locations Angle beam probe with both wave types
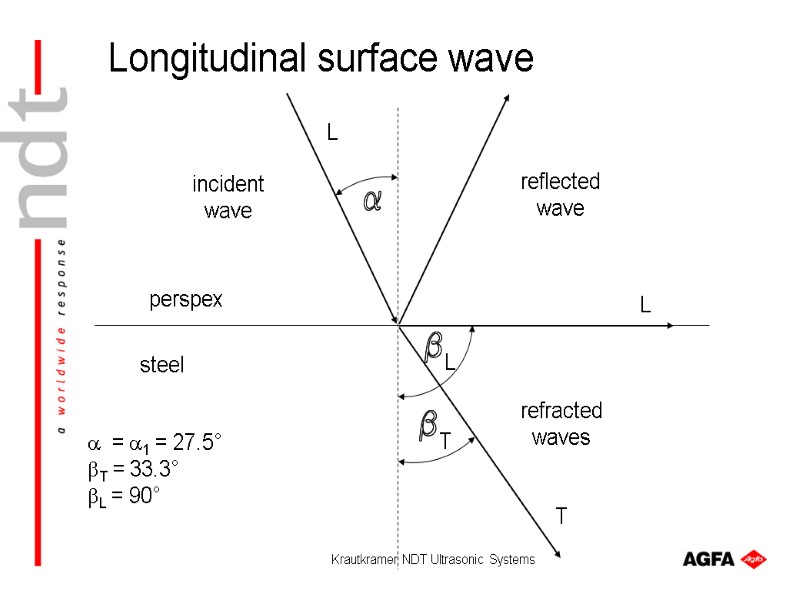
 Krautkramer NDT Ultrasonic Systems T L L T L perspex steel reflected wave refracted waves incident wave = 1 = 27.5° T = 33.3° L = 90° Longitudinal surface wave
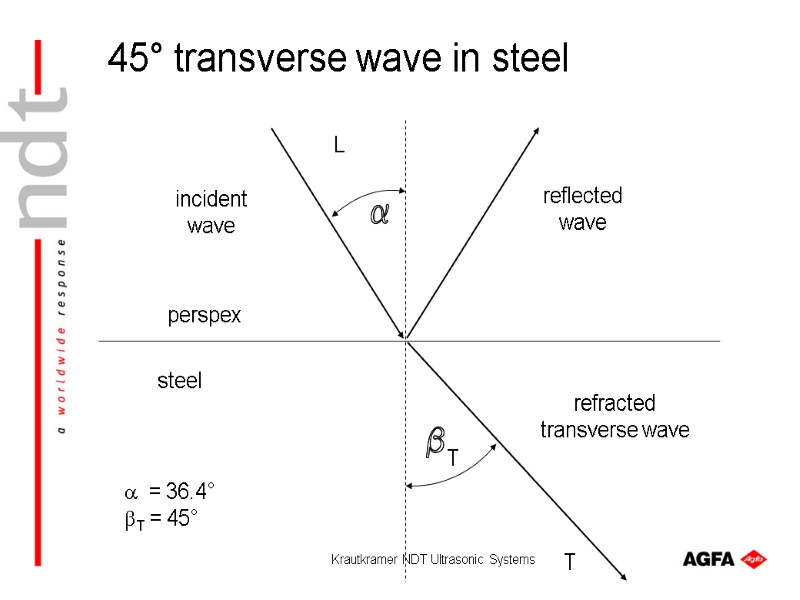
 Krautkramer NDT Ultrasonic Systems T L T perspex steel reflected wave refracted transverse wave incident wave = 36.4° T = 45° 45° transverse wave in steel
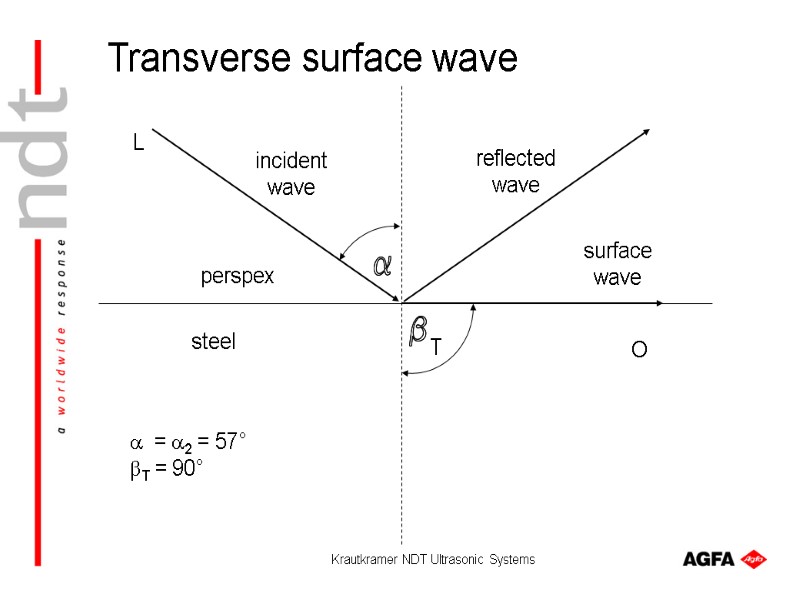
 Krautkramer NDT Ultrasonic Systems Transverse surface wave
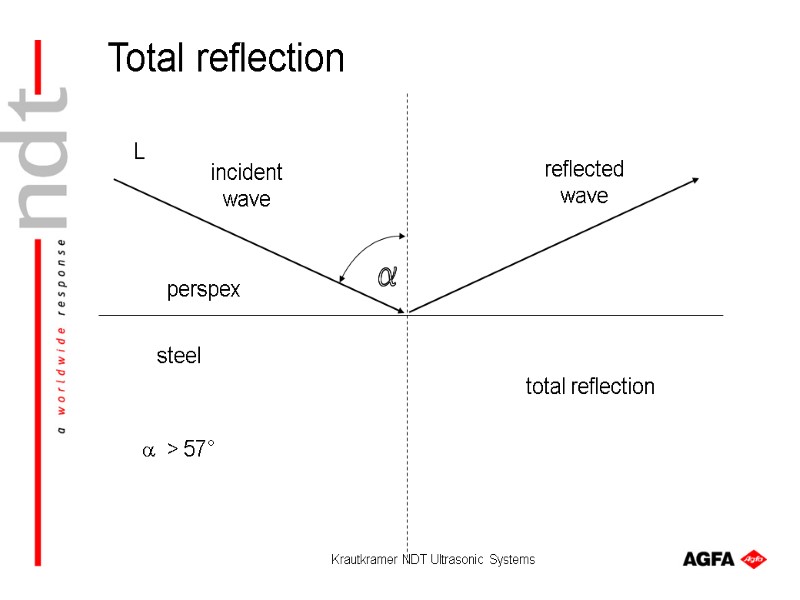
 Krautkramer NDT Ultrasonic Systems Total reflection
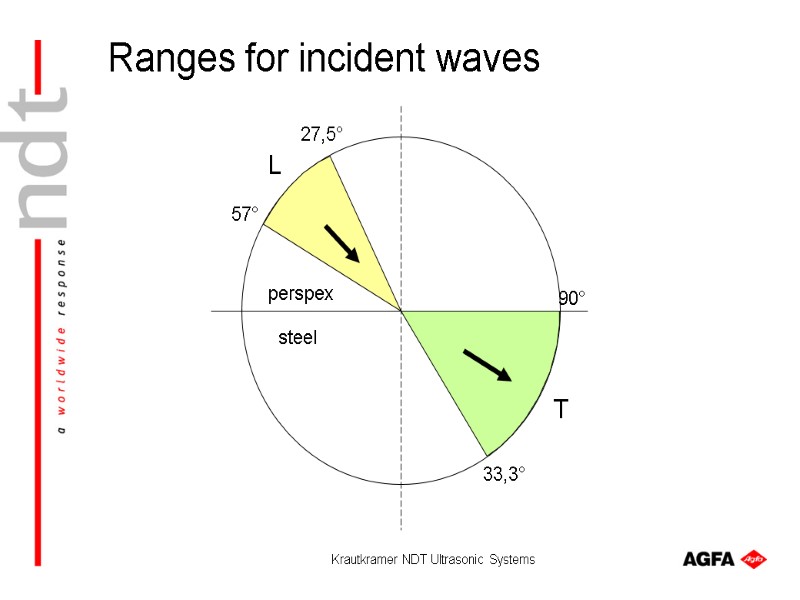
 Krautkramer NDT Ultrasonic Systems 27,5° 57° 33,3° 90° perspex steel L T Ranges for incident waves
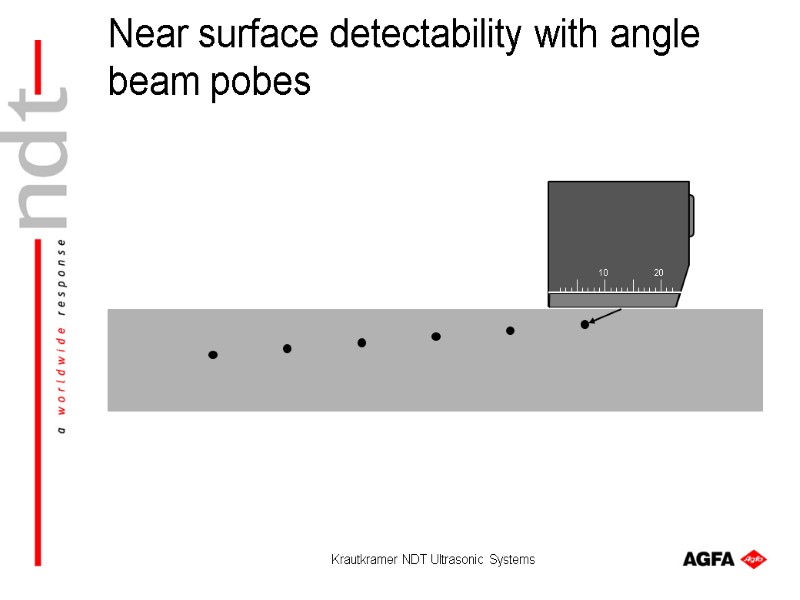
 Krautkramer NDT Ultrasonic Systems 10 20 Near surface detectability with angle beam pobes
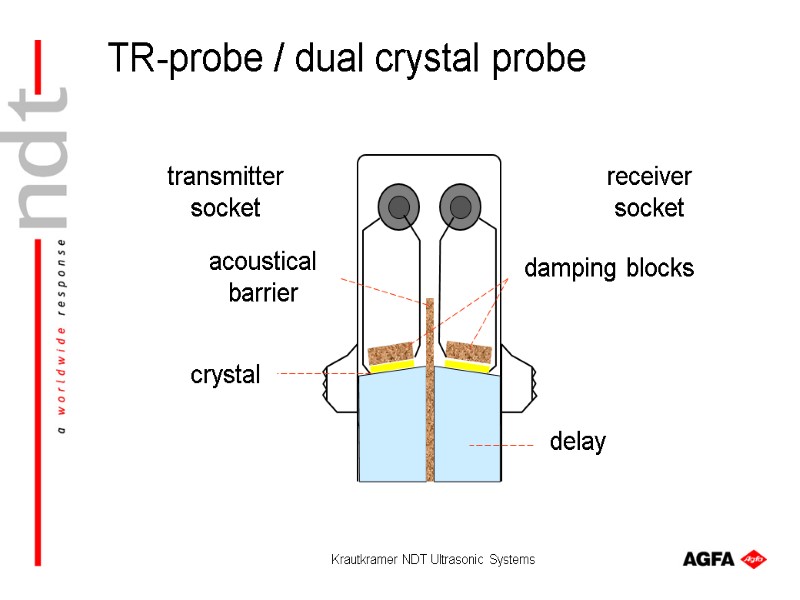
 Krautkramer NDT Ultrasonic Systems receiver socket transmitter socket damping blocks crystal delay acoustical barrier TR-probe / dual crystal probe
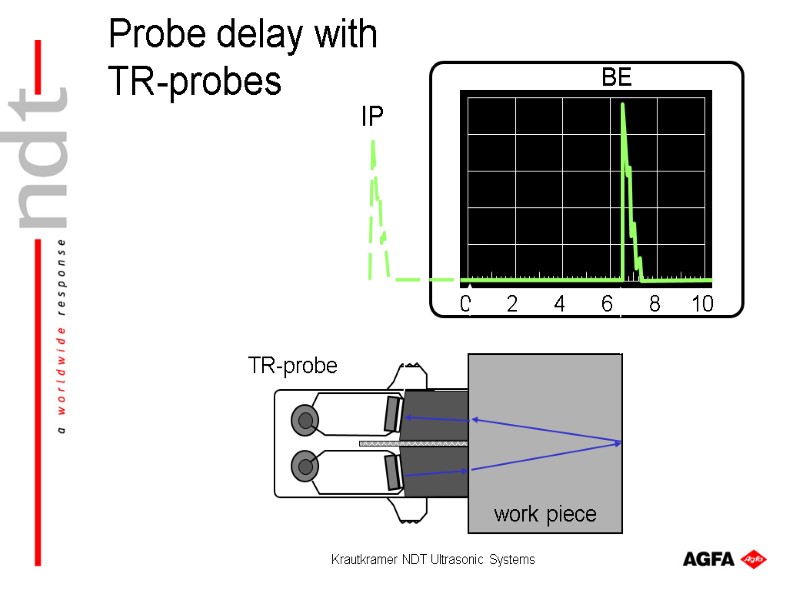
 Krautkramer NDT Ultrasonic Systems Probe delay with TR-probes
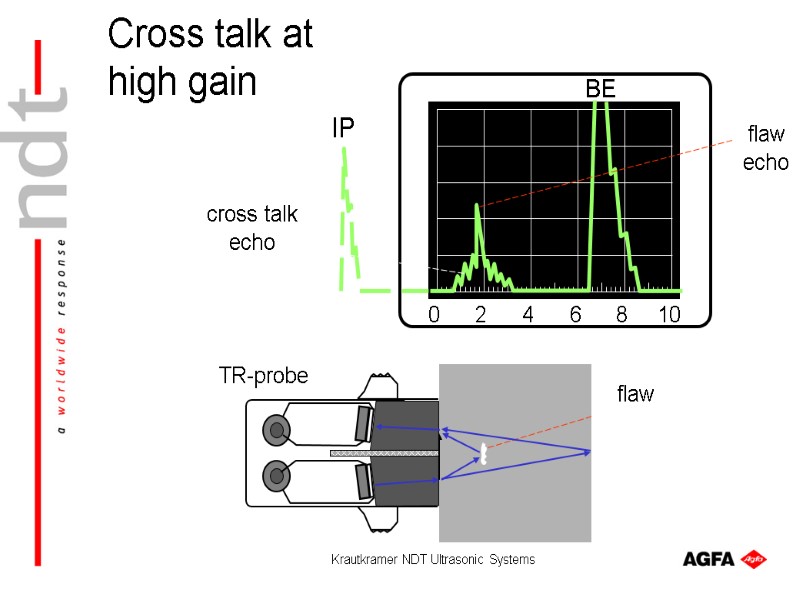
 Krautkramer NDT Ultrasonic Systems IP BE flaw cross talk echo flaw echo TR-probe Cross talk at high gain
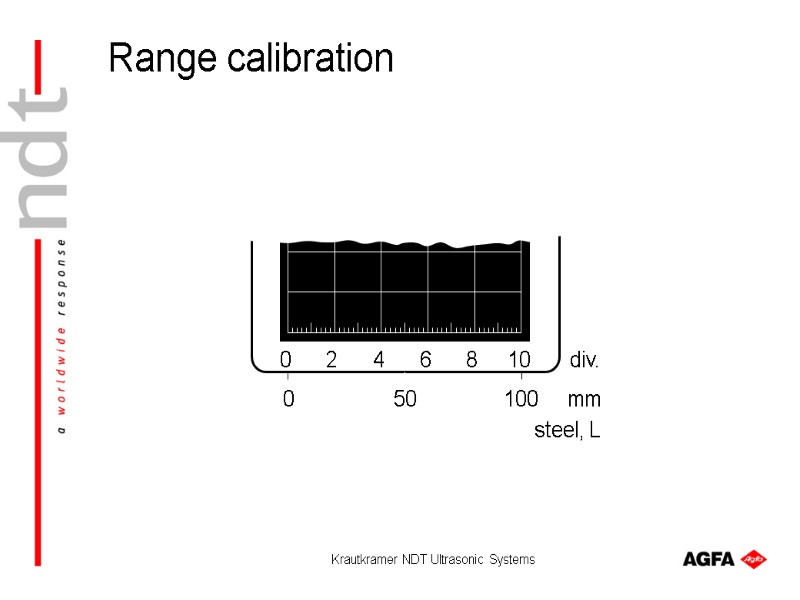
 Krautkramer NDT Ultrasonic Systems 0 100 mm 50 steel, L div. Range calibration
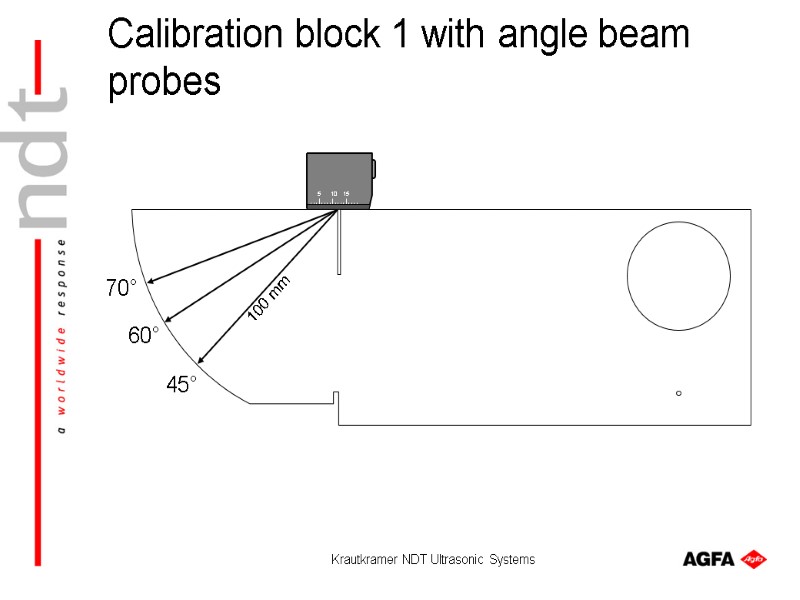
 Krautkramer NDT Ultrasonic Systems 5 10 15 70° 45° 100 mm 60° Calibration block 1 with angle beam probes
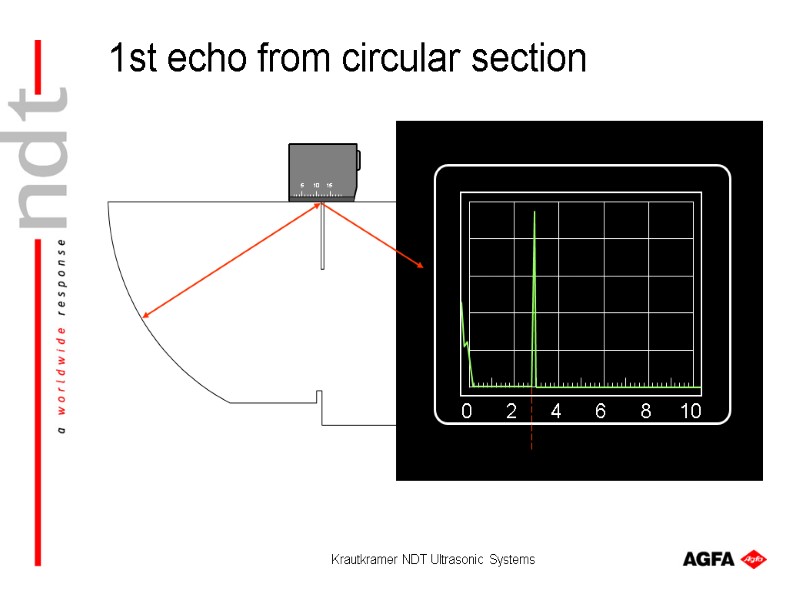
 Krautkramer NDT Ultrasonic Systems 100 mm 1st echo from circular section
 Krautkramer NDT Ultrasonic Systems 100 mm 200 mm 300 mm Echo sequence from 100 mm radius
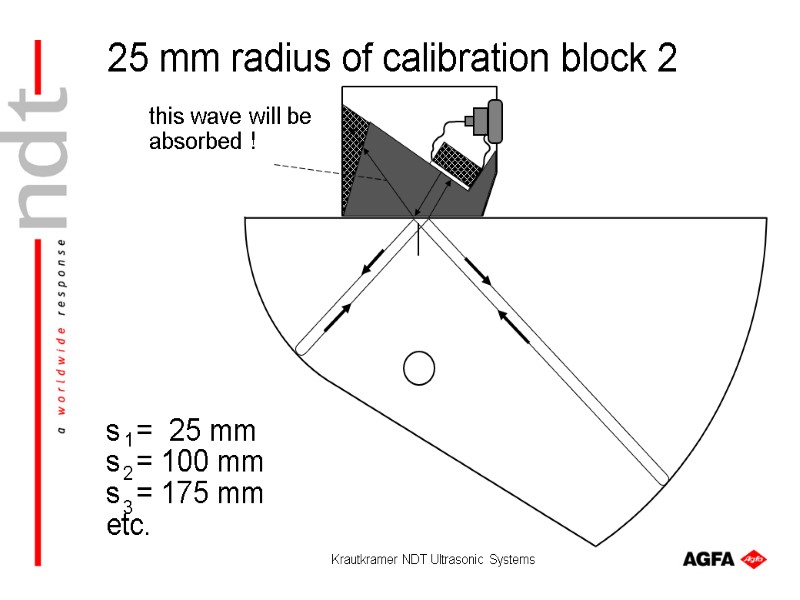
 Krautkramer NDT Ultrasonic Systems this wave will be absorbed ! 25 mm radius of calibration block 2
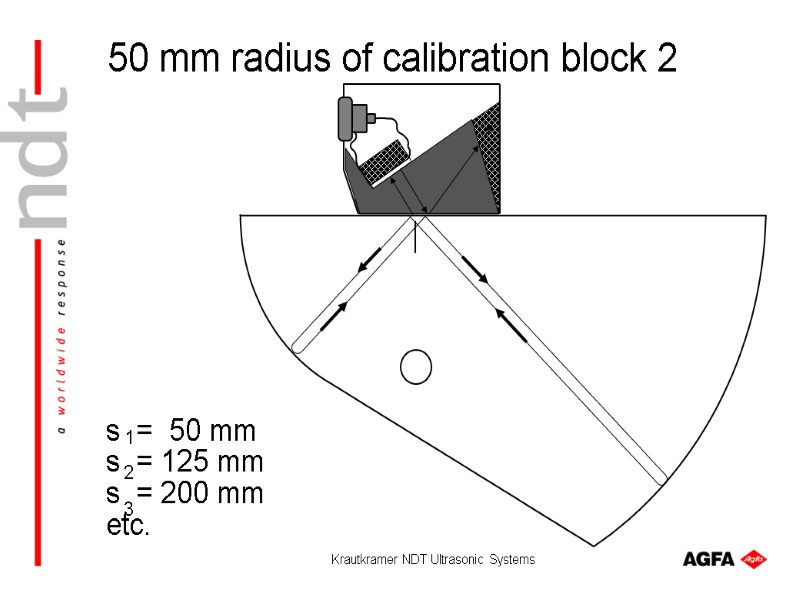
 Krautkramer NDT Ultrasonic Systems 50 mm radius of calibration block 2
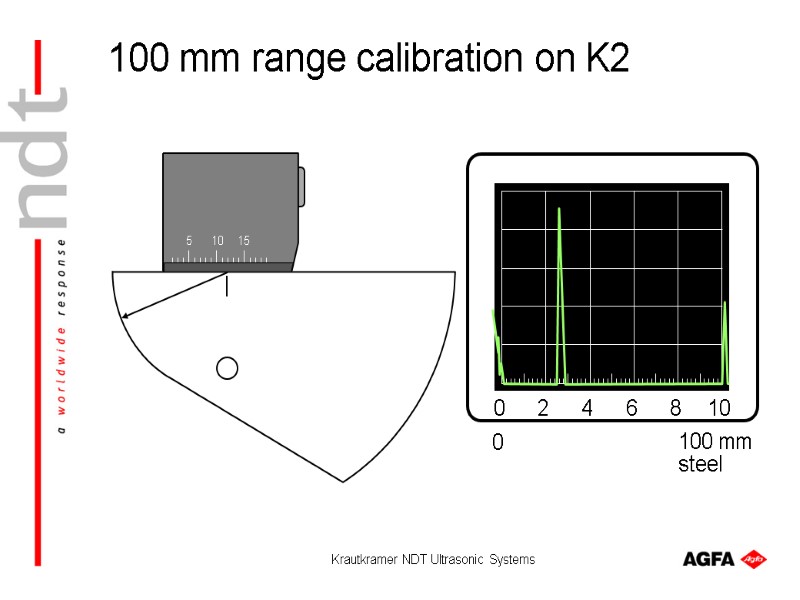
 Krautkramer NDT Ultrasonic Systems 0 100 mm steel 100 mm range calibration on K2
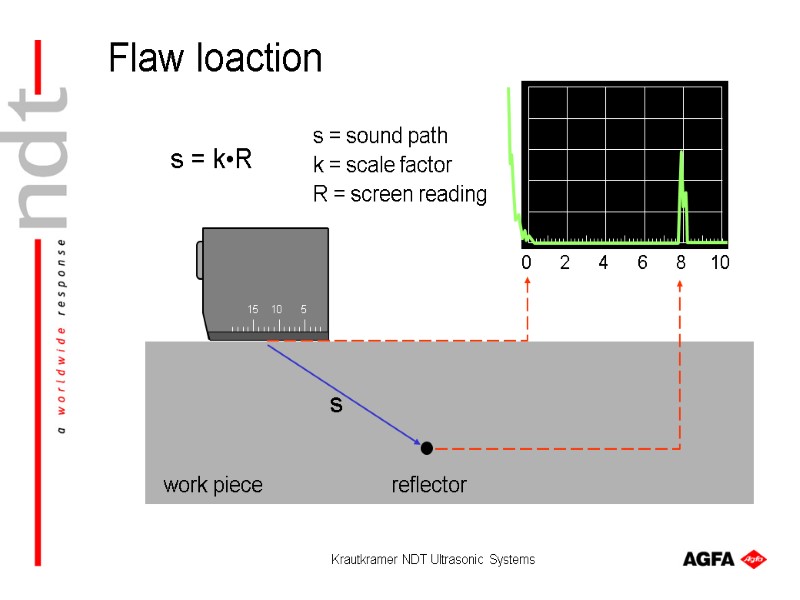
 Krautkramer NDT Ultrasonic Systems 5 10 15 work piece reflector s s = k•R s = sound path k = scale factor R = screen reading Flaw loaction
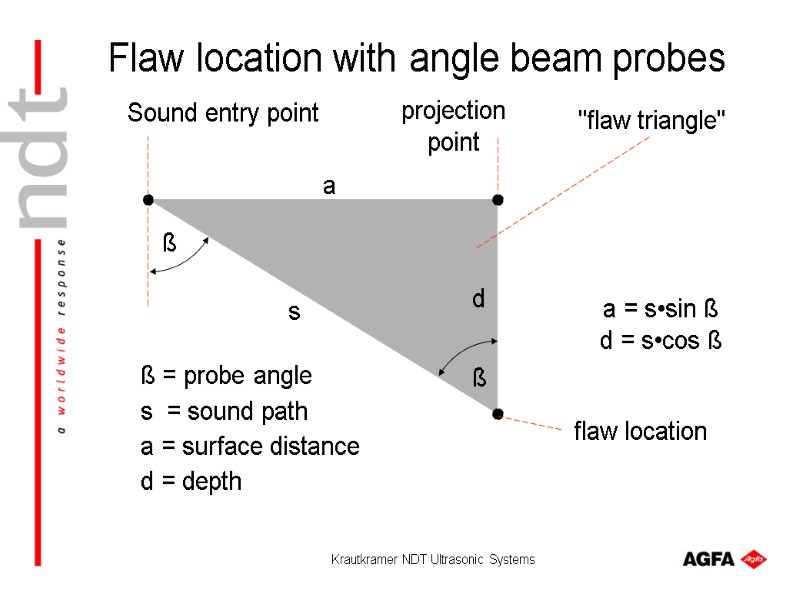
 Krautkramer NDT Ultrasonic Systems flaw location a s d Sound entry point projection point a = s•sin ß d = s•cos ß ß ß ß = probe angle s = sound path a = surface distance d = depth "flaw triangle" Flaw location with angle beam probes
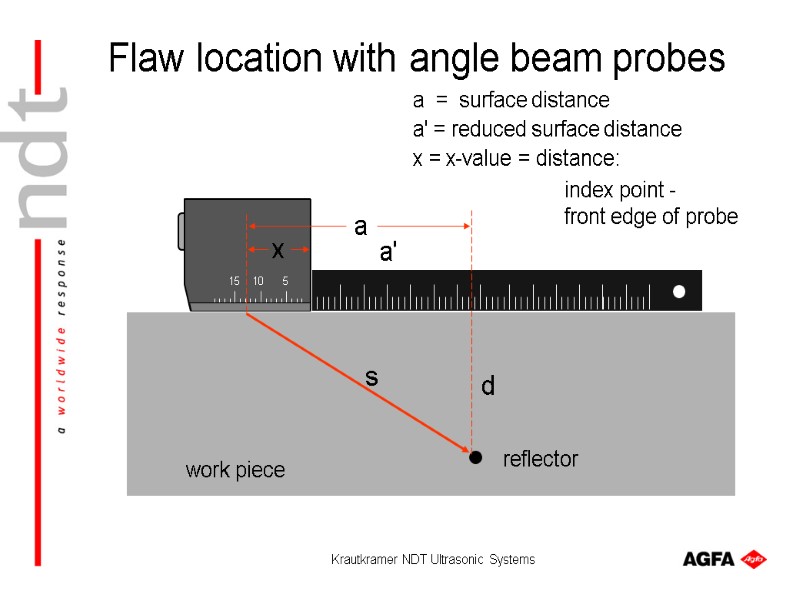
 Krautkramer NDT Ultrasonic Systems 5 10 15 work piece reflector a a' s d x index point - front edge of probe a = surface distance a' = reduced surface distance x = x-value = distance: Flaw location with angle beam probes
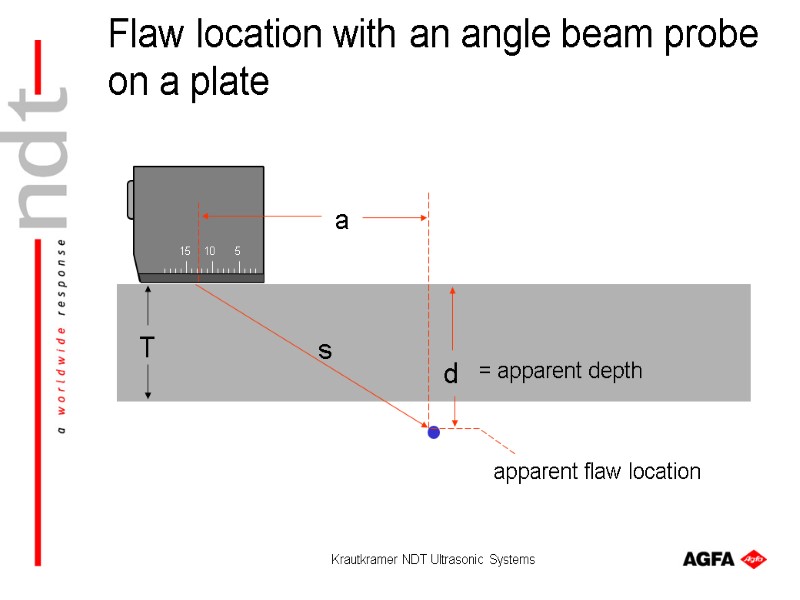
 Krautkramer NDT Ultrasonic Systems 5 10 15 apparent flaw location a s d = apparent depth T Flaw location with an angle beam probe on a plate
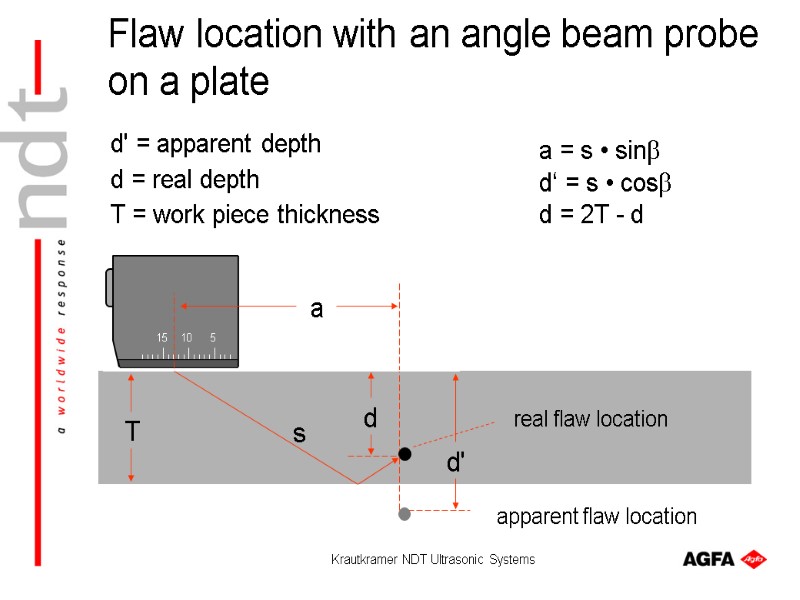
 Krautkramer NDT Ultrasonic Systems 5 10 15 apparent flaw location real flaw location a s d d' d' = apparent depth d = real depth T = work piece thickness T a = s • sin d‘ = s • cos d = 2T - d Flaw location with an angle beam probe on a plate
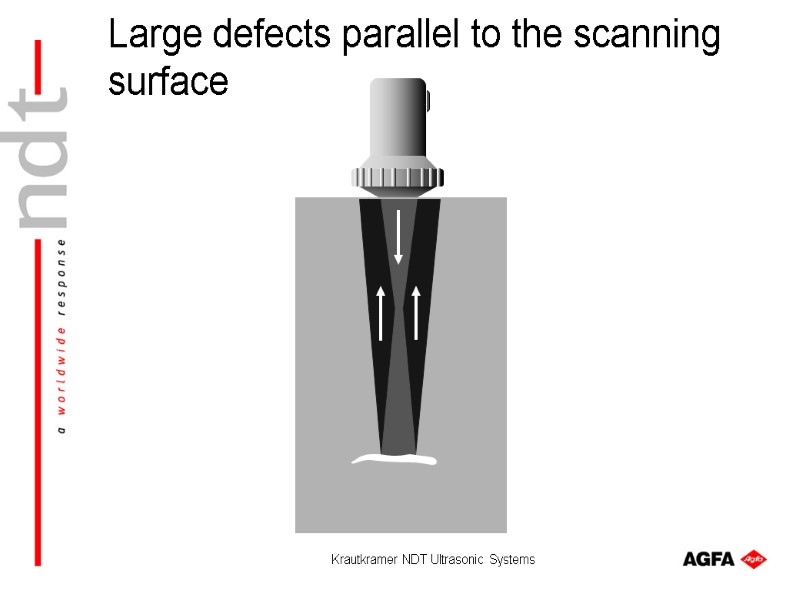
 Krautkramer NDT Ultrasonic Systems Large defects parallel to the scanning surface
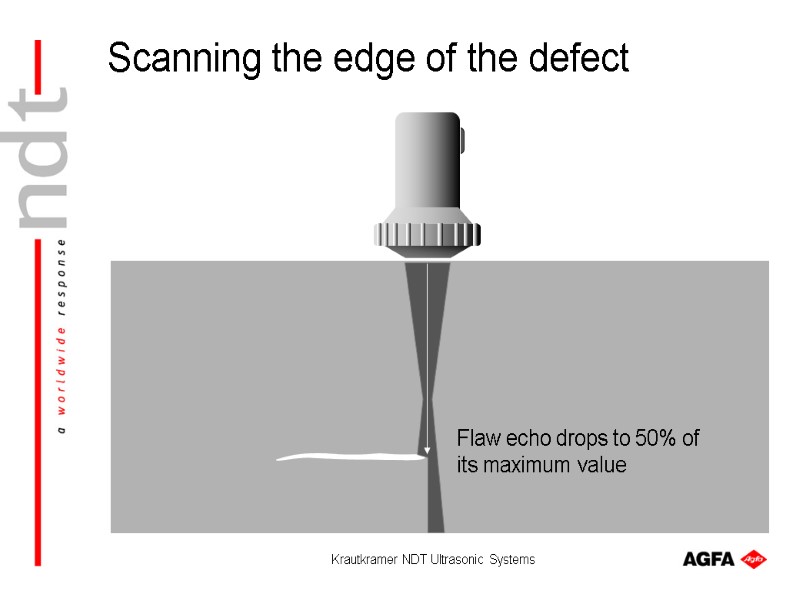
 Krautkramer NDT Ultrasonic Systems Scanning the edge of the defect Flaw echo drops to 50% of its maximum value
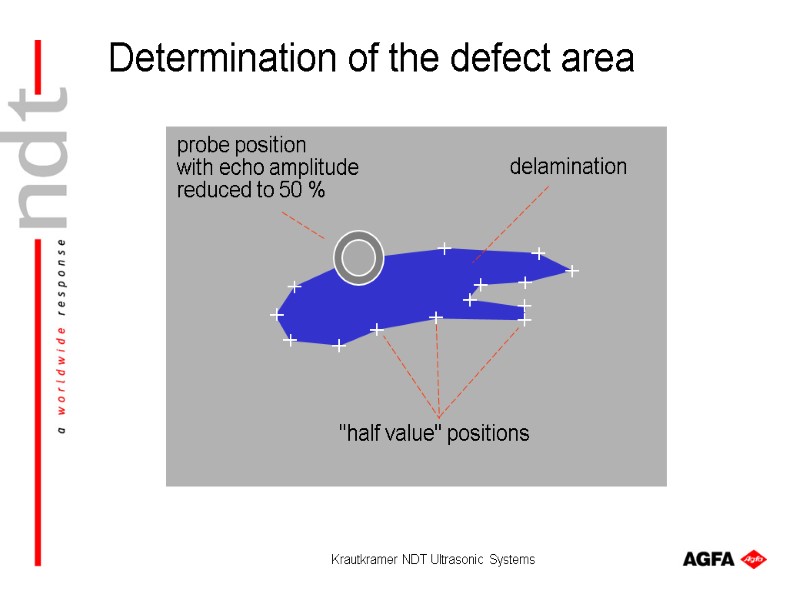
 Krautkramer NDT Ultrasonic Systems "half value" positions delamination probe position with echo amplitude reduced to 50 % Determination of the defect area
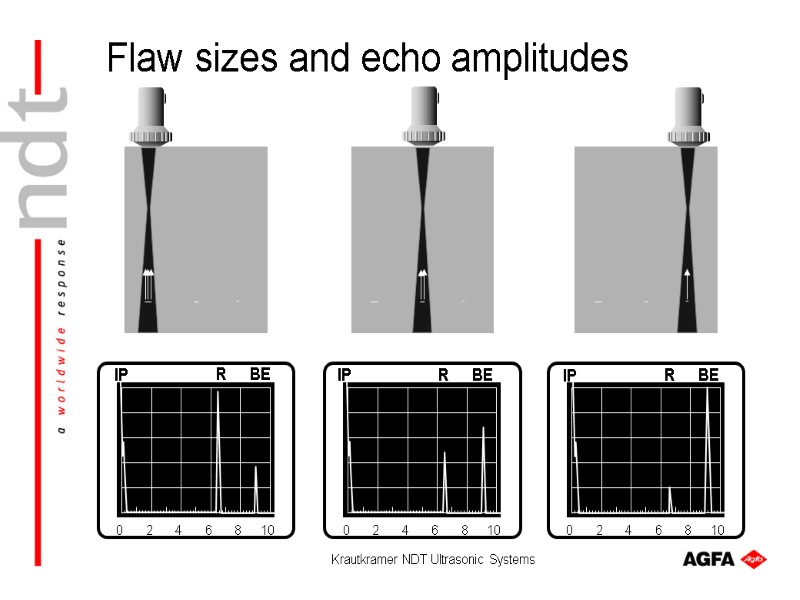
 Krautkramer NDT Ultrasonic Systems 0 2 4 6 8 10 Flaw sizes and echo amplitudes
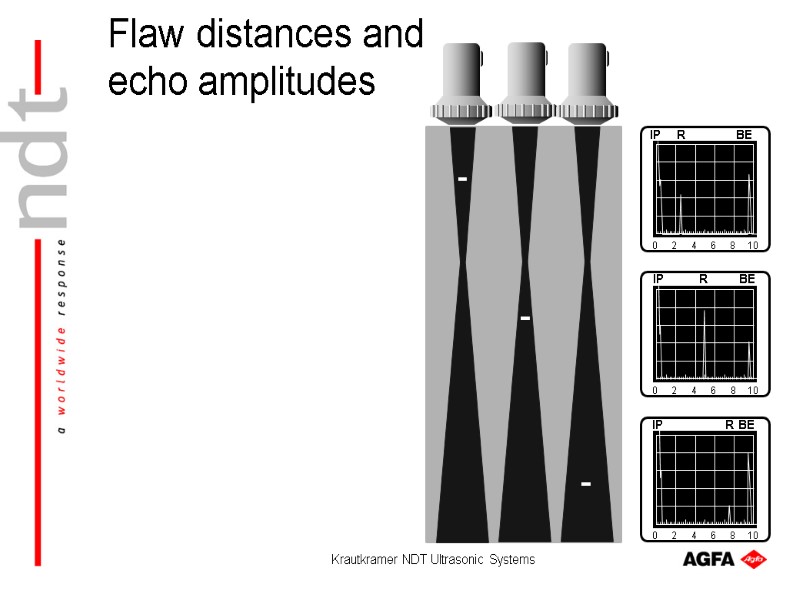
 Krautkramer NDT Ultrasonic Systems IP BE R IP BE R IP BE R Flaw distances and echo amplitudes
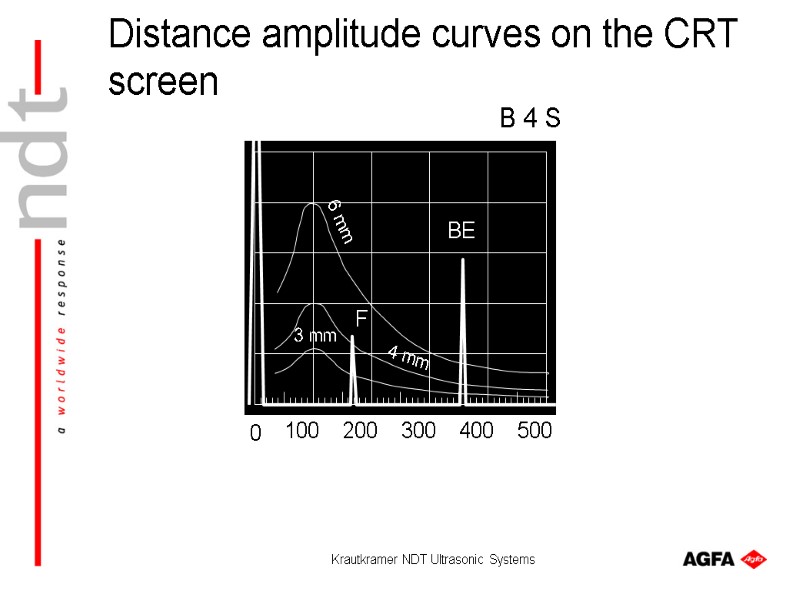
 Krautkramer NDT Ultrasonic Systems B 4 S 6 mm 4 mm 3 mm BE F Distance amplitude curves on the CRT screen
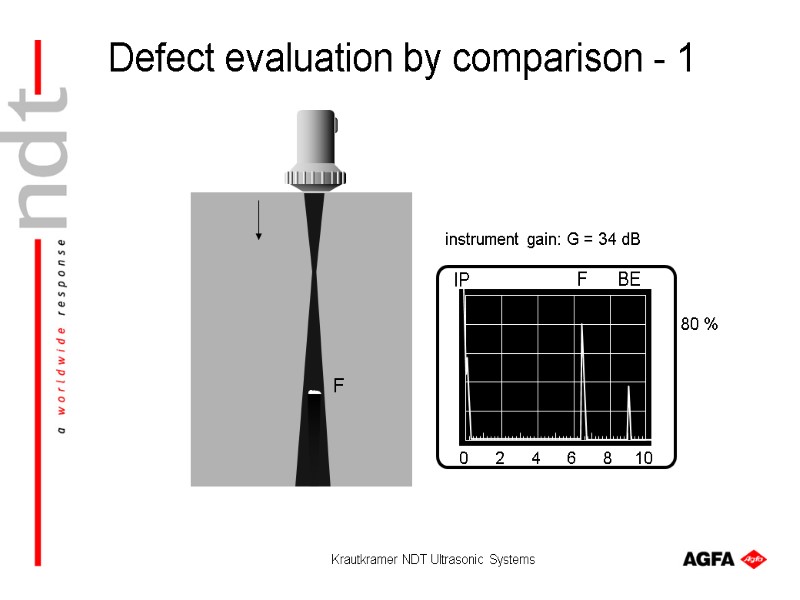
 Krautkramer NDT Ultrasonic Systems IP BE F F instrument gain: G = 34 dB 80 % Defect evaluation by comparison - 1
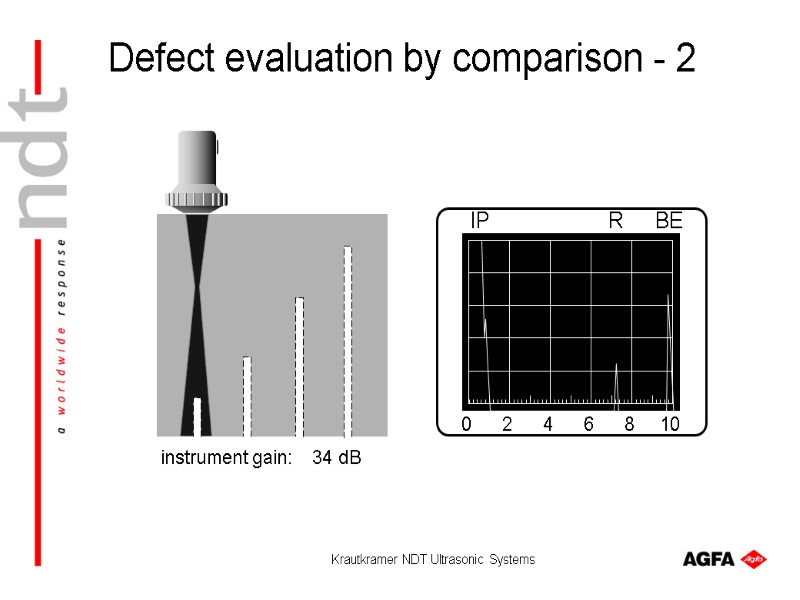
 Krautkramer NDT Ultrasonic Systems instrument gain: 34 dB Defect evaluation by comparison - 2
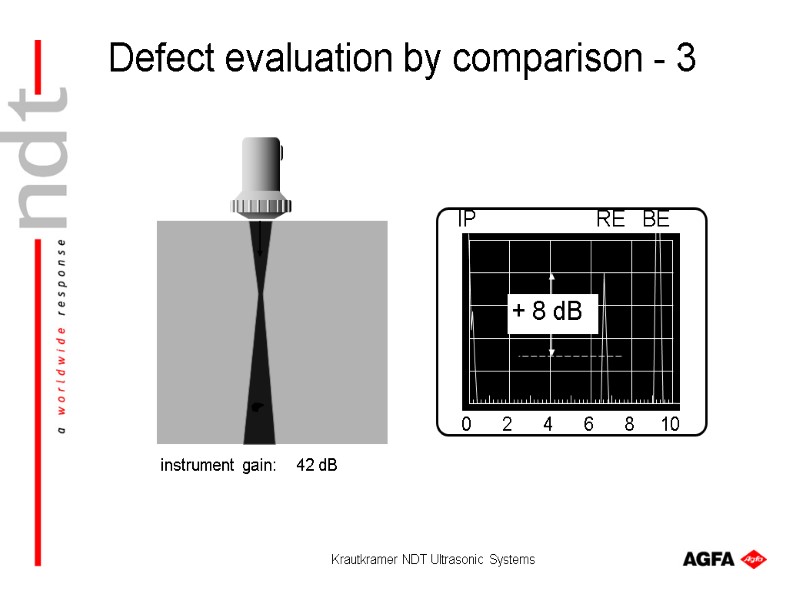
 Krautkramer NDT Ultrasonic Systems IP BE RE + 8 dB instrument gain: 42 dB Defect evaluation by comparison - 3
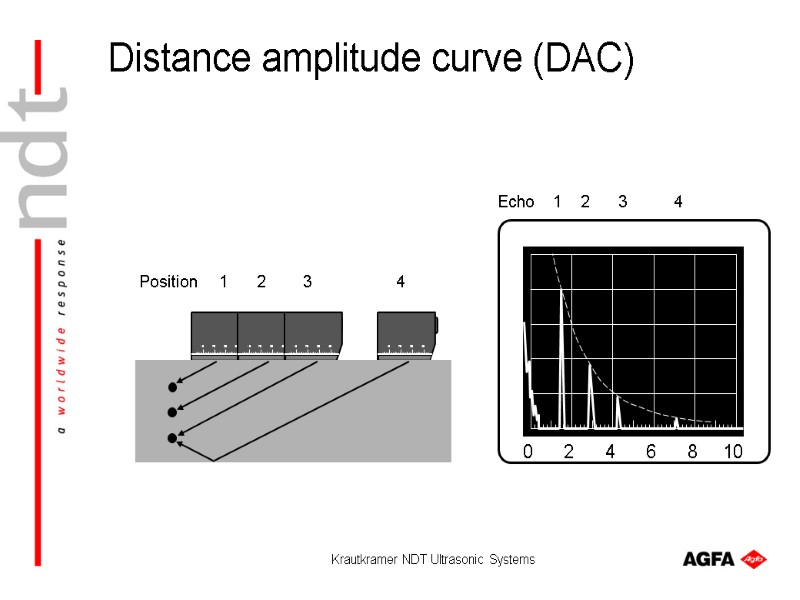
 Krautkramer NDT Ultrasonic Systems 10 20 30 40 10 20 30 40 10 20 30 40 10 20 30 40 1 1 2 2 3 3 4 4 Echo Position Distance amplitude curve (DAC)
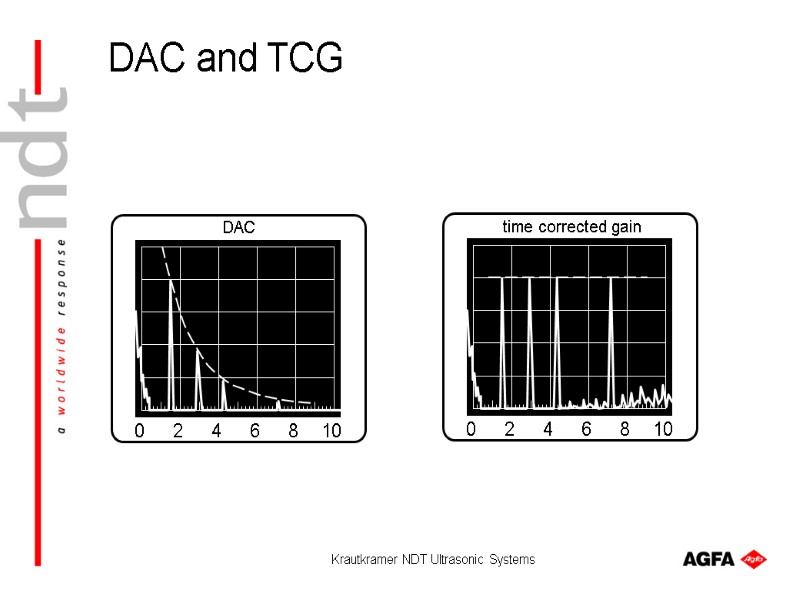
 Krautkramer NDT Ultrasonic Systems time corrected gain DAC DAC and TCG
 Krautkramer NDT Ultrasonic Systems

